Configure customer-managed keys for the DICOM service
By using customer-managed keys (CMK), you can protect and control access to your organization's data with keys that you create and manage. You use Azure Key Vault to create and manage CMK and then use the keys to encrypt the data stored by the DICOM® service.
Prerequisites
Make sure you're familiar with best practices for customer-managed keys.
Add a key for the DICOM service in Azure Key Vault. For steps, see Add a key in Azure Key Vault. Customer-managed keys must meet these requirements:
The key is versioned.
The key type is RSA-HSM or RSA.
The key is 2048-bit or 3072-bit.
The key vault is located in the same Azure tenant as the DICOM service.
When using a key vault with a firewall to disable public access, the option to Allow trusted Microsoft services to bypass this firewall must be enabled.
To prevent losing the encryption key for the DICOM service, the key vault or managed HSM must have soft delete and purge protection enabled. These features allow you to recover deleted keys for a certain time (default 90 days) and block permanent deletion until that time is over.
Enable a managed identity for the DICOM service
You can use either a system-assigned or user-assigned managed identity. To find out the differences between a system-assigned and user-assigned managed identity, see Managed identity types.
System-assigned managed identity
In the Azure portal, go to the DICOM instance. Select Identity from the left pane.
On the Identity page, select the System assigned tab.
Set the Status field to On.
Choose Save.

User-assigned managed identity
For steps to add a user-assigned managed identity, see Manage user-assigned managed identities.
Assign the Key Vault Crypto Service Encryption User role
The system-assigned managed identity needs the Key Vault Crypto Service Encryption User role to access keys and use them to encrypt and decrypt data.
In the Azure portal, go to the key vault and then select Access control (IAM) from the left pane.
On the Access control (IAM) page, select Add role assignment.

On the Add role assignment page, select the Key Vault Crypto Service Encryption User role.
Select Next.

On the Members tab, select Managed Identity and then select +Select members.
On the Select managed identities pane, select DICOM service from the Managed identity drop-down list. Select your DICOM service.
On the Select managed identities pane, choose Select.

- Review the role assignment and then select Review + assign.

Update the DICOM service with the encryption key
After you add the key, you need to update the DICOM service with the key URL.
In the key vault, select Keys.
Select the key for the DICOM service.

Select the key version.
Copy the Key Identifier. You need the key URL when you update the key by using an ARM template.

Update the key by using the Azure portal
In the Azure portal, go to the DICOM service and then select Encryption from the left pane.
Select Customer-managed key for the Encryption type.
Select a key vault and key or enter the Key URI for the key that was created previously.
Select an identity type, either System-assigned or User-assigned, that matches the type of managed identity configured previously.
Select Save to update the DICOM service to use the customer-managed key.

Update the key by using an ARM template
Use the Azure portal to Deploy a custom template and use one of the ARM templates to update the key. For more information, see Create and deploy ARM templates by using the Azure portal.
ARM template for a system-assigned managed identity
{
    "$schema": "https://schema.management.azure.com/schemas/2015-01-01/deploymentTemplate.json#",
    "contentVersion": "1.0.0.0",
    "parameters": {
        "workspaceName": {
            "type": "String"
        },
        "dicomServiceName": {
            "type": "String"
        },
        "keyEncryptionKeyUrl": {
            "type": "String"
        },
        "region": {
            "defaultValue": "West US 3",
            "type": "String"
        }
    },
    "resources": [
        {
            "type": "Microsoft.HealthcareApis/workspaces/dicomservices",
            "apiVersion": "2023-06-01-preview",
            "name": "[concat(parameters('workspaceName'), '/', parameters('dicomServiceName'))]",
            "location": "[parameters('region')]",
            "identity": {
                "type": "SystemAssigned"
            },
            "properties": {
                "encryption": {
                    "customerManagedKeyEncryption": {
                        "keyEncryptionKeyUrl": "[parameters('keyEncryptionKeyUrl')]"
                    }
                }
            }
        }
    ]
}
ARM template for a user-assigned managed identity
{
    "$schema": "https://schema.management.azure.com/schemas/2015-01-01/deploymentTemplate.json#",
    "contentVersion": "1.0.0.0",
    "parameters": {
        "workspaceName": {
            "type": "String"
        },
        "dicomServiceName": {
            "type": "String"
        },
        "keyVaultName": {
            "type": "String"
        },
        "keyName": {
            "type": "String"
        },
        "userAssignedIdentityName": {
            "type": "String"
        },
        "roleAssignmentName": {
            "type": "String"
        },
        "region": {
            "defaultValue": "West US 3",
            "type": "String"
        },
        "tenantId": {
            "type": "String"
        }
    },
    "resources": [
        {
            "type": "Microsoft.KeyVault/vaults",
            "apiVersion": "2022-07-01",
            "name": "[parameters('keyVaultName')]",
            "location": "[parameters('region')]",
            "properties": {
              "accessPolicies": [],
              "enablePurgeProtection": true,
              "enableRbacAuthorization": true,
              "enableSoftDelete": true,
              "sku": {
                "family": "A",
                "name": "standard"
              },
              "tenantId": "[parameters('tenantId')]"
            }
        },
        {
            "type": "Microsoft.ManagedIdentity/userAssignedIdentities",
            "apiVersion": "2023-01-31",
            "name": "[parameters('userAssignedIdentityName')]",
            "location": "[parameters('region')]"
        },
        {
            "type": "Microsoft.KeyVault/vaults/keys",
            "apiVersion": "2022-07-01",
            "name": "[concat(parameters('keyVaultName'), '/', parameters('keyName'))]",
            "properties": {
              "attributes": {
                "enabled": true
              },
              "curveName": "P-256",
              "keyOps": [ "unwrapKey","wrapKey" ],
              "keySize": 2048,
              "kty": "RSA"
            },
            "dependsOn": [
                "[resourceId('Microsoft.KeyVault/vaults/', parameters('keyVaultName'))]"
            ]
        },
        {
            "type": "Microsoft.Authorization/roleAssignments",
            "apiVersion": "2021-04-01-preview",
            "name": "[guid(parameters('roleAssignmentName'))]",
            "properties": {
              "roleDefinitionId": "[resourceId('Microsoft.Authorization/roleDefinitions', '14b46e9e-c2b7-41b4-b07b-48a6ebf60603')]",
              "principalId": "[reference(resourceId('Microsoft.ManagedIdentity/userAssignedIdentities', parameters('userAssignedIdentityName'))).principalId]"
            },
            "dependsOn": [
                "[resourceId('Microsoft.KeyVault/vaults/keys', parameters('keyVaultName'), parameters('keyName'))]",
                "[resourceId('Microsoft.ManagedIdentity/userAssignedIdentities', parameters('userAssignedIdentityName'))]"
            ]
        },
        {
            "type": "Microsoft.HealthcareApis/workspaces",
            "name": "[parameters('workspaceName')]",
            "apiVersion": "2022-05-15",
            "location": "[parameters('region')]"
        },
        {
            "type": "Microsoft.HealthcareApis/workspaces/dicomservices",
            "apiVersion": "2023-06-01-preview",
            "name": "[concat(parameters('workspaceName'), '/', parameters('dicomServiceName'))]",
            "location": "[parameters('region')]",
            "dependsOn": [
                "[resourceId('Microsoft.HealthcareApis/workspaces', parameters('workspaceName'))]",
                "[resourceId('Microsoft.Authorization/roleAssignments', guid(parameters('roleAssignmentName')))]"
            ],
            "identity": {
                "type": "userAssigned",
                "userAssignedIdentities": {
                    "[resourceId('Microsoft.ManagedIdentity/userAssignedIdentities/', parameters('userAssignedIdentityName'))]": {}
                }
            },
            "properties": {
                "encryption": {
                    "customerManagedKeyEncryption": {
                        "keyEncryptionKeyUrl": "[reference(resourceId('Microsoft.KeyVault/vaults/keys', parameters('keyVaultName'), parameters('keyName'))).keyUriWithVersion]"
                    }
                }
            }
        }
    ]
}
When prompted, select the values for the resource group, region, workspace, and DICOM service name.
- If you're using a system-assigned managed identity, enter the Key Identifier you copied from the key vault in the Key Encryption Key Url field.
- If you're using a user-assigned managed identity, enter the values for the key vault name, key name, user assigned identity name, and tenant ID.
Select Review + create to deploy the updates to the key.

Recover from lost key access
For the DICOM service to operate properly, it must always have access to the key in the key vault. However, there are scenarios where the service could lose access to the key, including:
The key is disabled or deleted from the key vault.
The DICOM service system-assigned managed identity is disabled.
The DICOM service system-assigned managed identity loses access to the key vault.
In any scenario where the DICOM service can't access the key, API requests return with 500 errors and the data is inaccessible until access to the key is restored. The Azure Resource health view for the DICOM service helps you diagnose key access issues.
If key access is lost for more than 30 minutes, make sure you update the DICOM service to refresh the key access. For more information, see Update the DICOM service with the encryption key. If you don't also update the DICOM service, it continues to be unavailable even when key access is restored.
Update the DICOM service after changing a managed identity
If you change the managed identity in any way, such as moving your DICOM service to a different tenant or subscription, the DICOM service isn't able to access your keys until you update the service manually with an ARM template deployment. For steps, see Use an ARM template to update the encryption key.

Configure a key when you create the DICOM service
If you use a user-assigned managed identity with the DICOM service, you can configure customer-managed keys at the same time you create the DICOM service.
On the Create DICOM service page, enter the DICOM service name.
Choose Next: Security.

On the Security tab, in the Encryption section select Customer-managed key.
Choose Select from key vault or Enter key URI and then enter the key.
Choose Select an identity to use the user-assigned managed identity. On the Select user assigned managed identity page, filter for and then select the managed identity. Choose Add.
On the Security tab, choose Review + create.
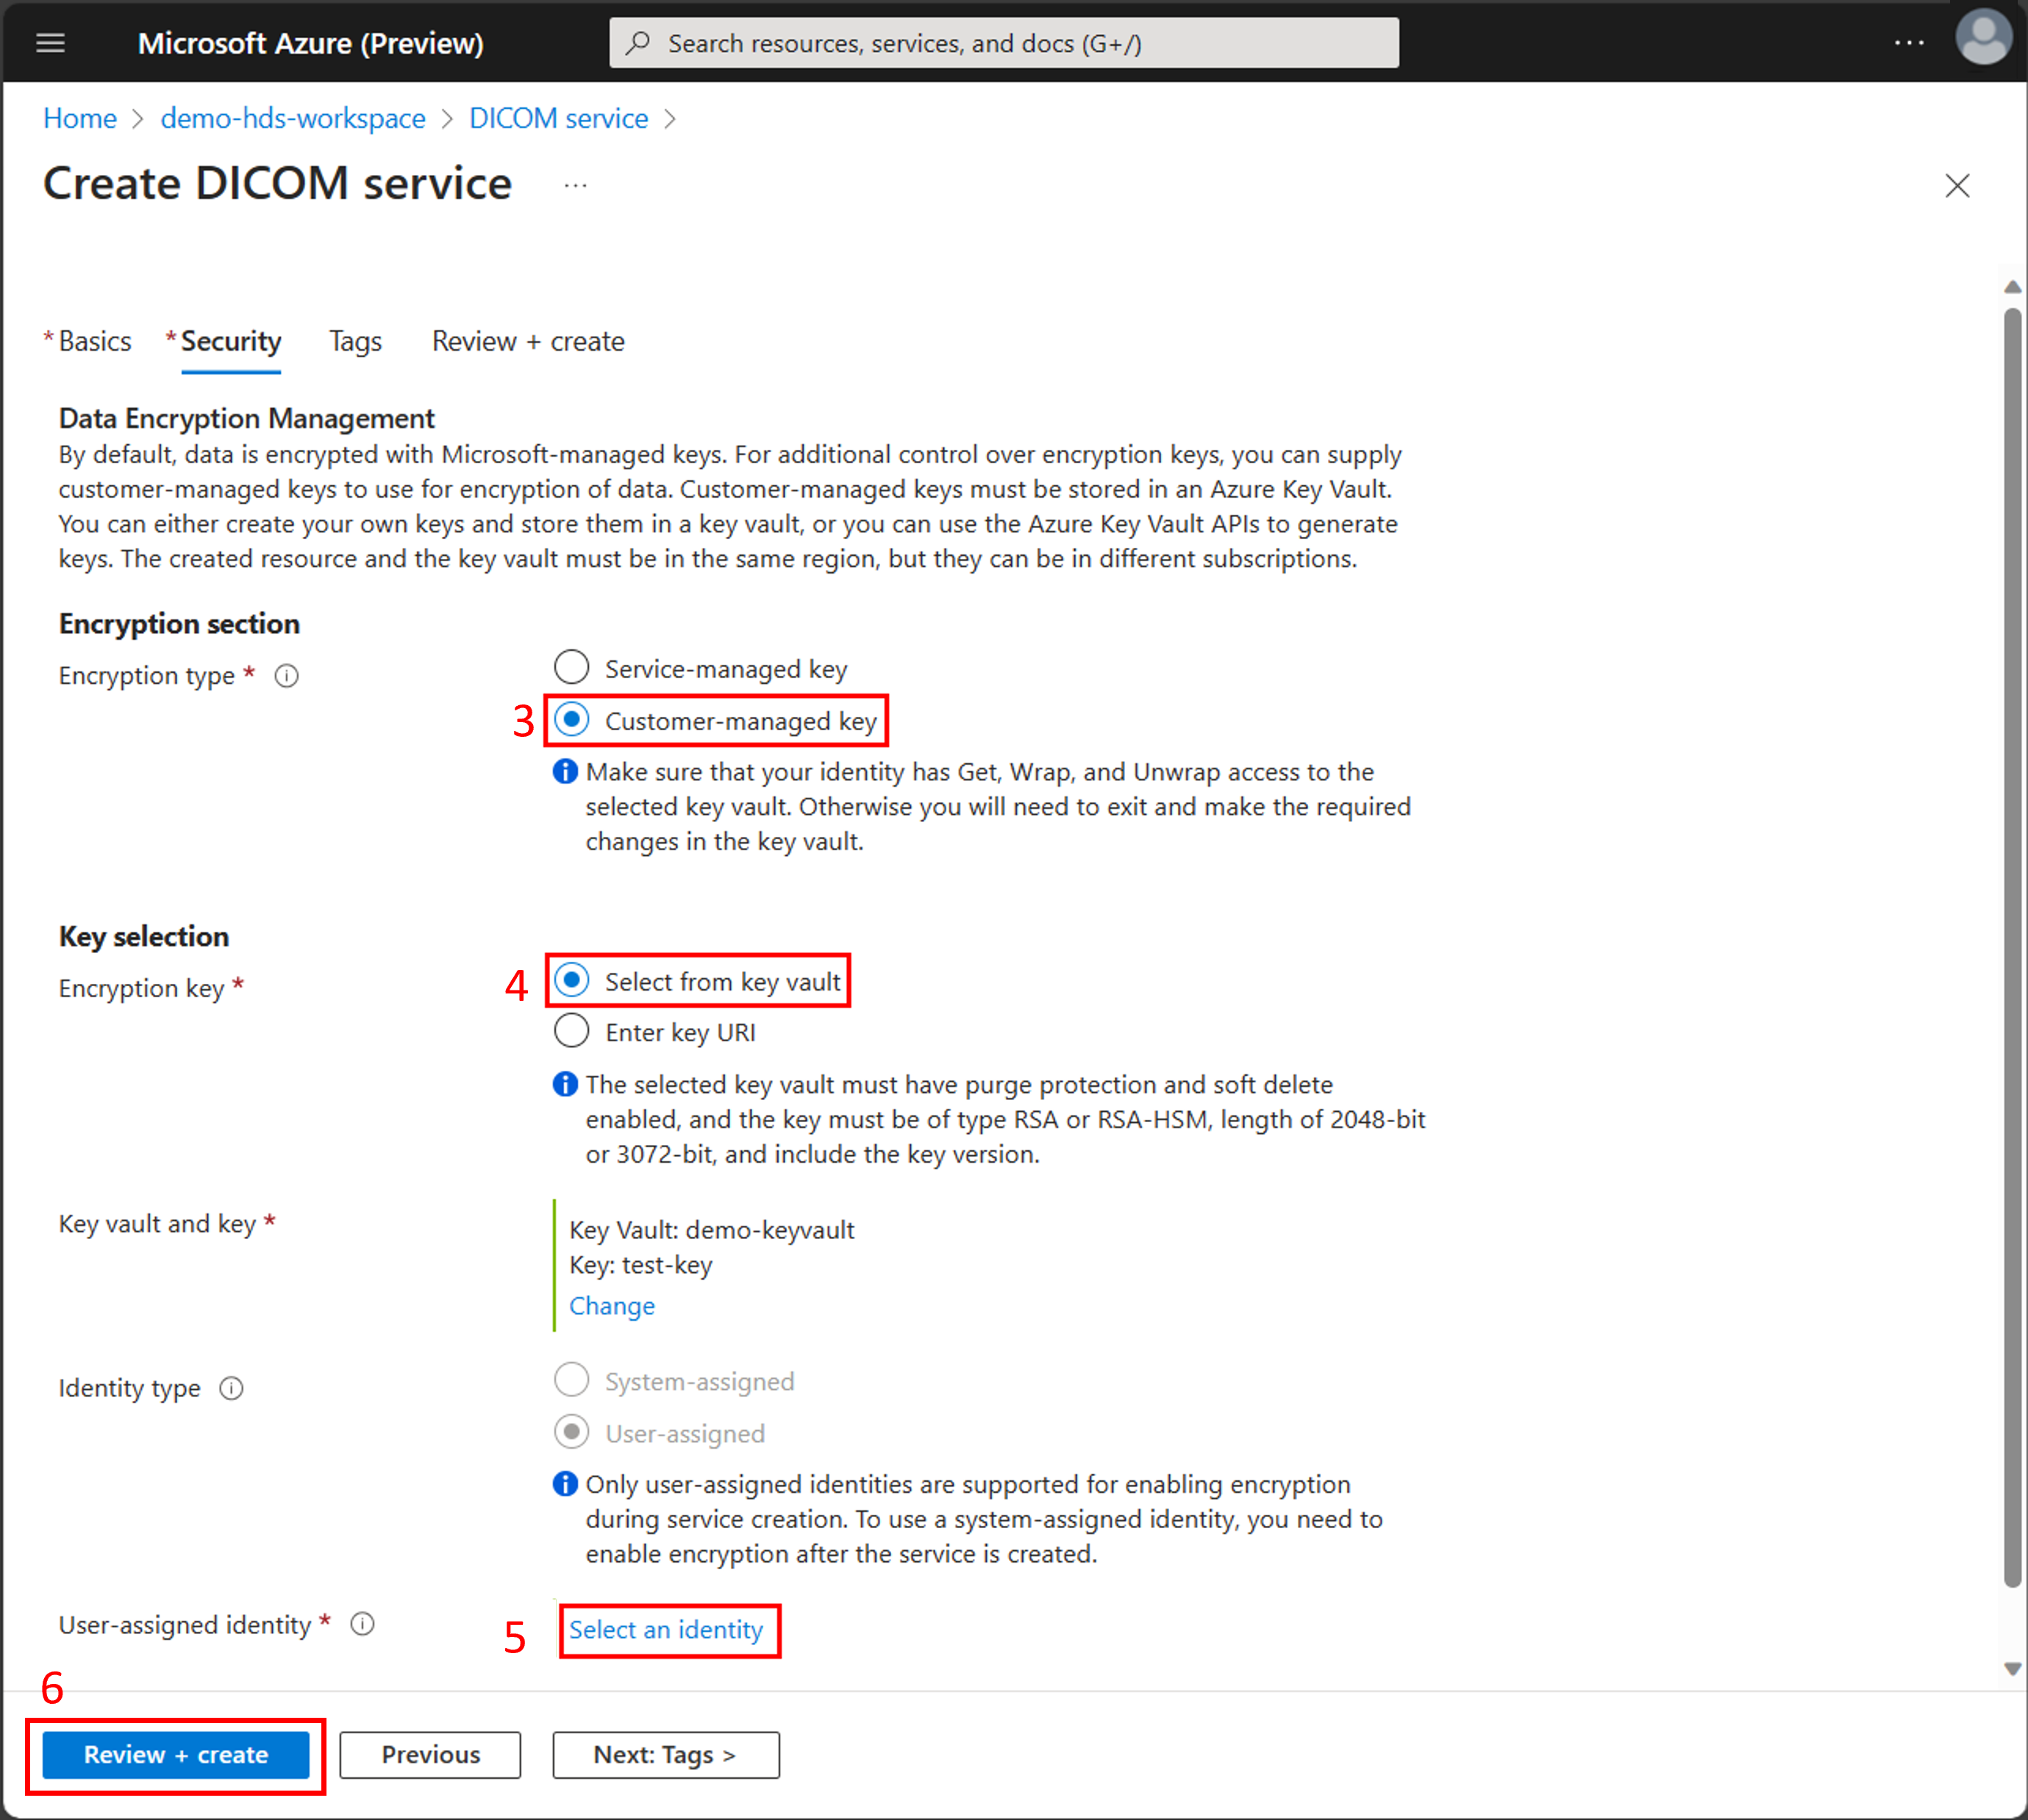
On the Review + create tab, review the summary of the configuration options and the validation success message. Choose Create to deploy the DICOM service with customer-managed keys.


Note
DICOM® is the registered trademark of the National Electrical Manufacturers Association for its Standards publications relating to digital communications of medical information.