Set up bank accounts
Use bank accounts in Business Central to keep track of your banking transactions. Accounts can be denominated in your local currency or a foreign currency. After you set up bank accounts, you can also print cheques. Bank accounts also offer features for payment reconciliation, bank reconciliation, and the import and export of bank files.
You can include bank accounts in transactions in general journal. Each bank account links to an account in the chart of accounts through the assigned bank account posting group. Using a bank account in a payment transaction automatically creates an entry in both the bank account and the connected general ledger (G/L) account.
Bank accounts work differently depending on whether a currency code is specified:
If a currency code isn't specified, all transactions in the bank account are in the local currency (LCY) for the current company. If you make a transaction for the account in another currency, the amounts post to the account in LCY based on the currency exchange rate. Any cheques issued from this account must be in LCY. If the bank account is used in a journal, the journal line automatically uses the blank currency code.
If a currency code is specified, all transactions made to this account, and all cheques issued from it, must use the same currency as the account.
You can save time on data entry by making a bank account the default account to use for the currency specified for the account. If you do, the account is assigned to sales and service documents that use the currency. To make the account the default for sales and service documents, on the Bank Account Card page, turn on the Use as Default for Currency toggle. If needed, you can choose a different account when you're working on a document.
A bank account is an integral part of Business Central and plays a role in many other capabilities. The following illustration shows the most important relations:
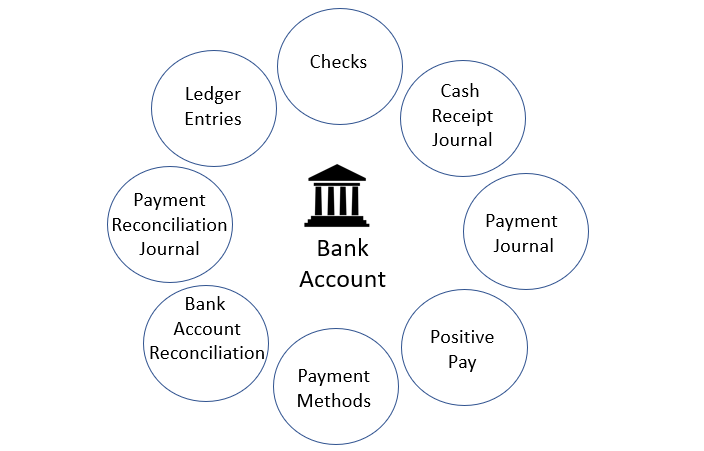
Creating a bank account makes it available in all the places shown in the illustration, and are mirrored in the G/L account and on the Company Information page.
Bank accounts are often monitored daily to ensure new payments from customers are registered as quickly as possible. Registering payments quickly helps ensure a customer's actual status is reflected in Business Central. Keeping the status of customer payments current helps sales people, accountants, and other employees making unnecessary calls regarding overdue invoices or delays in shipments.
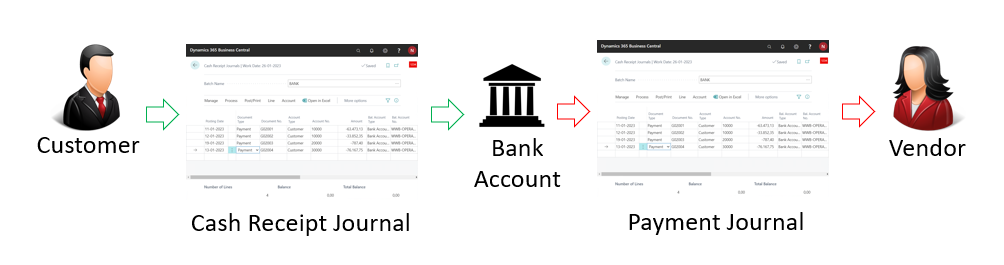
Another task is to import vendor currency payments with the realised currency rates to make sure that the actual status of the vendors is up-to-date. Using the payment reconciliation capability is the easiest way to do that. In the Payment Reconciliation Journal, you can import bank transactions directly from an online bank application and post them more or less automatically. The journal automatically identifies and posts the following transactions:
- Direct debit payments from customers.
- Customer payments of single invoices.
- Lump-sum payments from customers.
- Customer payments in foreign currencies.
- Vendor payments.
- Vendor payments in foreign currency.
- Vendor payments and subscriptions that are recurring.
- Bank charges and interests.
Payment reconciliation provides significant time savings in posting incoming and outgoing payments. However, the transactions on the bank account in Business Central aren't considered 100% correct until you run a bank reconciliation.
Bank reconciliation is how you make sure that the bank account in Business Central matches the external account at the bank.
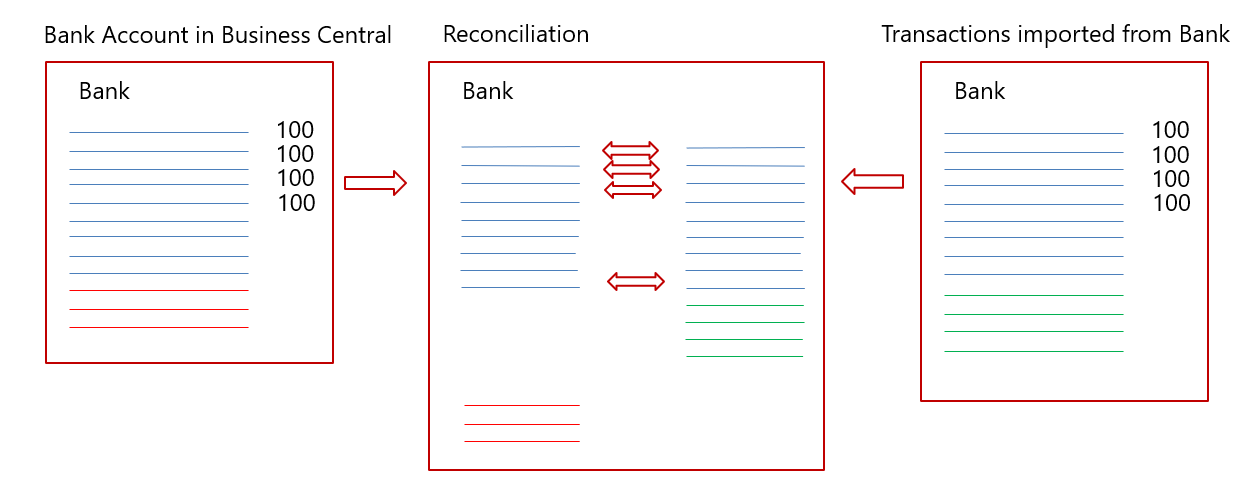
In the illustration, the left side represents the bank account in Business Central, and the rightmost side represents transactions imported from the bank through the online bank application. The diagram in the middle shows the transactions from both sides that make up the bank reconciliation.
From the bank account in Business Central, most transactions should be known to the physical bank. The few exceptions include the following cases:
- Corrections posted in Business Central.
- Cheques issued that aren't cashed.
- Vendor payments not yet approved by the bank.
From the physical account at the bank, transactions not identified in the payment reconciliation journal arrive all the time, such as the following transactions:
- New vendor subscriptions
- Customer payments without description
- Bank interest
- Bank charges
- Credit card charges not yet reported
The better you are at mapping information in the payment reconciliation journal, the more transactions are posted automatically and the easier periodic bank reconciliation becomes.
The following video shows the basic steps to set up a bank account in Business Central.
Warning
Some fields may contain sensitive data, such as the Bank Branch No., Bank Account No., SWIFT Code, and IBAN Code fields. Learn more at Monitor Sensitive Fields.
To set up bank accounts
Choose the
 icon, enter Bank Accounts, then choose the related link.
On the Bank Accounts page, choose the New action.
Fill in the fields as necessary. Hover over a field to read a short description.
An example would be the Bank Acc. Posting Group field that connects the bank account to the underlying G/L account in the balance sheet. Learn more at Set Up Posting Groups.
Tip
Some fields are hidden until you choose the Show more action, typically because they are rarely used. Others must be added through personalisation. Learn more at Personalise Your Workspace.
You can create as many bank accounts as you need for your business. For each bank account, you must specify information that makes the bank account uniquely identifiable. This information includes the bank's geographical address; number series for different types of transactions, such as direct debit and credit transfers; the currency amounts are specified in; and information used for importing bank statements. Hover over a field to read a short description.
To enter an opening balance
To fill in the Balance field with an opening balance, you must post a bank account ledger entry with the amount in question. You post the entry through a bank account reconciliation. Learn more at Reconcile Bank Accounts.
Alternatively, you can implement the opening balance as part of general data creation in new companies using the Migrate Business Data assisted setup guide. Learn more at Getting Ready for Doing Business.
Important
Don't post the opening balance directly to the general ledger. Entries in the G/L account that were posted directly to it typically prevent you from reconciling the bank account. With foreign currency bank accounts, direct posting results in differences that accumulate as you post more bank reconciliations. Usually, you post the opening bank balance directly to the bank account, and the amount ends up in the G/L account. Alternatively, later you can reverse it out of the G/L account you use to balance the opening general ledger balance. In either case, you must balance any direct posting to the G/L account before you start your first bank reconciliation—especially if the bank account is in a foreign currency.
To set up your bank account for import or export of bank files
The fields related to the import and export of bank feeds and files are on the Transfer FastTab on the Bank Account Card page. Learn more at Using the AMC Banking 365 Fundamentals Extension and Set Up the Envestnet Yodlee Bank Feeds Service.
- Choose the icon, enter Bank Accounts, then choose the related link.
- Open the card for the bank account to export or import bank files for.
- On the Transfer FastTab, fill in the fields as necessary. Hover over a field to read a short description.
Note
Different file export services and their formats require different setup values on the Bank Account Card page. You'll be informed of wrong or missing setup values when you export the file. Read the short descriptions of the fields carefully or refer to the related procedure topics. For example, exporting a payment file for North American electronic funds transfer (EFT) requires that both the Last Remittance Advice No. and the Transit No. fields be filled in. Learn more at Export Payments to a Bank File.
The fields on the Transit FastTab on the bank account serve different purposes, depending on whether the payment is inbound or outbound.
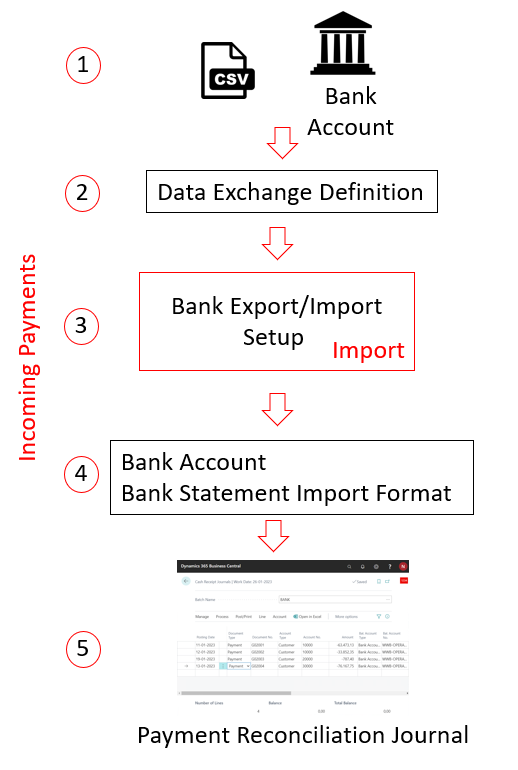
The following illustration shows the route of inbound payments. The numbers in the description correspond with the numbers in the illustration.
- The transactions are exported from the bank account in either a human-readable .csv format or the bank's own format.
- The data exchange definition maps the information in the file to the fields in Business Central. Learn more at Set Up Data Exchange
- The data export/import setup defines the export or import, and links to the data exchange definition.
- The bank statements import format links the import setup to the bank account.
- The payments are imported through the Payment Reconciliation Journal or the Bank Account Reconciliation page.
Incoming payments are always imported through the Payment Reconciliation Journal or directly into the Bank Account Reconciliation page. In contrast, outgoing payments can originate from any payment journal. The only prerequisite is that the Allow Payment Export field in the relevant payment journal batch must be selected.
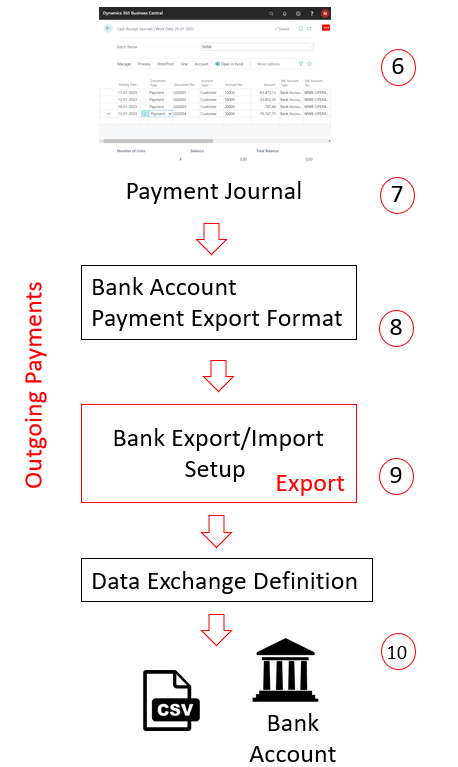
The following illustration shows the route of outbound payments. The numbers in the description correspond with the numbers in the illustration.
- The transactions populate in a payment journal that was prepared for exporting payments to file.
- The bank statements import format links the import setup to the bank account.
- The data export/import setup defines the export or import, and links to the data exchange definition.
- The data exchange definition maps the information in the file to the fields in Business Central. Learn more at see Set Up Data Exchange
- The payments are exported from the payment journal and imported into the bank account.
To set up vendor bank accounts for export of bank files
Fields on the Transfer FastTab on the Vendor Bank Account Card page are related to the export of bank feeds and files. Learn more at Use the AMC Banking 365 Fundamentals extension and Export Payments to a Bank File.
- Choose the icon, enter Vendors, and then choose the related link.
- Open the card for the vendor.
- Choose the Bank Accounts action.
- From the Vendor Bank Accounts List, choose the relevant bank account, or add a new bank account by choosing New.
- On the Vendor Bank Account Card page, fill in the fields as necessary. Hover over a field to read a short description.
Tip
Some fields are hidden until you choose the Show more action, typically because they are used rarely. Others must be added through personalisation. For more information, see Personalise Your Workspace.
Warning
Some fields on the vendor bank account contain sensitive business data, such as the Bank Branch No., Bank Account No., SWIFT Code, and IBAN Code. For more information on how to monitor and be notified when someone changes a value in those fields, see Monitor Sensitive Fields.
Changing your bank account
To use a different bank account for your business, you must create the new bank account in Business Central. We recommend that you don't just replace the information about the account you're currently using because that can cause incorrect data. For example, your opening balance might be incorrect or your bank feed might stop working correctly. It's important that you keep the current and new accounts separate.
After you create the new bank account, you should also create a new bank posting group and assign it to a new general ledger account. You can reuse an existing bank posting group, and bank transactions are posted to the same general ledger accounts as other bank accounts sharing that bank posting group. However, we recommend that you create a new bank posting group and general ledger account so that reconciliations are easier to do.
Note
Remember that the bank account information on open sales invoices still shows the original bank account. Accordingly, payments are likely to still be posted to that account. We recommend that you keep both accounts active for a period of time after the change.
To get a more condensed view of your cash accounts in financial reporting, use the Begin-Total and End-Total accounts in your chart of accounts, the Totalling rows in financial reports, or G/L account categories. Learn more at Business Intelligence and Financial Reporting section.
See also
Setting Up Banking
Setting Up Posting Groups
Reconciling Bank Accounts
Set Up the Envestnet Yodlee Bank Feeds Service
SEPA Direct Debit in Business Central
To set up your bank account for SEPA direct debit
To set up a bank account for SEPA Credit Transfer
Make Payments with the AMC Banking 365 Fundamentals Extension or SEPA Credit Transfer
Payment Reconciliation
Understanding the General Ledger and the COA
Work with Business Central
Feedback
Coming soon: Throughout 2024 we will be phasing out GitHub Issues as the feedback mechanism for content and replacing it with a new feedback system. For more information see: https://aka.ms/ContentUserFeedback.
Submit and view feedback for