Customize the sender's email address
By default, surveys are sent from the surveys@email.customervoice.microsoft.com email address. The email customization feature helps you create a custom email address based on your organization's domain. You can then use this custom email address to send survey invitations to your customers.
Let's say your company is Contoso Suites, and the company's website is www.contososuites.com. You want to create two custom email addresses based on your company's domain, such as noreply@contososuites.com and support@contososuites.com.
Note
- Only tenant administrators can add custom email addresses. If you want to send survey invitations from a custom email address, contact your tenant administrator to add it.
- In US Government Community Cloud, emails are sent from the logged in user's account.
- The capability to customize sender's email address is not available in US Government Community Cloud.
Add custom email addresses
Take the following steps to add custom email addresses:
Sign in to Microsoft 365 admin center with your work or school account.
Select Settings > Org settings.
On the Org settings page, under the Services tab, select Dynamics 365 Customer Voice.

In the Dynamics 365 Customer Voice panel, under the Distribution tab, select + Add domain.
On the Add domain page, enter the domain name of the email domain you want to create in Enter your URL, and then select Next.

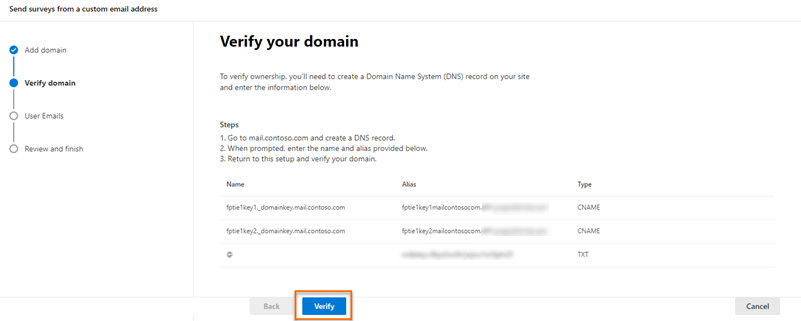
Create DNS records in your domain by using the values available under the Create DNS record section on the Verify your domain page. More information: Example DNS records.

After creating DNS records, select Verify.

Note
If the DNS records are not created, an error is displayed specifying that the application is unable to create a key and the domain can't be created.
On the Add Email addresses page, enter the following information:
- Email address: Email address to use for sending survey invitation.
- Display name: Display name for the email user.
- Approved users: Users who can use custom email addresses when sending survey invitations.

Note
To add more email addresses, select Add more emails, and then provide the required information.
After adding the required email addresses, select Next.
On the Review and finish page, review the entered information, and then select Finish.

A confirmation message is displayed that the custom email address is created, select Done.

The custom email address is displayed in the Dynamics 365 Customer Voice panel.
Edit custom email addresses
After creating a custom email address, you can edit it to change its address, display name, and modify the users allowed to use the email.
Sign in to Microsoft 365 admin center with your work or school account.
Select Settings > Org settings.
On the Org settings page, under the Services tab, select Dynamics 365 Customer Voice.
In the Dynamics 365 Customer Voice panel, hover over the domain that contains the email address you want to edit, select the ellipsis button, and then select Edit.
On the Add Email addresses page, edit the required information, and then select Next.
On the Review and finish page, review the entered information, and then select Finish.
Delete custom email addresses
You can delete custom email addresses that are no longer required.
Sign in to Microsoft 365 admin center with your work or school account.
Select Settings > Org settings.
On the Org settings page, under the Services tab, select Dynamics 365 Customer Voice.
In the Dynamics 365 Customer Voice panel, hover over the domain that contains the email address that you want to delete, select the ellipsis button, and then select Edit.
On the Add Email addresses page, select
 for the email you want to delete, and then select Next.
On the Review and finish page, review the information, and then select Finish.
Example DNS records
Here's an example of a DNS record. The DNS records are used to verify the domain and enable sending survey invitations from the custom email address.
Note
If the domain is not getting verified, open any open-source DNS lookup tool and check if CNAME and TXT records are published. If any of the records are not published, you need to add those records in your DNS zone.
TXT record
TXT name: @
TXT value: msfpkey=abc123abc123abc123abc123
In this example screen, we're using Microsoft Azure to add the TXT name and value:

CNAME record
Host name or Alias: fpeurkey1.\_domainkey
Points to address: fpeurkey1contosocom.d01.formspro.dynamics.com
Note
You must create two CNAME records using the information provided in step 6 of Add custom email addresses.
In this example screen, we're using Microsoft Azure to add the CNAME alias and address:

Important
Ensure that the domain name is not duplicated while creating a CNAME record. The domain name is added automatically to the record. For example, in the following image, adding the domain in the Name field will result in an incorrect record and lead to the failure of domain verification.

Frequently asked questions
Should the email account be a functioning account, or can it be a dummy account?
The email account need not be a functioning account to send emails; however, a mailbox must be configured if the account is expected to receive replies. In most cases, the email address from which survey emails are sent is an unmonitored email account and need not receive emails.
See also
Work with survey distribution settings
Send a survey by using the built-in email composer
Send a survey by using Power Automate
Embed a survey in a webpage
Send a survey link to others
Send a survey by using QR code