Configure an Azure load balancer for an AG VNN listener - SQL Server on Azure VMs
Applies to: ![]() SQL Server on Azure VM
SQL Server on Azure VM
Tip
There are many methods to deploy an availability group. Simplify your deployment and eliminate the need for an Azure Load Balancer or distributed network name (DNN) for your Always On availability group by creating your SQL Server virtual machines (VMs) in multiple subnets within the same Azure virtual network. If you've already created your availability group in a single subnet, you can migrate it to a multi-subnet environment.
On Azure virtual machines, clusters use a load balancer to hold an IP address that needs to be on one cluster node at a time. In this solution, the load balancer holds the IP address for the virtual network name (VNN) listener for the Always On availability group when the SQL Server VMs are in a single subnet.
This article teaches you to configure a load balancer by using the Azure Load Balancer service. The load balancer will route traffic to your availability group listener with SQL Server on Azure VMs for high availability and disaster recovery (HADR).
For an alternative connectivity option for customers who are on SQL Server 2019 CU8 and later, consider a distributed network name (DNN) listener instead. A DNN listener offers simplified configuration and improved failover.
Prerequisites
Before you complete the steps in this article, you should already have:
- Decided that Azure Load Balancer is the appropriate connectivity option for your availability group.
- Installed the latest version of PowerShell.
Create a load balancer
You can create either of these types of load balancers:
Internal: An internal load balancer can be accessed only from private resources that are internal to the network. When you configure an internal load balancer and its rules, use the same IP address as the availability group listener for the frontend IP address.
External: An external load balancer can route traffic from the public to internal resources. When you configure an external load balancer, you can't use the same IP address as the availability group listener because the listener IP address can't be a public IP address.
To use an external load balancer, logically allocate an IP address in the same subnet as the availability group that doesn't conflict with any other IP address. Use this address as the frontend IP address for the load-balancing rules.
Important
On September 30, 2025, the Basic SKU for Azure Load Balancer will be retired. For more information, see the official announcement. If you're currently using Basic Load Balancer, upgrade to Standard Load Balancer before the retirement date. For guidance, review Upgrade Load Balancer.
To create the load balancer:
In the Azure portal, go to the resource group that contains the virtual machines.
Select Add. Search Azure Marketplace for load balancer. Select Load Balancer.
Select Create.
In Create load balancer, on the Basics tab, set up the load balancer by using the following values:
- Subscription: Your Azure subscription.
- Resource group: The resource group that contains your virtual machines.
- Name: A name that identifies the load balancer.
- Region: The Azure location that contains your virtual machines.
- SKU: Standard.
- Type: Either Public or Internal. An internal load balancer can be accessed from within the virtual network. Most Azure applications can use an internal load balancer. If your application needs access to SQL Server directly over the internet, use a public load balancer.
- Tier: Regional.
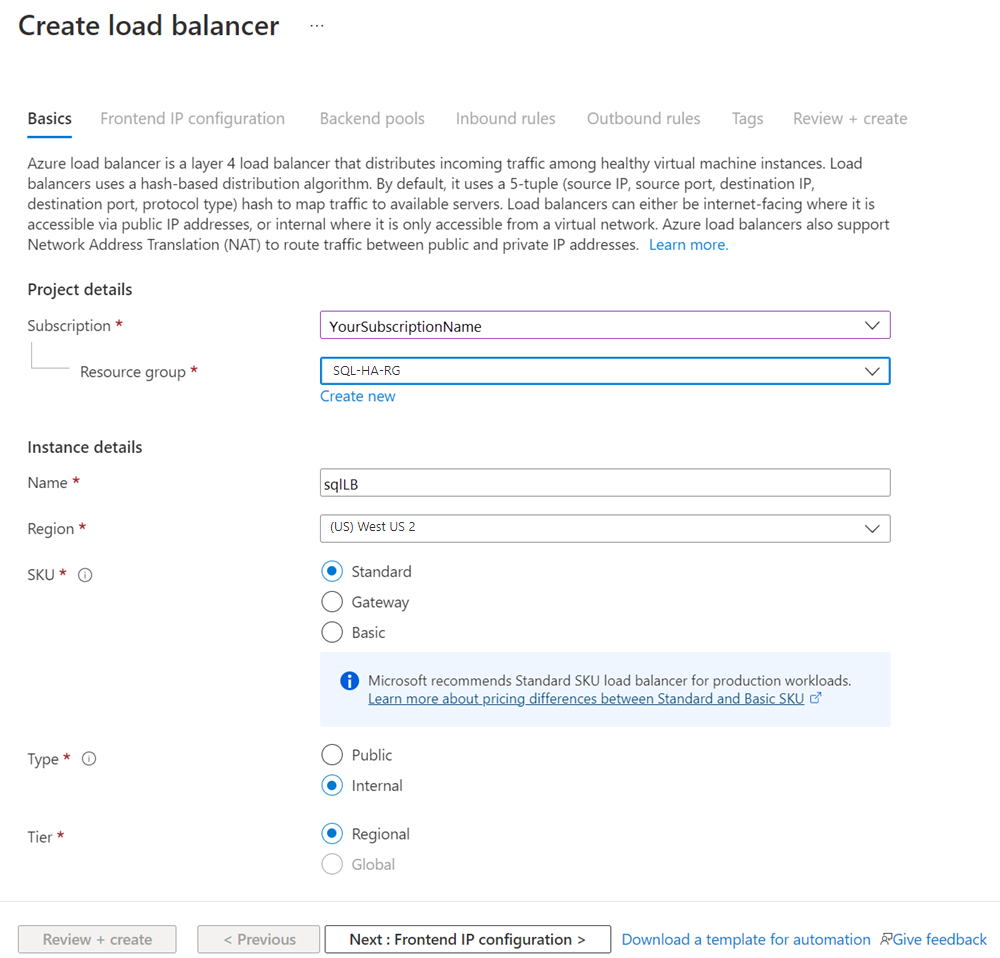
Select Next: Frontend IP configuration.
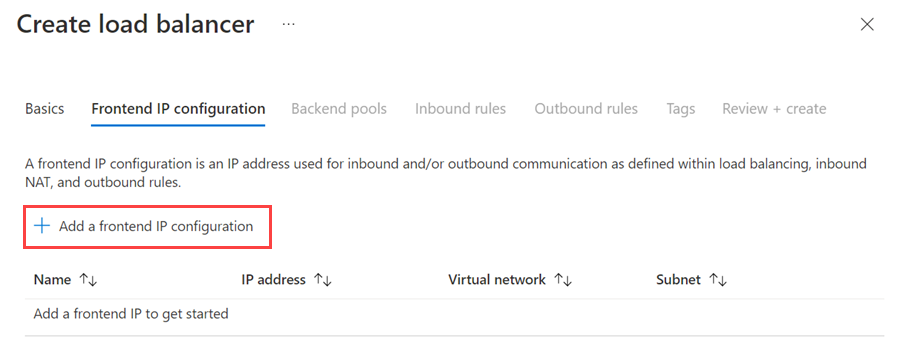
Select Add a frontend IP configuration.
Set up the frontend IP address by using the following values:
- Name: A name that identifies the frontend IP configuration.
- Virtual network: The same network as the virtual machines.
- Subnet: The same subnet as the virtual machines.
- Assignment: Static.
- IP address: The IP address that you assigned to the clustered network resource.
- Availability zone: An optional availability zone to deploy your IP address to.
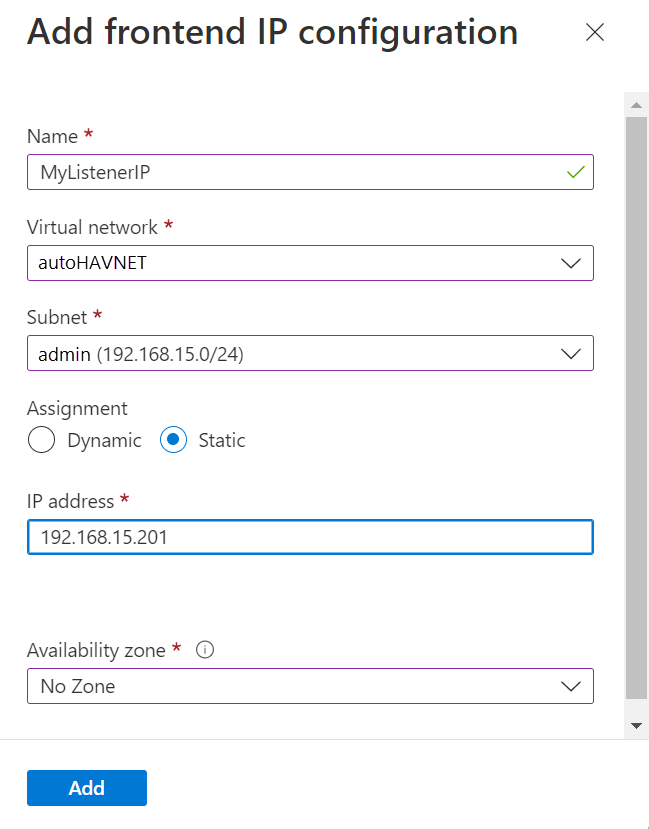
Select Add to create the frontend IP address.
Select Review + Create to create the load balancer.
Configure a backend pool
Return to the Azure resource group that contains the virtual machines and locate the new load balancer. You might need to refresh the view on the resource group. Select the load balancer.
Select Backend pools, and then select +Add.
For Name, provide a name for the backend pool.
For Backend Pool Configuration, select NIC.
Select Add to associate the backend pool with the availability set that contains the VMs.
Under Virtual machine, choose the virtual machines that will participate as cluster nodes. Be sure to include all virtual machines that will host the availability group.
Add only the primary IP address of each VM. Don't add any secondary IP addresses.
Select Add to add the virtual machines to the backend pool.
Select Save to create the backend pool.
Configure a health probe
On the pane for the load balancer, select Health probes.
On the Add health probe pane, set the following parameters:
- Name: A name for the health probe.
- Protocol: TCP.
- Port: The port that you created in the firewall for the health probe. In this article, the example uses TCP port 59999.
- Interval: 5 Seconds.
Select Add.
Set load-balancing rules
On the pane for the load balancer, select Load-balancing rules.
Select Add.
Set these parameters:
- Name: A name for the load-balancing rule.
- Frontend IP address: The IP address that you set when you configured the frontend.
- Backend pool: The backend pool that contains the virtual machines targeted for the load balancer.
- HA Ports: Enables load balancing on all ports for TCP and UDP protocols.
- Protocol: TCP.
- Port: The SQL Server TCP port. The default is 1433.
- Backend port: The same port as the Port value when you enable Floating IP (direct server return).
- Health probe: The health probe that you configured earlier.
- Session persistence: None.
- Idle timeout (minutes): 4.
- Floating IP (direct server return): Enabled.
Select Save.
Configure a cluster probe
Set the cluster probe's port parameter in PowerShell.
Update the variables in the following script with values from your environment. Remove the angle brackets (< and >) from the script.
$ClusterNetworkName = "<Cluster Network Name>"
$IPResourceName = "<AG Listener IP Address Resource Name>"
$ILBIP = "<n.n.n.n>"
[int]$ProbePort = <nnnnn>

Import-Module FailoverClusters

Get-ClusterResource $IPResourceName | Set-ClusterParameter -Multiple @{"Address"="$ILBIP";"ProbePort"=$ProbePort;"SubnetMask"="255.255.255.255";"Network"="$ClusterNetworkName";"EnableDhcp"=0}
The following table describes the values that you need to update:
| Variable | Value |
|---|---|
ClusterNetworkName |
The name of the Windows Server failover cluster for the network. In Failover Cluster Manager > Networks, right-click the network and select Properties. The correct value is under Name on the General tab. |
IPResourceName |
The resource name for the IP address of the AG listener. In Failover Cluster Manager > Roles, under the availability group role, under Server Name, right-click the IP address resource and select Properties. The correct value is under Name on the General tab. |
ILBIP |
The IP address of the internal load balancer. This address is configured in the Azure portal as the frontend address of the internal load balancer. This is the same IP address as the availability group listener. You can find it in Failover Cluster Manager, on the same properties page where you located the value for IPResourceName. |
ProbePort |
The probe port that you configured in the health probe of the load balancer. Any unused TCP port is valid. |
SubnetMask |
The subnet mask for the cluster parameter. It must be the TCP/IP broadcast address: 255.255.255.255. |
The changes you made do not take effect until the IP address resource is taken offline and brought online again. Perform a failover of the availability group for this change to take effect. After you set the cluster probe, you can see all the cluster parameters in PowerShell. Run this script:
Get-ClusterResource $IPResourceName | Get-ClusterParameter
Modify the connection string
For clients that support it, add MultiSubnetFailover=True to the connection string. Although the MultiSubnetFailover connection option isn't required, it provides the benefit of a faster subnet failover. This is because the client driver tries to open a TCP socket for each IP address in parallel. The client driver waits for the first IP address to respond with success. After the successful response, the client driver uses that IP address for the connection.
If your client doesn't support the MultiSubnetFailover parameter, you can modify the RegisterAllProvidersIP and HostRecordTTL settings to prevent connectivity delays after failover.
Use PowerShell to modify the RegisterAllProvidersIp and HostRecordTTL settings:
Get-ClusterResource yourListenerName | Set-ClusterParameter RegisterAllProvidersIP 0
Get-ClusterResource yourListenerName|Set-ClusterParameter HostRecordTTL 300
To learn more, see the documentation about listener connection timeout in SQL Server.
Tip
- Set the
MultiSubnetFailover parametertotruein the connection string, even for HADR solutions that span a single subnet. This setting supports future spanning of subnets without the need to update connection strings. - By default, clients cache cluster DNS records for 20 minutes. By reducing
HostRecordTTL, you reduce the time to live (TTL) for the cached record. Legacy clients can then reconnect more quickly. As such, reducing theHostRecordTTLsetting might increase traffic to the DNS servers.
Test failover
Test failover of the clustered resource to validate cluster functionality:
- Open SQL Server Management Studio and connect to your availability group listener.
- In Object Explorer, expand Always On Availability Group.
- Right-click the availability group and select Failover.
- Follow the wizard prompts to fail over the availability group to a secondary replica.
Failover succeeds when the replicas switch roles and are both synchronized.
Test connectivity
To test connectivity, sign in to another virtual machine in the same virtual network. Open SQL Server Management Studio and connect to the availability group listener.
Note
If you need to, you can download SQL Server Management Studio.
Next steps
After the VNN is created, consider optimizing the cluster settings for SQL Server VMs.
To learn more, see:
Feedback
Coming soon: Throughout 2024 we will be phasing out GitHub Issues as the feedback mechanism for content and replacing it with a new feedback system. For more information see: https://aka.ms/ContentUserFeedback.
Submit and view feedback for