Note
Access to this page requires authorization. You can try signing in or changing directories.
Access to this page requires authorization. You can try changing directories.
Applies to:
- Microsoft Defender for Endpoint Plan 1
- Microsoft Defender for Endpoint Plan 2
- Microsoft Defender XDR
Overview
By creating indicators for IPs and URLs or domains, you can now allow or block IPs, URLs, or domains based on your own threat intelligence. You can also warn users if they open a risky app. The prompt doesn't stop them from using the app; users can bypass the warning and continue to use the app if needed.
To block malicious IPs/URLs, Defender for Endpoint can use:
- Windows Defender SmartScreen for Microsoft browsers
- Network protection for non-Microsoft browsers and non-browser processes
The default threat-intelligence data set to block malicious IPs/URLs is managed by Microsoft.
You can block additional malicious IPs/URLs by configuring "Custom network indicators".
Supported operating systems
- Windows 11
- Windows 10, version 1709 or later
- Windows Server 2025
- Windows Server 2022
- Windows Server 2019
- Windows Server 2016 running Defender for Endpoint modern unified solution (requires installation through MSI)
- Windows Server 2012 R2 running Defender for Endpoint modern unified solution (requires installation through MSI)
- macOS
- Linux
- iOS
- Android
Before you begin
It's important to understand the following prerequisites before creating indicators for IPs, URLs, or domains.
Microsoft Defender Antivirus version requirements
Integration into Microsoft browsers is controlled by the browser's SmartScreen setting. For other browsers and applications, your organization must have:
Microsoft Defender Antivirus configured in active mode.
Behavior Monitoring enabled.
Cloud-based protection turned on.
The anti-malware client version must be
4.18.1906.xor later. See Monthly platform and engine versions.
Network Protection requirements
URL/IP allow and block requires that the Microsoft Defender for Endpoint component Network Protection is enabled in block mode. For more information on Network Protection and configuration instructions, see Enable network protection.
Custom network indicators requirements
To start blocking IP addresses and/or URLs, turn on the "Custom network indicators" feature in the Microsoft Defender portal. The feature is found in Settings > Endpoints > General > Advanced features. For more information, see Advanced features.
For support of indicators on iOS, see Microsoft Defender for Endpoint on iOS.
For support of indicators on Android, see Microsoft Defender for Endpoint on Android.
Indicator list limitations
Only external IPs can be added to the indicator list; indicators cannot be created for internal IPs.
Non Microsoft Edge and Internet Explorer processes
For processes other than Microsoft Edge and Internet Explorer, web protection scenarios use Network Protection for inspection and enforcement:
- IP addresses are supported for all three protocols (TCP, HTTP, and HTTPS (TLS))
- Only single IP addresses are supported (no CIDR blocks or IP ranges) in custom indicators
- HTTP URLs (including a full URL path) can be blocked for any browser or process
- HTTPS fully-qualified domain names (FQDN) can be blocked in non-Microsoft browsers (indicators specifying a full URL path can only be blocked in Microsoft Edge)
- Blocking FQDNs in non-Microsoft browsers requires that QUIC and Encrypted Client Hello be disabled in those browsers
- FQDNs loaded via HTTP2 connection coalescing can only be blocked in Microsoft Edge
- If there are conflicting URL indicator policies, the longer path is applied. For example, the URL indicator policy
https://support.microsoft.com/officetakes precedence over the URL indicator policyhttps://support.microsoft.com.
Network protection implementation
In non-Microsoft Edge processes, Network Protection determines the fully qualified domain name for each HTTPS connection by examining the content of the TLS handshake that occurs after a TCP/IP handshake. This requires that the HTTPS connection use TCP/IP (not UDP/QUIC) and that the ClientHello message not be encrypted. To disable QUIC and Encrypted Client Hello in Google Chrome, see QuicAllowed and EncryptedClientHelloEnabled. For Mozilla Firefox, see Disable EncryptedClientHello and network.http.http3.enable.
The determination of whether to allow or block access to a site is made after the completion of the three-way handshake via TCP/IP and any TLS handshake. Thus, when a site is blocked by network protection, you might see an action type of ConnectionSuccess under NetworkConnectionEvents in the Microsoft Defender portal, even though the site was blocked. NetworkConnectionEvents are reported from the TCP layer, and not from network protection. After the three-way handshake has completed, access to the site is allowed or blocked by network protection.
Here's an example of how that works:
Suppose that a user attempts to access a website on their device. The site happens to be hosted on a dangerous domain, and it should be blocked by network protection.
The TCP/IP handshake commences. Before it completes, a
NetworkConnectionEventsaction is logged, and itsActionTypeis listed asConnectionSuccess. However, as soon as the TCP/IP handshake process completes, network protection blocks access to the site. All of this happens quickly. A similar process occurs with Microsoft Defender SmartScreen; it's after the handshake completes that a determination is made, and access to a site is either blocked or allowed.In the Microsoft Defender portal, an alert is listed in the alerts queue. Details of that alert include both
NetworkConnectionEventsandAlertEvents. You can see that the site was blocked, even though you also have aNetworkConnectionEventsitem with the ActionType ofConnectionSuccess.
Warn mode controls
When using warn mode, you can configure the following controls:
Bypass ability
- Allow button in Microsoft Edge
- Allow button on toast (Non-Microsoft browsers)
- Bypass duration parameter on the indicator
- Bypass enforcement across Microsoft and Non-Microsoft browsers
Redirect URL
- Redirect URL parameter on the indicator
- Redirect URL in Microsoft Edge
- Redirect URL on toast (Non-Microsoft browsers)
For more information, see Govern apps discovered by Microsoft Defender for Endpoint.
Indicator IP URL and domain policy conflict handling order
Policy conflict handling for domains/URLs/IP addresses differ from policy conflict handling for certificates.
In the case where multiple different action types are set on the same indicator (for example, three indicators for Microsoft.com with the action types block, warn, and allow), the order those action types would take effect is:
Allow
Warn
Block
"Allow" overrides "warn," which overrides "block", as follows: Allow > Warn > Block. Therefore, in the previous example, Microsoft.com would be allowed.
Defender for Cloud Apps Indicators
If your organization has enabled integration between Defender for Endpoint and Defender for Cloud Apps, block indicators are created in Defender for Endpoint for all unsanctioned cloud applications. If an application is put in monitor mode, warn indicators (bypassable block) are created for the URLs associated with the application. Allow indicators are not automatically created for sanctioned applications. Indicators created by Defender for Cloud Apps follow the same policy conflict handling described in the previous section.
Policy precedence
Microsoft Defender for Endpoint policy has precedence over Microsoft Defender Antivirus policy. In situations when Defender for Endpoint is set to Allow, but Microsoft Defender Antivirus is set to Block, the result is Allow.
Precedence for multiple active policies
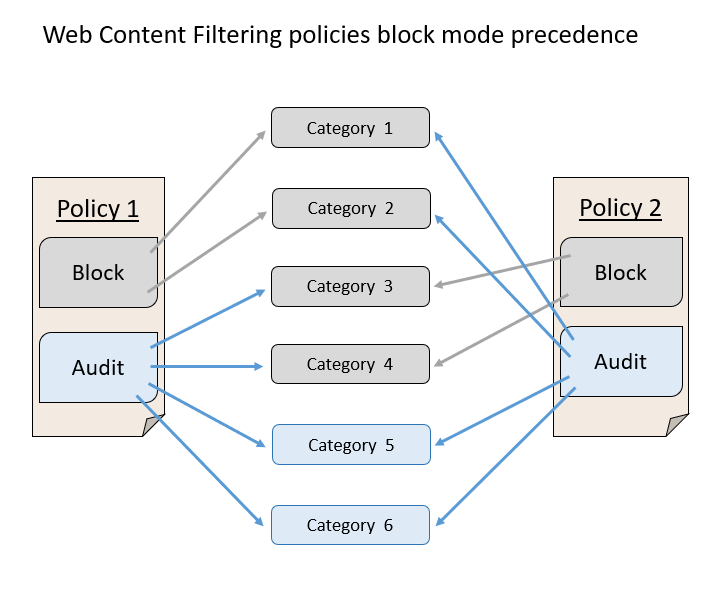
Applying multiple different web content filtering policies to the same device result in the more restrictive policy applying for each category. Consider the following scenario:
- Policy 1 blocks categories 1 and 2 and audits the rest
- Policy 2 blocks categories 3 and 4 and audits the rest
The result is that categories 1-4 are all blocked. This scenario is illustrated in the following image.
Create an indicator for IPs, URLs, or domains from the settings page
In the navigation pane, select Settings > Endpoints > Indicators (under Rules).
Select the IP addresses or URLs/Domains tab.
Select Add item.
Specify the following details:
- Indicator: Specify the entity details and define the expiration of the indicator.
- Action: Specify the action to be taken and provide a description.
- Scope: Specify the machine group(s) which should enforce the indicator.
Review the details in the Summary tab, then select Save.
Important
It can take up to 48 hours after a policy is created for a URL or IP address to be blocked on a device. In most cases, blocks will take effect in under two hours.
Related articles
- Create indicators
- Create indicators for files
- Create indicators based on certificates
- Manage indicators
- Exclusions for Microsoft Defender for Endpoint and Microsoft Defender Antivirus
Tip
Do you want to learn more? Engage with the Microsoft Security community in our Tech Community: Microsoft Defender for Endpoint Tech Community.