Configure predictive opportunity scoring
Predictive opportunity scoring uses a predictive machine learning model to calculate a score for open opportunities based on historical data. The score helps sellers prioritize opportunities and achieve higher opportunity won rates, and reduces the time it takes to win an opportunity.
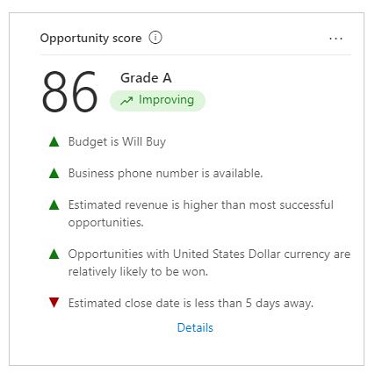
For example, say you have two opportunities, Opportunity A and Opportunity B, in your pipeline. The opportunity scoring model calculates a score of 80 for Opportunity A and 50 for Opportunity B. Based on the scores, you can predict that Opportunity A has a greater chance of being converted into a won deal. Further, you can review the top influencing factors to analyze why Opportunity B's score is low and decide whether to improve it.
The following image shows an example of an opportunity scoring widget:
Historical data collection begins when you create a scoring model. Historical data is stored in the data lake for analysis. If your Dynamics 365 Sales subscription expires or your org is deleted, the historical data is deleted after 30 days.
If you have a Dynamics 365 Sales Enterprise license, you can enable predictive opportunity scoring in lead and opportunity scoring quick setup. You'll get 1,500 scored records per month.
License and role requirements
| Requirement type | You must have |
|---|---|
| License | Dynamics 365 Sales Premium or Dynamics 365 Sales Enterprise More information: Dynamics 365 Sales pricing |
| Security roles | System Administrator More information: Predefined security roles for Sales |
Prerequisites
You need to have enough opportunities to train the model based on past data. Your organization must have created and closed at least 40 won and 40 lost opportunities during the time frame selected in the Train with opportunities from the past field of the scoring model. The time frame ranges from three months to two years. Verify whether you have the required number of leads to build a scoring model.
To define a per stage model, you must have at least 40 closed opportunities in the last stage of the business process in the selected time frame. The more opportunities you can include to train the model, the better the prediction results will be. Verify whether you have the required number of opportunities to build a per stage scoring model.
Note
If you're planning to use a business process flow for your model, then opportunities that have abandoned the selected business process flow will not be considered for training, scoring, and for establishing the minimum requirement for model creation.
The system takes about four hours to sync the data with the data lake. If you've closed opportunities recently, the model won't consider them right away.
What is a per stage model?
A per stage model calculates the influence of attributes at each stage of the business process flow based on past data. For example, you can review how the estimated close date influences different stages of the opportunity. You can then decide which stages are relevant for each attribute, according to your organization's standards, and improve the model's accuracy.
Per stage modeling is disabled by default. You can enable it only when you're adding a scoring model.
When per stage modeling is disabled, the model uses only attributes that had a higher influence on opportunities that were closed as won. For example, if most of the won deals had an associated business phone number, the model may give a higher score to opportunities that have an associated business phone number.
Create your first scoring model
Important
- If you're using a model that you created in a version of Dynamics 365 earlier than 2020 release wave 2, delete the model before you create a new one. Otherwise, the previous version of the model will be applied to all opportunities in your organization, and new models won't have any effect on the opportunities.
- As of 2020 release wave 2, the application writes the opportunity scoring data to the msdyn_predictivescore table and no longer writes to the opportunity entity. Both lead and opportunity scoring use the msdyn_predictivescore table.
A scoring model defines the criteria for choosing opportunities for training and scoring. If your organization follows different sales practices across different regions or business units, you can create models and unique training sets for each of them.
Go to Change area in the lower-left corner of the Sales Hub app, and select Sales Insights settings.
On the site map under Predictive models, select Opportunity scoring.
If your organization doesn't have at least 40 won and 40 lost opportunities that were created in the time frame identified in the Train with opportunities from the past field, you can't create a scoring model. If there are enough opportunities, the app generates a model by default.
On the Predictive opportunity scoring page, change the values for fields such as business process flow, filter column, and so on if needed. For more information about these fields, see the next section Add a model. When you're done, select Get started.
Allow some time for the app to train your model. You can leave the page and come back later.
The application uses standard attributes to train the model. You can edit the model later to include custom or intelligent attributes.
Publish your model
When your model is trained and ready to publish, the Predictive opportunity scoring page displays a confirmation:
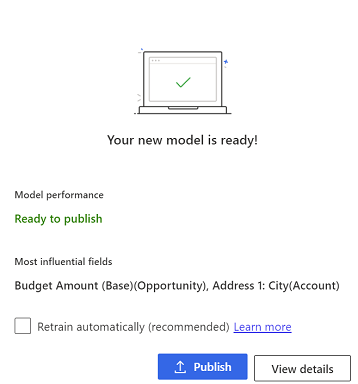
If the model is trained but not ready to publish, the Model performance field displays Not ready to Publish.
To retrain the model every 15 days, select Retrain automatically.
Select Publish or View details.
If the model is ready to publish and you're ready to apply it, select Publish.
The model is applied to opportunities that match the criteria specified in the model configuration. The opportunity score appears in the Opportunity score column in views and in a widget in the opportunity form.
To view the model's accuracy and performance before you publish it, or if the model isn't ready to publish and you want to know why, select View Details, and then select the Performance tab.
The app determines that the model isn't ready to publish if its accuracy falls below a threshold value, the Area under curve (AUC) score. You can still publish the model if you like. However, it will perform poorly.
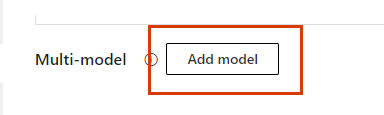
Add a model
You can create up to 10 models, both published and unpublished, for different sets of opportunities. The app warns you if you try to create a model that might score the same opportunities as an existing model.
At the bottom of the Predictive opportunity scoring page, select Add model.
Note
You won't see the Add model button if you haven't created at least one scoring model.
The Predictive opportunity scoring page opens with default values.
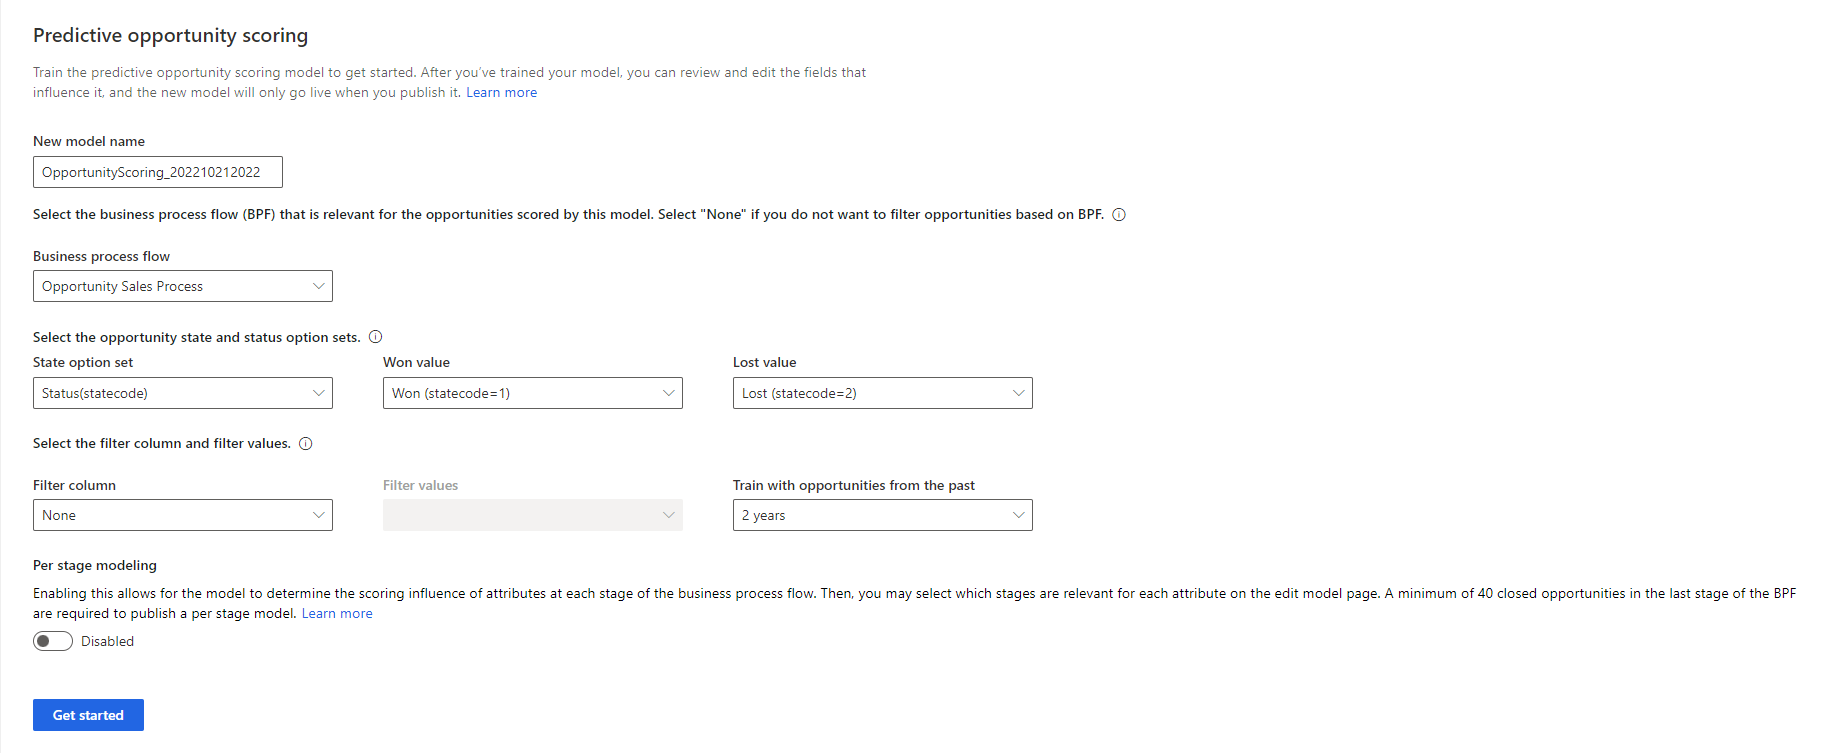
In the New model name box, enter a name that contains alphanumeric characters. Underscores are allowed, but not spaces or other special characters.
By default, the name is OpportunityScoring_<YYYYMMDD><Time> (for example, OpportunityScoring_202009181410). The date and time are based on Coordinated Universal Time (UTC).
In the Business process flow list, select a flow that's relevant for the opportunities that you're generating the model for. Opportunities that have abandoned the selected business process flow will not be considered for training, scoring, and for establishing the minimum requirement for model creation.
The list displays all the business process flows that are defined for opportunities in your organization. If you want to enable per stage modeling, you must select a business process flow.
To display custom business process flows in the list, enable Change Tracking for the business process flow entity. When you generate the model, custom business processes are automatically enabled to sync the data to the data lake for analysis.
In the State option set list, select the option set in which the status of the opportunities is defined.
Select the corresponding values in the Won Value and Lost Value lists, respectively.
The out-of-the-box Status state option set defines the values as Won and Lost. You can select a custom option set if one is defined.
Select Filter column and Filter values to specify the opportunities that the model must score.
To filter based on multiple columns, create a calculated field with the required columns, and then select the calculated field in the Filter column list.
In the Train with opportunities from the past list, select a time period for the training set. The default is two years.
Your organization must have a minimum of 40 won and 40 lost opportunities that were created and closed during the selected period. The model analyzes closed opportunities from the selected period and uses that data to score open opportunities from the past two years.
If you don't have the minimum closed opportunities in the chosen time period, the Get started button is disabled. Select another time period that has enough closed opportunities to train the model.
(Optional) Enable Per stage modeling to select the attributes that the model must consider for each business process stage.
After creating the model, you'll be able to view the prediction influence of each attribute across different stages. You can then select the attributes and corresponding stages.
Note
If you enable Per stage modeling, be sure to select a business process in the Business process flow list.
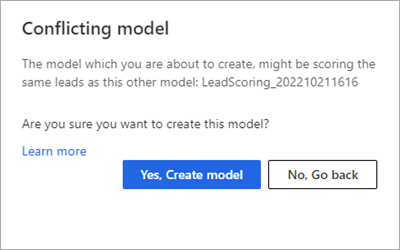
Select Get started. You'll get a warning message if the model is a duplicate of an existing model and is scoring the same set of opportunities. You can choose to create the model anyway or change the configurations to let the model score unique set of opportunities.
The system will take a few minutes to train your model.
When your model is trained, publish it or view its details.
Can't find the options in your app?
There are three possibilities:
- You don't have the necessary license or role. Check the License and role requirements section at the top of this page.
- Your administrator hasn't turned on the feature.
- Your organization is using a custom app. Check with your administrator for exact steps. The steps described in this article are specific to the out-of-the-box Sales Hub and Sales Professional apps.
Related information
System and application users who can push data to Dataverse
Edit and retrain an opportunity scoring model
Prioritize opportunities through scores
Opportunity management FAQs