Configure Universal Print
Universal Print is a modern print solution that organizations can use to manage their print infrastructure through cloud services from Microsoft.
Universal Print runs entirely on Microsoft Azure. When it's deployed with Universal Print–compatible printers, it doesn't require any on-premises infrastructure.
Universal Print is a Microsoft 365 subscription-based service that organizations use to centralize print management through the Universal Print portal. It's fully integrated with Microsoft Entra ID and supports single sign-on scenarios.
Universal Print can be deployed with non-compatible printers by using Universal Print connector software.
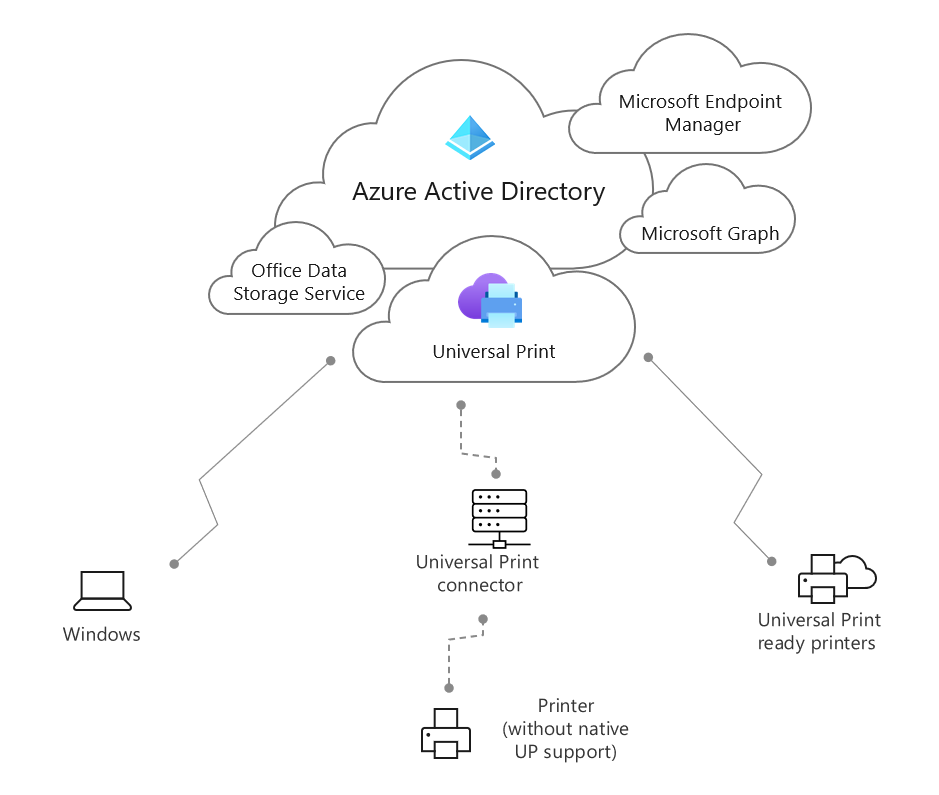
Component
Description
Universal Print
Cloud print service
Microsoft Entra ID
User and device identity and authorization service
Office Data Storage Service
Print queue data storage service
Microsoft Endpoint Manager
Client device printer provisioning policy service
Microsoft Graph
Printer management API
Universal Print connector
A component that handles communication between printers and the Universal Print service.
Universal Print ready printer
A printer that has built-in support for communicating with Universal Print.
Printer (without native UP support)
A printer that needs to be registered using the Universal Print connector to communicate with Universal Print.
Enable Universal Print
Universal Print is currently available, see the Universal Print Public documentation to learn how to deploy it in your organization.
Assign licenses
Once Universal Print is enabled for a tenant, a Universal Print license needs to be assigned to every user who will be using it, including administrators who manage it.
- A Universal Print license is assigned to the Microsoft 365 tenant by
Global Administrator. - To configure and manage Universal Print, the corresponding administrator must have a Universal Print license assigned.
- To configure and manage Universal Print, an administrator must be assigned either of the following two Microsoft Entra roles:
Printer Administrator or Global Administrator. - A client device (to install and print from Universal Print) running Windows client OS.
- An Internet connection.
Step 1: Set up the Universal Print connector
Current in-market printers cannot communicate with Universal Print directly, and require a proxy Universal Print connector. For more information, see:
What is Universal Print connector?
Set up Universal Print connector(s)
Step 2: Register printers using Universal Print connector
Printers installed on Universal Print connector(s) need to be registered with Universal Print. For more information, see the following:
Register printers with Universal Print
Step 3: Assign permissions and share printer
Registered printers need to have permissions assigned to Microsoft Entra users and security groups. Once the permissions are configured, the printer needs to be shared for the users to be able to add it to their device for printing.
Assign printer permissions and share a printer.
Once the printer is shared, it is ready for users to start printing to it.
Step 4: Add a Universal Print printer to a Windows device
Before you try to add a Universal Print printer to a user's device, ensure that:
- The user's device is connected to internet.
- The user's device is either:
- Microsoft Entra joined
- Microsoft Entra registered
- Microsoft Entra hybrid joined
- The Universal Print printer has been shared.
- The user has been added to the permissions of Universal Print printer that is to be added on the device.
- The user has been assigned the license to use Universal Print.
To add a Universal Print printer to a Windows client device:
- Select Settings > Devices > Printers & scanners.
- Select Add a printer or scanner.
- Select the desired printer, and then select Add device.
- Once the printer is added, it will show up in the list of Printers & scanners in Settings.
For Universal Print printers, the driver selected on user's Windows device is Universal Print Class Driver. Do not change the driver for Universal Print printers.
To test the printer by printing a test page:
- On the Printers & scanners settings page, select the Universal Print printer.
- Select Manage.
- Select Open print queue to monitor the test print job.
- Select Print a test page. You will see the job in print queue window. If the job is accepted by Universal Print, the status will change to
Sent to printer.