Manually deploy a Java application with Open Liberty/WebSphere Liberty on an Azure Red Hat OpenShift cluster
This article provides step-by-step manual guidance for running Open/WebSphere Liberty on an Azure Red Hat OpenShift cluster. It walks you through preparing a Liberty application, building the application Docker image and running the containerized application on an Azure Red Hat OpenShift cluster.
Specifically, you learn how to accomplish the following tasks:
- Prepare the Liberty application
- Build the application image
- Run the containerized application on an Azure Red Hat OpenShift cluster using the GUI and the CLI
For a more automated solution that accelerates your journey to Azure Red Hat OpenShift cluster, see Deploy IBM WebSphere Liberty and Open Liberty on Azure Red Hat OpenShift using Azure Marketplace offer.
For more information on Open Liberty, see the Open Liberty project page. For more information on WebSphere Liberty, see the WebSphere Liberty product page.
This article is intended to help you quickly get to deployment. Before going to production, you should explore Tuning Liberty.
If you're interested in providing feedback or working closely on your migration scenarios with the engineering team developing WebSphere on Azure solutions, fill out this short survey on WebSphere migration and include your contact information. The team of program managers, architects, and engineers will promptly get in touch with you to initiate close collaboration.
Important
While Azure Red Hat OpenShift is jointly engineered, operated, and supported by Red Hat and Microsoft to provide an integrated support experience, the software you run on top of Azure Red Hat OpenShift, including that described in this article, is subject to its own support and license terms. For more information about support for Azure Red Hat OpenShift, see Support lifecycle for Azure Red Hat OpenShift 4. For more information about support for the software described in this article, see the main pages for that software as listed in the article.
Note
Azure Red Hat OpenShift requires a minimum of 40 cores to create and run an OpenShift cluster. The default Azure resource quota for a new Azure subscription does not meet this requirement. To request an increase in your resource limit, see Standard quota: Increase limits by VM series. Note that the free trial subscription isn't eligible for a quota increase, upgrade to a Pay-As-You-Go subscription before requesting a quota increase.
Prerequisites
Complete the following prerequisites to successfully use this guide:
Prepare a local machine with Unix-like operating system installed (for example, Ubuntu, macOS, or Windows Subsystem for Linux).
Install a Java Standard Edition (SE) implementation, version 17 or later (for example, Eclipse Open J9).
Install Maven 3.5.0 or higher.
Install Docker for your OS.
Install Azure CLI 2.0.75 or later.
Install
envsubstif needed.Clone the code for this sample on your local system. The sample is on GitHub.
Follow the instructions in Create an Azure Red Hat OpenShift 4 cluster.
Though the "Get a Red Hat pull secret" step is labeled as optional, it is required for this article. The pull secret enables your Azure Red Hat OpenShift cluster to find the Open Liberty Operator.
If you plan to run memory-intensive applications on the cluster, specify the proper virtual machine size for the worker nodes using the
--worker-vm-sizeparameter. For example,Standard_E4s_v3is the minimum virtual machine size to install the Elasticsearch Operator on a cluster. For more information, see:Connect to the cluster by following the steps in Connect to an Azure Red Hat OpenShift 4 cluster.
- Be sure to follow the steps in "Install the OpenShift CLI" because we use the
occommand later in this article. - Save aside the cluster console URL. It should look like
https://console-openshift-console.apps.<random>.<region>.aroapp.io/. - Take note of the
kubeadmincredentials. - Be sure to follow the steps in "Connect using the OpenShift CLI" with the
kubeadmincredentials.
- Be sure to follow the steps in "Install the OpenShift CLI" because we use the
Install the Open Liberty OpenShift Operator
After creating and connecting to the cluster, use the following steps to install the Open Liberty Operator. The main starting page for the Open Liberty Operator is on GitHub.
Sign in to the OpenShift web console from your browser using the
kubeadmincredentials.Navigate to Operators > OperatorHub and search for Open Liberty.
Select Open Liberty from the search results.
Select Install.
In the page Install Operator, check v1.3 for Update channel, All namespaces on the cluster (default) for Installation mode, and Automatic for Update approval:

Select Install and wait a minute or two until the installation completes.
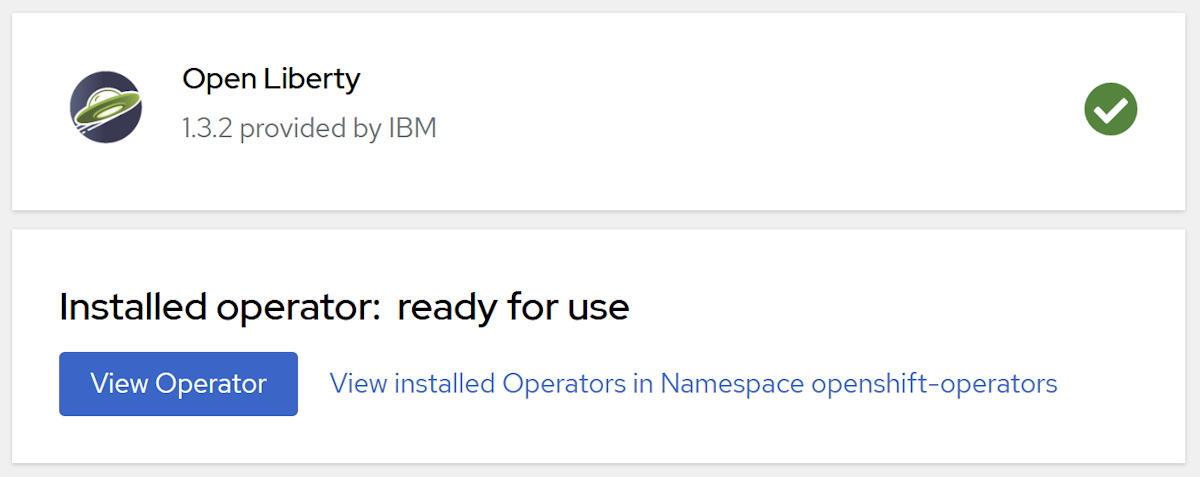
Observe that the Open Liberty Operator is successfully installed and ready for use. If it isn't ready, diagnose and resolve the problem before continuing.


Create an OpenShift namespace for the Java app
Use the following steps to create an OpenShift namespace for use with your app:
Make sure you signed in to the OpenShift web console from your browser using the
kubeadmincredentials.Navigate to Administration > Namespaces > Create Namespace.
Fill in
open-liberty-demofor Name and select Create, as shown next.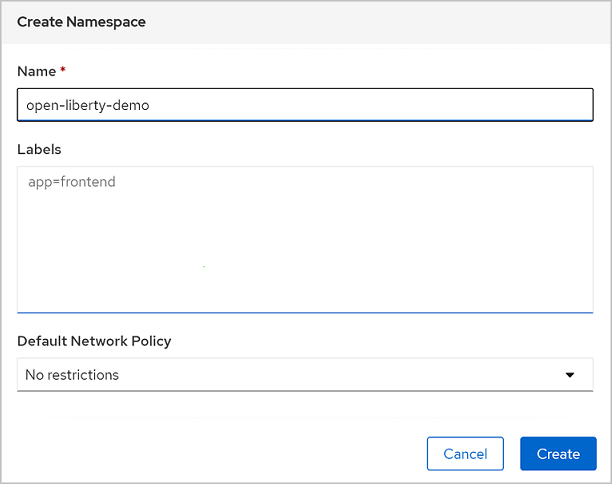

Create an Azure Database for MySQL
Use the following steps to set up an Azure Database for MySQL for use with your app:
Create an Azure Database for MySQL flexible server by following the steps in: Quickstart: Use the Azure portal to create an Azure Database for MySQL - Flexible Server. You can deploy the database to the same resource group as the OpenShift cluster. Return to this document after creating the database.
Note
At the Basics step, save aside the Server name.mysql.database.azure.com, Admin username, and Password values.
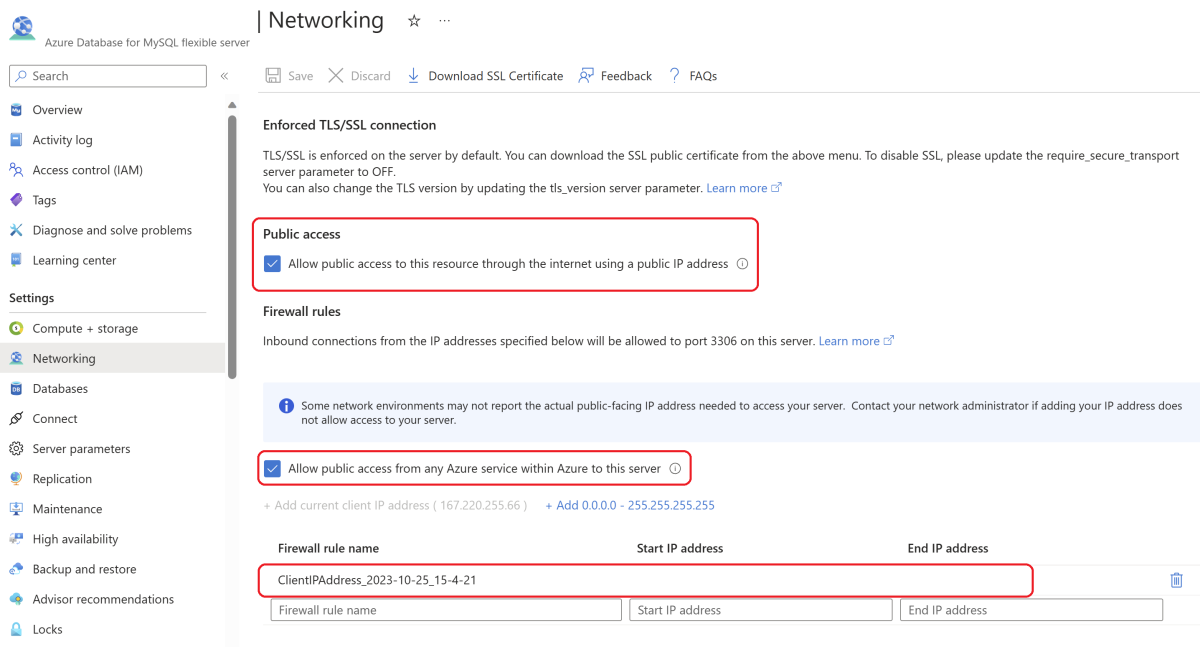
After your database is created, open your database > Settings > Networking, then use the following steps:
- Under Public access, ensure that Allow public access to this resource through the internet using a public IP address is selected.
- Select Allow public access from any Azure service within Azure to this server.
- Ensure that your client IPv4 address is in the allowlist of Firewall rules.
- Save your changes.
Open your database > Settings > Databases > Select Add. Fill in a value for Name and select Save to create a new database. This database has Scheme type as User and is used for the application later.
Note
Save aside the Name for the database you created.

Prepare the Liberty application
We use a Java EE 8 application as our example in this guide. Open Liberty is a Java EE 8 full profile compatible server, so it can easily run the application. Open Liberty is also Jakarta EE 8 full profile compatible.
Run the application on Open Liberty
To run the application on Open Liberty, you need to create an Open Liberty server configuration file so that the Liberty Maven plugin can package the application for deployment. The Liberty Maven plugin isn't required to deploy the application to OpenShift. However, we use it in this example with Open Liberty's developer (dev) mode. Developer mode lets you easily run the application locally. To learn more about the liberty-maven-plugin, see Building a web application with Maven.
Follow the steps in this section to prepare the sample application for later use in this article. These steps use Maven and the liberty-maven-plugin.
Check out the application
Use the following commands to clone the sample code for this guide. The sample is on GitHub.
git clone https://github.com/Azure-Samples/open-liberty-on-aro.git
cd open-liberty-on-aro
There are a few samples in the repository. We use open-liberty-on-aro/3-integration/connect-db/mysql. Here's the file structure of the application:
open-liberty-on-aro/3-integration/connect-db/mysql
├─ src/main/
│  ├─ aro/
│  │  ├─ db-secret.yaml
│  │  ├─ openlibertyapplication.yaml
│  ├─ liberty/config/
│  │  ├─ server.xml
│  ├─ java/
│  ├─ resources/
│  ├─ webapp/
├─ Dockerfile
├─ Dockerfile-wlp
├─ pom.xml
The directories java, resources, and webapp contain the source code of the sample application. The code declares and uses a data source named jdbc/JavaEECafeDB.
In the aro directory, we placed two deployment files. db-secret.xml is used to create Secrets with database connection credentials. The file openlibertyapplication.yaml is used to deploy the application image.
In the root directory, we placed two Dockerfiles. Dockerfile and Dockerfile-wlp are used for local debugging and to build the image for an Azure Red Hat OpenShift deployment, working with Open Liberty and WebSphere Liberty, respectively.
In the liberty/config directory, the server.xml is used to configure the database connection for the Open Liberty and WebSphere Liberty cluster.
Build project
Now that you gathered the necessary properties, use the following commands to build the application. The POM file for the project reads many properties from the environment.
cd <path-to-your-repo>/open-liberty-on-aro/3-integration/connect-db/mysql

# The following variables are used for deployment file generation
export DB_SERVER_NAME=<Server name>.mysql.database.azure.com
export DB_PORT_NUMBER=3306
export DB_NAME=<Database name>
export DB_USER=<Server admin username>
export DB_PASSWORD=<Server admin password>
export NAMESPACE=open-liberty-demo

mvn clean install
Test your application locally
Use the following steps to run the liberty:devc command to locally run and test the project and container image before dealing with any Azure complexity. For more information on liberty:devc, see the Liberty Plugin documentation.
Start your local Docker environment if needed. The instructions for doing this vary depending on the host operating system.
Use the following commands to start the application in
liberty:devcmode:cd <path-to-your-repo>/open-liberty-on-aro/3-integration/connect-db/mysql # If you are running with Open Liberty mvn liberty:devc -DcontainerRunOpts="-e DB_SERVER_NAME=${DB_SERVER_NAME} -e DB_PORT_NUMBER=${DB_PORT_NUMBER} -e DB_NAME=${DB_NAME} -e DB_USER=${DB_USER} -e DB_PASSWORD=${DB_PASSWORD}" -Dcontainerfile=Dockerfile # If you are running with WebSphere Liberty mvn liberty:devc -DcontainerRunOpts="-e DB_SERVER_NAME=${DB_SERVER_NAME} -e DB_PORT_NUMBER=${DB_PORT_NUMBER} -e DB_NAME=${DB_NAME} -e DB_USER=${DB_USER} -e DB_PASSWORD=${DB_PASSWORD}" -Dcontainerfile=Dockerfile-wlpVerify the application works as expected. You should see a message similar to
[INFO] [AUDIT] CWWKZ0003I: The application javaee-cafe updated in 1.930 seconds.in the command output if successful. Go tohttps://localhost:9443/in your browser and verify the application is accessible and all functions are working.To stop
liberty:devcmode, press Control+C.
Prepare the application image
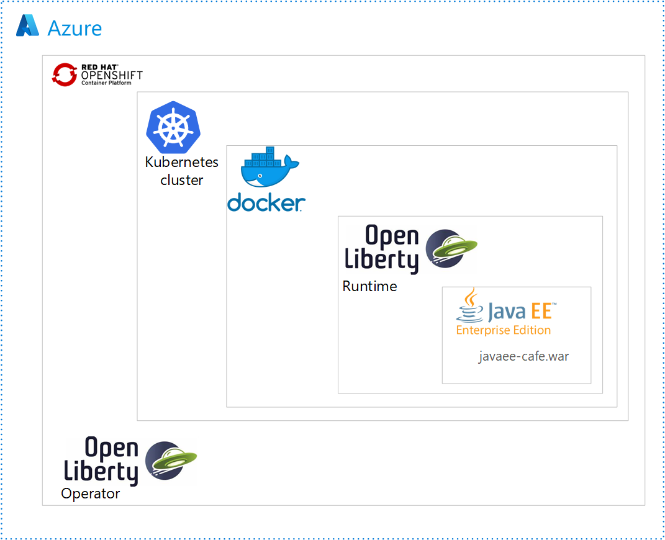
To deploy and run your Liberty application on an Azure Red Hat OpenShift cluster, containerize your application as a Docker image using Open Liberty container images or WebSphere Liberty container images.
Build the application and push to the image stream
Since you already successfully ran the app in the Liberty Docker container using the liberty:devc command, you're going to build the image remotely on the cluster by using the following steps:
Make sure you sign in to the OpenShift CLI using the
kubeadmincredentials.Use the following commands to identify the source directory and Dockerfile:
cd <path-to-your-repo>/open-liberty-on-aro/3-integration/connect-db/mysql

# If you are building with the Open Liberty base image, the existing Dockerfile is ready for you

# If you are building with the WebSphere Liberty base image, uncomment and execute the following two commands to rename Dockerfile-wlp to Dockerfile
# mv Dockerfile Dockerfile.backup
# mv Dockerfile-wlp Dockerfile
Use the following command to change project to open-liberty-demo:
oc project open-liberty-demoUse the following command to create an image stream:
oc create imagestream javaee-cafe-mysqlUse the following command to create a build configuration that specifies the image stream tag of the build output:
oc new-build --name javaee-cafe-mysql-config --binary --strategy docker --to javaee-cafe-mysql:v1Use the following command to start the build to upload local contents, containerize, and output to the image stream tag specified before:
oc start-build javaee-cafe-mysql-config --from-dir . --follow
Deploy application on the Azure Red Hat OpenShift cluster
Now you can deploy the sample Liberty application to the Azure Red Hat OpenShift cluster you created earlier when working through the prerequisites.
Deploy the application from the web console
Because we use the Open Liberty Operator to manage Liberty applications, we need to create an instance of its Custom Resource Definition, of type OpenLibertyApplication. The Operator takes care of all aspects of managing the OpenShift resources required for deployment. Use the following steps to create this instance:
Sign in to the OpenShift web console from your browser using the
kubeadmincredentials.Expand Home, Select Projects > open-liberty-demo.
Navigate to Operators > Installed Operators.
In the middle of the page, you see Open Liberty.
From Provided APIs, select OpenLibertyApplication. The navigation of items in the user interface mirrors the actual containment hierarchy of technologies in use.
Select Create OpenLibertyApplication.
Select YAML view for Configure via.
Replace the generated yaml with yours, which is located at <path-to-repo>/3-integration/connect-db/mysql/target/openlibertyapplication.yaml.
Select Create. You're returned to the list of OpenLibertyApplications.
Navigate to Workloads > Secrets.
Select Create > From YAML.
Replace the generated yaml with yours, which is located at <path-to-repo>/3-integration/connect-db/mysql/target/db-secret.yaml.
Select Create. You're returned to the Secret details page.
Navigate to Operators > Installed Operators > Open Liberty > OpenLibertyApplication.
Select javaee-cafe-mysql.
In the middle of the page, select Resources.
In the table, select the link for javaee-cafe-mysql with the Kind of Route.
On the page that opens, select the link below Location.
The application home page opens in the browser.
Delete the application from the web console
When you're done with the application, use the following steps to delete the application from Open Shift:
- In the left navigation pane, expand the entry for Operators.
- Select Installed Operators.
- Select Open Liberty.
- In the middle of the page, select OpenLibertyApplication.
- For javaee-cafe-mysql, select the vertical ellipsis (three vertical dots) then select Delete OpenLibertyApplication.
- Select Delete to delete the application.
Use the following steps to delete the secret from Open Shift:
- Navigate to Workloads > Secrets.
- Select db-secret-mysql.
- Select Actions > Delete Secret.
- Select Delete to delete the secret.
Clean up resources
Delete the Azure Red Hat OpenShift cluster by following the steps in Tutorial: Delete an Azure Red Hat OpenShift 4 cluster. Make sure the database and any associated resources are deleted too.
Next steps
You can learn more from references used in this guide:
- Open Liberty
- Azure Red Hat OpenShift
- Open Liberty Operator
- Open Liberty Server Configuration
- Liberty Maven Plugin
- Open Liberty Container Images
- WebSphere Liberty Container Images
To explore options to run WebSphere products on Azure, see What are solutions to run the WebSphere family of products on Azure?
Feedback
Coming soon: Throughout 2024 we will be phasing out GitHub Issues as the feedback mechanism for content and replacing it with a new feedback system. For more information see: https://aka.ms/ContentUserFeedback.
Submit and view feedback for