High availability for SAP NetWeaver on Azure VMs on SUSE Linux Enterprise Server for SAP applications
This article describes how to deploy the virtual machines, configure the virtual machines, install the cluster framework, and install a highly available SAP NetWeaver or SAP ABAP platform based system. In the example configurations, ASCS instance number 00, ERS instance number 02, and SAP System ID NW1 is used.
For new implementations on SLES for SAP Applications 15, we recommended deploying high availability for SAP ASCS/ERS in simple mount configuration. The classic Pacemaker configuration, based on cluster-controlled file systems for the SAP central services directories, described in this article is still supported.
Read the following SAP Notes and papers first
- SAP Note 1928533, which has:
- List of Azure VM sizes that are supported for the deployment of SAP software
- Important capacity information for Azure VM sizes
- Supported SAP software, and operating system (OS) and database combinations
- Required SAP kernel version for Windows and Linux on Microsoft Azure
- SAP Note 2015553 lists prerequisites for SAP-supported SAP software deployments in Azure.
- SAP Note 2205917 has recommended OS settings for SUSE Linux Enterprise Server for SAP Applications
- SAP Note 1944799 has SAP HANA Guidelines for SUSE Linux Enterprise Server for SAP Applications
- SAP Note 2178632 has detailed information about all monitoring metrics reported for SAP in Azure.
- SAP Note 2191498 has the required SAP Host Agent version for Linux in Azure.
- SAP Note 2243692 has information about SAP licensing on Linux in Azure.
- SAP Note 1984787 has general information about SUSE Linux Enterprise Server 12.
- SAP Note 1999351 has additional troubleshooting information for the Azure Enhanced Monitoring Extension for SAP.
- SAP Community WIKI has all required SAP Notes for Linux.
- Azure Virtual Machines planning and implementation for SAP on Linux
- Azure Virtual Machines deployment for SAP on Linux
- Azure Virtual Machines DBMS deployment for SAP on Linux
- SUSE SAP HA Best Practice Guides The guides contain all required information to set up Netweaver HA and SAP HANA System Replication on-premises. Use these guides as a general baseline. They provide much more detailed information.
- SUSE High Availability Extension 12 SP3 Release Notes
Overview
To achieve high availability, SAP NetWeaver requires an NFS server. The NFS server is configured in a separate cluster and can be used by multiple SAP systems.
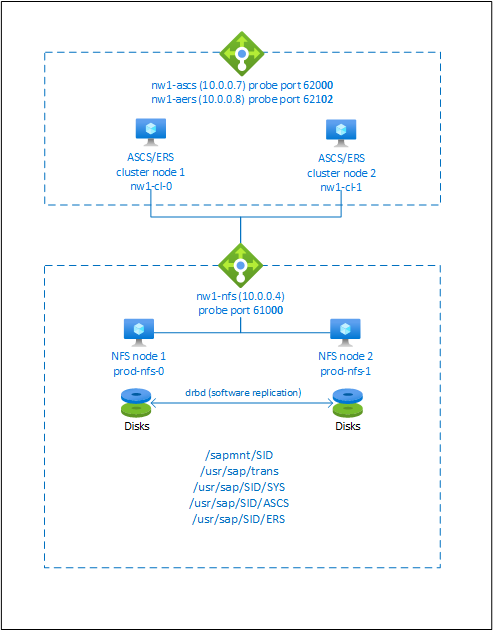
The NFS server, SAP NetWeaver ASCS, SAP NetWeaver SCS, SAP NetWeaver ERS, and the SAP HANA database use virtual hostname and virtual IP addresses. On Azure, a load balancer is required to use a virtual IP address. We recommend using Standard load balancer. The presented configuration shows a load balancer with:
- Frontend IP address 10.0.0.7 for ASCS
- Frontend IP address 10.0.0.8 for ERS
- Probe port 62000 for ASCS
- Probe port 62101 for ERS
Setting up a highly available NFS server
Note
We recommend deploying one of the Azure first-party NFS services: NFS on Azure Files or NFS ANF volumes for storing shared data in a highly available SAP system. Be aware that we are de-emphasizing SAP reference architectures, utilizing NFS clusters.
The SAP configuration guides for SAP NW highly available SAP system with native NFS services are:
SAP NetWeaver requires shared storage for the transport and profile directory. Read High availability for NFS on Azure VMs on SUSE Linux Enterprise Server on how to set up an NFS server for SAP NetWeaver.
Prepare infrastructure
The resource agent for SAP Instance is included in SUSE Linux Enterprise Server for SAP Applications. An image for SUSE Linux Enterprise Server for SAP Applications 12 or 15 is available in Azure Marketplace. You can use the image to deploy new VMs.
Deploy Linux VMs manually via Azure portal
This document assumes that you've already deployed a resource group, Azure Virtual Network, and subnet.
Deploy virtual machines with SLES for SAP Applications image. Choose a suitable version of SLES image that is supported for SAP system. You can deploy VM in any one of the availability options - virtual machine scale set, availability zone, or availability set.
Configure Azure load balancer
During VM configuration, you have an option to create or select exiting load balancer in networking section. Follow the steps below to configure a standard load balancer for the high-availability setup of SAP ASCS and SAP ERS.
Follow create load balancer guide to set up a standard load balancer for a high availability SAP system using the Azure portal. During the setup of load balancer, consider following points.
- Frontend IP Configuration: Create two frontend IP, one for ASCS and another for ERS. Select the same virtual network and subnet as your ASCS/ERS virtual machines.
- Backend Pool: Create backend pool and add ASCS and ERS VMs.
- Inbound rules: Create two load balancing rule, one for ASCS and another for ERS. Follow the same steps for both load balancing rules.
- Frontend IP address: Select frontend IP
- Backend pool: Select backend pool
- Check "High availability ports"
- Protocol: TCP
- Health Probe: Create health probe with below details (applies for both ASCS or ERS)
- Protocol: TCP
- Port: [for example: 620<Instance-no.> for ASCS, 621<Instance-no.> for ERS]
- Interval: 5
- Probe Threshold: 2
- Idle timeout (minutes): 30
- Check "Enable Floating IP"
Note
Health probe configuration property numberOfProbes, otherwise known as "Unhealthy threshold" in Portal, isn't respected. So to control the number of successful or failed consecutive probes, set the property "probeThreshold" to 2. It is currently not possible to set this property using Azure portal, so use either the Azure CLI or PowerShell command.
Note
When VMs without public IP addresses are placed in the backend pool of internal (no public IP address) Standard Azure load balancer, there will be no outbound internet connectivity, unless additional configuration is performed to allow routing to public end points. For details on how to achieve outbound connectivity see Public endpoint connectivity for Virtual Machines using Azure Standard Load Balancer in SAP high-availability scenarios.
Important
- Don't enable TCP time stamps on Azure VMs placed behind Azure Load Balancer. Enabling TCP timestamps will cause the health probes to fail. Set the
net.ipv4.tcp_timestampsparameter to0. For details, see Load Balancer health probes. - To prevent saptune from changing the manually set
net.ipv4.tcp_timestampsvalue from0back to1, you should update saptune version to 3.1.1 or higher. For more details, see saptune 3.1.1 – Do I Need to Update?.
Setting up (A)SCS
Next, you'll prepare and install the SAP ASCS and ERS instances.
Create Pacemaker cluster
Follow the steps in Setting up Pacemaker on SUSE Linux Enterprise Server in Azure to create a basic Pacemaker cluster for this (A)SCS server.
Installation
The following items are prefixed with either [A] - applicable to all nodes, [1] - only applicable to node 1, or [2] - only applicable to node 2.
[A] Install SUSE Connector
sudo zypper install sap-suse-cluster-connectorNote
The known issue with using a dash in host names is fixed with version 3.1.1 of package sap-suse-cluster-connector. Make sure that you are using at least version 3.1.1 of package sap-suse-cluster-connector, if using cluster nodes with dash in the host name. Otherwise your cluster will not work.
Make sure that you installed the new version of the SAP SUSE cluster connector. The old one was called sap_suse_cluster_connector and the new one is called sap-suse-cluster-connector.
sudo zypper info sap-suse-cluster-connector

Information for package sap-suse-cluster-connector:
---------------------------------------------------
Repository     : SLE-12-SP3-SAP-Updates
Name           : sap-suse-cluster-connector
<b>Version        : 3.0.0-2.2</b>
Arch           : noarch
Vendor         : SUSE LLC <https://www.suse.com/>
Support Level  : Level 3
Installed Size : 41.6 KiB
<b>Installed      : Yes</b>
Status         : up-to-date
Source package : sap-suse-cluster-connector-3.0.0-2.2.src
Summary        : SUSE High Availability Setup for SAP Products
[A] Update SAP resource agents
A patch for the resource-agents package is required to use the new configuration that is described in this article. You can check, if the patch is already installed with the following command
sudo grep 'parameter name="IS_ERS"' /usr/lib/ocf/resource.d/heartbeat/SAPInstanceThe output should be similar to
<parameter name="IS_ERS" unique="0" required="0">If the grep command doesn't find the IS_ERS parameter, you need to install the patch listed on the SUSE download page.
# example for patch for SLES 12 SP1
sudo zypper in -t patch SUSE-SLE-HA-12-SP1-2017-885=1
# example for patch for SLES 12 SP2
sudo zypper in -t patch SUSE-SLE-HA-12-SP2-2017-886=1
[A] Setup host name resolution
You can either use a DNS server or modify the /etc/hosts on all nodes. This example shows how to use the /etc/hosts file. Replace the IP address and the hostname in the following commands.
sudo vi /etc/hosts

# Insert the following lines to /etc/hosts. Change the IP address and hostname to match your environment
# IP address of the load balancer frontend configuration for NFS
10.0.0.4 nw1-nfs
# IP address of the load balancer frontend configuration for SAP NetWeaver ASCS
10.0.0.7 nw1-ascs
# IP address of the load balancer frontend configuration for SAP NetWeaver ASCS ERS
10.0.0.8 nw1-aers
# IP address of the load balancer frontend configuration for database
10.0.0.13 nw1-db
Prepare for SAP NetWeaver installation
[A] Create the shared directories
sudo mkdir -p /sapmnt/NW1
sudo mkdir -p /usr/sap/trans
sudo mkdir -p /usr/sap/NW1/SYS
sudo mkdir -p /usr/sap/NW1/ASCS00
sudo mkdir -p /usr/sap/NW1/ERS02

sudo chattr +i /sapmnt/NW1
sudo chattr +i /usr/sap/trans
sudo chattr +i /usr/sap/NW1/SYS
sudo chattr +i /usr/sap/NW1/ASCS00
sudo chattr +i /usr/sap/NW1/ERS02
[A] Configure autofs
sudo vi /etc/auto.master

# Add the following line to the file, save and exit
+auto.master
/- /etc/auto.direct
Create a file with
sudo vi /etc/auto.direct

# Add the following lines to the file, save and exit
/sapmnt/NW1 -nfsvers=4,nosymlink,sync nw1-nfs:/NW1/sapmntsid
/usr/sap/trans -nfsvers=4,nosymlink,sync nw1-nfs:/NW1/trans
/usr/sap/NW1/SYS -nfsvers=4,nosymlink,sync nw1-nfs:/NW1/sidsys
Restart autofs to mount the new shares
sudo systemctl enable autofs
sudo service autofs restart
[A] Configure SWAP file
Create a swap file as defined in Create a SWAP file for an Azure Linux VM
#!/bin/sh

# Percent of space on the ephemeral disk to dedicate to swap. Here 30% is being used. Modify as appropriate.
PCT=0.3

# Location of swap file. Modify as appropriate based on location of ephemeral disk.
LOCATION=/mnt

if [ ! -f ${LOCATION}/swapfile ]
then

    # Get size of the ephemeral disk and multiply it by the percent of space to allocate
    size=$(/bin/df -m --output=target,avail | /usr/bin/awk -v percent="$PCT" -v pattern=${LOCATION} '$0 ~ pattern {SIZE=int($2*percent);print SIZE}')
    echo "$size MB of space allocated to swap file"

     # Create an empty file first and set correct permissions
    /bin/dd if=/dev/zero of=${LOCATION}/swapfile bs=1M count=$size
    /bin/chmod 0600 ${LOCATION}/swapfile

    # Make the file available to use as swap
    /sbin/mkswap ${LOCATION}/swapfile
fi

# Enable swap
/sbin/swapon ${LOCATION}/swapfile
/sbin/swapon -a

# Display current swap status
/sbin/swapon -s
Make the file executable.
chmod +x /var/lib/cloud/scripts/per-boot/swap.shStop and start the VM. Stopping and starting the VM is only necessary the first time after you create the SWAP file.
Installing SAP NetWeaver ASCS/ERS
[1] Create a virtual IP resource and health-probe for the ASCS instance
Important
Recent testing revealed situations, where netcat stops responding to requests due to backlog and its limitation of handling only one connection. The netcat resource stops listening to the Azure Load balancer requests and the floating IP becomes unavailable.
For existing Pacemaker clusters, we recommended in the past replacing netcat with socat. Currently we recommend using azure-lb resource agent, which is part of package resource-agents, with the following package version requirements:- For SLES 12 SP4/SP5, the version must be at least resource-agents-4.3.018.a7fb5035-3.30.1.
- For SLES 15/15 SP1, the version must be at least resource-agents-4.3.0184.6ee15eb2-4.13.1.
Note that the change will require brief downtime.
For existing Pacemaker clusters, if the configuration was already changed to use socat as described in Azure Load-Balancer Detection Hardening, there is no requirement to switch immediately to azure-lb resource agent.sudo crm node standby nw1-cl-1 sudo crm configure primitive fs_NW1_ASCS Filesystem device='nw1-nfs:/NW1/ASCS' directory='/usr/sap/NW1/ASCS00' fstype='nfs4' \ op start timeout=60s interval=0 \ op stop timeout=60s interval=0 \ op monitor interval=20s timeout=40s sudo crm configure primitive vip_NW1_ASCS IPaddr2 \ params ip=10.0.0.7 \ op monitor interval=10 timeout=20 sudo crm configure primitive nc_NW1_ASCS azure-lb port=62000 \ op monitor timeout=20s interval=10 sudo crm configure group g-NW1_ASCS fs_NW1_ASCS nc_NW1_ASCS vip_NW1_ASCS \ meta resource-stickiness=3000Make sure that the cluster status is ok and that all resources are started. It isn't important on which node the resources are running.
sudo crm_mon -r

# Node nw1-cl-1: standby
# Online: [ nw1-cl-0 ]
#
# Full list of resources:
#
# stonith-sbd     (stonith:external/sbd): Started nw1-cl-0
#  Resource Group: g-NW1_ASCS
#      fs_NW1_ASCS        (ocf::heartbeat:Filesystem):    Started nw1-cl-0
#      nc_NW1_ASCS        (ocf::heartbeat:azure-lb):      Started nw1-cl-0
#      vip_NW1_ASCS       (ocf::heartbeat:IPaddr2):       Started nw1-cl-0
[1] Install SAP NetWeaver ASCS
Install SAP NetWeaver ASCS as root on the first node using a virtual hostname that maps to the IP address of the load balancer frontend configuration for the ASCS, for example nw1-ascs, 10.0.0.7 and the instance number that you used for the probe of the load balancer, for example 00.
You can use the sapinst parameter SAPINST_REMOTE_ACCESS_USER to allow a non-root user to connect to sapinst.
sudo <swpm>/sapinst SAPINST_REMOTE_ACCESS_USER=sapadmin SAPINST_USE_HOSTNAME=virtual_hostnameIf the installation fails to create a subfolder in /usr/sap/NW1/ASCS00, try setting the owner and group of the ASCS00 folder and retry.
chown nw1adm /usr/sap/NW1/ASCS00
chgrp sapsys /usr/sap/NW1/ASCS00
[1] Create a virtual IP resource and health-probe for the ERS instance
sudo crm node online nw1-cl-1
sudo crm node standby nw1-cl-0

sudo crm configure primitive fs_NW1_ERS Filesystem device='nw1-nfs:/NW1/ASCSERS' directory='/usr/sap/NW1/ERS02' fstype='nfs4' \
  op start timeout=60s interval=0 \
  op stop timeout=60s interval=0 \
  op monitor interval=20s timeout=40s

sudo crm configure primitive vip_NW1_ERS IPaddr2 \
  params ip=10.0.0.8 \
  op monitor interval=10 timeout=20

sudo crm configure primitive nc_NW1_ERS azure-lb port=62102 \
  op monitor timeout=20s interval=10

sudo crm configure group g-NW1_ERS fs_NW1_ERS nc_NW1_ERS vip_NW1_ERS
Make sure that the cluster status is ok and that all resources are started. It isn't important on which node the resources are running.
sudo crm_mon -r

# Node nw1-cl-0: standby
# Online: [ nw1-cl-1 ]
#
# Full list of resources:
#
# stonith-sbd     (stonith:external/sbd): Started nw1-cl-1
#  Resource Group: g-NW1_ASCS
#      fs_NW1_ASCS        (ocf::heartbeat:Filesystem):    Started nw1-cl-1
#      nc_NW1_ASCS        (ocf::heartbeat:azure-lb):      Started nw1-cl-1
#      vip_NW1_ASCS       (ocf::heartbeat:IPaddr2):       Started nw1-cl-1
#  Resource Group: g-NW1_ERS
#      fs_NW1_ERS (ocf::heartbeat:Filesystem):    Started nw1-cl-1
#      nc_NW1_ERS (ocf::heartbeat:azure-lb):      Started nw1-cl-1
#      vip_NW1_ERS        (ocf::heartbeat:IPaddr2):       Started nw1-cl-1
[2] Install SAP NetWeaver ERS
Install SAP NetWeaver ERS as root on the second node using a virtual hostname that maps to the IP address of the load balancer frontend configuration for the ERS, for example nw1-aers, 10.0.0.8 and the instance number that you used for the probe of the load balancer, for example 02.
You can use the sapinst parameter SAPINST_REMOTE_ACCESS_USER to allow a non-root user to connect to sapinst.
sudo <swpm>/sapinst SAPINST_REMOTE_ACCESS_USER=sapadmin SAPINST_USE_HOSTNAME=virtual_hostnameNote
Use SWPM SP 20 PL 05 or higher. Lower versions do not set the permissions correctly and the installation will fail.
If the installation fails to create a subfolder in /usr/sap/NW1/ERS02, try setting the owner and group of the ERS02 folder and retry.
chown nw1adm /usr/sap/NW1/ERS02
chgrp sapsys /usr/sap/NW1/ERS02
[1] Adapt the ASCS/SCS and ERS instance profiles
ASCS/SCS profile
sudo vi /sapmnt/NW1/profile/NW1_ASCS00_nw1-ascs

# Change the restart command to a start command
#Restart_Program_01 = local $(_EN) pf=$(_PF)
Start_Program_01 = local $(_EN) pf=$(_PF)

# Add the following lines
service/halib = $(DIR_CT_RUN)/saphascriptco.so
service/halib_cluster_connector = /usr/bin/sap_suse_cluster_connector

# Add the keep alive parameter, if using ENSA1
enque/encni/set_so_keepalive = true
For both ENSA1 and ENSA2, make sure that the
keepaliveOS parameters are set as described in SAP note 1410736.ERS profile
sudo vi /sapmnt/NW1/profile/NW1_ERS02_nw1-aers

# Change the restart command to a start command
#Restart_Program_00 = local $(_ER) pf=$(_PFL) NR=$(SCSID)
Start_Program_00 = local $(_ER) pf=$(_PFL) NR=$(SCSID)

# Add the following lines
service/halib = $(DIR_CT_RUN)/saphascriptco.so
service/halib_cluster_connector = /usr/bin/sap_suse_cluster_connector

# remove Autostart from ERS profile
# Autostart = 1
[A] Configure Keep Alive
The communication between the SAP NetWeaver application server and the ASCS/SCS is routed through a software load balancer. The load balancer disconnects inactive connections after a configurable timeout. To prevent this you need to set a parameter in the SAP NetWeaver ASCS/SCS profile, if using ENSA1, and change the Linux system
keepalivesettings on all SAP servers for both ENSA1/ENSA2. Read SAP Note 1410736 for more information.# Change the Linux system configuration sudo sysctl net.ipv4.tcp_keepalive_time=300[A] Configure the SAP users after the installation
# Add sidadm to the haclient group
sudo usermod -aG haclient nw1adm
[1] Add the ASCS and ERS SAP services to the sapservice file
Add the ASCS service entry to the second node and copy the ERS service entry to the first node.
cat /usr/sap/sapservices | grep ASCS00 | sudo ssh nw1-cl-1 "cat >>/usr/sap/sapservices"
sudo ssh nw1-cl-1 "cat /usr/sap/sapservices" | grep ERS02 | sudo tee -a /usr/sap/sapservices
[1] Create the SAP cluster resources
Depending on whether you are running an ENSA1 or ENSA2 system, select respective tab to define the resources. SAP introduced support for ENSA2, including replication, in SAP NetWeaver 7.52. Starting with ABAP Platform 1809, ENSA2 is installed by default. For ENSA2 support, see SAP Note 2630416.
sudo crm configure property maintenance-mode="true"

sudo crm configure primitive rsc_sap_NW1_ASCS00 SAPInstance \
  operations \$id=rsc_sap_NW1_ASCS00-operations \
  op monitor interval=11 timeout=60 on-fail=restart \
  params InstanceName=NW1_ASCS00_nw1-ascs START_PROFILE="/sapmnt/NW1/profile/NW1_ASCS00_nw1-ascs" \
  AUTOMATIC_RECOVER=false \
  meta resource-stickiness=5000 failure-timeout=60 migration-threshold=1 priority=10

sudo crm configure primitive rsc_sap_NW1_ERS02 SAPInstance \
  operations \$id=rsc_sap_NW1_ERS02-operations \
  op monitor interval=11 timeout=60 on-fail=restart \
  params InstanceName=NW1_ERS02_nw1-aers START_PROFILE="/sapmnt/NW1/profile/NW1_ERS02_nw1-aers" AUTOMATIC_RECOVER=false IS_ERS=true \
  meta priority=1000

sudo crm configure modgroup g-NW1_ASCS add rsc_sap_NW1_ASCS00
sudo crm configure modgroup g-NW1_ERS add rsc_sap_NW1_ERS02

sudo crm configure colocation col_sap_NW1_no_both -5000: g-NW1_ERS g-NW1_ASCS
sudo crm configure location loc_sap_NW1_failover_to_ers rsc_sap_NW1_ASCS00 rule 2000: runs_ers_NW1 eq 1
sudo crm configure order ord_sap_NW1_first_start_ascs Optional: rsc_sap_NW1_ASCS00:start rsc_sap_NW1_ERS02:stop symmetrical=false

sudo crm_attribute --delete --name priority-fencing-delay

sudo crm node online nw1-cl-0
sudo crm configure property maintenance-mode="false"
If you're upgrading from an older version and switching to enqueue server 2, see SAP note 2641019.
Make sure that the cluster status is ok and that all resources are started. It isn't important on which node the resources are running.
sudo crm_mon -r

# Online: [ nw1-cl-0 nw1-cl-1 ]
#
# Full list of resources:
#
# stonith-sbd     (stonith:external/sbd): Started nw1-cl-1
#  Resource Group: g-NW1_ASCS
#      fs_NW1_ASCS        (ocf::heartbeat:Filesystem):    Started nw1-cl-1
#      nc_NW1_ASCS        (ocf::heartbeat:azure-lb):      Started nw1-cl-1
#      vip_NW1_ASCS       (ocf::heartbeat:IPaddr2):       Started nw1-cl-1
#      rsc_sap_NW1_ASCS00 (ocf::heartbeat:SAPInstance):   Started nw1-cl-1
#  Resource Group: g-NW1_ERS
#      fs_NW1_ERS (ocf::heartbeat:Filesystem):    Started nw1-cl-0
#      nc_NW1_ERS (ocf::heartbeat:azure-lb):      Started nw1-cl-0
#      vip_NW1_ERS        (ocf::heartbeat:IPaddr2):       Started nw1-cl-0
#      rsc_sap_NW1_ERS02  (ocf::heartbeat:SAPInstance):   Started nw1-cl-0
SAP NetWeaver application server preparation
Some databases require that the database instance installation is executed on an application server. Prepare the application server virtual machines to be able to use them in these cases.
The steps bellow assume that you install the application server on a server different from the ASCS/SCS and HANA servers. Otherwise some of the steps below (like configuring host name resolution) aren't needed.
Configure operating system
Reduce the size of the dirty cache. For more information, see Low write performance on SLES 11/12 servers with large RAM.
sudo vi /etc/sysctl.conf

# Change/set the following settings
vm.dirty_bytes = 629145600
vm.dirty_background_bytes = 314572800
Set up host name resolution
You can either use a DNS server or modify the /etc/hosts on all nodes. This example shows how to use the /etc/hosts file. Replace the IP address and the hostname in the following commands
sudo vi /etc/hostsInsert the following lines to /etc/hosts. Change the IP address and hostname to match your environment
# IP address of the load balancer frontend configuration for NFS
10.0.0.4 nw1-nfs
# IP address of the load balancer frontend configuration for SAP NetWeaver ASCS/SCS
10.0.0.7 nw1-ascs
# IP address of the load balancer frontend configuration for SAP NetWeaver ERS
10.0.0.8 nw1-aers
# IP address of the load balancer frontend configuration for database
10.0.0.13 nw1-db
# IP address of all application servers
10.0.0.20 nw1-di-0
10.0.0.21 nw1-di-1
Create the sapmnt directory
sudo mkdir -p /sapmnt/NW1
sudo mkdir -p /usr/sap/trans

sudo chattr +i /sapmnt/NW1
sudo chattr +i /usr/sap/trans
Configure autofs
sudo vi /etc/auto.master

# Add the following line to the file, save and exit
+auto.master
/- /etc/auto.direct
Create a new file with
sudo vi /etc/auto.direct

# Add the following lines to the file, save and exit
/sapmnt/NW1 -nfsvers=4,nosymlink,sync nw1-nfs:/NW1/sapmntsid
/usr/sap/trans -nfsvers=4,nosymlink,sync nw1-nfs:/NW1/trans
Restart autofs to mount the new shares
sudo systemctl enable autofs
sudo service autofs restart
Configure SWAP file
sudo vi /etc/waagent.conf

# Set the property ResourceDisk.EnableSwap to y
# Create and use swapfile on resource disk.
ResourceDisk.EnableSwap=y

# Set the size of the SWAP file with property ResourceDisk.SwapSizeMB
# The free space of resource disk varies by virtual machine size. Make sure that you do not set a value that is too big. You can check the SWAP space with command swapon
# Size of the swapfile.
ResourceDisk.SwapSizeMB=2000
Restart the Agent to activate the change
sudo service waagent restart
Install database
In this example, SAP NetWeaver is installed on SAP HANA. You can use every supported database for this installation. For more information on how to install SAP HANA in Azure, see High Availability of SAP HANA on Azure Virtual Machines (VMs). For a list of supported databases, see SAP Note 1928533.
Run the SAP database instance installation
Install the SAP NetWeaver database instance as root using a virtual hostname that maps to the IP address of the load balancer frontend configuration for the database, for example, nw1-db and 10.0.0.13.
You can use the sapinst parameter SAPINST_REMOTE_ACCESS_USER to allow a non-root user to connect to sapinst.
sudo <swpm>/sapinst SAPINST_REMOTE_ACCESS_USER=sapadmin SAPINST_USE_HOSTNAME=virtual_hostname
SAP NetWeaver application server installation
Follow these steps to install an SAP application server.
Prepare application server
Follow the steps in the chapter SAP NetWeaver application server preparation above to prepare the application server.
Install SAP NetWeaver application server
Install a primary or additional SAP NetWeaver applications server.
You can use the sapinst parameter SAPINST_REMOTE_ACCESS_USER to allow a non-root user to connect to sapinst.
sudo <swpm>/sapinst SAPINST_REMOTE_ACCESS_USER=sapadmin SAPINST_USE_HOSTNAME=virtual_hostnameUpdate SAP HANA secure store
Update the SAP HANA secure store to point to the virtual name of the SAP HANA System Replication setup.
Run the following command to list the entries
hdbuserstore ListThis should list all entries and should look similar to
DATA FILE       : /home/nw1adm/.hdb/nw1-di-0/SSFS_HDB.DAT
KEY FILE        : /home/nw1adm/.hdb/nw1-di-0/SSFS_HDB.KEY

KEY DEFAULT
  ENV : 10.0.0.14:30313
  USER: SAPABAP1
  DATABASE: HN1
The output shows that the IP address of the default entry is pointing to the virtual machine and not to the load balancer's IP address. This entry needs to be changed to point to the virtual hostname of the load balancer. Make sure to use the same port (30313 in the output above) and database name (HN1 in the output above)!
su - nw1adm
hdbuserstore SET DEFAULT nw1-db:30313@HN1 SAPABAP1 <password of ABAP schema>
Test the cluster setup
The following tests are a copy of the test cases in the best practices guides of SUSE. They're copied for your convenience. Always also read the best practices guides and perform all additional tests that might have been added.
Test HAGetFailoverConfig, HACheckConfig and HACheckFailoverConfig
Run the following commands as <sapsid>adm on the node where the ASCS instance is currently running. If the commands fail with FAIL: Insufficient memory, it might be caused by dashes in your hostname. This is a known issue and will be fixed by SUSE in the sap-suse-cluster-connector package.
nw1-cl-0:nw1adm 54> sapcontrol -nr 00 -function HAGetFailoverConfig

# 15.08.2018 13:50:36
# HAGetFailoverConfig
# OK
# HAActive: TRUE
# HAProductVersion: Toolchain Module
# HASAPInterfaceVersion: Toolchain Module (sap_suse_cluster_connector 3.0.1)
# HADocumentation: https://www.suse.com/products/sles-for-sap/resource-library/sap-best-practices/
# HAActiveNode:
# HANodes: nw1-cl-0, nw1-cl-1

nw1-cl-0:nw1adm 55> sapcontrol -nr 00 -function HACheckConfig

# 15.08.2018 14:00:04
# HACheckConfig
# OK
# state, category, description, comment
# SUCCESS, SAP CONFIGURATION, Redundant ABAP instance configuration, 2 ABAP instances detected
# SUCCESS, SAP CONFIGURATION, Redundant Java instance configuration, 0 Java instances detected
# SUCCESS, SAP CONFIGURATION, Enqueue separation, All Enqueue server separated from application server
# SUCCESS, SAP CONFIGURATION, MessageServer separation, All MessageServer separated from application server
# SUCCESS, SAP CONFIGURATION, ABAP instances on multiple hosts, ABAP instances on multiple hosts detected
# SUCCESS, SAP CONFIGURATION, Redundant ABAP SPOOL service configuration, 2 ABAP instances with SPOOL service detected
# SUCCESS, SAP STATE, Redundant ABAP SPOOL service state, 2 ABAP instances with active SPOOL service detected
# SUCCESS, SAP STATE, ABAP instances with ABAP SPOOL service on multiple hosts, ABAP instances with active ABAP SPOOL service on multiple hosts detected
# SUCCESS, SAP CONFIGURATION, Redundant ABAP BATCH service configuration, 2 ABAP instances with BATCH service detected
# SUCCESS, SAP STATE, Redundant ABAP BATCH service state, 2 ABAP instances with active BATCH service detected
# SUCCESS, SAP STATE, ABAP instances with ABAP BATCH service on multiple hosts, ABAP instances with active ABAP BATCH service on multiple hosts detected
# SUCCESS, SAP CONFIGURATION, Redundant ABAP DIALOG service configuration, 2 ABAP instances with DIALOG service detected
# SUCCESS, SAP STATE, Redundant ABAP DIALOG service state, 2 ABAP instances with active DIALOG service detected
# SUCCESS, SAP STATE, ABAP instances with ABAP DIALOG service on multiple hosts, ABAP instances with active ABAP DIALOG service on multiple hosts detected
# SUCCESS, SAP CONFIGURATION, Redundant ABAP UPDATE service configuration, 2 ABAP instances with UPDATE service detected
# SUCCESS, SAP STATE, Redundant ABAP UPDATE service state, 2 ABAP instances with active UPDATE service detected
# SUCCESS, SAP STATE, ABAP instances with ABAP UPDATE service on multiple hosts, ABAP instances with active ABAP UPDATE service on multiple hosts detected
# SUCCESS, SAP STATE, SCS instance running, SCS instance status ok
# SUCCESS, SAP CONFIGURATION, SAPInstance RA sufficient version (nw1-ascs_NW1_00), SAPInstance includes is-ers patch
# SUCCESS, SAP CONFIGURATION, Enqueue replication (nw1-ascs_NW1_00), Enqueue replication enabled
# SUCCESS, SAP STATE, Enqueue replication state (nw1-ascs_NW1_00), Enqueue replication active

nw1-cl-0:nw1adm 56> sapcontrol -nr 00 -function HACheckFailoverConfig

# 15.08.2018 14:04:08
# HACheckFailoverConfig
# OK
# state, category, description, comment
# SUCCESS, SAP CONFIGURATION, SAPInstance RA sufficient version, SAPInstance includes is-ers patch
Manually migrate the ASCS instance
Resource state before starting the test:
stonith-sbd     (stonith:external/sbd): Started nw1-cl-0
 Resource Group: g-NW1_ASCS
     fs_NW1_ASCS        (ocf::heartbeat:Filesystem):    Started nw1-cl-0
     nc_NW1_ASCS        (ocf::heartbeat:azure-lb):      Started nw1-cl-0
     vip_NW1_ASCS       (ocf::heartbeat:IPaddr2):       Started nw1-cl-0
     rsc_sap_NW1_ASCS00 (ocf::heartbeat:SAPInstance):   Started nw1-cl-0
 Resource Group: g-NW1_ERS
     fs_NW1_ERS (ocf::heartbeat:Filesystem):    Started nw1-cl-1
     nc_NW1_ERS (ocf::heartbeat:azure-lb):      Started nw1-cl-1
     vip_NW1_ERS        (ocf::heartbeat:IPaddr2):       Started nw1-cl-1
     rsc_sap_NW1_ERS02  (ocf::heartbeat:SAPInstance):   Started nw1-cl-1
Run the following commands as root to migrate the ASCS instance.
nw1-cl-0:~ # crm resource migrate rsc_sap_NW1_ASCS00 force
# INFO: Move constraint created for rsc_sap_NW1_ASCS00

nw1-cl-0:~ # crm resource unmigrate rsc_sap_NW1_ASCS00
# INFO: Removed migration constraints for rsc_sap_NW1_ASCS00

# Remove failed actions for the ERS that occurred as part of the migration
nw1-cl-0:~ # crm resource cleanup rsc_sap_NW1_ERS02
Resource state after the test:
stonith-sbd     (stonith:external/sbd): Started nw1-cl-0
 Resource Group: g-NW1_ASCS
     fs_NW1_ASCS        (ocf::heartbeat:Filesystem):    Started nw1-cl-1
     nc_NW1_ASCS        (ocf::heartbeat:azure-lb):      Started nw1-cl-1
     vip_NW1_ASCS       (ocf::heartbeat:IPaddr2):       Started nw1-cl-1
     rsc_sap_NW1_ASCS00 (ocf::heartbeat:SAPInstance):   Started nw1-cl-1
 Resource Group: g-NW1_ERS
     fs_NW1_ERS (ocf::heartbeat:Filesystem):    Started nw1-cl-0
     nc_NW1_ERS (ocf::heartbeat:azure-lb):      Started nw1-cl-0
     vip_NW1_ERS        (ocf::heartbeat:IPaddr2):       Started nw1-cl-0
     rsc_sap_NW1_ERS02  (ocf::heartbeat:SAPInstance):   Started nw1-cl-0
Test HAFailoverToNode
Resource state before starting the test:
stonith-sbd     (stonith:external/sbd): Started nw1-cl-0
 Resource Group: g-NW1_ASCS
     fs_NW1_ASCS        (ocf::heartbeat:Filesystem):    Started nw1-cl-1
     nc_NW1_ASCS        (ocf::heartbeat:azure-lb):      Started nw1-cl-1
     vip_NW1_ASCS       (ocf::heartbeat:IPaddr2):       Started nw1-cl-1
     rsc_sap_NW1_ASCS00 (ocf::heartbeat:SAPInstance):   Started nw1-cl-1
 Resource Group: g-NW1_ERS
     fs_NW1_ERS (ocf::heartbeat:Filesystem):    Started nw1-cl-0
     nc_NW1_ERS (ocf::heartbeat:azure-lb):      Started nw1-cl-0
     vip_NW1_ERS        (ocf::heartbeat:IPaddr2):       Started nw1-cl-0
     rsc_sap_NW1_ERS02  (ocf::heartbeat:SAPInstance):   Started nw1-cl-0
Run the following commands as <sapsid>adm to migrate the ASCS instance.
nw1-cl-0:nw1adm 55> sapcontrol -nr 00 -host nw1-ascs -user nw1adm <password> -function HAFailoverToNode ""

# run as root
# Remove failed actions for the ERS that occurred as part of the migration
nw1-cl-0:~ # crm resource cleanup rsc_sap_NW1_ERS02
# Remove migration constraints
nw1-cl-0:~ # crm resource clear rsc_sap_NW1_ASCS00
#INFO: Removed migration constraints for rsc_sap_NW1_ASCS00
Resource state after the test:
stonith-sbd     (stonith:external/sbd): Started nw1-cl-0
 Resource Group: g-NW1_ASCS
     fs_NW1_ASCS        (ocf::heartbeat:Filesystem):    Started nw1-cl-0
     nc_NW1_ASCS        (ocf::heartbeat:azure-lb):      Started nw1-cl-0
     vip_NW1_ASCS       (ocf::heartbeat:IPaddr2):       Started nw1-cl-0
     rsc_sap_NW1_ASCS00 (ocf::heartbeat:SAPInstance):   Started nw1-cl-0
 Resource Group: g-NW1_ERS
     fs_NW1_ERS (ocf::heartbeat:Filesystem):    Started nw1-cl-1
     nc_NW1_ERS (ocf::heartbeat:azure-lb):      Started nw1-cl-1
     vip_NW1_ERS        (ocf::heartbeat:IPaddr2):       Started nw1-cl-1
     rsc_sap_NW1_ERS02  (ocf::heartbeat:SAPInstance):   Started nw1-cl-1
Simulate node crash
Resource state before starting the test:
stonith-sbd     (stonith:external/sbd): Started nw1-cl-0
 Resource Group: g-NW1_ASCS
     fs_NW1_ASCS        (ocf::heartbeat:Filesystem):    Started nw1-cl-0
     nc_NW1_ASCS        (ocf::heartbeat:azure-lb):      Started nw1-cl-0
     vip_NW1_ASCS       (ocf::heartbeat:IPaddr2):       Started nw1-cl-0
     rsc_sap_NW1_ASCS00 (ocf::heartbeat:SAPInstance):   Started nw1-cl-0
 Resource Group: g-NW1_ERS
     fs_NW1_ERS (ocf::heartbeat:Filesystem):    Started nw1-cl-1
     nc_NW1_ERS (ocf::heartbeat:azure-lb):      Started nw1-cl-1
     vip_NW1_ERS        (ocf::heartbeat:IPaddr2):       Started nw1-cl-1
     rsc_sap_NW1_ERS02  (ocf::heartbeat:SAPInstance):   Started nw1-cl-1
Run the following command as root on the node where the ASCS instance is running
nw1-cl-0:~ # echo b > /proc/sysrq-triggerIf you use SBD, Pacemaker shouldn't automatically start on the killed node. The status after the node is started again should look like this.
Online: [ nw1-cl-1 ]
OFFLINE: [ nw1-cl-0 ]

Full list of resources:

stonith-sbd     (stonith:external/sbd): Started nw1-cl-1
 Resource Group: g-NW1_ASCS
     fs_NW1_ASCS        (ocf::heartbeat:Filesystem):    Started nw1-cl-1
     nc_NW1_ASCS        (ocf::heartbeat:azure-lb):      Started nw1-cl-1
     vip_NW1_ASCS       (ocf::heartbeat:IPaddr2):       Started nw1-cl-1
     rsc_sap_NW1_ASCS00 (ocf::heartbeat:SAPInstance):   Started nw1-cl-1
 Resource Group: g-NW1_ERS
     fs_NW1_ERS (ocf::heartbeat:Filesystem):    Started nw1-cl-1
     nc_NW1_ERS (ocf::heartbeat:azure-lb):      Started nw1-cl-1
     vip_NW1_ERS        (ocf::heartbeat:IPaddr2):       Started nw1-cl-1
     rsc_sap_NW1_ERS02  (ocf::heartbeat:SAPInstance):   Started nw1-cl-1

Failed Actions:
* rsc_sap_NW1_ERS02_monitor_11000 on nw1-cl-1 'not running' (7): call=219, status=complete, exitreason='none',
    last-rc-change='Wed Aug 15 14:38:38 2018', queued=0ms, exec=0ms
Use the following commands to start Pacemaker on the killed node, clean the SBD messages, and clean the failed resources.
# run as root
# list the SBD device(s)
nw1-cl-0:~ # cat /etc/sysconfig/sbd | grep SBD_DEVICE=
# SBD_DEVICE="/dev/disk/by-id/scsi-36001405772fe8401e6240c985857e116;/dev/disk/by-id/scsi-36001405034a84428af24ddd8c3a3e9e1;/dev/disk/by-id/scsi-36001405cdd5ac8d40e548449318510c3"

nw1-cl-0:~ # sbd -d /dev/disk/by-id/scsi-36001405772fe8401e6240c985857e116 -d /dev/disk/by-id/scsi-36001405034a84428af24ddd8c3a3e9e1 -d /dev/disk/by-id/scsi-36001405cdd5ac8d40e548449318510c3 message nw1-cl-0 clear

nw1-cl-0:~ # systemctl start pacemaker
nw1-cl-0:~ # crm resource cleanup rsc_sap_NW1_ASCS00
nw1-cl-0:~ # crm resource cleanup rsc_sap_NW1_ERS02
Resource state after the test:
stonith-sbd     (stonith:external/sbd): Started nw1-cl-1
 Resource Group: g-NW1_ASCS
     fs_NW1_ASCS        (ocf::heartbeat:Filesystem):    Started nw1-cl-1
     nc_NW1_ASCS        (ocf::heartbeat:azure-lb):      Started nw1-cl-1
     vip_NW1_ASCS       (ocf::heartbeat:IPaddr2):       Started nw1-cl-1
     rsc_sap_NW1_ASCS00 (ocf::heartbeat:SAPInstance):   Started nw1-cl-1
 Resource Group: g-NW1_ERS
     fs_NW1_ERS (ocf::heartbeat:Filesystem):    Started nw1-cl-0
     nc_NW1_ERS (ocf::heartbeat:azure-lb):      Started nw1-cl-0
     vip_NW1_ERS        (ocf::heartbeat:IPaddr2):       Started nw1-cl-0
     rsc_sap_NW1_ERS02  (ocf::heartbeat:SAPInstance):   Started nw1-cl-0
Blocking network communication
Resource state before starting the test:
stonith-sbd     (stonith:external/sbd): Started nw1-cl-1
 Resource Group: g-NW1_ASCS
     fs_NW1_ASCS        (ocf::heartbeat:Filesystem):    Started nw1-cl-1
     nc_NW1_ASCS        (ocf::heartbeat:azure-lb):      Started nw1-cl-1
     vip_NW1_ASCS       (ocf::heartbeat:IPaddr2):       Started nw1-cl-1
     rsc_sap_NW1_ASCS00 (ocf::heartbeat:SAPInstance):   Started nw1-cl-1
 Resource Group: g-NW1_ERS
     fs_NW1_ERS (ocf::heartbeat:Filesystem):    Started nw1-cl-0
     nc_NW1_ERS (ocf::heartbeat:azure-lb):      Started nw1-cl-0
     vip_NW1_ERS        (ocf::heartbeat:IPaddr2):       Started nw1-cl-0
     rsc_sap_NW1_ERS02  (ocf::heartbeat:SAPInstance):   Started nw1-cl-0
Execute firewall rule to block the communication on one of the nodes.
# Execute iptable rule on nw1-cl-0 (10.0.0.5) to block the incoming and outgoing traffic to nw1-cl-1 (10.0.0.6)
iptables -A INPUT -s 10.0.0.6 -j DROP; iptables -A OUTPUT -d 10.0.0.6 -j DROP
When cluster nodes can't communicate to each other, there's a risk of a split-brain scenario. In such situations, cluster nodes will try to simultaneously fence each other, resulting in fence race.
When configuring a fencing device, it's recommended to configure
pcmk_delay_maxproperty. So, in the event of split-brain scenario, the cluster introduces a random delay up to thepcmk_delay_maxvalue, to the fencing action on each node. The node with the shortest delay will be selected for fencing.Additionally, in ENSA 2 configuration, to prioritize the node hosting the ASCS resource over the other node during a split brain scenario, it's recommended to configure
priority-fencing-delayproperty in the cluster. Enabling priority-fencing-delay property allows the cluster to introduce an additional delay in the fencing action specifically on the node hosting the ASCS resource, allowing the ASCS node to win the fence race.Execute below command to delete the firewall rule.
# If the iptables rule set on the server gets reset after a reboot, the rules will be cleared out. In case they have not been reset, please proceed to remove the iptables rule using the following command.
iptables -D INPUT -s 10.0.0.6 -j DROP; iptables -D OUTPUT -d 10.0.0.6 -j DROP
Test manual restart of ASCS instance
Resource state before starting the test:
stonith-sbd     (stonith:external/sbd): Started nw1-cl-1
 Resource Group: g-NW1_ASCS
     fs_NW1_ASCS        (ocf::heartbeat:Filesystem):    Started nw1-cl-1
     nc_NW1_ASCS        (ocf::heartbeat:azure-lb):      Started nw1-cl-1
     vip_NW1_ASCS       (ocf::heartbeat:IPaddr2):       Started nw1-cl-1
     rsc_sap_NW1_ASCS00 (ocf::heartbeat:SAPInstance):   Started nw1-cl-1
 Resource Group: g-NW1_ERS
     fs_NW1_ERS (ocf::heartbeat:Filesystem):    Started nw1-cl-0
     nc_NW1_ERS (ocf::heartbeat:azure-lb):      Started nw1-cl-0
     vip_NW1_ERS        (ocf::heartbeat:IPaddr2):       Started nw1-cl-0
     rsc_sap_NW1_ERS02  (ocf::heartbeat:SAPInstance):   Started nw1-cl-0
Create an enqueue lock by, for example edit a user in transaction su01. Run the following commands as <sapsid>adm on the node where the ASCS instance is running. The commands will stop the ASCS instance and start it again. If using enqueue server 1 architecture, the enqueue lock is expected to be lost in this test. If using enqueue server 2 architecture, the enqueue will be retained.
nw1-cl-1:nw1adm 54> sapcontrol -nr 00 -function StopWait 600 2The ASCS instance should now be disabled in Pacemaker
rsc_sap_NW1_ASCS00 (ocf::heartbeat:SAPInstance): Stopped (disabled)Start the ASCS instance again on the same node.
nw1-cl-1:nw1adm 54> sapcontrol -nr 00 -function StartWait 600 2The enqueue lock of transaction su01 should be lost and the back-end should have been reset. Resource state after the test:
stonith-sbd     (stonith:external/sbd): Started nw1-cl-1
 Resource Group: g-NW1_ASCS
     fs_NW1_ASCS        (ocf::heartbeat:Filesystem):    Started nw1-cl-1
     nc_NW1_ASCS        (ocf::heartbeat:azure-lb):      Started nw1-cl-1
     vip_NW1_ASCS       (ocf::heartbeat:IPaddr2):       Started nw1-cl-1
     rsc_sap_NW1_ASCS00 (ocf::heartbeat:SAPInstance):   Started nw1-cl-1
 Resource Group: g-NW1_ERS
     fs_NW1_ERS (ocf::heartbeat:Filesystem):    Started nw1-cl-0
     nc_NW1_ERS (ocf::heartbeat:azure-lb):      Started nw1-cl-0
     vip_NW1_ERS        (ocf::heartbeat:IPaddr2):       Started nw1-cl-0
     rsc_sap_NW1_ERS02  (ocf::heartbeat:SAPInstance):   Started nw1-cl-0
Kill message server process
Resource state before starting the test:
stonith-sbd     (stonith:external/sbd): Started nw1-cl-1
 Resource Group: g-NW1_ASCS
     fs_NW1_ASCS        (ocf::heartbeat:Filesystem):    Started nw1-cl-1
     nc_NW1_ASCS        (ocf::heartbeat:azure-lb):      Started nw1-cl-1
     vip_NW1_ASCS       (ocf::heartbeat:IPaddr2):       Started nw1-cl-1
     rsc_sap_NW1_ASCS00 (ocf::heartbeat:SAPInstance):   Started nw1-cl-1
 Resource Group: g-NW1_ERS
     fs_NW1_ERS (ocf::heartbeat:Filesystem):    Started nw1-cl-0
     nc_NW1_ERS (ocf::heartbeat:azure-lb):      Started nw1-cl-0
     vip_NW1_ERS        (ocf::heartbeat:IPaddr2):       Started nw1-cl-0
     rsc_sap_NW1_ERS02  (ocf::heartbeat:SAPInstance):   Started nw1-cl-0
Run the following commands as root to identify the process of the message server and kill it.
nw1-cl-1:~ # pgrep -f ms.sapNW1 | xargs kill -9If you only kill the message server once, it will be restarted by sapstart. If you kill it often enough, Pacemaker will eventually move the ASCS instance to the other node, in case of ENSA1. Run the following commands as root to clean up the resource state of the ASCS and ERS instance after the test.
nw1-cl-0:~ # crm resource cleanup rsc_sap_NW1_ASCS00
nw1-cl-0:~ # crm resource cleanup rsc_sap_NW1_ERS02
Resource state after the test:
stonith-sbd     (stonith:external/sbd): Started nw1-cl-1
 Resource Group: g-NW1_ASCS
     fs_NW1_ASCS        (ocf::heartbeat:Filesystem):    Started nw1-cl-0
     nc_NW1_ASCS        (ocf::heartbeat:azure-lb):      Started nw1-cl-0
     vip_NW1_ASCS       (ocf::heartbeat:IPaddr2):       Started nw1-cl-0
     rsc_sap_NW1_ASCS00 (ocf::heartbeat:SAPInstance):   Started nw1-cl-0
 Resource Group: g-NW1_ERS
     fs_NW1_ERS (ocf::heartbeat:Filesystem):    Started nw1-cl-1
     nc_NW1_ERS (ocf::heartbeat:azure-lb):      Started nw1-cl-1
     vip_NW1_ERS        (ocf::heartbeat:IPaddr2):       Started nw1-cl-1
     rsc_sap_NW1_ERS02  (ocf::heartbeat:SAPInstance):   Started nw1-cl-1
Kill enqueue server process
Resource state before starting the test:
stonith-sbd     (stonith:external/sbd): Started nw1-cl-1
 Resource Group: g-NW1_ASCS
     fs_NW1_ASCS        (ocf::heartbeat:Filesystem):    Started nw1-cl-0
     nc_NW1_ASCS        (ocf::heartbeat:azure-lb):      Started nw1-cl-0
     vip_NW1_ASCS       (ocf::heartbeat:IPaddr2):       Started nw1-cl-0
     rsc_sap_NW1_ASCS00 (ocf::heartbeat:SAPInstance):   Started nw1-cl-0
 Resource Group: g-NW1_ERS
     fs_NW1_ERS (ocf::heartbeat:Filesystem):    Started nw1-cl-1
     nc_NW1_ERS (ocf::heartbeat:azure-lb):      Started nw1-cl-1
     vip_NW1_ERS        (ocf::heartbeat:IPaddr2):       Started nw1-cl-1
     rsc_sap_NW1_ERS02  (ocf::heartbeat:SAPInstance):   Started nw1-cl-1
Run the following commands as root on the node where the ASCS instance is running to kill the enqueue server.
nw1-cl-0:~ #
#If using ENSA1
pgrep -f en.sapNW1 | xargs kill -9
#If using ENSA2
pgrep -f enq.sapNW1 | xargs kill -9
The ASCS instance should immediately fail over to the other node, in the case of ENSA1. The ERS instance should also fail over after the ASCS instance is started. Run the following commands as root to clean up the resource state of the ASCS and ERS instance after the test.
nw1-cl-0:~ # crm resource cleanup rsc_sap_NW1_ASCS00
nw1-cl-0:~ # crm resource cleanup rsc_sap_NW1_ERS02
Resource state after the test:
stonith-sbd     (stonith:external/sbd): Started nw1-cl-1
 Resource Group: g-NW1_ASCS
     fs_NW1_ASCS        (ocf::heartbeat:Filesystem):    Started nw1-cl-1
     nc_NW1_ASCS        (ocf::heartbeat:azure-lb):      Started nw1-cl-1
     vip_NW1_ASCS       (ocf::heartbeat:IPaddr2):       Started nw1-cl-1
     rsc_sap_NW1_ASCS00 (ocf::heartbeat:SAPInstance):   Started nw1-cl-1
 Resource Group: g-NW1_ERS
     fs_NW1_ERS (ocf::heartbeat:Filesystem):    Started nw1-cl-0
     nc_NW1_ERS (ocf::heartbeat:azure-lb):      Started nw1-cl-0
     vip_NW1_ERS        (ocf::heartbeat:IPaddr2):       Started nw1-cl-0
     rsc_sap_NW1_ERS02  (ocf::heartbeat:SAPInstance):   Started nw1-cl-0
Kill enqueue replication server process
Resource state before starting the test:
stonith-sbd     (stonith:external/sbd): Started nw1-cl-1
 Resource Group: g-NW1_ASCS
     fs_NW1_ASCS        (ocf::heartbeat:Filesystem):    Started nw1-cl-1
     nc_NW1_ASCS        (ocf::heartbeat:azure-lb):      Started nw1-cl-1
     vip_NW1_ASCS       (ocf::heartbeat:IPaddr2):       Started nw1-cl-1
     rsc_sap_NW1_ASCS00 (ocf::heartbeat:SAPInstance):   Started nw1-cl-1
 Resource Group: g-NW1_ERS
     fs_NW1_ERS (ocf::heartbeat:Filesystem):    Started nw1-cl-0
     nc_NW1_ERS (ocf::heartbeat:azure-lb):      Started nw1-cl-0
     vip_NW1_ERS        (ocf::heartbeat:IPaddr2):       Started nw1-cl-0
     rsc_sap_NW1_ERS02  (ocf::heartbeat:SAPInstance):   Started nw1-cl-0
Run the following command as root on the node where the ERS instance is running to kill the enqueue replication server process.
nw1-cl-0:~ # pgrep -f er.sapNW1 | xargs kill -9If you only run the command once, sapstart will restart the process. If you run it often enough, sapstart will not restart the process, and the resource will be in a stopped state. Run the following commands as root to clean up the resource state of the ERS instance after the test.
nw1-cl-0:~ # crm resource cleanup rsc_sap_NW1_ERS02Resource state after the test:
stonith-sbd     (stonith:external/sbd): Started nw1-cl-1
 Resource Group: g-NW1_ASCS
     fs_NW1_ASCS        (ocf::heartbeat:Filesystem):    Started nw1-cl-1
     nc_NW1_ASCS        (ocf::heartbeat:azure-lb):      Started nw1-cl-1
     vip_NW1_ASCS       (ocf::heartbeat:IPaddr2):       Started nw1-cl-1
     rsc_sap_NW1_ASCS00 (ocf::heartbeat:SAPInstance):   Started nw1-cl-1
 Resource Group: g-NW1_ERS
     fs_NW1_ERS (ocf::heartbeat:Filesystem):    Started nw1-cl-0
     nc_NW1_ERS (ocf::heartbeat:azure-lb):      Started nw1-cl-0
     vip_NW1_ERS        (ocf::heartbeat:IPaddr2):       Started nw1-cl-0
     rsc_sap_NW1_ERS02  (ocf::heartbeat:SAPInstance):   Started nw1-cl-0
Kill enqueue sapstartsrv process
Resource state before starting the test:
stonith-sbd     (stonith:external/sbd): Started nw1-cl-1
 Resource Group: g-NW1_ASCS
     fs_NW1_ASCS        (ocf::heartbeat:Filesystem):    Started nw1-cl-1
     nc_NW1_ASCS        (ocf::heartbeat:azure-lb):      Started nw1-cl-1
     vip_NW1_ASCS       (ocf::heartbeat:IPaddr2):       Started nw1-cl-1
     rsc_sap_NW1_ASCS00 (ocf::heartbeat:SAPInstance):   Started nw1-cl-1
 Resource Group: g-NW1_ERS
     fs_NW1_ERS (ocf::heartbeat:Filesystem):    Started nw1-cl-0
     nc_NW1_ERS (ocf::heartbeat:azure-lb):      Started nw1-cl-0
     vip_NW1_ERS        (ocf::heartbeat:IPaddr2):       Started nw1-cl-0
     rsc_sap_NW1_ERS02  (ocf::heartbeat:SAPInstance):   Started nw1-cl-0
Run the following commands as root on the node where the ASCS is running.
nw1-cl-1:~ # pgrep -fl ASCS00.*sapstartsrv
# 59545 sapstartsrv

nw1-cl-1:~ # kill -9 59545
The sapstartsrv process should always be restarted by the Pacemaker resource agent. Resource state after the test:
stonith-sbd     (stonith:external/sbd): Started nw1-cl-1
 Resource Group: g-NW1_ASCS
     fs_NW1_ASCS        (ocf::heartbeat:Filesystem):    Started nw1-cl-1
     nc_NW1_ASCS        (ocf::heartbeat:azure-lb):      Started nw1-cl-1
     vip_NW1_ASCS       (ocf::heartbeat:IPaddr2):       Started nw1-cl-1
     rsc_sap_NW1_ASCS00 (ocf::heartbeat:SAPInstance):   Started nw1-cl-1
 Resource Group: g-NW1_ERS
     fs_NW1_ERS (ocf::heartbeat:Filesystem):    Started nw1-cl-0
     nc_NW1_ERS (ocf::heartbeat:azure-lb):      Started nw1-cl-0
     vip_NW1_ERS        (ocf::heartbeat:IPaddr2):       Started nw1-cl-0
     rsc_sap_NW1_ERS02  (ocf::heartbeat:SAPInstance):   Started nw1-cl-0
Next steps
- HA for SAP NW on Azure VMs on SLES for SAP applications multi-SID guide
- Azure Virtual Machines planning and implementation for SAP
- Azure Virtual Machines deployment for SAP
- Azure Virtual Machines DBMS deployment for SAP
- To learn how to establish high availability and plan for disaster recovery of SAP HANA on Azure VMs, see High Availability of SAP HANA on Azure Virtual Machines (VMs)
Feedback
Coming soon: Throughout 2024 we will be phasing out GitHub Issues as the feedback mechanism for content and replacing it with a new feedback system. For more information see: https://aka.ms/ContentUserFeedback.
Submit and view feedback for