High availability for SAP HANA on Azure VMs on SUSE Linux Enterprise Server
To establish high availability in an on-premises SAP HANA deployment, you can use either SAP HANA system replication or shared storage.
Currently on Azure virtual machines (VMs), SAP HANA system replication on Azure is the only supported high availability function.
SAP HANA system replication consists of one primary node and at least one secondary node. Changes to the data on the primary node are replicated to the secondary node synchronously or asynchronously.
This article describes how to deploy and configure the VMs, install the cluster framework, and install and configure SAP HANA system replication.
Before you begin, read the following SAP Notes and papers:
- SAP Note 1928533. The note includes:
- The list of Azure VM sizes that are supported for the deployment of SAP software.
- Important capacity information for Azure VM sizes.
- The supported SAP software, operating system (OS), and database combinations.
- The required SAP kernel versions for Windows and Linux on Microsoft Azure.
- SAP Note 2015553 lists the prerequisites for SAP-supported SAP software deployments in Azure.
- SAP Note 2205917 has recommended OS settings for SUSE Linux Enterprise Server 12 (SLES 12) for SAP Applications.
- SAP Note 2684254 has recommended OS settings for SUSE Linux Enterprise Server 15 (SLES 15) for SAP Applications.
- SAP Note 2235581 has SAP HANA supported Operating systems
- SAP Note 2178632 has detailed information about all the monitoring metrics that are reported for SAP in Azure.
- SAP Note 2191498 has the required SAP host agent version for Linux in Azure.
- SAP Note 2243692 has information about SAP licensing for Linux in Azure.
- SAP Note 1984787 has general information about SUSE Linux Enterprise Server 12.
- SAP Note 1999351 has more troubleshooting information for the Azure Enhanced Monitoring Extension for SAP.
- SAP Note 401162 has information about how to avoid "address already in use" errors when you set up HANA system replication.
- SAP Community Support Wiki has all the required SAP Notes for Linux.
- SAP HANA Certified IaaS Platforms.
- Azure Virtual Machines planning and implementation for SAP on Linux guide.
- Azure Virtual Machines deployment for SAP on Linux guide.
- Azure Virtual Machines DBMS deployment for SAP on Linux guide.
- SUSE Linux Enterprise Server for SAP Applications 15 best practices guides and SUSE Linux Enterprise Server for SAP Applications 12 best practices guides:
- Setting up an SAP HANA SR Performance Optimized Infrastructure (SLES for SAP Applications). The guide contains all the required information to set up SAP HANA system replication for on-premises development. Use this guide as a baseline.
- Setting up an SAP HANA SR Cost Optimized Infrastructure (SLES for SAP Applications).
Plan for SAP HANA high availability
To achieve high availability, install SAP HANA on two VMs. The data is replicated by using HANA system replication.
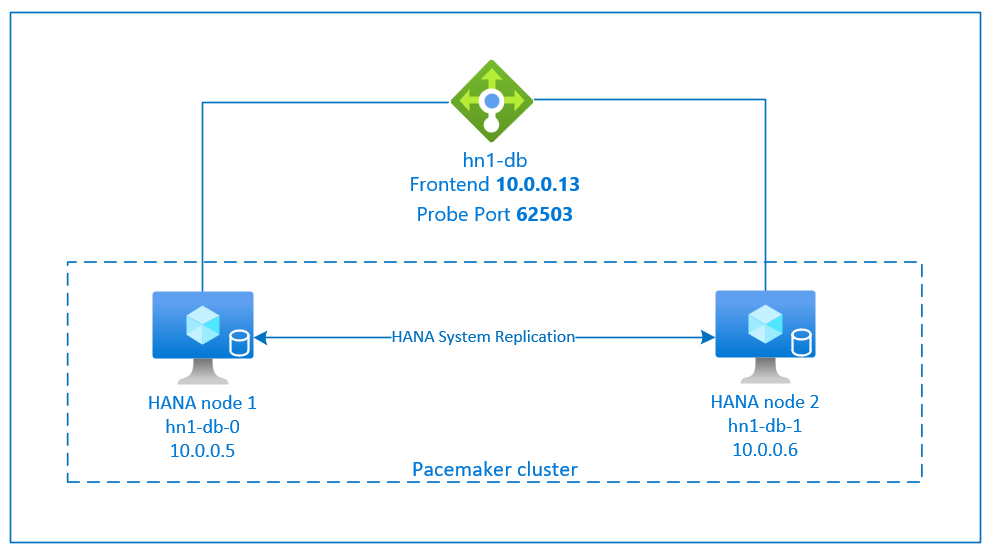
The SAP HANA system replication setup uses a dedicated virtual host name and virtual IP addresses. In Azure, you need a load balancer to deploy a virtual IP address.
The preceding figure shows an example load balancer that has these configurations:
- Front-end IP address: 10.0.0.13 for HN1-db
- Probe port: 62503
Prepare the infrastructure
The resource agent for SAP HANA is included in SUSE Linux Enterprise Server for SAP Applications. An image for SUSE Linux Enterprise Server for SAP Applications 12 or 15 is available in Azure Marketplace. You can use the image to deploy new VMs.
Deploy Linux VMs manually via Azure portal
This document assumes that you've already deployed a resource group, Azure Virtual Network, and subnet.
Deploy virtual machines for SAP HANA. Choose a suitable SLES image that is supported for HANA system. You can deploy VM in any one of the availability options - virtual machine scale set, availability zone, or availability set.
Important
Make sure that the OS you select is SAP certified for SAP HANA on the specific VM types that you plan to use in your deployment. You can look up SAP HANA-certified VM types and their OS releases in SAP HANA Certified IaaS Platforms. Make sure that you look at the details of the VM type to get the complete list of SAP HANA-supported OS releases for the specific VM type.
Configure Azure load balancer
During VM configuration, you have an option to create or select exiting load balancer in networking section. Follow below steps, to setup standard load balancer for high availability setup of HANA database.
Follow the steps in Create load balancer to set up a standard load balancer for a high-availability SAP system by using the Azure portal. During the setup of the load balancer, consider the following points:
- Frontend IP Configuration: Create a front-end IP. Select the same virtual network and subnet name as your database virtual machines.
- Backend Pool: Create a back-end pool and add database VMs.
- Inbound rules: Create a load-balancing rule. Follow the same steps for both load-balancing rules.
- Frontend IP address: Select a front-end IP.
- Backend pool: Select a back-end pool.
- High-availability ports: Select this option.
- Protocol: Select TCP.
- Health Probe: Create a health probe with the following details:
- Protocol: Select TCP.
- Port: For example, 625<instance-no.>.
- Interval: Enter 5.
- Probe Threshold: Enter 2.
- Idle timeout (minutes): Enter 30.
- Enable Floating IP: Select this option.
Note
The health probe configuration property numberOfProbes, otherwise known as Unhealthy threshold in the portal, isn't respected. To control the number of successful or failed consecutive probes, set the property probeThreshold to 2. It's currently not possible to set this property by using the Azure portal, so use either the Azure CLI or the PowerShell command.
For more information about the required ports for SAP HANA, read the chapter Connections to Tenant Databases in the SAP HANA Tenant Databases guide or SAP Note 2388694.
Note
When VMs that don't have public IP addresses are placed in the back-end pool of an internal (no public IP address) standard instance of Azure Load Balancer, the default configuration is no outbound internet connectivity. You can take extra steps to allow routing to public endpoints. For details on how to achieve outbound connectivity, see Public endpoint connectivity for VMs by using Azure Standard Load Balancer in SAP high-availability scenarios.
Important
- Don't enable TCP timestamps on Azure VMs that are placed behind Azure Load Balancer. Enabling TCP timestamps causes the health probes to fail. Set parameter
net.ipv4.tcp_timestampsto0. For details see Load Balancer health probes or SAP note 2382421. - To prevent saptune from changing the manually set
net.ipv4.tcp_timestampsvalue from0back to1, update saptune version to 3.1.1 or higher. For more details, see saptune 3.1.1 – Do I Need to Update?.
Create a Pacemaker cluster
Follow the steps in Set up Pacemaker on SUSE Linux Enterprise Server in Azure to create a basic Pacemaker cluster for this HANA server. You can use the same Pacemaker cluster for SAP HANA and SAP NetWeaver (A)SCS.
Install SAP HANA
The steps in this section use the following prefixes:
- [A]: The step applies to all nodes.
- [1]: The step applies only to node 1.
- [2]: The step applies only to node 2 of the Pacemaker cluster.
Replace <placeholders> with the values for your SAP HANA installation.
[A] Set up the disk layout by using Logical Volume Manager (LVM).
We recommend that you use LVM for volumes that store data and log files. The following example assumes that the VMs have four attached data disks that are used to create two volumes.
Run this command to list all the available disks:
/dev/disk/azure/scsi1/lun*Example output:
/dev/disk/azure/scsi1/lun0 /dev/disk/azure/scsi1/lun1 /dev/disk/azure/scsi1/lun2 /dev/disk/azure/scsi1/lun3Create physical volumes for all the disks that you want to use:
sudo pvcreate /dev/disk/azure/scsi1/lun0
sudo pvcreate /dev/disk/azure/scsi1/lun1
sudo pvcreate /dev/disk/azure/scsi1/lun2
sudo pvcreate /dev/disk/azure/scsi1/lun3
Create a volume group for the data files. Use one volume group for the log files and one volume group for the shared directory of SAP HANA:
sudo vgcreate vg_hana_data_<HANA SID> /dev/disk/azure/scsi1/lun0 /dev/disk/azure/scsi1/lun1
sudo vgcreate vg_hana_log_<HANA SID> /dev/disk/azure/scsi1/lun2
sudo vgcreate vg_hana_shared_<HANA SID> /dev/disk/azure/scsi1/lun3
Create the logical volumes.
A linear volume is created when you use
lvcreatewithout the-iswitch. We suggest that you create a striped volume for better I/O performance. Align the stripe sizes to the values that are described in SAP HANA VM storage configurations. The-iargument should be the number of underlying physical volumes, and the-Iargument is the stripe size.For example, if two physical volumes are used for the data volume, the
-iswitch argument is set to 2, and the stripe size for the data volume is 256KiB. One physical volume is used for the log volume, so no-ior-Iswitches are explicitly used for the log volume commands.Important
When you use more than one physical volume for each data volume, log volume, or shared volume, use the
-iswitch and set it the number of underlying physical volumes. When you create a striped volume, use the-Iswitch to specify the stripe size.For recommended storage configurations, including stripe sizes and the number of disks, see SAP HANA VM storage configurations.
sudo lvcreate <-i number of physical volumes> <-I stripe size for the data volume> -l 100%FREE -n hana_data vg_hana_data_<HANA SID>
sudo lvcreate -l 100%FREE -n hana_log vg_hana_log_<HANA SID>
sudo lvcreate -l 100%FREE -n hana_shared vg_hana_shared_<HANA SID>
sudo mkfs.xfs /dev/vg_hana_data_<HANA SID>/hana_data
sudo mkfs.xfs /dev/vg_hana_log_<HANA SID>/hana_log
sudo mkfs.xfs /dev/vg_hana_shared_<HANA SID>/hana_shared
Create the mount directories and copy the universally unique identifier (UUID) of all the logical volumes:
sudo mkdir -p /hana/data/<HANA SID>
sudo mkdir -p /hana/log/<HANA SID>
sudo mkdir -p /hana/shared/<HANA SID>
# Write down the ID of /dev/vg_hana_data_<HANA SID>/hana_data, /dev/vg_hana_log_<HANA SID>/hana_log, and /dev/vg_hana_shared_<HANA SID>/hana_shared
sudo blkid
Edit the /etc/fstab file to create
fstabentries for the three logical volumes:sudo vi /etc/fstabInsert the following lines in the /etc/fstab file:
/dev/disk/by-uuid/<UUID of /dev/mapper/vg_hana_data_<HANA SID>-hana_data> /hana/data/<HANA SID> xfs  defaults,nofail  0  2
/dev/disk/by-uuid/<UUID of /dev/mapper/vg_hana_log_<HANA SID>-hana_log> /hana/log/<HANA SID> xfs  defaults,nofail  0  2
/dev/disk/by-uuid/<UUID of /dev/mapper/vg_hana_shared_<HANA SID>-hana_shared> /hana/shared/<HANA SID> xfs  defaults,nofail  0  2
Mount the new volumes:
sudo mount -a
[A] Set up the disk layout by using plain disks.
For demo systems, you can place your HANA data and log files on one disk.
Create a partition on /dev/disk/azure/scsi1/lun0 and format it by using XFS:
sudo sh -c 'echo -e "n\n\n\n\n\nw\n" | fdisk /dev/disk/azure/scsi1/lun0'
sudo mkfs.xfs /dev/disk/azure/scsi1/lun0-part1

# Write down the ID of /dev/disk/azure/scsi1/lun0-part1
sudo /sbin/blkid
sudo vi /etc/fstab
Insert this line in the /etc/fstab file:
/dev/disk/by-uuid/<UUID> /hana xfs defaults,nofail 0 2Create the target directory and mount the disk:
sudo mkdir /hana
sudo mount -a
[A] Set up host name resolution for all hosts.
You can either use a DNS server or modify the /etc/hosts file on all nodes. This example shows you how to use the /etc/hosts file. Replace the IP addresses and the host names in the following commands.
Edit the /etc/hosts file:
sudo vi /etc/hostsInsert the following lines in the /etc/hosts file. Change the IP addresses and host names to match your environment.
10.0.0.5 hn1-db-0
10.0.0.6 hn1-db-1
[A] Install the SAP HANA high availability packages:
Run the following command to install the high availability packages:
sudo zypper install SAPHanaSR
To install SAP HANA system replication, review chapter 4 in the SAP HANA SR Performance Optimized Scenario guide.
[A] Run the hdblcm program from the HANA installation media.
When you're prompted, enter the following values:
- Choose installation: Enter 1.
- Select additional components for installation: Enter 1.
- Enter installation path: Enter /hana/shared and select Enter.
- Enter local host name: Enter .. and select Enter.
- Do you want to add additional hosts to the system? (y/n): Enter n and select Enter.
- Enter the SAP HANA system ID: Enter your HANA SID.
- Enter the instance number: Enter the HANA instance number. If you deployed by using the Azure template or if you followed the manual deployment section of this article, enter 03.
- Select the database mode / Enter the index: Enter or select 1 and select Enter.
- Select the system usage / Enter the index: Select the system usage value 4.
- Enter the location of the data volumes: Enter /hana/data/<HANA SID> and select Enter.
- Enter the location of the log volumes: Enter /hana/log/<HANA SID> and select Enter.
- Restrict maximum memory allocation?: Enter n and select Enter.
- Enter the certificate host name for the host: Enter ... and select Enter.
- Enter the SAP host agent user (sapadm) password: Enter the host agent user password, and then select Enter.
- Confirm the SAP host agent user (sapadm) password: Enter the host agent user password again, and then select Enter.
- Enter the system administrator (hdbadm) password: Enter the system administrator password, and then select Enter.
- Confirm the system administrator (hdbadm) password: Enter the system administrator password again, and then select Enter.
- Enter the system administrator home directory: Enter /usr/sap/<HANA SID>/home and select Enter.
- Enter the system administrator login shell: Enter /bin/sh and select Enter.
- Enter the system administrator user ID: Enter 1001 and select Enter.
- Enter ID of the user group (sapsys): Enter 79 and select Enter.
- Enter the database user (SYSTEM) password: Enter the database user password, and then select Enter.
- Confirm the database user (SYSTEM) password: Enter the database user password again, and then select Enter.
- Restart the system after machine reboot? (y/n): Enter n and select Enter.
- Do you want to continue? (y/n): Validate the summary. Enter y to continue.
[A] Upgrade the SAP host agent.
Download the latest SAP host agent archive from the SAP Software Center. Run the following command to upgrade the agent. Replace the path to the archive to point to the file that you downloaded.
sudo /usr/sap/hostctrl/exe/saphostexec -upgrade -archive <path to SAP host agent SAR>
Configure SAP HANA 2.0 system replication
The steps in this section use the following prefixes:
- [A]: The step applies to all nodes.
- [1]: The step applies only to node 1.
- [2]: The step applies only to node 2 of the Pacemaker cluster.
Replace <placeholders> with the values for your SAP HANA installation.
[1] Create the tenant database.
If you're using SAP HANA 2.0 or SAP HANA MDC, create a tenant database for your SAP NetWeaver system.
Run the following command as <HANA SID>adm:
hdbsql -u SYSTEM -p "<password>" -i <instance number> -d SYSTEMDB 'CREATE DATABASE <SAP SID> SYSTEM USER PASSWORD "<password>"'[1] Configure system replication on the first node:
First, back up the databases as <HANA SID>adm:
hdbsql -d SYSTEMDB -u SYSTEM -p "<password>" -i <instance number> "BACKUP DATA USING FILE ('<name of initial backup file for SYS>')"
hdbsql -d <HANA SID> -u SYSTEM -p "<password>" -i <instance number> "BACKUP DATA USING FILE ('<name of initial backup file for HANA SID>')"
hdbsql -d <SAP SID> -u SYSTEM -p "<password>" -i <instance number> "BACKUP DATA USING FILE ('<name of initial backup file for SAP SID>')"
Then, copy the system public key infrastructure (PKI) files to the secondary site:
scp /usr/sap/<HANA SID>/SYS/global/security/rsecssfs/data/SSFS_<HANA SID>.DAT   hn1-db-1:/usr/sap/<HANA SID>/SYS/global/security/rsecssfs/data/
scp /usr/sap/<HANA SID>/SYS/global/security/rsecssfs/key/SSFS_<HANA SID>.KEY  hn1-db-1:/usr/sap/<HANA SID>/SYS/global/security/rsecssfs/key/
Create the primary site:
hdbnsutil -sr_enable --name=<site 1>[2] Configure system replication on the second node:
Register the second node to start the system replication.
Run the following command as <HANA SID>adm:
sapcontrol -nr <instance number> -function StopWait 600 10
hdbnsutil -sr_register --remoteHost=hn1-db-0 --remoteInstance=<instance number> --replicationMode=sync --name=<site 2>
Configure SAP HANA 1.0 system replication
The steps in this section use the following prefixes:
- [A]: The step applies to all nodes.
- [1]: The step applies only to node 1.
- [2]: The step applies only to node 2 of the Pacemaker cluster.
Replace <placeholders> with the values for your SAP HANA installation.
[1] Create the required users.
Run the following command as root:
PATH="$PATH:/usr/sap/<HANA SID>/HDB<instance number>/exe"
hdbsql -u system -i <instance number> 'CREATE USER hdbhasync PASSWORD "<password>"'
hdbsql -u system -i <instance number> 'GRANT DATA ADMIN TO hdbhasync'
hdbsql -u system -i <instance number> 'ALTER USER hdbhasync DISABLE PASSWORD LIFETIME'
[A] Create the keystore entry.
Run the following command as root to create a new keystore entry:
PATH="$PATH:/usr/sap/<HANA SID>/HDB<instance number>/exe"
hdbuserstore SET hdbhaloc localhost:3<instance number>15 hdbhasync <password>
[1] Back up the database.
Back up the databases as root:
PATH="$PATH:/usr/sap/<HANA SID>/HDB<instance number>/exe"
hdbsql -d SYSTEMDB -u system -i <instance number> "BACKUP DATA USING FILE ('<name of initial backup file>')"
If you use a multi-tenant installation, also back up the tenant database:
hdbsql -d <HANA SID> -u system -i <instance number> "BACKUP DATA USING FILE ('<name of initial backup file>')"[1] Configure system replication on the first node.
Create the primary site as <HANA SID>adm:
su - hdbadm
hdbnsutil -sr_enable --name=<site 1>
[2] Configure system replication on the secondary node.
Register the secondary site as <HANA SID>adm:
sapcontrol -nr <instance number> -function StopWait 600 10
hdbnsutil -sr_register --remoteHost=<HANA SID>-db-<database 1> --remoteInstance=<instance number> --replicationMode=sync --name=<site 2>
Implement HANA hooks SAPHanaSR and susChkSrv
In this important step, you optimize the integration with the cluster and improve detection when a cluster failover is needed. We highly recommend that you configure the SAPHanaSR Python hook. For HANA 2.0 SP5 and later, we recommend that you implement the SAPHanaSR hook and the susChkSrv hook.
The susChkSrv hook extends the functionality of the main SAPHanaSR HA provider. It acts when the HANA process hdbindexserver crashes. If a single process crashes, HANA typically tries to restart it. Restarting the indexserver process can take a long time, during which the HANA database isn't responsive.
With susChkSrv implemented, an immediate and configurable action is executed. The action triggers a failover in the configured timeout period instead of waiting for the hdbindexserver process to restart on the same node.
[A] Install the HANA system replication hook. The hook must be installed on both HANA database nodes.
Tip
The SAPHanaSR Python hook can be implemented only for HANA 2.0. The SAPHanaSR package must be at least version 0.153.
The susChkSrv Python hook requires SAP HANA 2.0 SP5, and SAPHanaSR version 0.161.1_BF or later must be installed.
Stop HANA on both nodes.
Run the following code as <sapsid>adm:
sapcontrol -nr <instance number> -function StopSystemAdjust global.ini on each cluster node. If the requirements for the susChkSrv hook aren't met, remove the entire
[ha_dr_provider_suschksrv]block from the following parameters.You can adjust the behavior of
susChkSrvby using theaction_on_lostparameter. Valid values are [ignore|stop|kill|fence].# add to global.ini [ha_dr_provider_SAPHanaSR] provider = SAPHanaSR path = /usr/share/SAPHanaSR execution_order = 1 [ha_dr_provider_suschksrv] provider = susChkSrv path = /usr/share/SAPHanaSR execution_order = 3 action_on_lost = fence [trace] ha_dr_saphanasr = infoIf you point to the standard /usr/share/SAPHanaSR location, the Python hook code updates automatically through OS updates or package updates. HANA uses the hook code updates when it next restarts. With an optional own path like /hana/shared/myHooks, you can decouple OS updates from the hook version that you use.
[A] The cluster requires sudoers configuration on each cluster node for <SAP SID>adm. In this example, that's achieved by creating a new file.
Run the following command as root:
 cat << EOF > /etc/sudoers.d/20-saphana
 # Needed for SAPHanaSR and susChkSrv Python hooks
 hn1adm ALL=(ALL) NOPASSWD: /usr/sbin/crm_attribute -n hana_hn1_site_srHook_*
 hn1adm ALL=(ALL) NOPASSWD: /usr/sbin/SAPHanaSR-hookHelper --sid=HN1 --case=fenceMe
 EOF
For details about implementing the SAP HANA system replication hook, see Set up HANA HA/DR providers.
[A] Start SAP HANA on both nodes.
Run the following command as <SAP SID>adm:
sapcontrol -nr <instance number> -function StartSystem[1] Verify the hook installation.
Run the following command as <SAP SID>adm on the active HANA system replication site:
 cdtrace
 awk '/ha_dr_SAPHanaSR.*crm_attribute/ \
 { printf "%s %s %s %s\n",$2,$3,$5,$16 }' nameserver_*
 # Example output
 # 2021-04-08 22:18:15.877583 ha_dr_SAPHanaSR SFAIL
 # 2021-04-08 22:18:46.531564 ha_dr_SAPHanaSR SFAIL
 # 2021-04-08 22:21:26.816573 ha_dr_SAPHanaSR SOK
Verify the susChkSrv hook installation.
Run the following command as <SAP SID>adm on all HANA VMs:
 cdtrace
 egrep '(LOST:|STOP:|START:|DOWN:|init|load|fail)' nameserver_suschksrv.trc
 # Example output
 # 2022-11-03 18:06:21.116728  susChkSrv.init() version 0.7.7, parameter info: action_on_lost=fence stop_timeout=20 kill_signal=9
 # 2022-11-03 18:06:27.613588  START: indexserver event looks like graceful tenant start
 # 2022-11-03 18:07:56.143766  START: indexserver event looks like graceful tenant start (indexserver started)
Create SAP HANA cluster resources
First, create the HANA topology.
Run the following commands on one of the Pacemaker cluster nodes:
sudo crm configure property maintenance-mode=true

# Replace <placeholders> with your instance number and HANA system ID

sudo crm configure primitive rsc_SAPHanaTopology_<HANA SID>_HDB<instance number> ocf:suse:SAPHanaTopology \
  operations \$id="rsc_sap2_<HANA SID>_HDB<instance number>-operations" \
  op monitor interval="10" timeout="600" \
  op start interval="0" timeout="600" \
  op stop interval="0" timeout="300" \
  params SID="<HANA SID>" InstanceNumber="<instance number>"

sudo crm configure clone cln_SAPHanaTopology_<HANA SID>_HDB<instance number> rsc_SAPHanaTopology_<HANA SID>_HDB<instance number> \
  meta clone-node-max="1" target-role="Started" interleave="true"
Next, create the HANA resources:
Important
In recent testing, netcat stops responding to requests due to a backlog and because of its limitation of handling only one connection. The netcat resource stops listening to the Azure Load Balancer requests, and the floating IP becomes unavailable.
For existing Pacemaker clusters, we previously recommended that you replace netcat with socat. Currently, we recommend that you use the azure-lb resource agent, which is part of a package of resource-agents. The following package versions are required:
- For SLES 12 SP4/SP5, the version must be at least resource-agents-4.3.018.a7fb5035-3.30.1.
- For SLES 15/15 SP1, the version must be at least resource-agents-4.3.0184.6ee15eb2-4.13.1.
Making this change requires a brief downtime.
For existing Pacemaker clusters, if your configuration was already changed to use socat as described in Azure Load Balancer Detection Hardening, you don't need to immediately switch to the azure-lb resource agent.
Note
This article contains references to terms that Microsoft no longer uses. When these terms are removed from the software, we'll remove them from this article.
# Replace <placeholders> with your instance number, HANA system ID, and the front-end IP address of the Azure load balancer.

sudo crm configure primitive rsc_SAPHana_<HANA SID>_HDB<instance number> ocf:suse:SAPHana \
  operations \$id="rsc_sap_<HANA SID>_HDB<instance number>-operations" \
  op start interval="0" timeout="3600" \
  op stop interval="0" timeout="3600" \
  op promote interval="0" timeout="3600" \
  op monitor interval="60" role="Master" timeout="700" \
  op monitor interval="61" role="Slave" timeout="700" \
  params SID="<HANA SID>" InstanceNumber="<instance number>" PREFER_SITE_TAKEOVER="true" \
  DUPLICATE_PRIMARY_TIMEOUT="7200" AUTOMATED_REGISTER="false"

sudo crm configure ms msl_SAPHana_<HANA SID>_HDB<instance number> rsc_SAPHana_<HANA SID>_HDB<instance number> \
  meta notify="true" clone-max="2" clone-node-max="1" \
  target-role="Started" interleave="true"

sudo crm resource meta msl_SAPHana_<HANA SID>_HDB<instance number> set priority 100

sudo crm configure primitive rsc_ip_<HANA SID>_HDB<instance number> ocf:heartbeat:IPaddr2 \
  meta target-role="Started" \
  operations \$id="rsc_ip_<HANA SID>_HDB<instance number>-operations" \
  op monitor interval="10s" timeout="20s" \
  params ip="<front-end IP address>"

sudo crm configure primitive rsc_nc_<HANA SID>_HDB<instance number> azure-lb port=625<instance number> \
  op monitor timeout=20s interval=10 \
  meta resource-stickiness=0

sudo crm configure group g_ip_<HANA SID>_HDB<instance number> rsc_ip_<HANA SID>_HDB<instance number> rsc_nc_<HANA SID>_HDB<instance number>

sudo crm configure colocation col_saphana_ip_<HANA SID>_HDB<instance number> 4000: g_ip_<HANA SID>_HDB<instance number>:Started \
  msl_SAPHana_<HANA SID>_HDB<instance number>:Master

sudo crm configure order ord_SAPHana_<HANA SID>_HDB<instance number> Optional: cln_SAPHanaTopology_<HANA SID>_HDB<instance number> \
  msl_SAPHana_<HANA SID>_HDB<instance number>

# Clean up the HANA resources. The HANA resources might have failed because of a known issue.
sudo crm resource cleanup rsc_SAPHana_<HANA SID>_HDB<instance number>

sudo crm configure property priority-fencing-delay=30

sudo crm configure property maintenance-mode=false
sudo crm configure rsc_defaults resource-stickiness=1000
sudo crm configure rsc_defaults migration-threshold=5000
Important
We recommend that you set AUTOMATED_REGISTER to false only while you complete thorough failover tests, to prevent a failed primary instance from automatically registering as secondary. When the failover tests are successfully completed, set AUTOMATED_REGISTER to true, so that after takeover, system replication automatically resumes.
Make sure that the cluster status is OK and that all the resources started. It doesn't matter which node the resources are running on.
sudo crm_mon -r

# Online: [ hn1-db-0 hn1-db-1 ]
#
# Full list of resources:
#
# stonith-sbd     (stonith:external/sbd): Started hn1-db-0
# Clone Set: cln_SAPHanaTopology_HN1_HDB03 [rsc_SAPHanaTopology_HN1_HDB03]
#     Started: [ hn1-db-0 hn1-db-1 ]
# Master/Slave Set: msl_SAPHana_HN1_HDB03 [rsc_SAPHana_HN1_HDB03]
#     Masters: [ hn1-db-0 ]
#     Slaves: [ hn1-db-1 ]
# Resource Group: g_ip_HN1_HDB03
#     rsc_ip_HN1_HDB03   (ocf::heartbeat:IPaddr2):       Started hn1-db-0
#     rsc_nc_HN1_HDB03   (ocf::heartbeat:azure-lb):      Started hn1-db-0
Configure HANA active/read-enabled system replication in a Pacemaker cluster
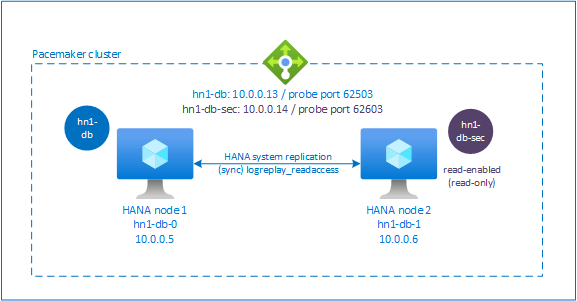
In SAP HANA 2.0 SPS 01 and later versions, SAP allows an active/read-enabled setup for SAP HANA system replication. In this scenario, the secondary systems of SAP HANA system replication can be actively used for read-intensive workloads.
To support this setup in a cluster, a second virtual IP address is required so that clients can access the secondary read-enabled SAP HANA database. To ensure that the secondary replication site can still be accessed after a takeover, the cluster needs to move the virtual IP address around with the secondary of the SAPHana resource.
This section describes the extra steps that are required to manage a HANA active/read-enabled system replication in a SUSE high availability cluster that uses a second virtual IP address.
Before you proceed, make sure that you have fully configured the SUSE high availability cluster that manages SAP HANA database as described in earlier sections.
Set up the load balancer for active/read-enabled system replication
To proceed with extra steps to provision the second virtual IP, make sure that you configured Azure Load Balancer as described in Deploy Linux VMs manually via Azure portal.
For the standard load balancer, complete these extra steps on the same load balancer that you created earlier.
- Create a second front-end IP pool:
- Open the load balancer, select frontend IP pool, and select Add.
- Enter the name of the second front-end IP pool (for example, hana-secondaryIP).
- Set the Assignment to Static and enter the IP address (for example, 10.0.0.14).
- Select OK.
- After the new front-end IP pool is created, note the front-end IP address.
- Create a health probe:
- In the load balancer, select health probes, and select Add.
- Enter the name of the new health probe (for example, hana-secondaryhp).
- Select TCP as the protocol and port 626<instance number>. Keep the Interval value set to 5, and the Unhealthy threshold value set to 2.
- Select OK.
- Create the load-balancing rules:
- In the load balancer, select load balancing rules, and select Add.
- Enter the name of the new load balancer rule (for example, hana-secondarylb).
- Select the front-end IP address, the back-end pool, and the health probe that you created earlier (for example, hana-secondaryIP, hana-backend, and hana-secondaryhp).
- Select HA Ports.
- Increase idle timeout to 30 minutes.
- Make sure that you enable floating IP.
- Select OK.
Set up HANA active/read-enabled system replication
The steps to configure HANA system replication are described in Configure SAP HANA 2.0 system replication. If you're deploying a read-enabled secondary scenario, when you set up system replication on the second node, run the following command as <HANA SID>adm:
sapcontrol -nr <instance number> -function StopWait 600 10

hdbnsutil -sr_register --remoteHost=hn1-db-0 --remoteInstance=<instance number> --replicationMode=sync --name=<site 2> --operationMode=logreplay_readaccess
Add a secondary virtual IP address resource
You can set up the second virtual IP and the appropriate colocation constraint by using the following commands:
crm configure property maintenance-mode=true

crm configure primitive rsc_secip_<HANA SID>_HDB<instance number> ocf:heartbeat:IPaddr2 \
 meta target-role="Started" \
 operations \$id="rsc_secip_<HANA SID>_HDB<instance number>-operations" \
 op monitor interval="10s" timeout="20s" \
 params ip="<secondary IP address>"

crm configure primitive rsc_secnc_<HANA SID>_HDB<instance number> azure-lb port=626<instance number> \
 op monitor timeout=20s interval=10 \
 meta resource-stickiness=0

crm configure group g_secip_<HANA SID>_HDB<instance number> rsc_secip_<HANA SID>_HDB<instance number> rsc_secnc_<HANA SID>_HDB<instance number>

crm configure colocation col_saphana_secip_<HANA SID>_HDB<instance number> 4000: g_secip_<HANA SID>_HDB<instance number>:Started \
 msl_SAPHana_<HANA SID>_HDB<instance number>:Slave

crm configure property maintenance-mode=false
Make sure that the cluster status is OK and that all the resources started. The second virtual IP runs on the secondary site along with the SAPHana secondary resource.
sudo crm_mon -r

# Online: [ hn1-db-0 hn1-db-1 ]
#
# Full list of resources:
#
# stonith-sbd     (stonith:external/sbd): Started hn1-db-0
# Clone Set: cln_SAPHanaTopology_HN1_HDB03 [rsc_SAPHanaTopology_HN1_HDB03]
#     Started: [ hn1-db-0 hn1-db-1 ]
# Master/Slave Set: msl_SAPHana_HN1_HDB03 [rsc_SAPHana_HN1_HDB03]
#     Masters: [ hn1-db-0 ]
#     Slaves: [ hn1-db-1 ]
# Resource Group: g_ip_HN1_HDB03
#     rsc_ip_HN1_HDB03   (ocf::heartbeat:IPaddr2):       Started hn1-db-0
#     rsc_nc_HN1_HDB03   (ocf::heartbeat:azure-lb):      Started hn1-db-0
# Resource Group: g_secip_HN1_HDB03:
#     rsc_secip_HN1_HDB03       (ocf::heartbeat:IPaddr2):        Started hn1-db-1
#     rsc_secnc_HN1_HDB03       (ocf::heartbeat:azure-lb):       Started hn1-db-1
The next section describes the typical set of failover tests to execute.
Considerations when you test a HANA cluster that's configured with a read-enabled secondary:
When you migrate the
SAPHana_<HANA SID>_HDB<instance number>cluster resource tohn1-db-1, the second virtual IP moves tohn1-db-0. If you have configuredAUTOMATED_REGISTER="false"and HANA system replication isn't registered automatically, the second virtual IP runs onhn1-db-0because the server is available and cluster services are online.When you test a server crash, the second virtual IP resources (
rsc_secip_<HANA SID>_HDB<instance number>) and the Azure load balancer port resource (rsc_secnc_<HANA SID>_HDB<instance number>) run on the primary server alongside the primary virtual IP resources. While the secondary server is down, the applications that are connected to a read-enabled HANA database connect to the primary HANA database. The behavior is expected because you don't want applications that are connected to a read-enabled HANA database to be inaccessible while the secondary server is unavailable.When the secondary server is available and the cluster services are online, the second virtual IP and port resources automatically move to the secondary server, even though HANA system replication might not be registered as secondary. Make sure that you register the secondary HANA database as read-enabled before you start cluster services on that server. You can configure the HANA instance cluster resource to automatically register the secondary by setting the parameter
AUTOMATED_REGISTER="true".During failover and fallback, the existing connections for applications, which are then using the second virtual IP to connect to the HANA database, might be interrupted.
Test the cluster setup
This section describes how you can test your setup. Every test assumes that you're signed in as root and that the SAP HANA master is running on the hn1-db-0 VM.
Test the migration
Before you start the test, make sure that Pacemaker doesn't have any failed action (run crm_mon -r), that there are no unexpected location constraints (for example, leftovers of a migration test), and that HANA is in sync state, for example, by running SAPHanaSR-showAttr.
hn1-db-0:~ # SAPHanaSR-showAttr
Sites    srHook
----------------
SITE2    SOK
Global cib-time
--------------------------------
global Mon Aug 13 11:26:04 2018
Hosts    clone_state lpa_hn1_lpt node_state op_mode   remoteHost    roles                            score site  srmode sync_state version                vhost
-----------------------------------------------------------------------------------------------------------------------------------------------------------------------------
hn1-db-0 PROMOTED    1534159564  online     logreplay nws-hana-vm-1 4:P:master1:master:worker:master 150   SITE1 sync   PRIM       2.00.030.00.1522209842 nws-hana-vm-0
hn1-db-1 DEMOTED     30          online     logreplay nws-hana-vm-0 4:S:master1:master:worker:master 100   SITE2 sync   SOK        2.00.030.00.1522209842 nws-hana-vm-1
You can migrate the SAP HANA master node by running the following command:
crm resource move msl_SAPHana_<HANA SID>_HDB<instance number> hn1-db-1 force
The cluster would migrate the SAP HANA master node and the group containing virtual IP address to hn1-db-1.
When the migration is finished, the crm_mon -r output looks like this example:
Online: [ hn1-db-0 hn1-db-1 ]

Full list of resources:
stonith-sbd     (stonith:external/sbd): Started hn1-db-1
 Clone Set: cln_SAPHanaTopology_HN1_HDB03 [rsc_SAPHanaTopology_HN1_HDB03]
     Started: [ hn1-db-0 hn1-db-1 ]
 Master/Slave Set: msl_SAPHana_HN1_HDB03 [rsc_SAPHana_HN1_HDB03]
     Masters: [ hn1-db-1 ]
     Stopped: [ hn1-db-0 ]
 Resource Group: g_ip_HN1_HDB03
     rsc_ip_HN1_HDB03   (ocf::heartbeat:IPaddr2):       Started hn1-db-1
     rsc_nc_HN1_HDB03   (ocf::heartbeat:azure-lb):      Started hn1-db-1
Failed Actions:
* rsc_SAPHana_HN1_HDB03_start_0 on hn1-db-0 'not running' (7): call=84, status=complete, exitreason='none',
    last-rc-change='Mon Aug 13 11:31:37 2018', queued=0ms, exec=2095ms
With AUTOMATED_REGISTER="false", the cluster would not restart the failed HANA database or register it against the new primary on hn1-db-0. In this case, configure the HANA instance as secondary by running this command:
su - <hana sid>adm

# Stop the HANA instance, just in case it is running
hn1adm@hn1-db-0:/usr/sap/HN1/HDB03> sapcontrol -nr <instance number> -function StopWait 600 10
hn1adm@hn1-db-0:/usr/sap/HN1/HDB03> hdbnsutil -sr_register --remoteHost=hn1-db-1 --remoteInstance=<instance number> --replicationMode=sync --name=<site 1>
The migration creates location constraints that need to be deleted again:
# Switch back to root and clean up the failed state
exit
hn1-db-0:~ # crm resource clear msl_SAPHana_<HANA SID>_HDB<instance number>
You also need to clean up the state of the secondary node resource:
hn1-db-0:~ # crm resource cleanup msl_SAPHana_<HANA SID>_HDB<instance number> hn1-db-0
Monitor the state of the HANA resource by using crm_mon -r. When HANA is started on hn1-db-0, the output looks like this example:
Online: [ hn1-db-0 hn1-db-1 ]

Full list of resources:
stonith-sbd     (stonith:external/sbd): Started hn1-db-1
 Clone Set: cln_SAPHanaTopology_HN1_HDB03 [rsc_SAPHanaTopology_HN1_HDB03]
     Started: [ hn1-db-0 hn1-db-1 ]
 Master/Slave Set: msl_SAPHana_HN1_HDB03 [rsc_SAPHana_HN1_HDB03]
     Masters: [ hn1-db-1 ]
     Slaves: [ hn1-db-0 ]
 Resource Group: g_ip_HN1_HDB03
     rsc_ip_HN1_HDB03   (ocf::heartbeat:IPaddr2):       Started hn1-db-1
     rsc_nc_HN1_HDB03   (ocf::heartbeat:azure-lb):      Started hn1-db-1
Blocking network communication
Resource state before starting the test:
Online: [ hn1-db-0 hn1-db-1 ]

Full list of resources:
stonith-sbd     (stonith:external/sbd): Started hn1-db-1
 Clone Set: cln_SAPHanaTopology_HN1_HDB03 [rsc_SAPHanaTopology_HN1_HDB03]
     Started: [ hn1-db-0 hn1-db-1 ]
 Master/Slave Set: msl_SAPHana_HN1_HDB03 [rsc_SAPHana_HN1_HDB03]
     Masters: [ hn1-db-1 ]
     Slaves: [ hn1-db-0 ]
 Resource Group: g_ip_HN1_HDB03
     rsc_ip_HN1_HDB03   (ocf::heartbeat:IPaddr2):       Started hn1-db-1
     rsc_nc_HN1_HDB03   (ocf::heartbeat:azure-lb):      Started hn1-db-1
Execute firewall rule to block the communication on one of the nodes.
# Execute iptable rule on hn1-db-1 (10.0.0.6) to block the incoming and outgoing traffic to hn1-db-0 (10.0.0.5)
iptables -A INPUT -s 10.0.0.5 -j DROP; iptables -A OUTPUT -d 10.0.0.5 -j DROP
When cluster nodes can't communicate to each other, there's a risk of a split-brain scenario. In such situations, cluster nodes will try to simultaneously fence each other, resulting in fence race.
When configuring a fencing device, it's recommended to configure pcmk_delay_max property. So, in the event of split-brain scenario, the cluster introduces a random delay up to the pcmk_delay_max value, to the fencing action on each node. The node with the shortest delay will be selected for fencing.
Additionally, to ensure that the node running the HANA master takes priority and wins the fence race in a split brain scenario, it's recommended to set priority-fencing-delay property in the cluster configuration. By enabling priority-fencing-delay property, the cluster can introduce an additional delay in the fencing action specifically on the node hosting HANA master resource, allowing the node to win the fence race.
Execute below command to delete the firewall rule.
# If the iptables rule set on the server gets reset after a reboot, the rules will be cleared out. In case they have not been reset, please proceed to remove the iptables rule using the following command.
iptables -D INPUT -s 10.0.0.5 -j DROP; iptables -D OUTPUT -d 10.0.0.5 -j DROP
Test SBD fencing
You can test the setup of SBD by killing the inquisitor process:
hn1-db-0:~ # ps aux | grep sbd
root       1912  0.0  0.0  85420 11740 ?        SL   12:25   0:00 sbd: inquisitor
root       1929  0.0  0.0  85456 11776 ?        SL   12:25   0:00 sbd: watcher: /dev/disk/by-id/scsi-360014056f268462316e4681b704a9f73 - slot: 0 - uuid: 7b862dba-e7f7-4800-92ed-f76a4e3978c8
root       1930  0.0  0.0  85456 11776 ?        SL   12:25   0:00 sbd: watcher: /dev/disk/by-id/scsi-360014059bc9ea4e4bac4b18808299aaf - slot: 0 - uuid: 5813ee04-b75c-482e-805e-3b1e22ba16cd
root       1931  0.0  0.0  85456 11776 ?        SL   12:25   0:00 sbd: watcher: /dev/disk/by-id/scsi-36001405b8dddd44eb3647908def6621c - slot: 0 - uuid: 986ed8f8-947d-4396-8aec-b933b75e904c
root       1932  0.0  0.0  90524 16656 ?        SL   12:25   0:00 sbd: watcher: Pacemaker
root       1933  0.0  0.0 102708 28260 ?        SL   12:25   0:00 sbd: watcher: Cluster
root      13877  0.0  0.0   9292  1572 pts/0    S+   12:27   0:00 grep sbd

hn1-db-0:~ # kill -9 1912
The <HANA SID>-db-<database 1> cluster node reboots. The Pacemaker service might not restart. Make sure that you start it again.
Test a manual failover
You can test a manual failover by stopping the Pacemaker service on the hn1-db-0 node:
service pacemaker stop
After the failover, you can start the service again. If you set AUTOMATED_REGISTER="false", the SAP HANA resource on the hn1-db-0 node fails to start as secondary.
In this case, configure the HANA instance as secondary by running this command:
service pacemaker start
su - <hana sid>adm

# Stop the HANA instance, just in case it is running
sapcontrol -nr <instance number> -function StopWait 600 10
hdbnsutil -sr_register --remoteHost=hn1-db-1 --remoteInstance=<instance number> --replicationMode=sync --name=<site 1>

# Switch back to root and clean up the failed state
exit
crm resource cleanup msl_SAPHana_<HANA SID>_HDB<instance number> hn1-db-0
SUSE tests
Important
Make sure that the OS that you select is SAP certified for SAP HANA on the specific VM types you plan to use. You can look up SAP HANA-certified VM types and their OS releases in SAP HANA Certified IaaS Platforms. Make sure that you look at the details of the VM type you plan to use to get the complete list of SAP HANA-supported OS releases for that VM type.
Run all test cases that are listed in the SAP HANA SR Performance Optimized Scenario guide or SAP HANA SR Cost Optimized Scenario guide, depending on your scenario. You can find the guides listed in SLES for SAP best practices.
The following tests are a copy of the test descriptions of the SAP HANA SR Performance Optimized Scenario SUSE Linux Enterprise Server for SAP Applications 12 SP1 guide. For an up-to-date version, also read the guide itself. Always make sure that HANA is in sync before you start the test, and make sure that the Pacemaker configuration is correct.
In the following test descriptions, we assume PREFER_SITE_TAKEOVER="true" and AUTOMATED_REGISTER="false".
Note
The following tests are designed to be run in sequence. Each test depends on the exit state of the preceding test.
Test 1: Stop the primary database on node 1.
The resource state before starting the test:
Clone Set: cln_SAPHanaTopology_HN1_HDB03 [rsc_SAPHanaTopology_HN1_HDB03]
   Started: [ hn1-db-0 hn1-db-1 ]
Master/Slave Set: msl_SAPHana_HN1_HDB03 [rsc_SAPHana_HN1_HDB03]
   Masters: [ hn1-db-0 ]
   Slaves: [ hn1-db-1 ]
Resource Group: g_ip_HN1_HDB03
   rsc_ip_HN1_HDB03   (ocf::heartbeat:IPaddr2):       Started hn1-db-0
   rsc_nc_HN1_HDB03   (ocf::heartbeat:azure-lb):      Started hn1-db-0
Run the following commands as <hana sid>adm on the
hn1-db-0node:hn1adm@hn1-db-0:/usr/sap/HN1/HDB03> HDB stopPacemaker detects the stopped HANA instance and fails over to the other node. When the failover is finished, the HANA instance on the
hn1-db-0node is stopped because Pacemaker doesn't automatically register the node as HANA secondary.Run the following commands to register the
hn1-db-0node as secondary and clean up the failed resource:hn1adm@hn1-db-0:/usr/sap/HN1/HDB03> hdbnsutil -sr_register --remoteHost=hn1-db-1 --remoteInstance=<instance number> --replicationMode=sync --name=<site 1> # run as root hn1-db-0:~ # crm resource cleanup msl_SAPHana_<HANA SID>_HDB<instance number> hn1-db-0The resource state after the test:
Clone Set: cln_SAPHanaTopology_HN1_HDB03 [rsc_SAPHanaTopology_HN1_HDB03]
   Started: [ hn1-db-0 hn1-db-1 ]
Master/Slave Set: msl_SAPHana_HN1_HDB03 [rsc_SAPHana_HN1_HDB03]
   Masters: [ hn1-db-1 ]
   Slaves: [ hn1-db-0 ]
Resource Group: g_ip_HN1_HDB03
   rsc_ip_HN1_HDB03   (ocf::heartbeat:IPaddr2):       Started hn1-db-1
   rsc_nc_HN1_HDB03   (ocf::heartbeat:azure-lb):      Started hn1-db-1
Test 2: Stop the primary database on node 2.
The resource state before starting the test:
Clone Set: cln_SAPHanaTopology_HN1_HDB03 [rsc_SAPHanaTopology_HN1_HDB03]
   Started: [ hn1-db-0 hn1-db-1 ]
Master/Slave Set: msl_SAPHana_HN1_HDB03 [rsc_SAPHana_HN1_HDB03]
   Masters: [ hn1-db-1 ]
   Slaves: [ hn1-db-0 ]
Resource Group: g_ip_HN1_HDB03
   rsc_ip_HN1_HDB03   (ocf::heartbeat:IPaddr2):       Started hn1-db-1
   rsc_nc_HN1_HDB03   (ocf::heartbeat:azure-lb):      Started hn1-db-1
Run the following commands as <hana sid>adm on the
hn1-db-1node:hn1adm@hn1-db-1:/usr/sap/HN1/HDB01> HDB stopPacemaker detects the stopped HANA instance and fails over to the other node. When the failover is finished, the HANA instance on the
hn1-db-1node is stopped because Pacemaker doesn't automatically register the node as HANA secondary.Run the following commands to register the
hn1-db-1node as secondary and clean up the failed resource:hn1adm@hn1-db-1:/usr/sap/HN1/HDB03> hdbnsutil -sr_register --remoteHost=hn1-db-0 --remoteInstance=<instance number> --replicationMode=sync --name=<site 2> # run as root hn1-db-1:~ # crm resource cleanup msl_SAPHana_<HANA SID>_HDB<instance number> hn1-db-1The resource state after the test:
Clone Set: cln_SAPHanaTopology_HN1_HDB03 [rsc_SAPHanaTopology_HN1_HDB03]
   Started: [ hn1-db-0 hn1-db-1 ]
Master/Slave Set: msl_SAPHana_HN1_HDB03 [rsc_SAPHana_HN1_HDB03]
   Masters: [ hn1-db-0 ]
   Slaves: [ hn1-db-1 ]
Resource Group: g_ip_HN1_HDB03
   rsc_ip_HN1_HDB03   (ocf::heartbeat:IPaddr2):       Started hn1-db-0
   rsc_nc_HN1_HDB03   (ocf::heartbeat:azure-lb):      Started hn1-db-0
Test 3: Crash the primary database on node 1.
The resource state before starting the test:
Clone Set: cln_SAPHanaTopology_HN1_HDB03 [rsc_SAPHanaTopology_HN1_HDB03]
   Started: [ hn1-db-0 hn1-db-1 ]
Master/Slave Set: msl_SAPHana_HN1_HDB03 [rsc_SAPHana_HN1_HDB03]
   Masters: [ hn1-db-0 ]
   Slaves: [ hn1-db-1 ]
Resource Group: g_ip_HN1_HDB03
   rsc_ip_HN1_HDB03   (ocf::heartbeat:IPaddr2):       Started hn1-db-0
   rsc_nc_HN1_HDB03   (ocf::heartbeat:azure-lb):      Started hn1-db-0
Run the following commands as <hana sid>adm on the
hn1-db-0node:hn1adm@hn1-db-0:/usr/sap/HN1/HDB03> HDB kill-9Pacemaker detects the killed HANA instance and fails over to the other node. When the failover is finished, the HANA instance on the
hn1-db-0node is stopped because Pacemaker doesn't automatically register the node as HANA secondary.Run the following commands to register the
hn1-db-0node as secondary and clean up the failed resource:hn1adm@hn1-db-0:/usr/sap/HN1/HDB03> hdbnsutil -sr_register --remoteHost=hn1-db-1 --remoteInstance=<instance number> --replicationMode=sync --name=<site 1> # run as root hn1-db-0:~ # crm resource cleanup msl_SAPHana_<HANA SID>_HDB<instance number> hn1-db-0The resource state after the test:
Clone Set: cln_SAPHanaTopology_HN1_HDB03 [rsc_SAPHanaTopology_HN1_HDB03]
   Started: [ hn1-db-0 hn1-db-1 ]
Master/Slave Set: msl_SAPHana_HN1_HDB03 [rsc_SAPHana_HN1_HDB03]
   Masters: [ hn1-db-1 ]
   Slaves: [ hn1-db-0 ]
Resource Group: g_ip_HN1_HDB03
   rsc_ip_HN1_HDB03   (ocf::heartbeat:IPaddr2):       Started hn1-db-1
   rsc_nc_HN1_HDB03   (ocf::heartbeat:azure-lb):      Started hn1-db-1
Test 4: Crash the primary database on node 2.
The resource state before starting the test:
Clone Set: cln_SAPHanaTopology_HN1_HDB03 [rsc_SAPHanaTopology_HN1_HDB03]
   Started: [ hn1-db-0 hn1-db-1 ]
Master/Slave Set: msl_SAPHana_HN1_HDB03 [rsc_SAPHana_HN1_HDB03]
   Masters: [ hn1-db-1 ]
   Slaves: [ hn1-db-0 ]
Resource Group: g_ip_HN1_HDB03
   rsc_ip_HN1_HDB03   (ocf::heartbeat:IPaddr2):       Started hn1-db-1
   rsc_nc_HN1_HDB03   (ocf::heartbeat:azure-lb):      Started hn1-db-1
Run the following commands as <hana sid>adm on the
hn1-db-1node:hn1adm@hn1-db-1:/usr/sap/HN1/HDB03> HDB kill-9Pacemaker detects the killed HANA instance and fails over to the other node. When the failover is finished, the HANA instance on the
hn1-db-1node is stopped because Pacemaker doesn't automatically register the node as HANA secondary.Run the following commands to register the
hn1-db-1node as secondary and clean up the failed resource.hn1adm@hn1-db-1:/usr/sap/HN1/HDB03> hdbnsutil -sr_register --remoteHost=hn1-db-0 --remoteInstance=<instance number> --replicationMode=sync --name=<site 2> # run as root hn1-db-1:~ # crm resource cleanup msl_SAPHana_<HANA SID>_HDB<instance number> hn1-db-1The resource state after the test:
Clone Set: cln_SAPHanaTopology_HN1_HDB03 [rsc_SAPHanaTopology_HN1_HDB03]
   Started: [ hn1-db-0 hn1-db-1 ]
Master/Slave Set: msl_SAPHana_HN1_HDB03 [rsc_SAPHana_HN1_HDB03]
   Masters: [ hn1-db-0 ]
   Slaves: [ hn1-db-1 ]
Resource Group: g_ip_HN1_HDB03
   rsc_ip_HN1_HDB03   (ocf::heartbeat:IPaddr2):       Started hn1-db-0
   rsc_nc_HN1_HDB03   (ocf::heartbeat:azure-lb):      Started hn1-db-0
Test 5: Crash the primary site node (node 1).
The resource state before starting the test:
Clone Set: cln_SAPHanaTopology_HN1_HDB03 [rsc_SAPHanaTopology_HN1_HDB03]
   Started: [ hn1-db-0 hn1-db-1 ]
Master/Slave Set: msl_SAPHana_HN1_HDB03 [rsc_SAPHana_HN1_HDB03]
   Masters: [ hn1-db-0 ]
   Slaves: [ hn1-db-1 ]
Resource Group: g_ip_HN1_HDB03
   rsc_ip_HN1_HDB03   (ocf::heartbeat:IPaddr2):       Started hn1-db-0
   rsc_nc_HN1_HDB03   (ocf::heartbeat:azure-lb):      Started hn1-db-0
Run the following commands as root on the
hn1-db-0node:hn1-db-0:~ # echo 'b' > /proc/sysrq-triggerPacemaker detects the killed cluster node and fences the node. When the node is fenced, Pacemaker triggers a takeover of the HANA instance. When the fenced node is rebooted, Pacemaker doesn't start automatically.
Run the following commands to start Pacemaker, clean the SBD messages for the
hn1-db-0node, register thehn1-db-0node as secondary, and clean up the failed resource:# run as root # list the SBD device(s) hn1-db-0:~ # cat /etc/sysconfig/sbd | grep SBD_DEVICE= # SBD_DEVICE="/dev/disk/by-id/scsi-36001405772fe8401e6240c985857e116;/dev/disk/by-id/scsi-36001405034a84428af24ddd8c3a3e9e1;/dev/disk/by-id/scsi-36001405cdd5ac8d40e548449318510c3" hn1-db-0:~ # sbd -d /dev/disk/by-id/scsi-36001405772fe8401e6240c985857e116 -d /dev/disk/by-id/scsi-36001405034a84428af24ddd8c3a3e9e1 -d /dev/disk/by-id/scsi-36001405cdd5ac8d40e548449318510c3 message hn1-db-0 clear hn1-db-0:~ # systemctl start pacemaker # run as <hana sid>adm hn1adm@hn1-db-0:/usr/sap/HN1/HDB03> hdbnsutil -sr_register --remoteHost=hn1-db-1 --remoteInstance=<instance number> --replicationMode=sync --name=<site 1> # run as root hn1-db-0:~ # crm resource cleanup msl_SAPHana_<HANA SID>_HDB<instance number> hn1-db-0The resource state after the test:
Clone Set: cln_SAPHanaTopology_HN1_HDB03 [rsc_SAPHanaTopology_HN1_HDB03]
   Started: [ hn1-db-0 hn1-db-1 ]
Master/Slave Set: msl_SAPHana_HN1_HDB03 [rsc_SAPHana_HN1_HDB03]
   Masters: [ hn1-db-1 ]
   Slaves: [ hn1-db-0 ]
Resource Group: g_ip_HN1_HDB03
   rsc_ip_HN1_HDB03   (ocf::heartbeat:IPaddr2):       Started hn1-db-1
   rsc_nc_HN1_HDB03   (ocf::heartbeat:azure-lb):      Started hn1-db-1
Test 6: Crash the secondary site node (node 2).
The resource state before starting the test:
Clone Set: cln_SAPHanaTopology_HN1_HDB03 [rsc_SAPHanaTopology_HN1_HDB03]
   Started: [ hn1-db-0 hn1-db-1 ]
Master/Slave Set: msl_SAPHana_HN1_HDB03 [rsc_SAPHana_HN1_HDB03]
   Masters: [ hn1-db-1 ]
   Slaves: [ hn1-db-0 ]
Resource Group: g_ip_HN1_HDB03
   rsc_ip_HN1_HDB03   (ocf::heartbeat:IPaddr2):       Started hn1-db-1
   rsc_nc_HN1_HDB03   (ocf::heartbeat:azure-lb):      Started hn1-db-1
Run the following commands as root on the
hn1-db-1node:hn1-db-1:~ # echo 'b' > /proc/sysrq-triggerPacemaker detects the killed cluster node and fences the node. When the node is fenced, Pacemaker triggers a takeover of the HANA instance. When the fenced node is rebooted, Pacemaker doesn't start automatically.
Run the following commands to start Pacemaker, clean the SBD messages for the
hn1-db-1node, register thehn1-db-1node as secondary, and clean up the failed resource:# run as root # list the SBD device(s) hn1-db-1:~ # cat /etc/sysconfig/sbd | grep SBD_DEVICE= # SBD_DEVICE="/dev/disk/by-id/scsi-36001405772fe8401e6240c985857e116;/dev/disk/by-id/scsi-36001405034a84428af24ddd8c3a3e9e1;/dev/disk/by-id/scsi-36001405cdd5ac8d40e548449318510c3" hn1-db-1:~ # sbd -d /dev/disk/by-id/scsi-36001405772fe8401e6240c985857e116 -d /dev/disk/by-id/scsi-36001405034a84428af24ddd8c3a3e9e1 -d /dev/disk/by-id/scsi-36001405cdd5ac8d40e548449318510c3 message hn1-db-1 clear hn1-db-1:~ # systemctl start pacemaker # run as <hana sid>adm hn1adm@hn1-db-1:/usr/sap/HN1/HDB03> hdbnsutil -sr_register --remoteHost=hn1-db-0 --remoteInstance=<instance number> --replicationMode=sync --name=<site 2> # run as root hn1-db-1:~ # crm resource cleanup msl_SAPHana_<HANA SID>_HDB<instance number> hn1-db-1The resource state after the test:
Clone Set: cln_SAPHanaTopology_HN1_HDB03 [rsc_SAPHanaTopology_HN1_HDB03]
   Started: [ hn1-db-0 hn1-db-1 ]
Master/Slave Set: msl_SAPHana_HN1_HDB03 [rsc_SAPHana_HN1_HDB03]
   Masters: [ hn1-db-0 ]
   Slaves: [ hn1-db-1 ]
Resource Group: g_ip_HN1_HDB03
   rsc_ip_HN1_HDB03   (ocf::heartbeat:IPaddr2):       Started hn1-db-0
   rsc_nc_HN1_HDB03   (ocf::heartbeat:azure-lb):      Started hn1-db-0
</code></pre>
Test 7: Stop the secondary database on node 2.
The resource state before starting the test:
Clone Set: cln_SAPHanaTopology_HN1_HDB03 [rsc_SAPHanaTopology_HN1_HDB03]
   Started: [ hn1-db-0 hn1-db-1 ]
Master/Slave Set: msl_SAPHana_HN1_HDB03 [rsc_SAPHana_HN1_HDB03]
   Masters: [ hn1-db-0 ]
   Slaves: [ hn1-db-1 ]
Resource Group: g_ip_HN1_HDB03
   rsc_ip_HN1_HDB03   (ocf::heartbeat:IPaddr2):       Started hn1-db-0
   rsc_nc_HN1_HDB03   (ocf::heartbeat:azure-lb):      Started hn1-db-0
Run the following commands as <hana sid>adm on the
hn1-db-1node:hn1adm@hn1-db-1:/usr/sap/HN1/HDB03> HDB stopPacemaker detects the stopped HANA instance and marks the resource as failed on the
hn1-db-1node. Pacemaker automatically restarts the HANA instance.Run the following command to clean up the failed state:
# run as root
hn1-db-1>:~ # crm resource cleanup msl_SAPHana_<HANA SID>_HDB<instance number> hn1-db-1
The resource state after the test:
Clone Set: cln_SAPHanaTopology_HN1_HDB03 [rsc_SAPHanaTopology_HN1_HDB03]
   Started: [ hn1-db-0 hn1-db-1 ]
Master/Slave Set: msl_SAPHana_HN1_HDB03 [rsc_SAPHana_HN1_HDB03]
   Masters: [ hn1-db-0 ]
   Slaves: [ hn1-db-1 ]
Resource Group: g_ip_HN1_HDB03
   rsc_ip_HN1_HDB03   (ocf::heartbeat:IPaddr2):       Started hn1-db-0
   rsc_nc_HN1_HDB03   (ocf::heartbeat:azure-lb):      Started hn1-db-0
Test 8: Crash the secondary database on node 2.
The resource state before starting the test:
Clone Set: cln_SAPHanaTopology_HN1_HDB03 [rsc_SAPHanaTopology_HN1_HDB03]
   Started: [ hn1-db-0 hn1-db-1 ]
Master/Slave Set: msl_SAPHana_HN1_HDB03 [rsc_SAPHana_HN1_HDB03]
   Masters: [ hn1-db-0 ]
   Slaves: [ hn1-db-1 ]
Resource Group: g_ip_HN1_HDB03
   rsc_ip_HN1_HDB03   (ocf::heartbeat:IPaddr2):       Started hn1-db-0
   rsc_nc_HN1_HDB03   (ocf::heartbeat:azure-lb):      Started hn1-db-0
Run the following commands as <hana sid>adm on the
hn1-db-1node:hn1adm@hn1-db-1:/usr/sap/HN1/HDB03> HDB kill-9Pacemaker detects the killed HANA instance and marks the resource as failed on the
hn1-db-1node. Run the following command to clean up the failed state. Pacemaker then automatically restarts the HANA instance.# run as root hn1-db-1:~ # crm resource cleanup msl_SAPHana_<HANA SID>_HDB<instance number> HN1-db-1The resource state after the test:
Clone Set: cln_SAPHanaTopology_HN1_HDB03 [rsc_SAPHanaTopology_HN1_HDB03]
   Started: [ hn1-db-0 hn1-db-1 ]
Master/Slave Set: msl_SAPHana_HN1_HDB03 [rsc_SAPHana_HN1_HDB03]
   Masters: [ hn1-db-0 ]
   Slaves: [ hn1-db-1 ]
Resource Group: g_ip_HN1_HDB03
   rsc_ip_HN1_HDB03   (ocf::heartbeat:IPaddr2):       Started hn1-db-0
   rsc_nc_HN1_HDB03   (ocf::heartbeat:azure-lb):      Started hn1-db-0
Test 9: Crash the secondary site node (node 2) that's running the secondary HANA database.
The resource state before starting the test:
Clone Set: cln_SAPHanaTopology_HN1_HDB03 [rsc_SAPHanaTopology_HN1_HDB03]
   Started: [ hn1-db-0 hn1-db-1 ]
Master/Slave Set: msl_SAPHana_HN1_HDB03 [rsc_SAPHana_HN1_HDB03]
   Masters: [ hn1-db-0 ]
   Slaves: [ hn1-db-1 ]
Resource Group: g_ip_HN1_HDB03
   rsc_ip_HN1_HDB03   (ocf::heartbeat:IPaddr2):       Started hn1-db-0
   rsc_nc_HN1_HDB03   (ocf::heartbeat:azure-lb):      Started hn1-db-0
Run the following commands as root on the
hn1-db-1node:hn1-db-1:~ # echo b > /proc/sysrq-triggerPacemaker detects the killed cluster node and fenced the node. When the fenced node is rebooted, Pacemaker doesn't start automatically.
Run the following commands to start Pacemaker, clean the SBD messages for the
hn1-db-1node, and clean up the failed resource:# run as root # list the SBD device(s) hn1-db-1:~ # cat /etc/sysconfig/sbd | grep SBD_DEVICE= # SBD_DEVICE="/dev/disk/by-id/scsi-36001405772fe8401e6240c985857e116;/dev/disk/by-id/scsi-36001405034a84428af24ddd8c3a3e9e1;/dev/disk/by-id/scsi-36001405cdd5ac8d40e548449318510c3" hn1-db-1:~ # sbd -d /dev/disk/by-id/scsi-36001405772fe8401e6240c985857e116 -d /dev/disk/by-id/scsi-36001405034a84428af24ddd8c3a3e9e1 -d /dev/disk/by-id/scsi-36001405cdd5ac8d40e548449318510c3 message hn1-db-1 clear hn1-db-1:~ # systemctl start pacemaker hn1-db-1:~ # crm resource cleanup msl_SAPHana_<HANA SID>_HDB<instance number> hn1-db-1The resource state after the test:
Clone Set: cln_SAPHanaTopology_HN1_HDB03 [rsc_SAPHanaTopology_HN1_HDB03]
   Started: [ hn1-db-0 hn1-db-1 ]
Master/Slave Set: msl_SAPHana_HN1_HDB03 [rsc_SAPHana_HN1_HDB03]
   Masters: [ hn1-db-0 ]
   Slaves: [ hn1-db-1 ]
Resource Group: g_ip_HN1_HDB03
   rsc_ip_HN1_HDB03   (ocf::heartbeat:IPaddr2):       Started hn1-db-0
   rsc_nc_HN1_HDB03   (ocf::heartbeat:azure-lb):      Started hn1-db-0
Test 10: Crash primary database indexserver
This test is relevant only when you have set up the susChkSrv hook as outlined in Implement HANA hooks SAPHanaSR and susChkSrv.
The resource state before starting the test:
Clone Set: cln_SAPHanaTopology_HN1_HDB03 [rsc_SAPHanaTopology_HN1_HDB03]
   Started: [ hn1-db-0 hn1-db-1 ]
Master/Slave Set: msl_SAPHana_HN1_HDB03 [rsc_SAPHana_HN1_HDB03]
   Masters: [ hn1-db-0 ]
   Slaves: [ hn1-db-1 ]
Resource Group: g_ip_HN1_HDB03
   rsc_ip_HN1_HDB03   (ocf::heartbeat:IPaddr2):       Started hn1-db-0
   rsc_nc_HN1_HDB03   (ocf::heartbeat:azure-lb):      Started hn1-db-0
Run the following commands as root on the
hn1-db-0node:hn1-db-0:~ # killall -9 hdbindexserverWhen the indexserver is terminated, the susChkSrv hook detects the event and trigger an action to fence 'hn1-db-0' node and initiate a takeover process.
Run the following commands to register
hn1-db-0node as secondary and clean up the failed resource:# run as <hana sid>adm hn1adm@hn1-db-0:/usr/sap/HN1/HDB03> hdbnsutil -sr_register --remoteHost=hn1-db-1 --remoteInstance=<instance number> --replicationMode=sync --name=<site 1> # run as root hn1-db-0:~ # crm resource cleanup msl_SAPHana_<HANA SID>_HDB<instance number> hn1-db-0The resource state after the test:
Clone Set: cln_SAPHanaTopology_HN1_HDB03 [rsc_SAPHanaTopology_HN1_HDB03]
   Started: [ hn1-db-0 hn1-db-1 ]
Master/Slave Set: msl_SAPHana_HN1_HDB03 [rsc_SAPHana_HN1_HDB03]
   Masters: [ hn1-db-1 ]
   Slaves: [ hn1-db-0 ]
Resource Group: g_ip_HN1_HDB03
   rsc_ip_HN1_HDB03   (ocf::heartbeat:IPaddr2):       Started hn1-db-1
   rsc_nc_HN1_HDB03   (ocf::heartbeat:azure-lb):      Started hn1-db-1
You can execute a comparable test case by causing the indexserver on the secondary node to crash. In the event of indexserver crash, the susChkSrv hook will recognize the occurrence and initiate an action to fence the secondary node.
Next steps
Feedback
Coming soon: Throughout 2024 we will be phasing out GitHub Issues as the feedback mechanism for content and replacing it with a new feedback system. For more information see: https://aka.ms/ContentUserFeedback.
Submit and view feedback for