High availability of SAP HANA scale-up with Azure NetApp Files on SUSE Enterprise Linux
This article describes how to configure SAP HANA system replication in scale-up deployment when the HANA file systems are mounted via NFS by using Azure NetApp Files. In the example configurations and installation commands, instance number 03 and HANA System ID HN1 are used. SAP HANA replication consists of one primary node and at least one secondary node.
When steps in this document are marked with the following prefixes, they mean:
- [A]: The step applies to all nodes.
- [1]: The step applies to node1 only.
- [2]: The step applies to node2 only.
Read the following SAP Notes and papers first:
- SAP Note 1928533 has:
- The list of Azure VM sizes that are supported for the deployment of SAP software.
- Important capacity information for Azure virtual machine (VM) sizes.
- The supported SAP software and operating system (OS) and database combinations.
- The required SAP kernel version for Windows and Linux on Azure.
- SAP Note 2015553 lists prerequisites for SAP-supported SAP software deployments in Azure.
- SAP Note 405827 lists the recommended file system for the HANA environment.
- SAP Note 2684254 has recommended OS settings for SUSE Linux Enterprise Server (SLES) 15/SLES for SAP Applications 15.
- SAP Note 1944799 has SAP HANA guidelines for SLES OS installation.
- SAP Note 2178632 has detailed information about all monitoring metrics reported for SAP in Azure.
- SAP Note 2191498 has the required SAP Host Agent version for Linux in Azure.
- SAP Note 2243692 has information about SAP licensing on Linux in Azure.
- SAP Note 1999351 has more troubleshooting information for the Azure Enhanced Monitoring extension for SAP.
- SAP Note 1900823 contains information about SAP HANA storage requirements.
- SUSE SAP high availability (HA) Best Practice Guides contain all required information to set up NetWeaver HA and SAP HANA system replication on-premises (to be used as a general baseline). They provide much more detailed information.
- SAP Community Wiki has all required SAP Notes for Linux.
- Azure Virtual Machines planning and implementation for SAP on Linux
- Azure Virtual Machines deployment for SAP on Linux
- Azure Virtual Machines DBMS deployment for SAP on Linux
- General SLES documentation:
- Setting up an SAP HANA cluster
- SLES High Availability Extension 15 SP3 Release Notes
- Operating System Security Hardening Guide for SAP HANA for SUSE Linux Enterprise Server 15
- SUSE Linux Enterprise Server for SAP Applications 15 SP3 Guide
- SUSE Linux Enterprise Server for SAP Applications 15 SP3 SAP Automation
- SUSE Linux Enterprise Server for SAP Applications 15 SP3 SAP Monitoring
- Azure-specific SLES documentation:
- NetApp SAP Applications on Microsoft Azure using Azure NetApp Files
- NFS v4.1 volumes on Azure NetApp Files for SAP HANA
- Azure Virtual Machines planning and implementation for SAP on Linux
Note
This article contains references to a term that Microsoft no longer uses. When the term is removed from the software, we'll remove it from this article.
Overview
Traditionally, in a scale-up environment, all file systems for SAP HANA are mounted from local storage. Setting up HA of SAP HANA system replication on SUSE Enterprise Linux is published in Set up SAP HANA system replication on SLES.
To achieve SAP HANA HA of a scale-up system on Azure NetApp Files NFS shares, we need extra resource configuration in the cluster. This configuration is needed so that HANA resources can recover when one node loses access to the NFS shares on Azure NetApp Files.
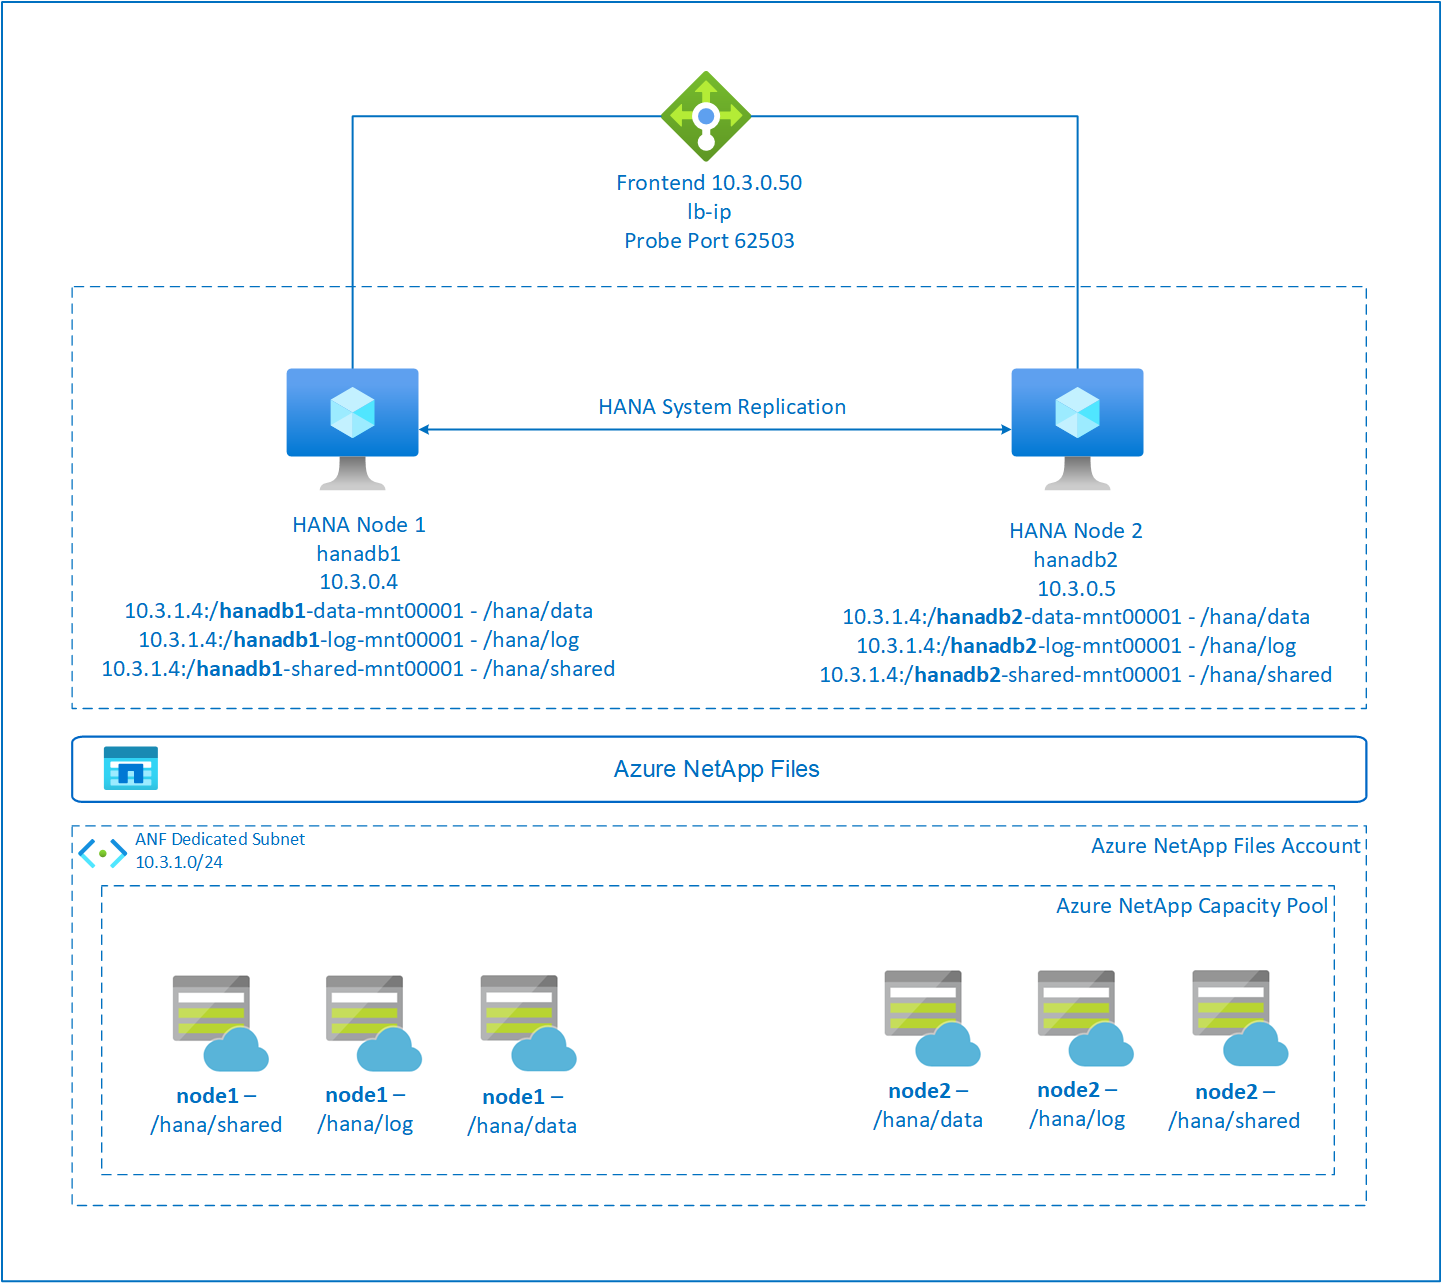
SAP HANA file systems are mounted on NFS shares by using Azure NetApp Files on each node. The file systems /hana/data, /hana/log, and /hana/shared are unique to each node.
Mounted on node1 (hanadb1):
- 10.3.1.4:/hanadb1-data-mnt00001 on /hana/data
- 10.3.1.4:/hanadb1-log-mnt00001 on /hana/log
- 10.3.1.4:/hanadb1-shared-mnt00001 on /hana/shared
Mounted on node2 (hanadb2):
- 10.3.1.4:/hanadb2-data-mnt00001 on /hana/data
- 10.3.1.4:/hanadb2-log-mnt00001 on /hana/log
- 10.3.1.4:/hanadb2-shared-mnt0001 on /hana/shared
Note
The file systems /hana/shared, /hana/data, and /hana/log aren't shared between the two nodes. Each cluster node has its own separate file systems.
SAP HA HANA system replication configuration uses a dedicated virtual hostname and virtual IP addresses. On Azure, a load balancer is required to use a virtual IP address. The presented configuration shows a load balancer with:
- Front-end configuration IP address: 10.3.0.50 for hn1-db
- Probe port: 62503
Set up the Azure NetApp Files infrastructure
Before you continue with the setup for Azure NetApp Files infrastructure, familiarize yourself with the Azure NetApp Files documentation.
Azure NetApp Files is available in several Azure regions. Check to see whether your selected Azure region offers Azure NetApp Files.
For information about the availability of Azure NetApp Files by Azure region, see Azure NetApp Files availability by Azure region.
Important considerations
As you create your Azure NetApp Files for SAP HANA scale-up systems, be aware of the important considerations documented in NFS v4.1 volumes on Azure NetApp Files for SAP HANA.
Sizing of HANA database on Azure NetApp Files
The throughput of an Azure NetApp Files volume is a function of the volume size and service level, as documented in Service level for Azure NetApp Files.
While you design the infrastructure for SAP HANA on Azure with Azure NetApp Files, be aware of the recommendations in NFS v4.1 volumes on Azure NetApp Files for SAP HANA.
The configuration in this article is presented with simple Azure NetApp Files volumes.
Important
For production systems, where performance is key, we recommend that you evaluate and consider using Azure NetApp Files application volume group for SAP HANA.
All commands to mount /hana/shared in this article are presented for NFSv4.1 /hana/shared volumes. If you deployed the /hana/shared volumes as NFSv3 volumes, don't forget to adjust the mount commands for /hana/shared for NFSv3.
Deploy Azure NetApp Files resources
The following instructions assume that you already deployed your Azure virtual network. The Azure NetApp Files resources and VMs, where the Azure NetApp Files resources are mounted, must be deployed in the same Azure virtual network or in peered Azure virtual networks.
Create a NetApp account in your selected Azure region by following the instructions in Create a NetApp account.
Set up an Azure NetApp Files capacity pool by following the instructions in Set up an Azure NetApp Files capacity pool.
The HANA architecture presented in this article uses a single Azure NetApp Files capacity pool at the Ultra service level. For HANA workloads on Azure, we recommend using the Azure NetApp Files Ultra or Premium service Level.
Delegate a subnet to Azure NetApp Files, as described in the instructions in Delegate a subnet to Azure NetApp Files.
Deploy Azure NetApp Files volumes by following the instructions in Create an NFS volume for Azure NetApp Files.
As you deploy the volumes, be sure to select the NFSv4.1 version. Deploy the volumes in the designated Azure NetApp Files subnet. The IP addresses of the Azure NetApp Files volumes are assigned automatically.
The Azure NetApp Files resources and the Azure VMs must be in the same Azure virtual network or in peered Azure virtual networks. For example, hanadb1-data-mnt00001, hanadb1-log-mnt00001, and so on are the volume names, and nfs://10.3.1.4/hanadb1-data-mnt00001, nfs://10.3.1.4/hanadb1-log-mnt00001, and so on are the file paths for the Azure NetApp Files volumes.
On hanadb1:
- Volume hanadb1-data-mnt00001 (nfs://10.3.1.4:/hanadb1-data-mnt00001)
- Volume hanadb1-log-mnt00001 (nfs://10.3.1.4:/hanadb1-log-mnt00001)
- Volume hanadb1-shared-mnt00001 (nfs://10.3.1.4:/hanadb1-shared-mnt00001)
On hanadb2:
- Volume hanadb2-data-mnt00001 (nfs://10.3.1.4:/hanadb2-data-mnt00001)
- Volume hanadb2-log-mnt00001 (nfs://10.3.1.4:/hanadb2-log-mnt00001)
- Volume hanadb2-shared-mnt00001 (nfs://10.3.1.4:/hanadb2-shared-mnt00001)
Prepare the infrastructure
The resource agent for SAP HANA is included in SUSE Linux Enterprise Server for SAP Applications. An image for SUSE Linux Enterprise Server for SAP Applications 12 or 15 is available in Azure Marketplace. You can use the image to deploy new VMs.
Deploy Linux VMs manually via the Azure portal
This document assumes that you already deployed a resource group, Azure Virtual Network, and subnet.
Deploy VMs for SAP HANA. Choose a suitable SLES image that's supported for the HANA system. You can deploy a VM in any one of the availability options: virtual machine scale set, availability zone, or availability set.
Important
Make sure that the OS you select is SAP certified for SAP HANA on the specific VM types that you plan to use in your deployment. You can look up SAP HANA-certified VM types and their OS releases in SAP HANA Certified IaaS Platforms. Make sure that you look at the details of the VM type to get the complete list of SAP HANA-supported OS releases for the specific VM type.
Configure Azure Load Balancer
During VM configuration, you have an option to create or select the existing load balancer in the networking section. Follow the next steps to set up a standard load balancer for HA setup of the HANA database.
Follow the steps in Create load balancer to set up a standard load balancer for a high-availability SAP system by using the Azure portal. During the setup of the load balancer, consider the following points:
- Frontend IP Configuration: Create a front-end IP. Select the same virtual network and subnet name as your database virtual machines.
- Backend Pool: Create a back-end pool and add database VMs.
- Inbound rules: Create a load-balancing rule. Follow the same steps for both load-balancing rules.
- Frontend IP address: Select a front-end IP.
- Backend pool: Select a back-end pool.
- High-availability ports: Select this option.
- Protocol: Select TCP.
- Health Probe: Create a health probe with the following details:
- Protocol: Select TCP.
- Port: For example, 625<instance-no.>.
- Interval: Enter 5.
- Probe Threshold: Enter 2.
- Idle timeout (minutes): Enter 30.
- Enable Floating IP: Select this option.
Note
The health probe configuration property numberOfProbes, otherwise known as Unhealthy threshold in the portal, isn't respected. To control the number of successful or failed consecutive probes, set the property probeThreshold to 2. It's currently not possible to set this property by using the Azure portal, so use either the Azure CLI or the PowerShell command.
For more information about the required ports for SAP HANA, read the chapter Connections to Tenant Databases in the SAP HANA Tenant Databases guide or SAP Note 2388694.
When VMs without public IP addresses are placed in the back-end pool of internal (no public IP address) Standard Azure Load Balancer, there's no outbound internet connectivity unless more configuration is performed to allow routing to public endpoints. For more information on how to achieve outbound connectivity, see Public endpoint connectivity for VMs using Azure Standard Load Balancer in SAP high-availability scenarios.
Important
- Don't enable TCP timestamps on Azure VMs placed behind Load Balancer. Enabling TCP timestamps causes the health probes to fail. Set the parameter
net.ipv4.tcp_timestampsto0. For more information, see Load Balancer health probes and SAP Note 2382421. - To prevent saptune from changing the manually set
net.ipv4.tcp_timestampsvalue from0back to1, update the saptune version to 3.1.1 or higher. For more information, see saptune 3.1.1 – Do I Need to Update?.
Mount the Azure NetApp Files volume
[A] Create mount points for the HANA database volumes.
sudo mkdir -p /hana/data/HN1/mnt00001
sudo mkdir -p /hana/log/HN1/mnt00001
sudo mkdir -p /hana/shared/HN1
[A] Verify the NFS domain setting. Make sure that the domain is configured as the default Azure NetApp Files domain, that is, defaultv4iddomain.com, and the mapping is set to nobody.
sudo cat /etc/idmapd.confExample output:
[General]
Domain = defaultv4iddomain.com
[Mapping]
Nobody-User = nobody
Nobody-Group = nobody
Important
Make sure to set the NFS domain in /etc/idmapd.conf on the VM to match the default domain configuration on Azure NetApp Files: defaultv4iddomain.com. If there's a mismatch between the domain configuration on the NFS client (that is, the VM) and the NFS server (that is, the Azure NetApp Files configuration), the permissions for files on Azure NetApp Files volumes that are mounted on the VMs display as nobody.
[A] Edit
/etc/fstabon both nodes to permanently mount the volumes relevant to each node. The following example shows how you mount the volumes permanently.sudo vi /etc/fstabAdd the following entries in
/etc/fstabon both nodes.Example for hanadb1:
10.3.1.4:/hanadb1-data-mnt00001 /hana/data/HN1/mnt00001  nfs   rw,nfsvers=4.1,hard,timeo=600,rsize=262144,wsize=262144,noatime,lock,_netdev,sec=sys  0  0
10.3.1.4:/hanadb1-log-mnt00001 /hana/log/HN1/mnt00001  nfs   rw,nfsvers=4.1,hard,timeo=600,rsize=262144,wsize=262144,noatime,lock,_netdev,sec=sys  0  0
10.3.1.4:/hanadb1-shared-mnt00001 /hana/shared/HN1  nfs   rw,nfsvers=4.1,hard,timeo=600,rsize=262144,wsize=262144,noatime,lock,_netdev,sec=sys  0  0
Example for hanadb2:
10.3.1.4:/hanadb2-data-mnt00001 /hana/data/HN1/mnt00001  nfs   rw,nfsvers=4.1,hard,timeo=600,rsize=262144,wsize=262144,noatime,lock,_netdev,sec=sys  0  0
10.3.1.4:/hanadb2-log-mnt00001 /hana/log/HN1/mnt00001  nfs   rw,nfsvers=4.1,hard,timeo=600,rsize=262144,wsize=262144,noatime,lock,_netdev,sec=sys  0  0
10.3.1.4:/hanadb2-shared-mnt00001 /hana/shared/HN1  nfs   rw,nfsvers=4.1,hard,timeo=600,rsize=262144,wsize=262144,noatime,lock,_netdev,sec=sys  0  0
Mount all volumes.
sudo mount -aFor workloads that require higher throughput, consider using the
nconnectmount option, as described in NFS v4.1 volumes on Azure NetApp Files for SAP HANA. Check ifnconnectis supported by Azure NetApp Files on your Linux release.[A] Verify that all HANA volumes are mounted with NFS protocol version NFSv4.
sudo nfsstat -mVerify that flag
versis set to 4.1.Example from hanadb1:
/hana/log/HN1/mnt00001 from 10.3.1.4:/hanadb1-log-mnt00001
Flags: rw,noatime,vers=4.1,rsize=262144,wsize=262144,namlen=255,hard,proto=tcp,timeo=600,retrans=2,sec=sys,clientaddr=10.3.0.4,local_lock=none,addr=10.3.1.4
/hana/data/HN1/mnt00001 from 10.3.1.4:/hanadb1-data-mnt00001
Flags: rw,noatime,vers=4.1,rsize=262144,wsize=262144,namlen=255,hard,proto=tcp,timeo=600,retrans=2,sec=sys,clientaddr=10.3.0.4,local_lock=none,addr=10.3.1.4
/hana/shared/HN1 from 10.3.1.4:/hanadb1-shared-mnt00001
Flags: rw,noatime,vers=4.1,rsize=262144,wsize=262144,namlen=255,hard,proto=tcp,timeo=600,retrans=2,sec=sys,clientaddr=10.3.0.4,local_lock=none,addr=10.3.1.4
[A] Verify nfs4_disable_idmapping. It should be set to Y. To create the directory structure where nfs4_disable_idmapping is located, run the mount command. You won't be able to manually create the directory under
/sys/modulesbecause access is reserved for the kernel/drivers.#Check nfs4_disable_idmapping sudo cat /sys/module/nfs/parameters/nfs4_disable_idmapping #If you need to set nfs4_disable_idmapping to Y sudo echo "Y" > /sys/module/nfs/parameters/nfs4_disable_idmapping #Make the configuration permanent sudo echo "options nfs nfs4_disable_idmapping=Y" >> /etc/modprobe.d/nfs.conf
SAP HANA installation
[A] Set up host name resolution for all hosts.
You can either use a DNS server or modify the
/etc/hostsfile on all nodes. This example shows how to use the/etc/hostsfile. Replace the IP address and the host name in the following commands:sudo vi /etc/hostsInsert the following lines in the
/etc/hostsfile. Change the IP address and host name to match your environment.10.3.0.4 hanadb1 10.3.0.5 hanadb2[A] Prepare the OS for running SAP HANA on Azure NetApp with NFS, as described in SAP Note 3024346 - Linux Kernel Settings for NetApp NFS. Create the configuration file
/etc/sysctl.d/91-NetApp-HANA.conffor the NetApp configuration settings.sudo vi /etc/sysctl.d/91-NetApp-HANA.confAdd the following entries in the configuration file:
net.core.rmem_max = 16777216
net.core.wmem_max = 16777216
net.ipv4.tcp_rmem = 4096 131072 16777216
net.ipv4.tcp_wmem = 4096 16384 16777216
net.core.netdev_max_backlog = 300000
net.ipv4.tcp_slow_start_after_idle=0
net.ipv4.tcp_no_metrics_save = 1
net.ipv4.tcp_moderate_rcvbuf = 1
net.ipv4.tcp_window_scaling = 1
net.ipv4.tcp_sack = 1
[A] Create the configuration file
/etc/sysctl.d/ms-az.confwith more optimization settings.sudo vi /etc/sysctl.d/ms-az.confAdd the following entries in the configuration file:
net.ipv6.conf.all.disable_ipv6 = 1
net.ipv4.tcp_max_syn_backlog = 16348
net.ipv4.conf.all.rp_filter = 0
sunrpc.tcp_slot_table_entries = 128
vm.swappiness=10
Tip
Avoid setting
net.ipv4.ip_local_port_rangeandnet.ipv4.ip_local_reserved_portsexplicitly in the sysctl configuration files to allow the SAP Host Agent to manage the port ranges. For more information, see SAP Note 2382421.[A] Adjust the
sunrpcsettings, as recommended in SAP Note 3024346 - Linux Kernel Settings for NetApp NFS.sudo vi /etc/modprobe.d/sunrpc.confInsert the following line:
options sunrpc tcp_max_slot_table_entries=128[A] Configure SLES for HANA.
Configure SLES as described in the following SAP Notes based on your SLES version:
- 2684254 Recommended OS settings for SLES 15 / SLES for SAP Applications 15
- 2205917 Recommended OS settings for SLES 12 / SLES for SAP Applications 12
- 2455582 Linux: Running SAP applications compiled with GCC 6.x
- 2593824 Linux: Running SAP applications compiled with GCC 7.x
- 2886607 Linux: Running SAP applications compiled with GCC 9.x
[A] Install the SAP HANA.
Starting with HANA 2.0 SPS 01, Multitenant Database Containers (MDC) is the default option. When you install the HANA system, SYSTEMDB and a tenant with the same SID are created together. In some cases, you don't want the default tenant. If you don't want to create the initial tenant along with the installation, follow the instructions in SAP Note 2629711.
Start the
hdblcmprogram from the HANA installation software directory../hdblcmAt the prompt, enter the following values:
- For Choose installation: Enter 1 (for install).
- For Select additional components for installation: Enter 1.
- For Enter Installation Path [/hana/shared]: Press Enter to accept the default.
- For Enter Local Host Name [..]: Press Enter to accept the default.
- Under Do you want to add additional hosts to the system? (y/n) [n]: Select n.
- For Enter SAP HANA System ID: Enter HN1.
- For Enter Instance Number [00]: Enter 03.
- For Select Database Mode / Enter Index [1]: Press Enter to accept the default.
- For Select System Usage / Enter Index [4]: Enter 4 (for custom).
- For Enter Location of Data Volumes [/hana/data]: Press Enter to accept the default.
- For Enter Location of Log Volumes [/hana/log]: Press Enter to accept the default.
- For Restrict maximum memory allocation? [n]: Press Enter to accept the default.
- For Enter Certificate Host Name For Host '...' [...]: Press Enter to accept the default.
- For Enter SAP Host Agent User (sapadm) Password: Enter the host agent user password.
- For Confirm SAP Host Agent User (sapadm) Password: Enter the host agent user password again to confirm.
- For Enter System Administrator (hn1adm) Password: Enter the system administrator password.
- For Confirm System Administrator (hn1adm) Password: Enter the system administrator password again to confirm.
- For Enter System Administrator Home Directory [/usr/sap/HN1/home]: Press Enter to accept the default.
- For Enter System Administrator Login Shell [/bin/sh]: Press Enter to accept the default.
- For Enter System Administrator User ID [1001]: Press Enter to accept the default.
- For Enter ID of User Group (sapsys) [79]: Press Enter to accept the default.
- For Enter Database User (SYSTEM) Password: Enter the database user password.
- For Confirm Database User (SYSTEM) Password: Enter the database user password again to confirm.
- For Restart system after machine reboot? [n]: Press Enter to accept the default.
- For Do you want to continue? (y/n): Validate the summary. Enter y to continue.
[A] Upgrade the SAP Host Agent.
Download the latest SAP Host Agent archive from the SAP Software Center and run the following command to upgrade the agent. Replace the path to the archive to point to the file that you downloaded.
sudo /usr/sap/hostctrl/exe/saphostexec -upgrade -archive <path to SAP Host Agent SAR>
Configure SAP HANA system replication
Follow the steps in SAP HANA system replication to configure SAP HANA system replication.
Cluster configuration
This section describes the necessary steps that are required for the cluster to operate seamlessly when SAP HANA is installed on NFS shares by using Azure NetApp Files.
Create a Pacemaker cluster
Follow the steps in Setting up Pacemaker on SUSE Enterprise Linux in Azure to create a basic Pacemaker cluster for this HANA server.
Implement HANA hooks SAPHanaSR and susChkSrv
This important step optimizes the integration with the cluster and improves the detection when a cluster failover is needed. We highly recommend that you configure both SAPHanaSR and susChkSrv Python hooks. Follow the steps in Implement the Python system replication hooks SAPHanaSR and susChkSrv.
Configure SAP HANA cluster resources
This section describes the necessary steps that are required to configure the SAP HANA cluster resources.
Create SAP HANA cluster resources
Follow the steps in Creating SAP HANA cluster resources to create the cluster resources for the HANA server. After the resources are created, you should see the status of the cluster with the following command:
sudo crm_mon -r
Example output:
# Online: [ hn1-db-0 hn1-db-1 ]
# Full list of resources:
# stonith-sbd     (stonith:external/sbd): Started hn1-db-0
# Clone Set: cln_SAPHanaTopology_HN1_HDB03 [rsc_SAPHanaTopology_HN1_HDB03]
#     Started: [ hn1-db-0 hn1-db-1 ]
# Master/Slave Set: msl_SAPHana_HN1_HDB03 [rsc_SAPHana_HN1_HDB03]
#     Masters: [ hn1-db-0 ]
#     Slaves: [ hn1-db-1 ]
# Resource Group: g_ip_HN1_HDB03
#     rsc_ip_HN1_HDB03   (ocf::heartbeat:IPaddr2):       Started hn1-db-0
#     rsc_nc_HN1_HDB03   (ocf::heartbeat:azure-lb):      Started hn1-db-0
Create file system resources
Create a dummy file system cluster resource. It monitors and reports failures if there's a problem accessing the NFS-mounted file system /hana/shared. That allows the cluster to trigger failover if there's a problem accessing /hana/shared. For more information, see Handling failed NFS share in SUSE HA cluster for HANA system replication.
[A] Create the directory structure on both nodes.
sudo mkdir -p /hana/shared/HN1/check
sudo mkdir -p /hana/shared/check
[1] Configure the cluster to add the directory structure for monitoring.
sudo crm configure primitive rsc_fs_check_HN1_HDB03 Filesystem params \
    device="/hana/shared/HN1/check/" \
    directory="/hana/shared/check/" fstype=nfs  \
    options="bind,defaults,rw,hard,rsize=262144,wsize=262144,proto=tcp,noatime,_netdev,nfsvers=4.1,lock,sec=sys" \
    op monitor interval=120 timeout=120 on-fail=fence \
    op_params OCF_CHECK_LEVEL=20 \
    op start interval=0 timeout=120 \
    op stop interval=0 timeout=120
[1] Clone and check the newly configured volume in the cluster.
sudo crm configure clone cln_fs_check_HN1_HDB03 rsc_fs_check_HN1_HDB03 meta clone-node-max=1 interleave=trueExample output:
sudo crm status

# Cluster Summary:
# Stack: corosync
# Current DC: hanadb1 (version 2.0.5+20201202.ba59be712-4.9.1-2.0.5+20201202.ba59be712) - partition with quorum
# Last updated: Tue Nov  2 17:57:39 2021
# Last change:  Tue Nov  2 17:57:38 2021 by root via crm_attribute on hanadb1
# 2 nodes configured
# 11 resource instances configured

# Node List:
# Online: [ hanadb1 hanadb2 ]

# Full List of Resources:
# Clone Set: cln_azure-events [rsc_azure-events]:
#  Started: [ hanadb1 hanadb2 ]
# Clone Set: cln_SAPHanaTopology_HN1_HDB03 [rsc_SAPHanaTopology_HN1_HDB03]:
#  rsc_SAPHanaTopology_HN1_HDB03     (ocf::suse:SAPHanaTopology):     Started hanadb1 (Monitoring)
#  rsc_SAPHanaTopology_HN1_HDB03     (ocf::suse:SAPHanaTopology):     Started hanadb2 (Monitoring)
# Clone Set: msl_SAPHana_HN1_HDB03 [rsc_SAPHana_HN1_HDB03] (promotable):
#  rsc_SAPHana_HN1_HDB03     (ocf::suse:SAPHana):     Master hanadb1 (Monitoring)
#  Slaves: [ hanadb2 ]
# Resource Group: g_ip_HN1_HDB03:
#  rsc_ip_HN1_HDB03  (ocf::heartbeat:IPaddr2):        Started hanadb1
#  rsc_nc_HN1_HDB03  (ocf::heartbeat:azure-lb):       Started hanadb1
# rsc_st_azure        (stonith:fence_azure_arm):       Started hanadb2
# Clone Set: cln_fs_check_HN1_HDB03 [rsc_fs_check_HN1_HDB03]:
#  Started: [ hanadb1 hanadb2 ]
The
OCF_CHECK_LEVEL=20attribute is added to the monitor operation so that monitor operations perform a read/write test on the file system. Without this attribute, the monitor operation only verifies that the file system is mounted. This can be a problem because when connectivity is lost, the file system might remain mounted, despite being inaccessible.The
on-fail=fenceattribute is also added to the monitor operation. With this option, if the monitor operation fails on a node, that node is immediately fenced.
Important
Timeouts in the preceding configuration might need to be adapted to the specific HANA setup to avoid unnecessary fence actions. Don't set the timeout values too low. Be aware that the file system monitor isn't related to the HANA system replication. For more information, see the SUSE documentation.
Test the cluster setup
This section describes how you can test your setup.
Before you start a test, make sure that Pacemaker doesn't have any failed action (via crm status) and no unexpected location constraints (for example, leftovers of a migration test). Also, ensure that HANA system replication is in sync state, for example, with
systemReplicationStatus.sudo su - hn1adm -c "python /usr/sap/HN1/HDB03/exe/python_support/systemReplicationStatus.py"Verify the status of the HANA resources by using this command:
SAPHanaSR-showAttr

# You should see something like below
# hanadb1:~ SAPHanaSR-showAttr
# Global cib-time                 maintenance
# --------------------------------------------
# global Mon Nov  8 22:50:30 2021 false
# Sites srHook
# -------------
# SITE1 PRIM
# SITE2 SOK
# Site2 SOK
# Hosts   clone_state lpa_hn1_lpt node_state op_mode   remoteHost roles                            score site  srmode sync_state version                vhost
# --------------------------------------------------------------------------------------------------------------------------------------------------------------
# hanadb1 PROMOTED    1636411810  online     logreplay hanadb2    4:P:master1:master:worker:master 150   SITE1 sync   PRIM       2.00.058.00.1634122452 hanadb1
# hanadb2 DEMOTED     30          online     logreplay hanadb1    4:S:master1:master:worker:master 100   SITE2 sync   SOK        2.00.058.00.1634122452 hanadb2
Verify the cluster configuration for a failure scenario when a node is shut down. The following example shows shutting down node 1:
sudo crm status
sudo crm resource move msl_SAPHana_HN1_HDB03 hanadb2 force
sudo crm resource cleanup
Example output:
sudo crm status

#Cluster Summary:
# Stack: corosync
# Current DC: hanadb2 (version 2.0.5+20201202.ba59be712-4.9.1-2.0.5+20201202.ba59be712) - partition with quorum
# Last updated: Mon Nov  8 23:25:36 2021
# Last change:  Mon Nov  8 23:25:19 2021 by root via crm_attribute on hanadb2
# 2 nodes configured
# 11 resource instances configured

# Node List:
# Online: [ hanadb1 hanadb2 ]
# Full List of Resources:
# Clone Set: cln_azure-events [rsc_azure-events]:
#  Started: [ hanadb1 hanadb2 ]
# Clone Set: cln_SAPHanaTopology_HN1_HDB03 [rsc_SAPHanaTopology_HN1_HDB03]:
#  Started: [ hanadb1 hanadb2 ]
# Clone Set: msl_SAPHana_HN1_HDB03 [rsc_SAPHana_HN1_HDB03] (promotable):
#  Masters: [ hanadb2 ]
#  Stopped: [ hanadb1 ]
# Resource Group: g_ip_HN1_HDB03:
#  rsc_ip_HN1_HDB03  (ocf::heartbeat:IPaddr2):        Started hanadb2
#  rsc_nc_HN1_HDB03  (ocf::heartbeat:azure-lb):       Started hanadb2
# rsc_st_azure        (stonith:fence_azure_arm):       Started hanadb2
# Clone Set: cln_fs_check_HN1_HDB03 [rsc_fs_check_HN1_HDB03]:
#  Started: [ hanadb1 hanadb2 ]
Stop the HANA on Node1:
sudo su - hn1adm
sapcontrol -nr 03 -function StopWait 600 10
Register Node 1 as the Secondary Node and check status:
hdbnsutil -sr_register --remoteHost=hanadb2 --remoteInstance=03 --replicationMode=sync --name=SITE1 --operationMode=logreplayExample output:
#adding site ...
#nameserver hanadb1:30301 not responding.
#collecting information ...
#updating local ini files ...
#done.
sudo crm statussudo SAPHanaSR-showAttrVerify the cluster configuration for a failure scenario when a node loses access to the NFS share (/hana/shared).
The SAP HANA resource agents depend on binaries stored on /hana/shared to perform operations during failover. File system /hana/shared is mounted over NFS in the presented scenario.
It's difficult to simulate a failure, where one of the servers loses access to the NFS share. As a test, you can remount the file system as read-only. This approach validates that the cluster can fail over if access to /hana/shared is lost on the active node.
Expected result: On making /hana/shared as a read-only file system, the
OCF_CHECK_LEVELattribute of the resourcehana_shared1, which performs read/write operations on the file system, fails. It fails because it can't write anything on the file system and performs a HANA resource failover. The same result is expected when your HANA node loses access to the NFS shares.Resource state before starting the test:
sudo crm  status

#Cluster Summary:
 # Stack: corosync
 # Current DC: hanadb2 (version 2.0.5+20201202.ba59be712-4.9.1-2.0.5+20201202.ba59be712) - partition with quorum
 # Last updated: Mon Nov  8 23:01:27 2021
 # Last change:  Mon Nov  8 23:00:46 2021 by root via crm_attribute on hanadb1
 # 2 nodes configured
 # 11 resource instances configured

 #Node List:
 # Online: [ hanadb1 hanadb2 ]

 #Full List of Resources:
 # Clone Set: cln_azure-events [rsc_azure-events]:
   # Started: [ hanadb1 hanadb2 ]
 # Clone Set: cln_SAPHanaTopology_HN1_HDB03 [rsc_SAPHanaTopology_HN1_HDB03]:
   # Started: [ hanadb1 hanadb2 ]
 # Clone Set: msl_SAPHana_HN1_HDB03 [rsc_SAPHana_HN1_HDB03] (promotable):
   # Masters: [ hanadb1 ]
   # Slaves: [ hanadb2 ]
 # Resource Group: g_ip_HN1_HDB03:
   # rsc_ip_HN1_HDB03  (ocf::heartbeat:IPaddr2):        Started hanadb1
   # rsc_nc_HN1_HDB03  (ocf::heartbeat:azure-lb):       Started hanadb1
 # rsc_st_azure        (stonith:fence_azure_arm):       Started hanadb2
 # Clone Set: cln_fs_check_HN1_HDB03 [rsc_fs_check_HN1_HDB03]:
   # Started: [ hanadb1 hanadb2 ]
You can place /hana/shared in read-only mode on the active cluster node by using this command:
sudo mount -o ro 10.3.1.4:/hanadb1-shared-mnt00001 /hana/sharedbThe server
hanadb1either reboots or powers off based on the action set. After the serverhanadb1is down, the HANA resource moves tohanadb2. You can check the status of the cluster fromhanadb2.sudo crm status #Cluster Summary: # Stack: corosync # Current DC: hanadb2 (version 2.0.5+20201202.ba59be712-4.9.1-2.0.5+20201202.ba59be712) - partition with quorum # Last updated: Wed Nov 10 22:00:27 2021 # Last change: Wed Nov 10 21:59:47 2021 by root via crm_attribute on hanadb2 # 2 nodes configured # 11 resource instances configured #Node List: # Online: [ hanadb1 hanadb2 ] #Full List of Resources: # Clone Set: cln_azure-events [rsc_azure-events]: # Started: [ hanadb1 hanadb2 ] # Clone Set: cln_SAPHanaTopology_HN1_HDB03 [rsc_SAPHanaTopology_HN1_HDB03]: # Started: [ hanadb1 hanadb2 ] # Clone Set: msl_SAPHana_HN1_HDB03 [rsc_SAPHana_HN1_HDB03] (promotable): # Masters: [ hanadb2 ] # Stopped: [ hanadb1 ] # Resource Group: g_ip_HN1_HDB03: # rsc_ip_HN1_HDB03 (ocf::heartbeat:IPaddr2): Started hanadb2 # rsc_nc_HN1_HDB03 (ocf::heartbeat:azure-lb): Started hanadb2 # rsc_st_azure (stonith:fence_azure_arm): Started hanadb2 # Clone Set: cln_fs_check_HN1_HDB03 [rsc_fs_check_HN1_HDB03]: # Started: [ hanadb1 hanadb2 ]We recommend testing the SAP HANA cluster configuration thoroughly by doing the tests described in SAP HANA system replication.
Next steps
Feedback
Coming soon: Throughout 2024 we will be phasing out GitHub Issues as the feedback mechanism for content and replacing it with a new feedback system. For more information see: https://aka.ms/ContentUserFeedback.
Submit and view feedback for