Use private endpoints with Azure Batch accounts
By default, Azure Batch accounts have public endpoints and are publicly accessible. The Batch service offers the ability to create private endpoint for Batch accounts, allowing private network access to the Batch service.
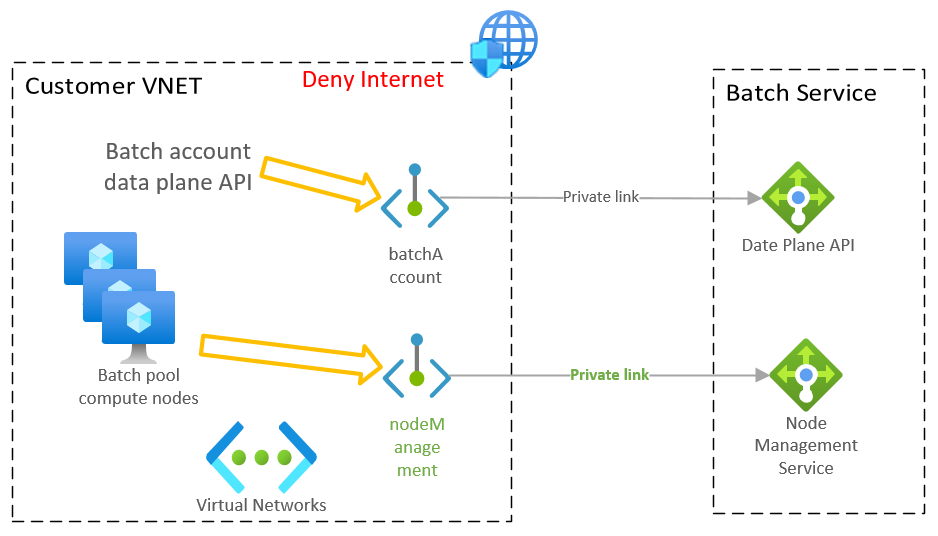
By using Azure Private Link, you can connect to an Azure Batch account via a private endpoint. The private endpoint is a set of private IP addresses in a subnet within your virtual network. You can then limit access to an Azure Batch account over private IP addresses.
Private Link allows users to access an Azure Batch account from within the virtual network or from any peered virtual network. Resources mapped to Private Link are also accessible on-premises over private peering through VPN or Azure ExpressRoute. You can connect to an Azure Batch account configured with Private Link by using the automatic or manual approval method.
This article describes the steps to create a private endpoint to access Batch account endpoints.
Private endpoint sub-resources supported for Batch account
Batch account resource has two endpoints supported to access with private endpoints:
Account endpoint (sub-resource: batchAccount): this endpoint is used for accessing Batch Service REST API (data plane), for example managing pools, compute nodes, jobs, tasks, etc.
Node management endpoint (sub-resource: nodeManagement): used by Batch pool nodes to access Batch node management service. This endpoint is only applicable when using simplified compute node communication.
Tip
You can create private endpoint for one of them or both within your virtual network, depending on the actual usage for your Batch account. For example, if you run Batch pool within the virtual network, but call Batch service REST API from somewhere else, you will only need to create the nodeManagement private endpoint in the virtual network.
Azure portal
Use the following steps to create a private endpoint with your Batch account using the Azure portal:
- Go to your Batch account in the Azure portal.
- In Settings, select Networking and go to the tab Private Access. Then, select + Private endpoint.

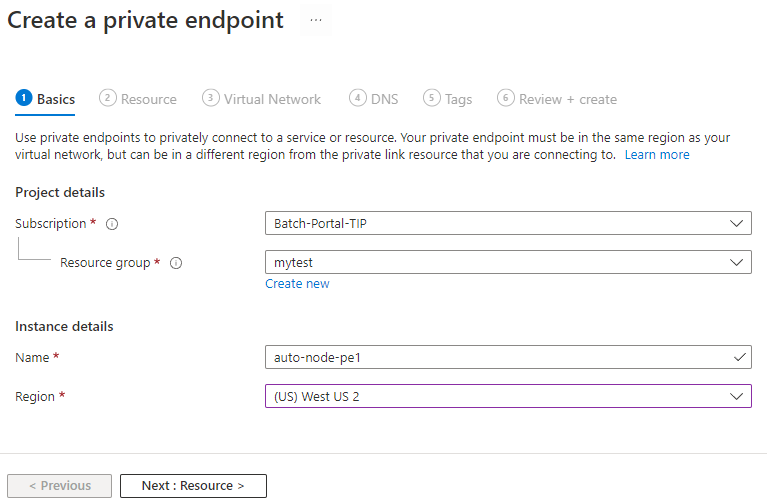
- In the Basics pane, enter or select the subscription, resource group, private endpoint resource name and region details, then select Next: Resource.
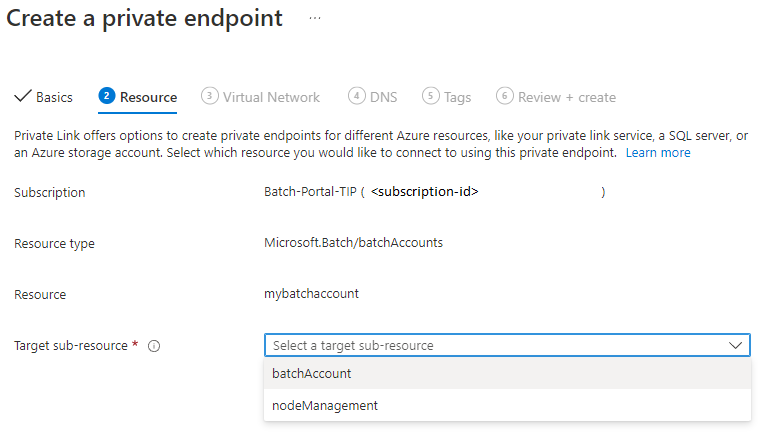
- In the Resource pane, set the Resource type to Microsoft.Batch/batchAccounts. Select the Batch account you want to access, select the target sub-resource, then select Next: Configuration.
- In the Configuration pane, enter or select this information:
- For Virtual network, select your virtual network.
- For Subnet, select your subnet.
- For Private IP configuration, select the default Dynamically allocate IP address.
- For Integrate with private DNS zone, select Yes. To connect privately with your private endpoint, you need a DNS record. We recommend that you integrate your private endpoint with a private DNS zone. You can also use your own DNS servers or create DNS records by using the host files on your virtual machines.
- For Private DNS Zone, select privatelink.batch.azure.com. The private DNS zone is determined automatically. You can't change this setting by using the Azure portal.
Important
- If you have existing private endpoints created with previous private DNS zone
privatelink.<region>.batch.azure.com, please follow Migration with existing Batch account private endpoints. - If you've selected private DNS zone integration, make sure the private DNS zone is linked to your virtual network successfully. It's possible that Azure portal let you choose an existing private DNS zone, which might not be linked to your virtual network and you'll need to manually add the virtual network link.
- Select Review + create, then wait for Azure to validate your configuration.
- When you see the Validation passed message, select Create.
Tip
You can also create the private endpoint from Private Link Center in Azure portal, or create a new resource by searching private endpoint.
Use the private endpoint
After the private endpoint is provisioned, you can access the Batch account using the private IP address within the virtual network:
Private endpoint for batchAccount: can access Batch account data plane to manage pools/jobs/tasks.
Private endpoint for nodeManagement: Batch pool's compute nodes can connect to and be managed by Batch node management service.
Tip
It's recommended to also disable the public network access with your Batch account when you're using private endpoints, which will restrict the access to private network only.
Important
If public network access is disabled with Batch account, performing account operations (for example pools, jobs) outside of the virtual network where the private endpoint is provisioned will result in an "AuthorizationFailure" message for Batch account in the Azure portal.
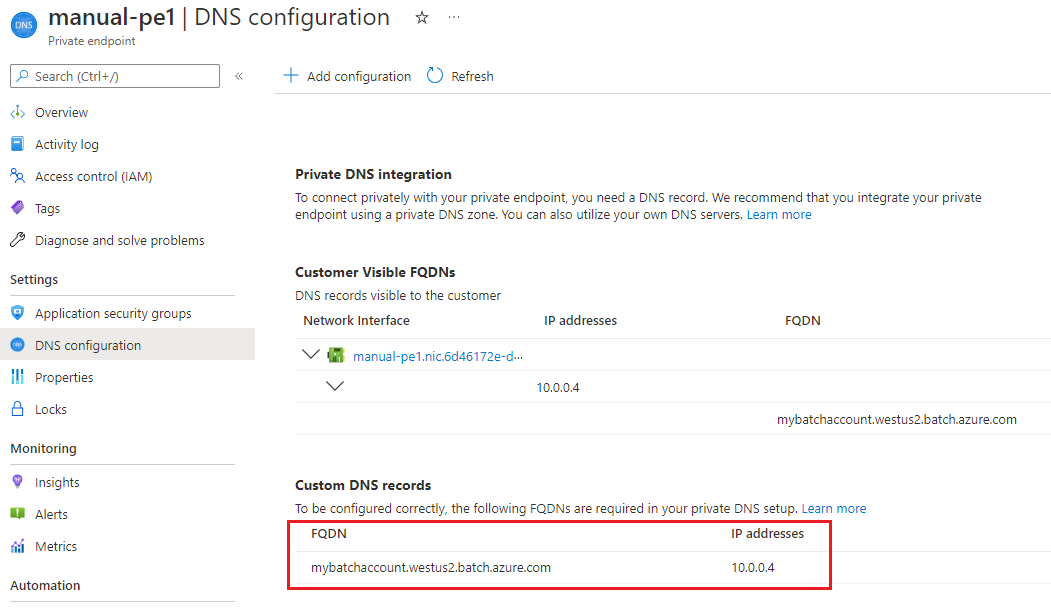
To view the IP addresses for the private endpoint from the Azure portal:
- Select All resources.
- Search for the private endpoint that you created earlier.
- Select the DNS Configuration tab to see the DNS settings and IP addresses.
Configure DNS zones
Use a private DNS zone within the subnet where you've created the private endpoint. Configure the endpoints so that each private IP address is mapped to a DNS entry.
When you're creating the private endpoint, you can integrate it with a private DNS zone in Azure. If you choose to instead use a custom domain, you must configure it to add DNS records for all private IP addresses reserved for the private endpoint.
Migration with existing Batch account private endpoints
With the introduction of the new private endpoint sub-resource nodeManagement for Batch node management endpoint, the default private DNS zone for Batch account is simplified from privatelink.<region>.batch.azure.com to privatelink.batch.azure.com. To keep backward compatibility with the previously used private DNS zone, for a Batch account with any approved batchAccount private endpoint, its account endpoint's DNS CNAME mappings contains both zones (with the previous zone comes first), for example:
myaccount.east.batch.azure.com CNAME myaccount.privatelink.east.batch.azure.com
myaccount.privatelink.east.batch.azure.com CNAME myaccount.east.privatelink.batch.azure.com
myaccount.east.privatelink.batch.azure.com CNAME <Batch API public FQDN>
Continue to use previous private DNS zone
If you've already used the previous DNS zone privatelink.<region>.batch.azure.com with your virtual network, you should continue to use it for existing and new batchAccount private endpoints, and no action is needed.
Important
With existing usage of previous private DNS zone, please keep using it even with newly created private endpoints. Do not use the new zone with your DNS integration solution until you can migrate to the new zone.
Create a new batchAccount private endpoint with DNS integration in Azure portal
If you manually create a new batchAccount private endpoint using Azure portal with automatic DNS integration enabled, it will use the new private DNS zone privatelink.batch.azure.com for the DNS integration: create the private DNS zone, link it to your virtual network, and configure DNS A record in the zone for your private endpoint.
However, if your virtual network has already been linked to the previous private DNS zone privatelink.<region>.batch.azure.com, it will break the DNS resolution for your batch account in your virtual network, because the DNS A record for your new private endpoint is added into the new zone but DNS resolution checks the previous zone first for backward-compatibility support.
You can mitigate this issue with following options:
If you don't need the previous private DNS zone anymore, unlink it from your virtual network. No further action is needed.
Otherwise, after the new private endpoint is created:
make sure the automatic private DNS integration has a DNS A record created in the new private DNS zone
privatelink.batch.azure.com. For example,myaccount.<region> A <IPv4 address>.Go to previous private DNS zone
privatelink.<region>.batch.azure.com.Manually add a DNS CNAME record. For example,
myaccount CNAME => myaccount.<region>.privatelink.batch.azure.com.
Important
This manual mitigation is only needed when you create a new batchAccount private endpoint with private DNS integration in the same virtual network which has already been linked to the previous private DNS zone.
Migrating previous private DNS zone to the new zone
Although you can keep using the previous private DNS zone with your existing deployment process, it's recommended to migrate it to the new zone for simplicity of DNS configuration management:
- With the new private DNS zone
privatelink.batch.azure.com, you won't need to configure and manage different zones for each region with your Batch accounts. - When you start to use the new nodeManagement private endpoint that also uses the new private DNS zone, you'll only need to manage one single private DNS zone for both types of private endpoints.
You can migrate the previous private DNS zone with following steps:
- Create and link the new private DNS zone
privatelink.batch.azure.comto your virtual network. - Copy all DNS A records from the previous private DNS zone to the new zone:
From zone "privatelink.<region>.batch.azure.com":
    myaccount  A <ip>
To zone "privatelink.batch.azure.com":
    myaccount.<region>  A <ip>
- Unlink the previous private DNS zone from your virtual network.
- Verify DNS resolution within your virtual network, and the Batch account DNS name should continue to be resolved to the private endpoint IP address:
nslookup myaccount.<region>.batch.azure.com
- Start to use the new private DNS zone with your deployment process for new private endpoints.
- Delete the previous private DNS zone after the migration is completed.
Pricing
For details on costs related to private endpoints, see Azure Private Link pricing.
Current limitations and best practices
When creating a private endpoint with your Batch account, keep in mind the following:
- Private endpoint resources can be created in different subscription as the Batch account, but the subscription must be registered with Microsoft.Batch resource provider.
- Resource movement isn't supported for private endpoints with Batch accounts.
- If a Batch account resource is moved to a different resource group or subscription, the private endpoints can still work, but the association to the Batch account breaks. If you delete the private endpoint resource, its associated private endpoint connection still exists in your Batch account. You can manually remove connection from your Batch account.
- To delete the private connection, either delete the private endpoint resource, or delete the private connection in the Batch account (this action disconnects the related private endpoint resource).
- DNS records in the private DNS zone aren't removed automatically when you delete a private endpoint connection from the Batch account. You must manually remove the DNS records before adding a new private endpoint linked to this private DNS zone. If you don't clean up the DNS records, unexpected access issues might happen.
- When private endpoint is enabled for the Batch account, the task authentication token for Batch task is not supported. The workaround is to use Batch pool with managed identities.
Next steps
- Learn how to create Batch pools in virtual networks.
- Learn how to create Batch pools without public IP addresses.
- Learn how to configure public network access for Batch accounts.
- Learn how to manage private endpoint connections for Batch accounts.
- Learn about Azure Private Link.