Make Remote Assist calls
Remote Assist offers technicians and remote collaborators many tools that help them work together to resolve an issue when each person is at a different location. The main capability is video sharing with mixed reality annotations, but people also find great value in sharing files, sending messages, and recording calls.
Get started
When a technician, inspector, or auditor in the field encounters a scenario that they require assistance on, they will launch the Remote Assist application. Because the mobile application will be using the mobile device's camera, you will need to allow the application to access it. When in the application, the Remote Assist mobile app includes an in-app, guided tutorial to help technicians begin using the app. The tutorial can be accessed by selecting Try it on the Remote Assist sign in screen.
This tutorial shows technicians how to:
Map their environment for better tracking of surfaces.
Place and manipulate annotations, such as the arrow and the ink tool.
Important
Mapping an environment is important to ensure that annotations and other interactive pieces can be rendered correctly.
Consider the following techniques to improve your tracking experience:
Map your environment area at the beginning of a video call.
Avoid rapid camera movements.
Avoid frequently minimizing the app and reopening it while annotations are present.
Limitations that might hinder accurate understanding of surfaces or facilitate in the loss of tracking include:
Flat surfaces without texture, such as a white desk.
Environments with dim lighting or bright lighting.
Transparent or reflective surfaces like glass.
Dynamic or moving surfaces.
For more information on using the tutorial, see Mobile tutorial.
Make calls
When a technician needs assistance, they will initiate a video call with remote collaborators who will engage with them on their computer or mobile device through Microsoft Teams. Calls can be made with remote collaborators who are located either inside or outside of the technician's company. Only a Remote Assist mobile user (technician) can initiate an outgoing call to either one Teams desktop user (remote collaborator) or one Teams mobile user (remote collaborator).
After the technician has signed in to Remote Assist mobile on their iOS or Android device, they can search for and select the collaborator whom they want to work with. When selected, the remote collaborator will receive the call on Microsoft Teams and will be taken to the technician's live video feed.
For more information on making calls, see Making calls.
Draw or annotate (technician)
Drawings, annotations, or holograms allow technicians and remote collaborators to visually call out an environmental area or asset to examine or manipulate. As technicians display the environment through their rear-facing camera, the technician and remote collaborator can add annotations to what they're looking at and then share with each other during a video call.
While in a call, the annotation toolbar allows technicians to place arrows and drawings into their environment. Several commands are available from the command bar. The following image shows the available options.
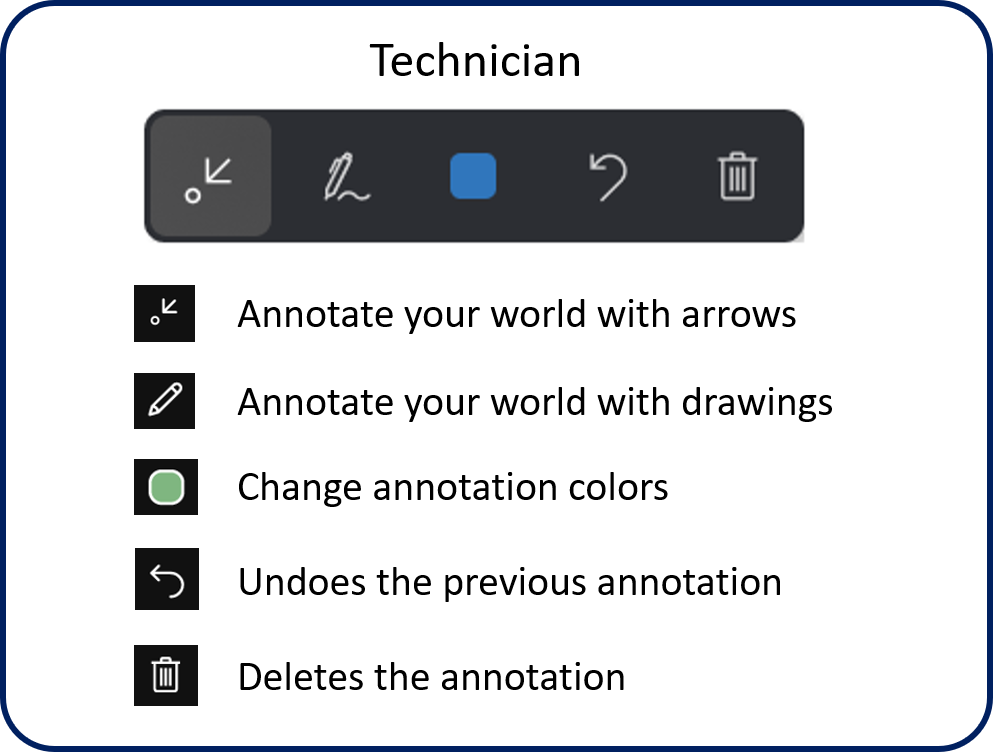
The Delete All icon allows technicians to remove all annotations that they placed in their environment (they can't remove the expert's annotations).
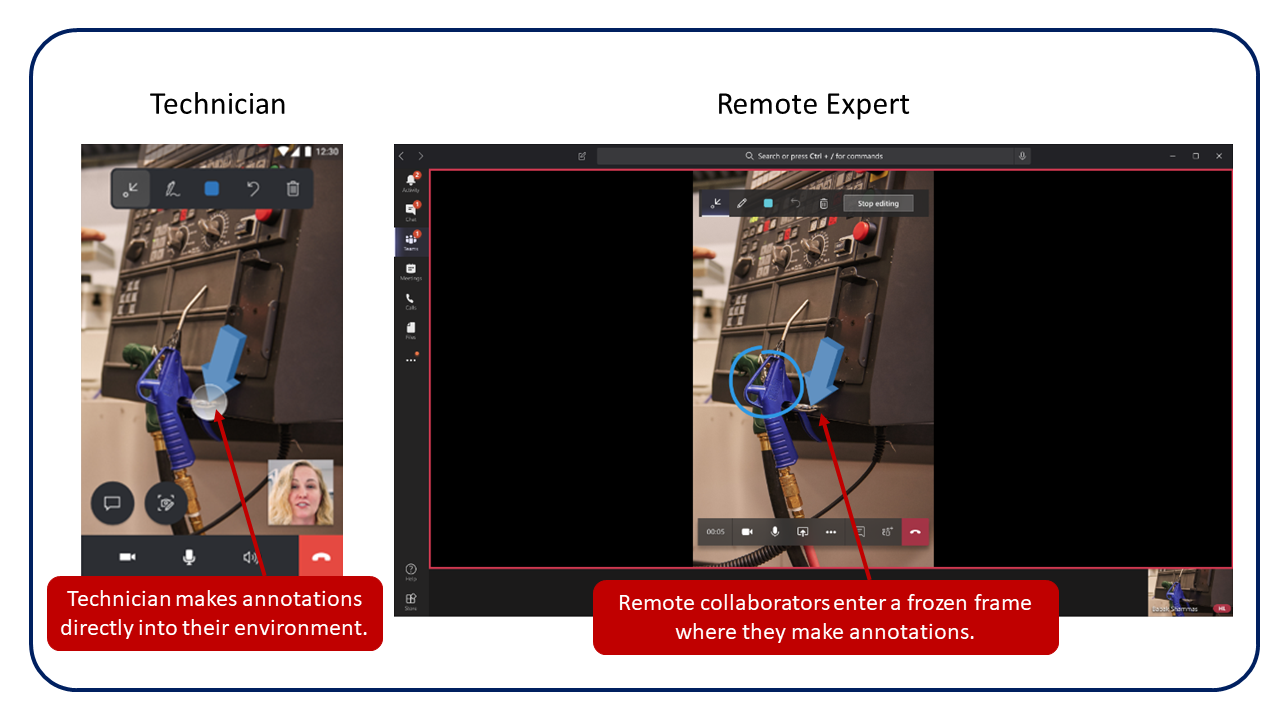
As annotations are placed in the technician's environment, the expert whom you are collaborating with will see your annotations in real time on Microsoft Teams.
Draw or annotate (remote collaborator)
Like Remote Assist users, remote collaborators also have an annotation toolbar that allows them to place arrows and drawings into their environment. The toolbar contains the same commands that are available to the Remote Assist technician.
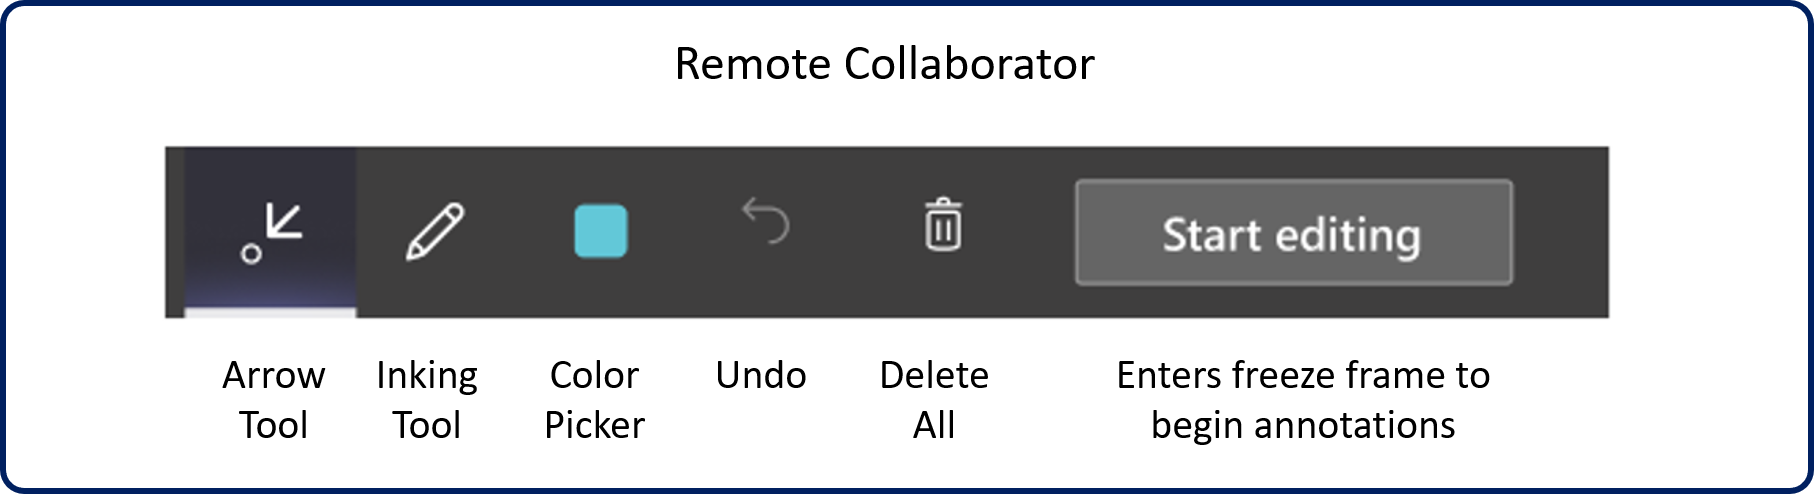
To begin adding annotations, remote collaborators must select the Start editing button. When initiated, they can enter a frozen frame where they can add annotations onto it. When finished, the collaborator can select Stop editing to return to the technician's live video feed. At that point, any added annotations will appear in the technician's environment.
For more information on annotations, see Annotate your environment.
Snapshots
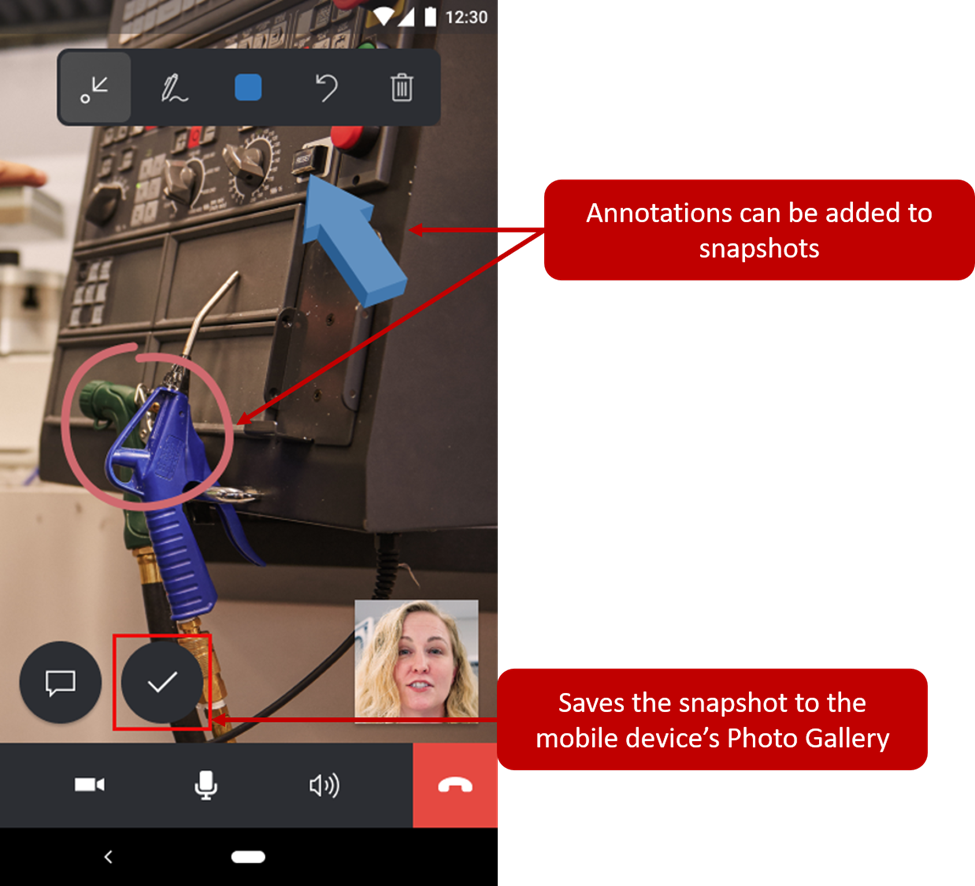
Being able to capture a snapshot of the environment can be critical in situations where a still image might help better communicate what a technician is looking at. After a snapshot has been taken, annotations can be added to emphasize specific elements in the snapshot. These snapshots can then be used later for reference or work validation.
To take a snapshot during a Remote Assist mobile call, select the Snapshot icon to take a picture. The snapshot is shared to the expert's screen on Microsoft Teams. Both the technician and expert can add annotations to the snapshot; however, snapshots can be captured with or without annotations. As previously mentioned, remote collaborators need to select the Start editing button to add annotations to the snapshot. After both the technician and expert are finished annotating on the snapshot, the technician can select the check mark to save the snapshot to their mobile device's photo gallery. The technician will then be prompted to save the snapshot to their mobile device's photo gallery or discard it.
After the technician has left the snapshot, they are taken back to the live video call, where they can continue working or taking more snapshots. Annotations that are added on a 2D snapshot will not appear in the technician's environment.
At the end of the call, the technician can now go to their mobile device's photo gallery and view the snapshots. Then, the technician can share it with others or include it in their Field Service work order.
For more information about using snapshots, see Annotate snapshots.
Low-bandwidth scenarios
In scenarios where technicians find themselves on factory floors or remote locations with poor network connectivity, Remote Assist mobile will provide them with the ability to discuss, diagnose, and resolve issues with remote experts.
Poor network connectivity is determined by the following conditions:
The bandwidth is between 150 Kbps and 1.5 Mbps
The latency is higher than 1,000 ms
The packet loss is higher than 10 percent
Remote Assist mobile autodetects whether the technician is experiencing poor network conditions or not. If so, the technician is prompted to share snapshots with the remote expert to collaborate instead of transmitting a live video feed. As a result, the expert can view and annotate images of better quality instead of viewing a low-quality video feed.
The following scenario describes a situation when a technician encounters poor network connectivity. In this scenario, the technician is the field worker, while the remote expert is elsewhere.
After a technician launches a video call with a remote expert, Remote Assist mobile autodetects whether the technician is experiencing poor network conditions. If poor conditions are detected, the technician is prompted to use the snapshot tool to share images with the expert. The technician and expert can annotate simultaneously on the snapshot. After sharing a snapshot, the technician can save it on the mobile device's photo gallery or discard it.
For more information on working in low-bandwidth scenarios, see Poor network connectivity.
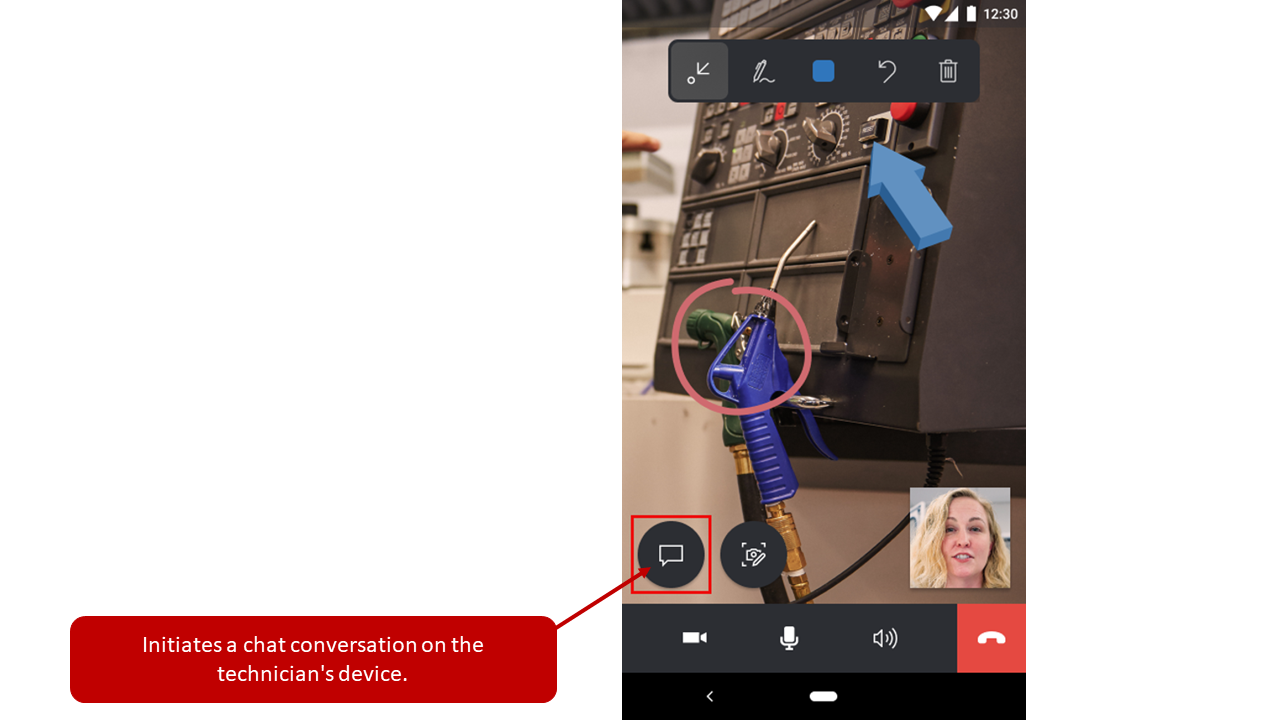
Send chat messages
During a Remote Assist mobile call, technicians can send chat messages to experts through text chat. You can start this process by selecting the Text Chat icon. While in text chat, technicians can send and receive text messages from experts on Microsoft Teams. As a technician is in a chat, Remote Assist mobile's live video will be unavailable to them.
For more information on using chats in Remote Assist calls, see Send chat messages.
Share files
Often, technicians might find that they need to share items, such as documents, with collaborators. This feature can help by adding more context and information, such as visual aids or schematics, to the technician's environment. Sharing files can help technicians have richer conversations with remote collaborators and therefore solve problems quickly.
Technicians and remote collaborators can send any file type to each other. Files and images can be uploaded from their local device or from OneDrive. Shared files are accessible in your OneDrive account in the Files > RemoteAssistMobile folder. After a file or image has been opened, it will be downloaded to your local device's Downloads folder. Technicians will need the corresponding app that supports the file type; in-app previews might be available, depending on the file type and size. For Field Service customers, the files that are shared during your Remote Assist mobile call can be linked to your work order.
For more information on sharing files, see File sharing.
Call recording
For many businesses, it's important to keep a record of different incidents daily. Often, these records are kept through paper trails or text-based collateral. By capturing and tracking Remote Assist video sessions, operations managers, technicians, and business decision makers can use call recordings for:
References for follow-up work.
Validation that the maintenance and repair process was completed correctly.
Training material for their workers.
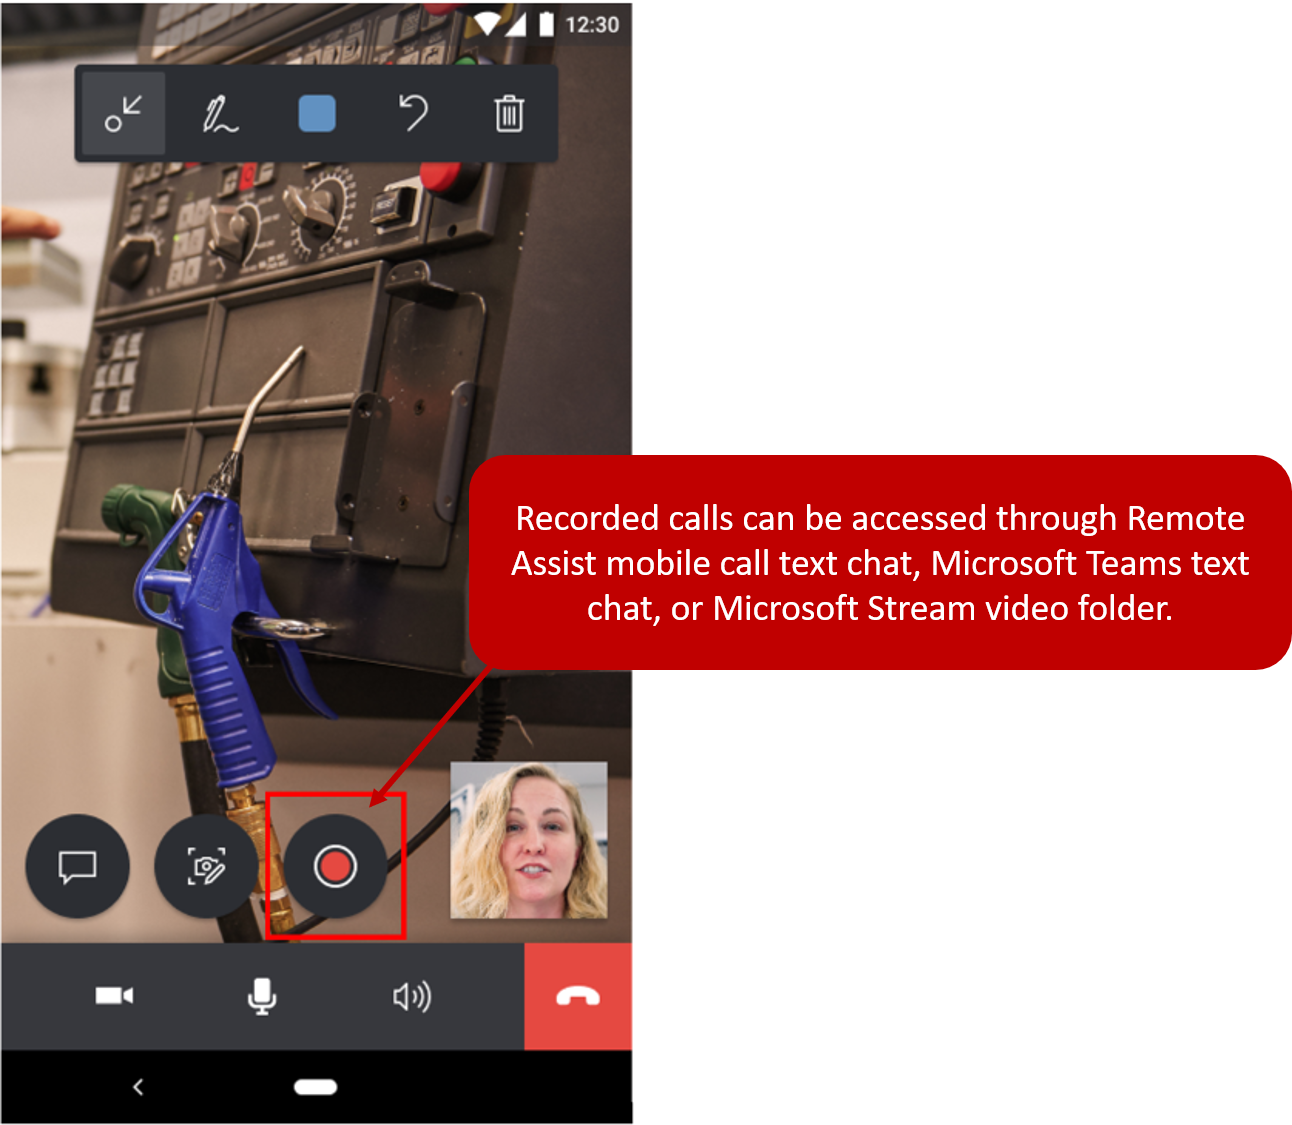
Call recording is only available for one-to-one calls between a Remote Assist user and a Teams desktop user, not a Teams mobile user. Only the Remote Assist user can start and stop recording a call. After the call recording ends, it is automatically uploaded to Microsoft Stream. After the recording is uploaded, all call participants can access it through their Remote Assist mobile call text chat or Microsoft Teams chat. The Remote Assist mobile user, who started the call recording, can also see it in their Microsoft Stream videos folder.
The technician selects the Record button to start the call recording. While on the call, the technician can see that the call recording is in progress, as shown in the call recording indicator in the text chat. The call recording can be stopped at any point by selecting the Stop button. After a call is stopped, both call participants will receive a notification that the call recording will be available in Microsoft Stream. The notification can be dismissed at any time. After the call recording has been uploaded to Microsoft Stream, both participants can access it through the Remote Assist mobile call text chat, Microsoft Teams text chat, or on the Microsoft Stream video folder.
For more information on Remote Assist's call recording capabilities, see Call recording.
Other important notes
Currently, the following scenarios are not supported when you are using Remote Assist mobile:
Joining Teams meetings
Making calls to browser-based Teams
Participating in calls with three or more participants
Participating in Remote Assist mobile to Remote Assist mobile calls
Participating in Remote Assist mobile to Remote Assist on HoloLens calls
If the Remote Assist mobile app is not open, the technician will not receive incoming call notifications from Teams desktop or mobile
The following video demonstrates what a Remote Assist call looks like.