Note
Access to this page requires authorization. You can try signing in or changing directories.
Access to this page requires authorization. You can try changing directories.
Note
Learn more about where Microsoft Shopping campaigns and Product ads are available.
Product ads are created using Shopping campaigns. They're a great way to give your ads more space on the search results page and make those ads more compelling to potential customers. By using Product ads, you can enhance your ads with real-time, specific product information from your Microsoft Merchant Center store feed.
Complete each of the following steps to start using Product ads:
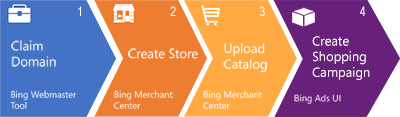
Claim your domain
You must claim your domain before you can build a Microsoft Merchant Center store. If you've already added a Universal Event Tracking (UET) tag to your domain for conversion tracking and remarketing, you can use that UET tag to validate your domain. See Verify and claim your website's URL for more details. Otherwise, read on to learn more about domain validation via Bing Webmaster Tools.
- Go to the Bing Webmaster Tools URL: http://www.bing.com/webmasters/about.
- Sign in using the same Microsoft account that you use to sign in to Microsoft Advertising. If you don't use a Microsoft account yet, learn how to sign in to Microsoft Advertising.
- Make sure your profile is filled out by selecting the button with your initials on the top right and selecting and filling out Personal details and Professional details.
- In the main screen, you'll be prompted to enter your URL > select Add.
- You'll then see your Site URL at the bottom of the screen. Under Action, select Verify now.
- Choose one of the three verification steps: XML File, HTML Meta Tag, or Add CNAME record to DNS.
- Follow and complete the steps of your chosen path.
- You'll see the Dashboard page if your URL is verified.
For additional information on verifying your URL, take a look at these detailed instructions.
Create a Microsoft Merchant Center store
- From the navigation menu on the left, select Tools > Merchant Center > Manage stores (shopping cart icon).
- Select Create a store.
- Enter your Store info and Contact details.
Upload your catalog feed
From the navigation menu on the left, select Tools > Merchant Center > Feeds.
Select Create feed and then move through the steps in the wizard.
Upload your file.
Note
It can take up to three business days for your feed file to process.
These steps are slightly summarized. For more information, here are some details about creating and uploading your feed.
Create your Shopping campaign
You can use predictive targeting for both shopping audience and shopping search campaigns.
Create a Shopping Audience campaign
Shopping Audience campaigns deliver to audience placements.
- From the navigation menu on the left, select Create.
- Choose Sell products as your campaign goal.
- Select Standard Shopping as your campaign type.
- Select Audience below Choose the type of Shopping campaign you prefer.
- Select Continue.
- Follow the steps provided by the campaign creation wizard for Shopping settings, Targeting, Budget & bids, and Summary.
- Optionally, the final step is to create product groups. Take a look at this article for more information.
- Select Save.
Create a Shopping Search campaign
Shopping Search campaigns deliver to both audience and search placements.
- From the navigation menu on the left, select Create.
- Choose Sell products as your campaign goal.
- Select Standard Shopping as your campaign type.
- Select Search below Choose the type of Shopping campaign you prefer.
- Select Continue.
- Follow the steps provided by the campaign creation wizard for Shopping settings, Targeting, Budget & bids, and Summary.
- Optionally, the final step is to create product groups. Take a look at this article for more information.
- Select Save.
If you'd like to set audience targeting for your Shopping Search campaign, you can do so after you finish creating the campaign. In All campaigns, select the shopping Search campaign > Audiences from the panel on the left. Reduce and increase bid adjustments for the audience types.
What you need to know
- If you ever need to edit or make changes to your Shopping campaign, simply select the campaign name in the left panel > Settings tab.
- You can monitor your campaign with reports created specifically for Shopping campaigns, which can be generated by from the Reports page:
- From the navigation menu on the left, select Reporting > Templates > Product ads > choose the option that best suits your needs.
- Fill in the necessary information and select either Run or Download.