Microsoft 365 and Office | Excel | For business | Windows
A family of Microsoft spreadsheet software with tools for analyzing, charting, and communicating data
This browser is no longer supported.
Upgrade to Microsoft Edge to take advantage of the latest features, security updates, and technical support.
' cx='32' cy='32' r='32' /%3E%3Ctext x='50%25' y='55%25' dominant-baseline='middle' text-anchor='middle' fill='%23FFF' %3EJD%3C/text%3E%3C/svg%3E)
A colleague needed help with a spreadsheet. I was supposed to create a new version of a spreadsheet. Instead, I accidentally updated the existing file and just pressed save.
I have tried, right clicking the file and looking for previous versions but no history is showing. Further looking into the file, looks like OneDrive wasn't logged in and history version through excel doesn't look enabled
Is there anyway that I could get this version back? It is very important.
A family of Microsoft spreadsheet software with tools for analyzing, charting, and communicating data
Thank you for your prompt response.
I am using my education email address - but I do not think I'm listed as a business admin.
I have tried those tips, except for the recovery file app. Do you recommend?
Its hard, because it's not like the spreadsheet has been deleted, just been saved over. But it just has no history to recover even though there should be history.
' cx='32' cy='32' r='32' /%3E%3Ctext x='50%25' y='55%25' dominant-baseline='middle' text-anchor='middle' fill='%23FFF' %3EVH%3C/text%3E%3C/svg%3E)
Dear @Jasmine D,
Thank you for posting your question in the Microsoft Q&A forum.
Before giving you the best solution, could you please confirm these questions below to help me diagnose the issue more effectively:
According to your description, since OneDrive wasn’t signed in and Excel’s Version History/AutoSave wasn’t enabled, recovery depends on what your local computer may have kept. Here are some methods I recommend you try:
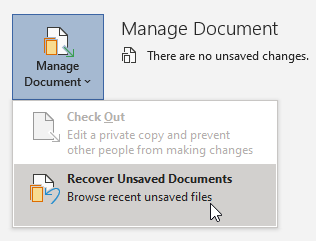
Method 1: “UnsavedFiles” cache - Recover Unsaved Documents
If you have a Microsoft 365 subscription, check the following folder locations for backup files:
Note: In these paths, replace <UserName> with your username.
If you don't find the missing file in these locations, open Word, and select File > Info > Manage Document > Recover Unsaved Documents.
If you still haven’t found the file, try manually searching for AutoRecover files. To do this, select Start, enter .xlsb or .xlsx or .xlk in the Search box, then press Enter.
If you find any files that have the .xlsb or .xlsx or .xlk extension, follow these steps:
Method 2: Windows File Recovery Tool
If you are using Windows 10, version 2004 or later, you can try the Windows File Recovery tool. Windows File Recovery is available from the Microsoft Store. You can use it to recover files that have been permanently deleted. For more information about this tool, see Recover lost files on Windows.
Method 3: Restarting Word to open AutoRecover files
Excel searches for AutoRecover files every time it starts. Therefore, you can try using the AutoRecover feature by closing and reopening Excel. If Word finds any automatically recovered file, the Recovery task pane opens, and the missing document should be listed as "document name [Original]" or as "document name [Recovered]." If this occurs, double-click the file name in the Recovery pane, select File > Save as, and then save the document as a .docx file. To manually change the extension to .docx, right-click the file, and select Rename.
Note: In Microsoft 365 Subscription, when Excel starts, it searches for AutoRecover files. If any recovered files are found, Excel opens them by having a Message Bar. Select Save to save the recovered file. If there are many recovered files, Word usually opens the last-changed files, and puts the remaining files into the Recovery task pane. 
Method 4: Searching for temporary files
Temporary file names have a .tmp extension. To find these files, follow these steps:
Step 1: Select Start, type .tmp > press Enter > Select the Documents tab.
Step 2: Scroll through the files to search for file names that match the last few dates and times that you edited the document.
Step 3: In Word, go to File > Open, and then select the Folders tab > Navigate to or search for the folder where you found the .tmp file, and then select the folder name to open the folder contents pane.
Step 4: At the top of the pane, select the name of the folder. This opens File Explorer.
Step 5: In File Explorer, change the file type (next to the file name field, near the bottom) to All files > Open the .tmp file.
If you don’t find the file, repeat steps 1 through 3, but search on the tilde character (~) instead of .tmp (temporary file names start with a tilde). Excel sometimes writes temporary artifacts alongside the file (Hidden lock file: ~$YourFile.xlsx)
I hope this information is helpful. Please follow these steps and let me know if it works for you. If not, we can work together to resolve this.
Please understand that our initial response does not always resolve the issue immediately. However, with your help and more detailed information, we can work together to find a solution.
Thank you for your patience and your understanding. If you have any questions, please feel free to reach out.
I'm looking forward for your reply.
If the answer is helpful, please click "Accept Answer" and kindly upvote it. If you have extra questions about this answer, please click "Comment".
Note: Please follow the steps in our documentation to enable e-mail notifications if you want to receive the related email notification for this thread.
Thank you for your prompt response.
I am using my education email address - but I do not think I'm listed as a business admin.
I have tried those tips, except for the recovery file app. Do you recommend?
Its hard, because it's not like the spreadsheet has been deleted, just been saved over. But it just has no history to recover even though there should be history.
Dear @Jasmine D,
Thank you for your update.
When a file is saved over (not deleted), recovery depends on where the file is stored and whether versioning or AutoRecover snapshots exist.
If the OneDrive didn't sign in and sync at the time you saved over the file (the spreadsheet was saved to a local folder), unfortunately, there’s “no history” showing because version History appears only for files stored in OneDrive or SharePoint. Therefore, the Version History panel will be empty. For reference: View or restore version history of a workbook
In this case, after you tried all the above steps, but the issue still persists. The best next step is to reach out to your organization's IT administrator; they can help you to create support ticket to Microsoft Support Team. The support team has the right tools and permissions to perform deeper troubleshooting and, if possible, recover previous versions or restore your file. I truly apologize that, as a forum moderator, I cannot directly access your environment or contact Microsoft on your behalf.
For more information and instruction, please follow the Microsoft Official Guide here to help your IT Admin to create support tickets: Get support for Microsoft 365 for business
Here's the official support site: https://support.microsoft.com/en-us/contactus
Please understand that as a forum moderator, I don’t have access to your organization’s tenant, files, or admin tools. These limits exist to protect your organization’s data privacy and security. Our primary goal is to provide helpful guidance and support through general troubleshooting steps. We genuinely hope the information we share helps guide you in the right direction, and we're always here to assist as much as we can within our scope.
I hope this information is helpful. Thank you for your patience and your understanding.
If you have any questions, please feel free to reach out. I'm looking forward for your reply.
This comment has been deleted due to a violation of our Code of Conduct. The comment was manually reported or identified through automated detection before action was taken. Please refer to our Code of Conduct for more information.
Dear @Jasmine D,
Good day and I hope you're doing well. I just wanted to check in and see if there is any updates from you.
If you're still facing any problems, please feel free to share more details about the current error or steps you're stuck on. I’ll be happy to assist further.
Looking forward to your update.
Hi Vivian,
Thanks for the message.
I ended up opening a ticket with the department help desk and they were able to restore the file with their backup.
Thanks for your help, I appreciate it.
Dear @Jasmine D,
Thank you for sharing your feedback about your recent interactions with our team.
I'm glad that my suggestions were able to address your issue and help you found a solution.
In the meantime, if you see my replies bring helpful information, please kindly accept it as an answer and vote it up by your original account, which raised this question. Once marked, it will automatically be pinned to top. As other users will also search for information in this community, your valuable vote up will definitely also help other users who have similar queries easily to find the correct channel and useful information more quickly.
Your satisfaction is our priority, and Microsoft appreciates the opportunity to improve. If you have any further concerns or need additional assistance, please don’t hesitate to contact us directly.
Looking forward to your update.
AI answer
If you have accidentally overwritten a spreadsheet and need to restore a previous version, you can try the following steps:
If none of these options work, it may be difficult to recover the overwritten file unless you have a backup saved elsewhere.