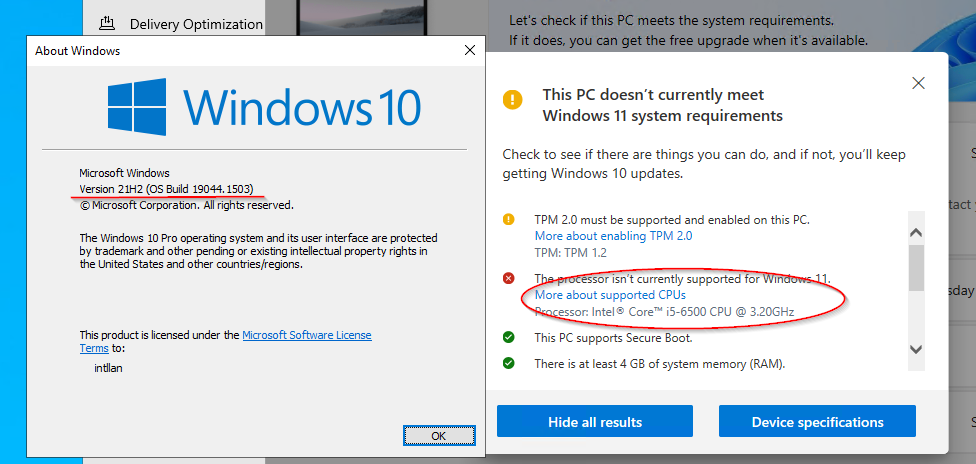
There is still a way to install Windows 11 on those old CPU models.
- DOWNLOAD THE WINDOWS 11 ISO
You’ll need to download the ISO. In our testing, this trick doesn’t work with the Windows 11 Install Assistant, it doesn’t trigger Windows Update, and it doesn’t fool Microsoft’s PC Health Check tool.
On this Microsoft page, scroll down to Download Windows 11 Disk Image (ISO). Open the Select Download dropdown, pick Windows 11, hit the Download button, select your product language from the Choose one dropdown that appears below, hit Confirm, then click 64-bit Download.
While that 5.1GB image is downloading, let’s move to step two.
2) EDIT THE WINDOWS REGISTRY TO BYPASS THE CPU CHECK
In Windows, hit Start and type regedit, then hit enter to launch the Registry Editor. Navigate to Computer\HKEY_LOCAL_MACHINE\SYSTEM\Setup\MoSetup, either by pasting that whole address into the box just beneath “File, Edit, View, Favorites, Help” or by drilling down through the HKEY_LOCAL_MACHINE and System and Setup and MoSetup folders one at a time.
First a new DWORD, then enter a value of 1.
In the right pane, right-click and pick New > DWORD (32-bit) Value. Name the value “AllowUpgradesWithUnsupportedTPMOrCPU” minus the quotes. Double-click on the new value you created, and enter 1 into the Value data field. Hit OK and close the registry editor.
3) OPEN THE ISO IN WINDOWS EXPLORER AND LAUNCH SETUP
Did the ISO finish downloading? Just right-click on it and pick Open with > Windows Explorer to mount the virtual disc, then double-click the setup file to begin installation.
That’s it! If the registry hack worked, you should soon see a warning message instead of a rejection message, and be given the option to install Windows 11 without losing your data.
' cx='32' cy='32' r='32' /%3E%3Ctext x='50%25' y='55%25' dominant-baseline='middle' text-anchor='middle' fill='%23FFF' %3EAH%3C/text%3E%3C/svg%3E)
' cx='32' cy='32' r='32' /%3E%3Ctext x='50%25' y='55%25' dominant-baseline='middle' text-anchor='middle' fill='%23FFF' %3EMD%3C/text%3E%3C/svg%3E)
' cx='32' cy='32' r='32' /%3E%3Ctext x='50%25' y='55%25' dominant-baseline='middle' text-anchor='middle' fill='%23FFF' %3EIG%3C/text%3E%3C/svg%3E)
' cx='32' cy='32' r='32' /%3E%3Ctext x='50%25' y='55%25' dominant-baseline='middle' text-anchor='middle' fill='%23FFF' %3ET%3C/text%3E%3C/svg%3E)
' cx='32' cy='32' r='32' /%3E%3Ctext x='50%25' y='55%25' dominant-baseline='middle' text-anchor='middle' fill='%23FFF' %3EO%3C/text%3E%3C/svg%3E)

' cx='32' cy='32' r='32' /%3E%3Ctext x='50%25' y='55%25' dominant-baseline='middle' text-anchor='middle' fill='%23FFF' %3EE%3C/text%3E%3C/svg%3E)
' cx='32' cy='32' r='32' /%3E%3Ctext x='50%25' y='55%25' dominant-baseline='middle' text-anchor='middle' fill='%23FFF' %3ED%3C/text%3E%3C/svg%3E)

' cx='32' cy='32' r='32' /%3E%3Ctext x='50%25' y='55%25' dominant-baseline='middle' text-anchor='middle' fill='%23FFF' %3EMP%3C/text%3E%3C/svg%3E)
' cx='32' cy='32' r='32' /%3E%3Ctext x='50%25' y='55%25' dominant-baseline='middle' text-anchor='middle' fill='%23FFF' %3EG%3C/text%3E%3C/svg%3E)