Note
Access to this page requires authorization. You can try signing in or changing directories.
Access to this page requires authorization. You can try changing directories.
Before a device is deployed using Windows Autopilot, the device must be registered with the Windows Autopilot deployment service.
Successful registration requires that two processes are complete:
- The device's unique hardware identity (known as a hardware hash) is captured and uploaded to the Windows Autopilot service.
- The device is associated to an Azure tenant ID.
Ideally, the OEM, reseller, or distributor performs both of these processes from which the devices were purchased. An OEM or other device provider uses the registration authorization process to perform device registration on behalf of the organization.
Registration can also be performed within the organization by collecting the hardware identity from new or existing devices and uploading it manually. If devices meet certain requirements, they can also be configured for automatic registration with Windows Autopilot. For more information about the ways in which devices can be registered with Windows Autopilot, see the following overview articles:
- OEM registration
- Reseller, distributor, or partner registration
- Automatic registration
- Manual registration
When a Windows Autopilot device is registered, it automatically creates a Microsoft Entra object. The Windows Autopilot deployment process needs this object to identify the device before the user signs in. If the object is deleted, the device can fail to enroll through Windows Autopilot.
Important
The following type of devices shouldn't be registered as a Windows Autopilot device:
- Microsoft Entra registered devices, also known as "workplace joined" devices.
- Intune MDM-only enrollment devices.
These options are intended for users to join personally owned devices to their organization's network. Windows Autopilot registered devices are registered as corporate owned devices.
If a device is already one of these two types of devices, to register is as a Windows Autopilot device, first remove it from Microsoft Intune and Microsoft Entra ID. For more information, see Why is the join type for a device showing as "Microsoft Entra registered" instead of "Microsoft Entra joined"? and Deregister a device.
If a profile isn't assigned to a Windows Autopilot device, it receives the default Windows Autopilot profile. If a device shouldn't go through Windows Autopilot, remove the Windows Autopilot registration.
Terms
The following terms are used to refer to various steps in the registration process:
| Term | Definition |
|---|---|
| Device registration | Device registration happens when a device's hardware hash is associated with the Windows Autopilot service. This process can be automated for new enterprise devices manufactured by OEMs that are Windows Autopilot partners. |
| Add devices | Adding a device is the process of registering a device with the Windows Autopilot service (if it isn't already registered) and associating it to a tenant ID. |
| Import devices | Importing devices is the process of uploading a comma-separated-values (CSV) file that contains device information in order to manually add devices. The device information includes information such the model and serial number. |
| Enroll devices | Enrolling a device is the process of adding devices to Intune. |
Device identification
To identify a device with Windows Autopilot, the device's unique hardware hash must be captured and uploaded to the service. As previously mentioned, this step is ideally done by the hardware vendor (OEM, reseller, or distributor) automatically associating the device with an organization. It's also possible to do identify a device with a harvesting process that collects the device's hardware hash from within a running Windows installation.
The hardware hash contains details about the device, such as:
- Manufacturer.
- Model.
- Device serial number.
- Hard drive serial number.
- Details about when the ID was generated.
- Many other attributes that can be used to uniquely identify the device.
The hardware hash changes each time it's generated because it includes details about when it was generated. When the Windows Autopilot deployment service attempts to match a device, it considers changes like that. It also considers large changes such as a new hard drive, and is still able to match successfully. But large changes to the hardware, such as a motherboard replacement, wouldn't match, so a new hash would need to be generated and uploaded.
For more information about device IDs, see the following articles:
Windows Autopilot devices
Devices that are registered with the Windows Autopilot service are displayed in the Intune admin center under Devices > Enrollment > Windows > Windows Autopilot > Devices:
Note
Devices that are listed in Intune under Devices > Windows > Windows devices aren't the same as Windows Autopilot devices Devices > Enrollment > Windows > Windows Autopilot > Devices. Windows Autopilot devices are added to the list of Windows devices when both of the following are complete:
- The Windows Autopilot registration process is successful.
- A licensed user has signed in on the device.
Deregister a device
Whenever a device permanently leaves an organization, the device should always be deregistered from Windows Autopilot. For example, the device leaves the organization for repair or because the device is at the end of its life cycle.
Below we describe the steps an admin would go through to deregister a device from Intune and Windows Autopilot.
Delete from Intune
Before a device is deregistered from Windows Autopilot, it first has to be deleted from Intune. To delete a Windows Autopilot device from Intune:
Sign into the Microsoft Intune admin center.
In the Home screen, select Devices in the left pane.
In the Devices | Overview screen, under By platform, select Windows.
Under Device name, find the device that needs to be deleted and then select the device. If necessary, use the Search box.
In the properties screen for the device, make a note of the serial number listed under Serial number.
After making a note of the serial number of the device, select Delete in the toolbar at the top of the page.
A warning dialog box appears to confirm the deletion of the device from Intune. Select Yes to confirm deleting the device.
Deregister from Windows Autopilot using Intune
Once the device is deleted from Intune, it can then be deregistered from Windows Autopilot. This process includes required cleanup steps in Intune and Microsoft Entra ID to prevent orphaned or unrecoverable devices. To deregister a device from Windows Autopilot:
Make sure the device is deleted from Intune as described in the Delete from Intune section.
Sign into the Microsoft Intune admin center.
In the Home screen, select Devices in the left hand pane.
In the Devices | Overview screen, under By platform, select Windows.
In the Windows | Windows devices screen, under Device onboarding, select Enrollment.
In the Windows | Windows enrollment screen, under Windows Autopilot, select Devices.
In the Windows Autopilot devices screen that opens, under Serial number, find the device that needs to be deregistered by its serial number as determined in the Delete from Intune section. If necessary, use the Search by serial number box.
Select the device by selecting the checkbox next to the device.
Select the extended menu icon (
…) on the far right end of the line containing the device. A menu appears with the option Unassign user.- If the Unassign user option is available and not greyed out, then select it. A warning dialog box appears confirming to unassign the user from the device. Select OK to confirm unassigning the device from the user.
- If the Unassign user option isn't available and greyed out, then move on to the next step.
With the device still selected, select Delete in the toolbar at the top of the page.
A warning dialog box appears to confirm the deletion of the device from Windows Autopilot. Select Yes to confirm deleting the device.
The deregistration process might take some time. The process can be accelerated by selecting the Sync button in the toolbar at the top of the page.
Every few minutes select Refresh in the toolbar at the top of the page until the device is no longer present.
Important
For Microsoft Entra joined devices, no additional steps are required after deregistering the device from Windows Autopilot using Intune. Avoid manually deleting the device from Microsoft Entra ID, as this can cause unexpected issues.
For Microsoft Entra hybrid joined devices, delete the computer object from the on‑premises Active Directory Domain Services (AD DS) environment to prevent it from being resynced to Microsoft Entra ID. After this step, no additional actions are required in Intune or Windows Autopilot. Avoid manually deleting the device from Microsoft Entra ID.
For information about what to expect in Microsoft Entra ID after deregistration, see What happens to the Microsoft Entra device object after deregistration?
This process ensures that related records in Windows Autopilot, Intune, and Microsoft Entra ID are handled correctly. Skipping steps or removing records out of order can result in orphaned records or unrecoverable devices. If a device goes into an unrecoverable state, contact the appropriate Microsoft support alias for assistance.
What happens to the Microsoft Entra device object after deregistration?
Deregistering a device from Windows Autopilot removes the device’s registration from the Windows Autopilot deployment service. However, this action doesn’t always remove the corresponding Microsoft Entra device object.
What happens in Microsoft Entra ID depends on the device’s join and enrollment state:
- Devices that aren’t currently enrolled in MDM: Removing the Windows Autopilot registration can also result in the associated Microsoft Entra device object being removed.
- Devices that are or were enrolled in MDM: Removing the Windows Autopilot registration doesn’t automatically delete the Microsoft Entra device object. In this case, the device can remain in Microsoft Entra ID even though it’s no longer registered with Windows Autopilot.
Because this behavior varies, avoid manually deleting the device from Microsoft Entra ID unless a specific scenario requires it. The Windows Autopilot deployment process relies on the Microsoft Entra device object, and deleting it can cause enrollment failures.
Deregister from Windows Autopilot using Microsoft 365 admin center
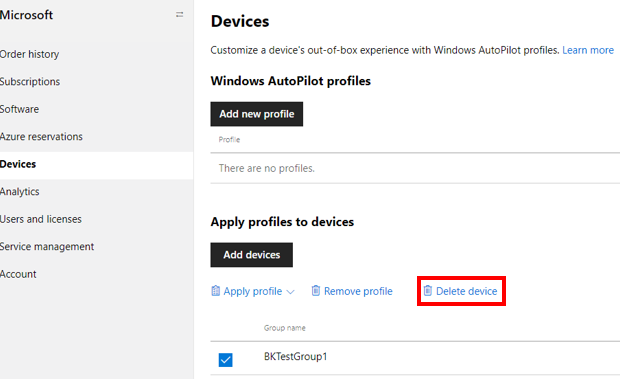
The device can be deregistered from Windows Autopilot in Microsoft 365 admin center if using the Microsoft 365 admin center instead of Intune. To deregister a Windows Autopilot device from the Microsoft 365 admin center:
- Sign into to the Microsoft 365 admin center.
- Navigate to Devices > Autopilot.
- Select the device to be deregistered and then select Delete device.
Deregister from Windows Autopilot in Microsoft Partner Center (MPC)
To deregister a Windows Autopilot device from the Microsoft Partner Center (MPC), a Cloud Solution Partner (CSP) would:
Sign into the Microsoft Partner Center (MPC).
Navigate to Customer > Devices.
Select the device to be deregistered and then select Delete device.
Partners deregistering a device from Windows Autopilot in Microsoft Partner Center (MPC) only deregisters the device from Windows Autopilot. It doesn't perform any of the following actions:
- Unenroll the device from the mobile device management (MDM) solution, such as Intune.
- Disjoin the device from Microsoft Entra ID.
For these reasons, the OEM or CSP should work with the customer IT administrators to have the device fully removed by following the steps in the Deregister a device section.
An OEM or CSP with integrated OEM Direct APIs can also deregister a device with the AutopilotDeviceRegistration API. Make sure the TenantID and TenantDomain fields are left blank.
Note
If an admin registered a device via another portal other than the Microsoft Partner Center (MPC) such as Intune or the Microsoft 365 admin center, the device doesn't show up in Microsoft Partner Center (MPC). For a partner to register a device in the Microsoft Partner Center (MPC), the devices first needs to be deregistered using the steps outlined in the Deregister a device section.