Note
Access to this page requires authorization. You can try signing in or changing directories.
Access to this page requires authorization. You can try changing directories.
Important
Effective May 1, 2025, Azure AD B2C will no longer be available to purchase for new customers. Learn more in our FAQ.
Before you begin, use the Choose a policy type selector at the top of this page to choose the type of policy you’re setting up. Azure Active Directory B2C offers two methods to define how users interact with your applications: through predefined user flows or through fully configurable custom policies. The steps required in this article are different for each method.
Prerequisites
- Create a user flow so users can sign up and sign in to your application.
- Register a web application.
- Complete the steps in Get started with custom policies in Active Directory B2C. This tutorial guides you how to update custom policy files to use your Azure AD B2C tenant configuration.
- Register a web application.
Create an AD FS application
To enable sign-in for users with an AD FS account in Azure Active Directory B2C (Azure AD B2C), create an Application Group in your AD FS. For more information, see Build a web application using OpenID Connect with AD FS 2016 and later
To create an Application Group, follow these steps:
- In Server Manager, select Tools, and then select AD FS Management.
- In AD FS Management, right-click on Application Groups and select Add Application Group.
- On the Application Group Wizard Welcome screen:
- Enter the Name of your application. For example, Azure AD B2C application.
- Under Client-Server applications, select the Web browser accessing a web application template.
- Select Next.
- On the Application Group Wizard Native Application screen:
- Copy the Client Identifier value. The client identifier is your AD FS Application ID. You will need the application ID later in this article.
- In Redirect URI, enter
https://your-tenant-name.b2clogin.com/your-tenant-name.onmicrosoft.com/oauth2/authresp, and then Add. If you use a custom domain, enterhttps://your-domain-name/your-tenant-name.onmicrosoft.com/oauth2/authresp. Replaceyour-tenant-namewith the name of your tenant, andyour-domain-namewith your custom domain. - Select Next, and then Next, and then Next again to complete the app registration wizard.
- Select Close.
Configure the app claims
In this step, configure the claims AD FS application returns to Azure AD B2C.
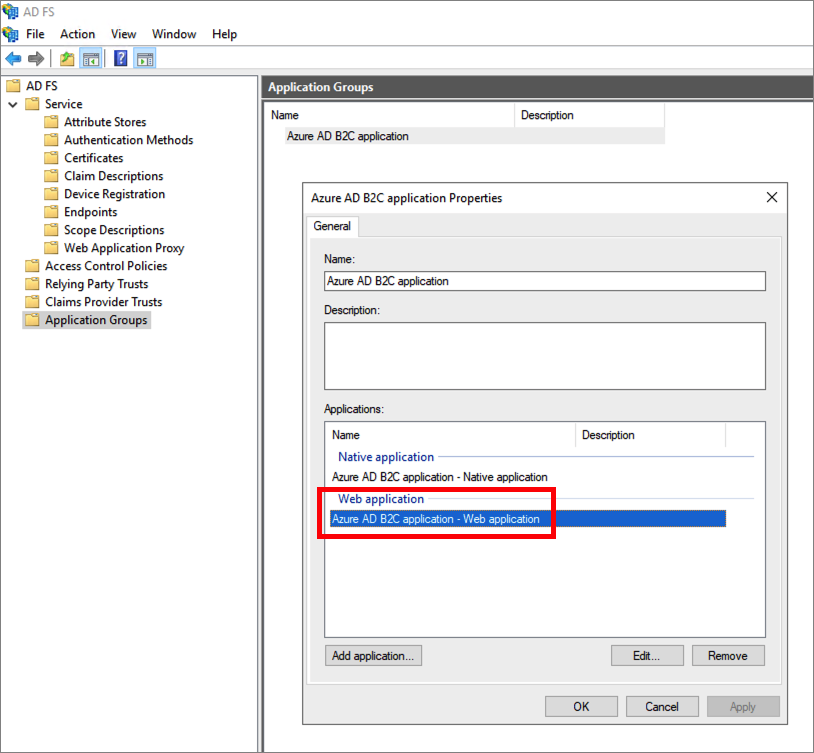
In the Application Groups, select the application your created.
In the application properties window, under the Applications, select the Web Application. Then select Edit.
Select the Issuance Transformation Rules tab. Then select Add Rule.
In Claim rule template, select Send LDAP attributes as claims, and then Next.
Provide a Claim rule name. For the Attribute store, select Active Directory, add the following claims.
LDAP attribute Outgoing claim type User-Principal-Name upn Surname family_name Given-Name given_name Display-Name name Note some of the names will not display in the outgoing claim type dropdown. You need to manually type them in (the dropdown is editable).
Select Finish.
Select Apply, and then OK.
Select OK again to finish.
Configure AD FS as an identity provider
Sign in to the Azure portal with an account that has at least External Identity Provider Administrator privileges.
If you have access to multiple tenants, select the Settings icon in the top menu to switch to your Azure AD B2C tenant from the Directories + subscriptions menu.
Choose All services in the top-left corner of the Azure portal, and then search for and select Azure AD B2C.
Select Identity providers, and then select New OpenID Connect provider.
Enter a Name. For example, Contoso.
For Metadata url, enter the URL of the AD FS OpenID Connect Configuration document. For example:
https://adfs.contoso.com/adfs/.well-known/openid-configurationFor Client ID, enter the application ID that you previously recorded.
For the Scope, enter the
openid.For Response type, select id_token. So, the Client secret value isn't needed. Learn more about use of Client ID and secret when adding a generic OpenID Connect identity provider.
(Optional) For the Domain hint, enter
contoso.com. For more information, see Set up direct sign-in using Azure Active Directory B2C.Under Identity provider claims mapping, select the following claims:
- User ID:
upn - Display name:
unique_name - Given name:
given_name - Surname:
family_name
- User ID:
Select Save.
Add AD FS identity provider to a user flow
At this point, the AD FS (Contoso) identity provider has been set up, but it's not yet available in any of the sign-in pages. To add the AD FS identity provider to a user flow:
- In your Azure AD B2C tenant, select User flows.
- Select the user flow that you want to add the AD FS identity provider (Contoso).
- Under the Social identity providers, select Contoso.
- Select Save.
- To test your policy, select Run user flow.
- For Application, select the web application named testapp1 that you previously registered. The Reply URL should show
https://jwt.ms. - Select the Run user flow button.
- From the sign-up or sign-in page, select Contoso to sign in with the Contoso account.
If the sign-in process is successful, your browser is redirected to https://jwt.ms, which displays the contents of the token returned by Azure AD B2C.
Configure AD FS as an identity provider
To enable users to sign in using an AD FS account, you need to define the AD FS as a claims provider that Azure AD B2C can communicate with through an endpoint.
Open the TrustFrameworkExtensions.xml.
Find the ClaimsProviders element. If it does not exist, add it under the root element.
Add a new ClaimsProvider as follows:
<ClaimsProvider>
  <Domain>contoso.com</Domain>
  <DisplayName>Contoso</DisplayName>
  <TechnicalProfiles>
    <TechnicalProfile Id="Contoso-OpenIdConnect">
      <DisplayName>Contoso</DisplayName>
      <Protocol Name="OpenIdConnect" />
      <Metadata>
        <Item Key="METADATA">https://your-adfs-domain/adfs/.well-known/openid-configuration</Item>
        <Item Key="response_types">id_token</Item>
        <Item Key="response_mode">form_post</Item>
        <Item Key="scope">openid</Item>
        <Item Key="HttpBinding">POST</Item>
        <Item Key="UsePolicyInRedirectUri">0</Item>
        <!-- Update the Client ID below to the Application ID -->
        <Item Key="client_id">Your AD FS application ID</Item>
      </Metadata>
      <OutputClaims>
        <OutputClaim ClaimTypeReferenceId="issuerUserId" PartnerClaimType="upn" />
        <OutputClaim ClaimTypeReferenceId="givenName" PartnerClaimType="given_name" />
        <OutputClaim ClaimTypeReferenceId="surname" PartnerClaimType="family_name" />
        <OutputClaim ClaimTypeReferenceId="displayName" PartnerClaimType="unique_name" />
        <OutputClaim ClaimTypeReferenceId="identityProvider" PartnerClaimType="iss"  />
        <OutputClaim ClaimTypeReferenceId="authenticationSource" DefaultValue="socialIdpAuthentication" AlwaysUseDefaultValue="true" />
      </OutputClaims>
      <OutputClaimsTransformations>
        <OutputClaimsTransformation ReferenceId="CreateRandomUPNUserName" />
        <OutputClaimsTransformation ReferenceId="CreateUserPrincipalName" />
        <OutputClaimsTransformation ReferenceId="CreateAlternativeSecurityId" />
      </OutputClaimsTransformations>
      <UseTechnicalProfileForSessionManagement ReferenceId="SM-SocialLogin" />
    </TechnicalProfile>
  </TechnicalProfiles>
</ClaimsProvider>
For the Metadata url, enter the URL of the AD FS OpenID Connect Configuration document. For example:
https://adfs.contoso.com/adfs/.well-known/openid-configurationSet client_id to the application ID from the application registration.
Save the file.
Add a user journey
At this point, the identity provider has been set up, but it's not yet available in any of the sign-in pages. If you don't have your own custom user journey, create a duplicate of an existing template user journey, otherwise continue to the next step.
- Open the TrustFrameworkBase.xml file from the starter pack.
- Find and copy the entire contents of the UserJourney element that includes
Id="SignUpOrSignIn". - Open the TrustFrameworkExtensions.xml and find the UserJourneys element. If the element doesn't exist, add one.
- Paste the entire content of the UserJourney element that you copied as a child of the UserJourneys element.
- Rename the Id of the user journey. For example,
Id="CustomSignUpSignIn".
Add the identity provider to a user journey
Now that you have a user journey, add the new identity provider to the user journey. You first add a sign-in button, then link the button to an action. The action is the technical profile you created earlier.
Find the orchestration step element that includes
Type="CombinedSignInAndSignUp", orType="ClaimsProviderSelection"in the user journey. It's usually the first orchestration step. The ClaimsProviderSelections element contains a list of identity providers that a user can sign in with. The order of the elements controls the order of the sign-in buttons presented to the user. Add a ClaimsProviderSelection XML element. Set the value of TargetClaimsExchangeId to a friendly name.In the next orchestration step, add a ClaimsExchange element. Set the Id to the value of the target claims exchange Id. Update the value of TechnicalProfileReferenceId to the Id of the technical profile you created earlier.
The following XML demonstrates the first two orchestration steps of a user journey with the identity provider:
<OrchestrationStep Order="1" Type="CombinedSignInAndSignUp" ContentDefinitionReferenceId="api.signuporsignin">
  <ClaimsProviderSelections>
    ...
    <ClaimsProviderSelection TargetClaimsExchangeId="ContosoExchange" />
  </ClaimsProviderSelections>
  ...
</OrchestrationStep>

<OrchestrationStep Order="2" Type="ClaimsExchange">
  ...
  <ClaimsExchanges>
    <ClaimsExchange Id="ContosoExchange" TechnicalProfileReferenceId="Contoso-OpenIdConnect" />
  </ClaimsExchanges>
</OrchestrationStep>
Configure the relying party policy
The relying party policy, for example SignUpSignIn.xml, specifies the user journey which Azure AD B2C will execute. Find the DefaultUserJourney element within relying party. Update the ReferenceId to match the user journey ID, in which you added the identity provider.
In the following example, for the CustomSignUpSignIn user journey, the ReferenceId is set to CustomSignUpSignIn:
<RelyingParty>
  <DefaultUserJourney ReferenceId="CustomSignUpSignIn" />
  ...
</RelyingParty>
Upload the custom policy
- Sign in to the Azure portal.
- Select the Directory + Subscription icon in the portal toolbar, and then select the directory that contains your Azure AD B2C tenant.
- In the Azure portal, search for and select Azure AD B2C.
- Under Policies, select Identity Experience Framework.
- Select Upload Custom Policy, and then upload the two policy files that you changed, in the following order: the extension policy, for example
TrustFrameworkExtensions.xml, then the relying party policy, such asSignUpSignIn.xml.
Test your custom policy
- Select your relying party policy, for example
B2C_1A_signup_signin. - For Application, select a web application that you previously registered. The Reply URL should show
https://jwt.ms. - Select the Run now button.
- From the sign-up or sign-in page, select Contoso to sign in with Contoso account.
If the sign-in process is successful, your browser is redirected to https://jwt.ms, which displays the contents of the token returned by Azure AD B2C.
Next steps
Learn how to pass AD-FS token to your application.