Create an access package in entitlement management
An access package enables you to do a one-time setup of resources and policies that automatically administers access for the life of the access package. This article describes how to create an access package.
Overview
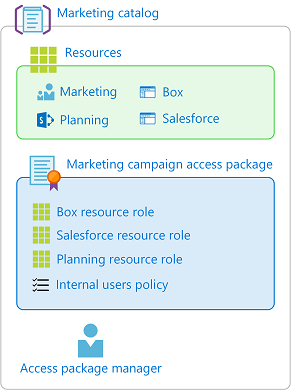
All access packages must be in a container called a catalog. A catalog defines what resources you can add to your access package. If you don't specify a catalog, your access package goes in the general catalog. Currently, you can't move an existing access package to a different catalog.
An access package can be used to assign access to roles of multiple resources that are in the catalog. If you're an administrator or catalog owner, you can add resources to the catalog while you're creating an access package. You can also add resources after the access package is created, and users assigned to the access package will also receive the extra resources.
If you're an access package manager, you can't add resources that you own to a catalog. You're restricted to using the resources available in the catalog. If you need to add resources to a catalog, you can ask the catalog owner.
All access packages must have at least one policy for users to be assigned to them. Policies specify who can request the access package, along with approval and lifecycle settings, or how access is automatically assigned. When you create an access package, you can create an initial policy for users in your directory, for users not in your directory, or for administrator direct assignments only.
Here are the high-level steps to create an access package with an initial policy:
In Identity Governance, start the process to create an access package.
Select the catalog where you want to put the access package and ensure that it has the necessary resources.
Add resource roles from resources in the catalog to your access package.
Specify an initial policy for users who can request access.
Specify approval settings and lifecycle settings in that policy.
Then once the access package is created, you can change the hidden setting, add or remove resource roles, and add additional policies.
Start the creation process
Sign in to the Microsoft Entra admin center as at least an Identity Governance Administrator.
Tip
Other least privilege roles that can complete this task include the Catalog owner or Access Package manager.
Browse to Identity governance > Entitlement management > Access package.
Select New access package.

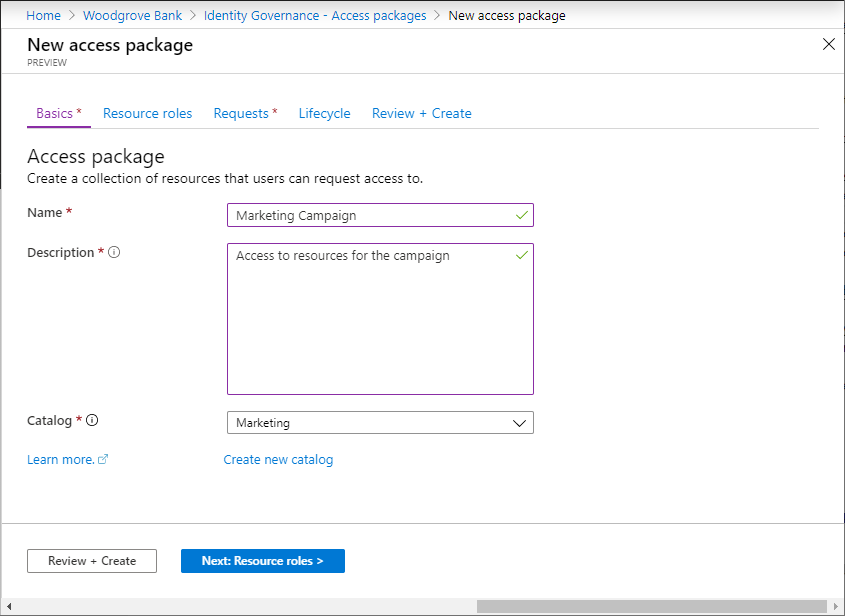
Configure basics
On the Basics tab, you give the access package a name and specify which catalog to create the access package in.
Enter a display name and description for the access package. Users see this information when they submit a request for the access package.
In the Catalog dropdown list, select the catalog where you want to put the access package. For example, you might have a catalog owner who manages all the marketing resources that can be requested. In this case, you could select the marketing catalog.
You see only catalogs that you have permission to create access packages in. To create an access package in an existing catalog, you must be at least an Identity Governance Administrator. Or you must be a catalog owner or access package manager in that catalog.
If you're at least an Identity Governance Administrator, or catalog creator, and you want to create your access package in a new catalog that's not listed, select Create new catalog. Enter the catalog name and description, and then select Create.
The access package that you're creating, and any resources included in it, are added to the new catalog. Later, you can add more catalog owners or add attributes to the resources that you put in the catalog. To learn more about how to edit the attributes list for a specific catalog resource and the prerequisite roles, read Add resource attributes in the catalog.
Select Next: Resource roles.
Select resource roles
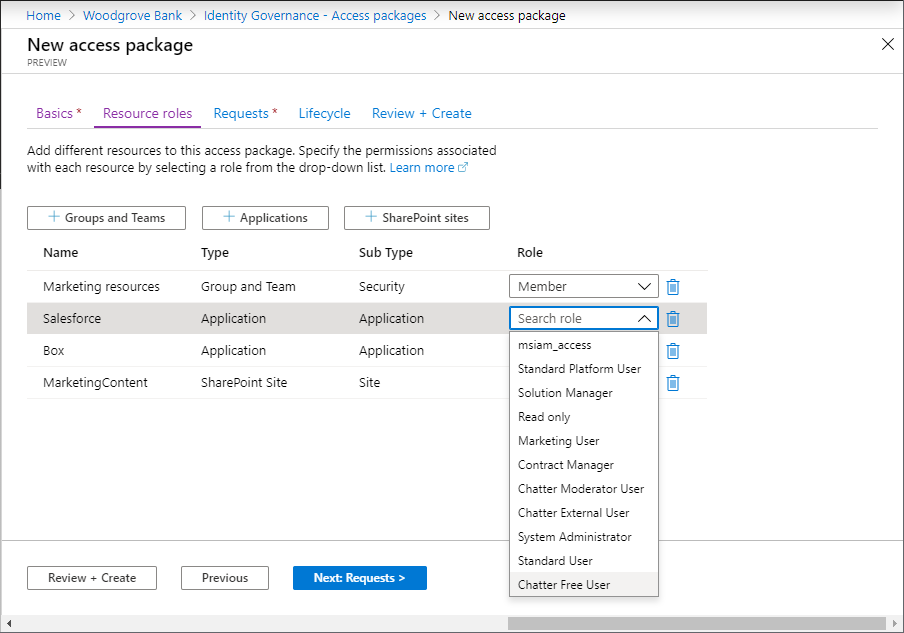
On the Resource roles tab, you select the resources to include in the access package. Users who request and receive the access package receive all the resource roles, such as group membership in the access package.
If you're not sure which resource roles to include, you can skip adding them while creating the access package, and then add them later.
Select the resource type that you want to add (Groups and Teams, Applications, or SharePoint sites).
In the Select applications panel that appears, select one or more resources from the list.
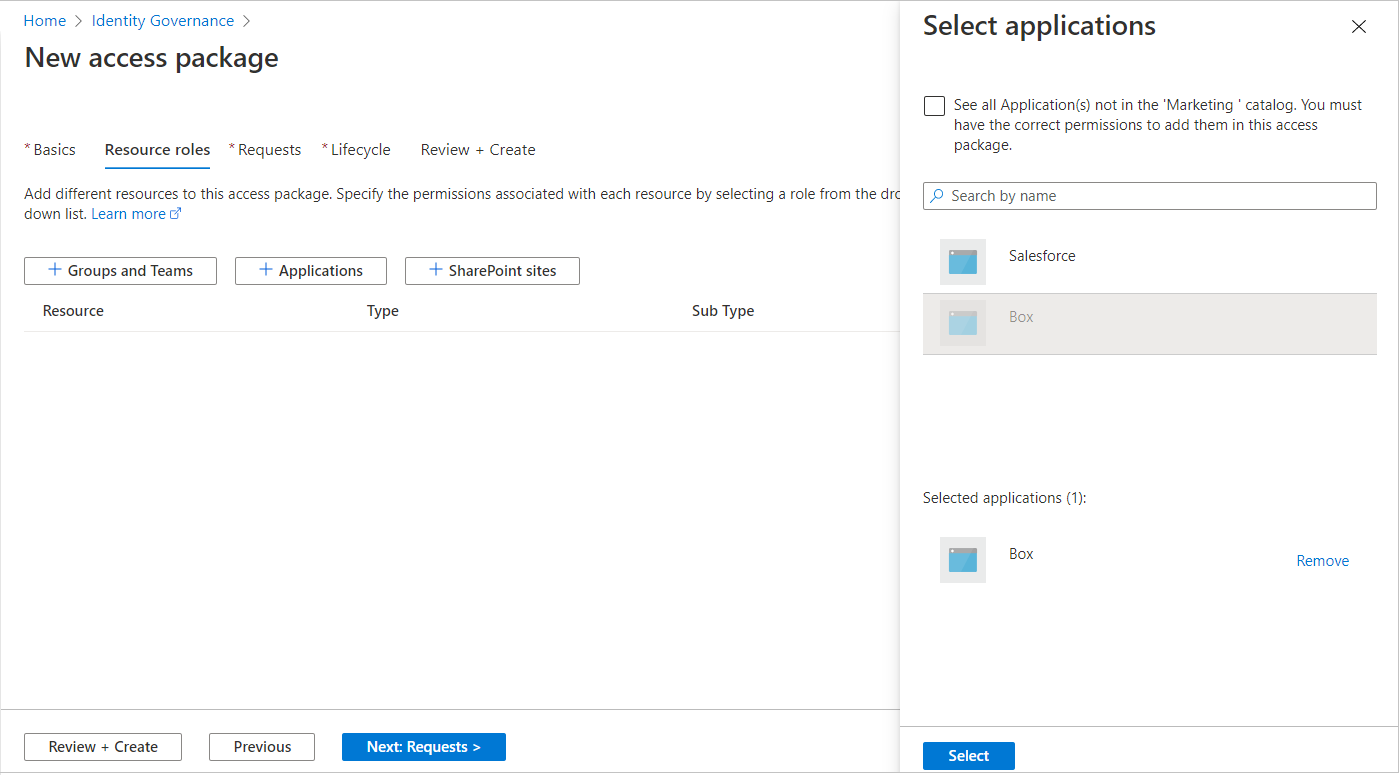
If you're creating the access package in the general catalog or a new catalog, you can choose any resource from the directory that you own. You must be at least an Identity Governance Administrator, or catalog creator.
Note
You can add dynamic membership groups to a catalog and to an access package. However, you can select only the owner role when you're managing a dynamic group resource in an access package.
If you're creating the access package in an existing catalog, you can select any resource that's already in the catalog without needing to be an owner of that resource.
If you're at least an Identity Governance Administrator, or catalog owner, you have the additional option of selecting resources that you own or administer but that aren't yet in the catalog. If you select resources in the directory but not currently in the selected catalog, these resources are also added to the catalog for other catalog administrators to build access packages with. To see all the resources in the directory that can be added to the catalog, select the See all checkbox at the top of the panel. If you want to select only resources that are currently in the selected catalog, leave the See all checkbox cleared (the default state).
In the Role list, select the role that you want users to be assigned for the resource. For more information on selecting the appropriate roles for a resource, see how to determine which resource roles to include in an access package.
Select Next: Requests.
Create the initial policy
On the Requests tab, you create the first policy to specify who can request the access package. You also configure approval settings for that policy. Later, after creating the access package with this initial policy, you can add more policies to allow additional groups of users to request the access package with their own approval settings, or to assign access automatically.
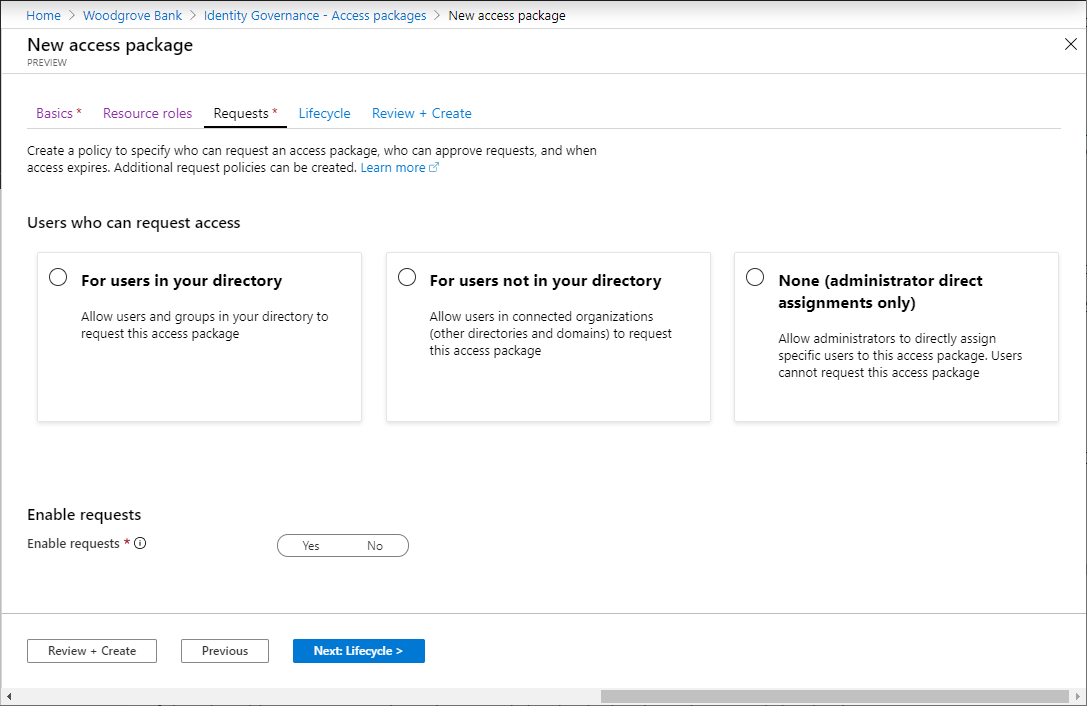
Depending on which users you want to be able to request this access package, perform the steps in one of the following sections Allow users in your directory to request the access package, Allow users not in your directory to request the access package or Allow administrator direct assignments only. If you're not sure which request or approval settings you'll need, you plan to create assignments for users who already have access to the underlying resources, or you plan to use access package automatic assignment polices to automate access, then select the direct assignment policy as the initial policy.
Allow users in your directory to request the access package
Use the following steps if you want to allow users in your directory to be able to request this access package. When you're defining the request policy, you can specify individual users or (more commonly) groups of users. For example, your organization might already have a group such as All employees. If that group is added in the policy for users who can request access, any member of that group can then request access.
In the Users who can request access section, select For users in your directory.
When you select this option, new options appear so you can refine who in your directory can request this access package.

Select one of the following options:
Option Description Specific users and groups Choose this option if you want only the users and groups in your directory that you specify to be able to request this access package. All members (excluding guests) Choose this option if you want all member users in your directory to be able to request this access package. This option doesn't include any guest users you might have invited into your directory. All users (including guests) Choose this option if you want all member users and guest users in your directory to be able to request this access package. Guest users are external users who have been invited into your directory via Microsoft Entra B2B. For more information about the differences between member users and guest users, see What are the default user permissions in Microsoft Entra ID?.
If you selected Specific users and groups, select Add users and groups.
On the Select users and groups pane, select the users and groups that you want to add.

Choose Select to add the users and groups.
Skip down to the Specify approval settings section.
Allow users not in your directory to request the access package
Users who are in another Microsoft Entra directory or domain might not have been invited into your directory yet. Microsoft Entra directories must be configured to allow invitations in Collaboration restrictions. For more information, see Configure external collaboration settings.
A guest user account will be created for a user not yet in your directory whose request is approved or does not need approval. The guest will be invited but won't receive an invite email. Instead, they'll receive an email when their access package assignment is delivered. Later, when that guest user no longer has any access package assignments because the last assignment expired or was canceled, the account will be blocked from sign-in and subsequently deleted. The blocking and deletion happen by default.
If you want guest users to remain in your directory indefinitely, even if they have no access package assignments, you can change the settings for your entitlement management configuration. For more information about the guest user object, see Properties of a Microsoft Entra B2B collaboration user.
Follow these steps if you want to allow users not in your directory to request the access package:
In the Users who can request access section, select For users not in your directory.
When you select this option, new options appear.

Select one of the following options:
Option Description Specific connected organizations Choose this option if you want to select from a list of organizations that your administrator previously added. All users from the selected organizations can request this access package. All connected organizations Choose this option if all users from all your configured connected organizations can request this access package. All users (All connected organizations + any new external users) Choose this option if any users can request this access package and the B2B allowlist or blocklist settings should take precedence for any new external user. A connected organization is an external Microsoft Entra directory or domain that you have a relationship with.
If you selected Specific connected organizations, select Add directories to select from a list of connected organizations that your administrator previously added.
Enter the name or domain name to search for a previously connected organization.

If the organization that you want to collaborate with isn't in the list, you can ask your administrator to add it as a connected organization. For more information, see Add a connected organization.
If you selected All connected organizations, then you should confirm the list of connected organizations that are currently configured and planned to be in scope.
If you selected All users, then you will need to configure approvals in the approvals section, as this scope would allow any identity on the Internet to request access.
After you select all your connected organizations, choose Select.
All users from the selected connected organizations will be able to request this access package. This includes users in Microsoft Entra ID from all subdomains associated with the organization, unless the Azure B2B allowlist or blocklist blocks those domains. If you specify a social identity provider domain, such as live.com, then any user from the social identity provider will be able to request this access package. For more information, see Allow or block invitations to B2B users from specific organizations.
Skip down to the Specify approval settings section.
Allow administrator direct assignments only
Follow these steps if you want to bypass access requests and allow administrators to directly assign specific users to this access package. Users won't have to request the access package. You can still set lifecycle settings, but there are no request settings.
In the Users who can request access section, select None (administrator direct assignments only).

After you create the access package, you can directly assign specific internal and external users to it. If you specify an external user, a guest user account is created in your directory. For information about directly assigning a user, see View, add, and remove assignments for an access package.
Skip down to the Enable requests section.
Specify approval settings
In the Approval section, you specify whether an approval is required when users request this access package. The approval settings work in the following way:
- Only one of the selected approvers or fallback approvers needs to approve a request for single-stage approval.
- Only one of the selected approvers from each stage needs to approve a request for two-stage approval.
- An approver can be a manager, a sponsor of a user, an internal sponsor, or an external sponsor, depending on access governance for the policy.
- Approval from every selected approver isn't required for single-stage or two-stage approval.
- The approval decision is based on whichever approver reviews the request first.
For a demonstration of how to add approvers to a request policy, watch the following video:
For a demonstration of how to add a multiple-stage approval to a request policy, watch the following video:
Follow these steps to specify the approval settings for requests for the access package:
To require approval for requests from the selected users, set the Require approval toggle to Yes. Or, to have requests automatically approved, set the toggle to No. If the policy allows external users from outside your organization to request access, you should require approval, so there is oversight on who is being added to your organization's directory.
To require users to provide a justification to request the access package, set the Require requestor justification toggle to Yes.
Determine if requests require single-stage or two-stage approval. Set the How many stages toggle to 1 for single-stage approval, 2 for two-stage approval, or 3 for three-stage approval.

Use the following steps to add approvers after you select the number of stages.
Single-stage approval
Add the First Approver information:
If the policy is set to For users in your directory, you can select either Manager as approver or Sponsors as approvers. Or, you can add a specific user by selecting Choose specific approvers, and then selecting Add approvers.
To use Sponsors as approvers for Approval, you must have a Microsoft Entra ID Governance license. For more information, see Compare generally available features of Microsoft Entra ID.

If the policy is set to For users not in your directory, you can select either External sponsor or Internal sponsor. Or, you can add a specific user by selecting Choose specific approvers, and then selecting Add approvers.

If you selected Manager as the first approver, select Add fallback to select one or more users or groups in your directory to be a fallback approver. Fallback approvers receive the request if entitlement management can't find the manager for the user who's requesting access.
Entitlement management finds the manager by using the Manager attribute. The attribute is in the user's profile in Microsoft Entra ID. For more information, see Add or update a user's profile information and settings.
If you selected Sponsors as the first approver, select Add fallback to select one or more users or groups in your directory to be a fallback approver. Fallback approvers receive the request if entitlement management can't find the sponsor for the user who's requesting access.
Entitlement management finds sponsors by using the Sponsors attribute. The attribute is in the user's profile in Microsoft Entra ID. For more information, see Add or update a user's profile information and settings.
If you selected Choose specific approvers, select Add approvers to select one or more users or groups in your directory to be approvers.
In Decision must be made in how many days? box, specify the number of days that an approver has to review a request for this access package.
If a request isn't approved within this time period, it's automatically denied. The user must then submit another request for the access package.
To require approvers to provide a justification for their decision, set Require approver justification to Yes.
The justification is visible to other approvers and the requestor.
Two-stage approval
If you selected a two-stage approval, you need to add a second approver:
Add the Second Approver information:
If the users are in your directory, you can select Sponsors as approvers. Or, add a specific user by selecting Choose specific approvers from the dropdown menu, and then selecting Add approvers.

If the users aren't in your directory, select Internal sponsor or External sponsor as the second approver. After you select the approver, add the fallback approvers.

In the Decision must be made in how many days? box, specify the number of days the second approver has to approve the request.
Set the Require approver justification toggle to Yes or No.
Three-stage approval
If you selected a three-stage approval, you need to add a third approver:
Add the Third Approver information:
If the users are in your directory, add a specific user as the third approver by selecting Choose specific approvers > Add approvers.

In the Decision must be made in how many days? box, specify the number of days the second approver has to approve the request.
Set the Require approver justification toggle to Yes or No.
Alternate approvers
You can specify alternate approvers, similar to specifying the first and second approvers who can approve requests. Having alternate approvers helps ensure that the requests are approved or denied before they expire (time out). You can list alternate approvers for the first approver and the second approver for two-stage approval.
When you specify alternate approvers, if the first or second approvers can't approve or deny the request, the pending request is forwarded to the alternate approvers. The request is sent according to the forwarding schedule that you specified during policy setup. The approvers receive an email to approve or deny the pending request.
After the request is forwarded to the alternate approvers, the first or second approvers can still approve or deny the request. Alternate approvers use the same My Access site to approve or deny the pending request.
You can list people or groups of people to be approvers and alternate approvers. Ensure that you list different sets of people to be the first, second, and alternate approvers. For example, if you listed Alice and Bob as the first approvers, list Carol and Dave as the alternate approvers.
Use the following steps to add alternate approvers to an access package:
Under First Approver, Second Approver, or both, select Show advanced request settings.

Set the If no action taken, forward to alternate approvers? toggle to Yes.
Select Add alternate approvers, and then select the alternate approvers from the list.

If you select Manager as the first approver, an extra option appears in the Alternate Approver box: Second level manager as alternate approver. If you select this option, you need to add a fallback approver to forward the request to, in case the system can't find the second-level manager.
In the Forward to alternate approver(s) after how many days box, enter the number of days the approvers have to approve or deny a request. If no approvers approve or deny the request before the request duration, the request expires (times out). The user must then submit another request for the access package.
Requests can only be forwarded to alternate approvers a day after the request duration reaches half-life. The decision of the main approvers must time out after at least four days. If the request time-out is less or equal than three days, there isn't enough time to forward the request to alternate approvers.
In this example, the duration of the request is 14 days. The request duration reaches half-life at day 7. So, the request can't be forwarded earlier than day 8.
Also, requests can't be forwarded on the last day of the request duration. So in the example, the latest the request can be forwarded is day 13.
Email Notifications (Preview)
- You're able to disable assignment emails notifying you of assignment requests that are delivered, expired, or near expiration.

You can always either enable, or disable, email notifications in the future after you finish creating the access package.
Enable requests
If you want the access package to be made immediately available for users in the request policy to request, move the Enable new requests and assignments toggle to Yes.
You can always enable it in the future, after you finish creating the access package.
If you select None (administrator direct assignments only) and you set Enable new requests and assignments to No, administrators can't directly assign this access package.

Go to the next section to learn how to add a verified ID requirement to your access package. Otherwise, select Next.
Add a verified ID requirement
Use the following steps if you want to add a verified ID requirement to your access package policy. Users who want access to the access package need to present the required verified IDs before successfully submitting their request. To learn how to configure your tenant with the Microsoft Entra Verified ID service, see Introduction to Microsoft Entra Verified ID.
You need a Global Administrator role to add verified ID requirements to an access package in a request policy. An Identity Governance administrator, user administrator, catalog owner, or access package manager can't yet add verified ID requirements.
Select + Add issuer, and then select an issuer from the Microsoft Entra Verified ID network. If you want to issue your own credentials to users, you can find instructions in Issue Microsoft Entra Verified ID credentials from an application.

Select the credential types that you want users to present during the request process.

If you select multiple credential types from one issuer, users will be required to present credentials of all selected types. Similarly, if you include multiple issuers, users will be required to present credentials from each of the issuers that you include in the policy. To give users the option of presenting different credentials from various issuers, configure separate policies for each issuer or credential type you'll accept.
Select Add to add the verified ID requirement to the access package policy.
Add requestor information to an access package
Go to the Requestor information tab, and then select the Questions tab.
In the Question box, enter a question that you want to ask the requestor. This question is also known as the display string.
If you want to add your own localization options, select add localization.

On the Add localizations for question pane:
- For Language code, select the language code for the language in which you're localizing the question.
- In the Localized Text box, enter the question in the language that you configured.
- When you finish adding all the localizations that you need, select Save.

For Answer format, select the format in which you want requestors to answer. Answer formats include Short text, Multiple choice, and Long text.
If you selected multiple choice, select the Edit and localize button to configure the answer options.

On the View/edit question pane:
- In the Answer values boxes, enter the response options that you want to give when the requestor is answering the question.
- In the Language boxes, select the language for the response options. You can localize response options if you choose extra languages.
- Select Save.

To require requestors to answer this question when they're requesting access to an access package, select the Required checkbox.
Select the Attributes tab to view attributes associated with resources that you added to the access package.
Note
To add or update attributes for an access package's resources, go to Catalogs and find the catalog associated with the access package. To learn more about how to edit the attributes list for a specific catalog resource and the prerequisite roles, read Add resource attributes in the catalog.
Select Next.
Specify a lifecycle
On the Lifecycle tab, you specify when a user's assignment to the access package expires. You can also specify whether users can extend their assignments.
In the Expiration section, set Access package assignments expire to On date, Number of days, Number of hours, or Never.
- For On date, select an expiration date in the future.
- For Number of days, specify a number from 0 to 3660 days.
- For Number of hours, specify how many hours.
Based on your selection, a user's assignment to the access package expires on a certain date, some days after they're approved, or never.
If you want the user to request a specific start and end date for their access, select Yes for the Users can request specific timeline toggle.
Select Show advanced expiration settings to show more settings.

To allow the user to extend their assignments, set Allow users to extend access to Yes.
If extensions are allowed in the policy, the user receives an email 14 days before, and then one day before, their access package assignment is set to expire. The email prompts the user to extend the assignment. The user must still be in the scope of the policy at the time that they request an extension.
Also, if the policy has an explicit end date for assignments, and a user submits a request to extend access, the extension date in the request must be at or before when assignments expire. The policy that you used to grant the user access to the access package defines whether the extension date is at or before the assignment expiration. For example, if the policy indicates that assignments are set to expire on June 30, the maximum extension that a user can request is June 30.
If a user's access is extended, they won't be able to request the access package after the specified extension date (the date set in the time zone of the user who created the policy).
To require approval to grant an extension, set Require approval to grant extension to Yes.
This approval will use the same approval settings that you specified on the Requests tab.
Select Next or Update.
Review and create the access package
On the Review + create tab, you can review your settings and check for any validation errors.
Review the access package's settings.
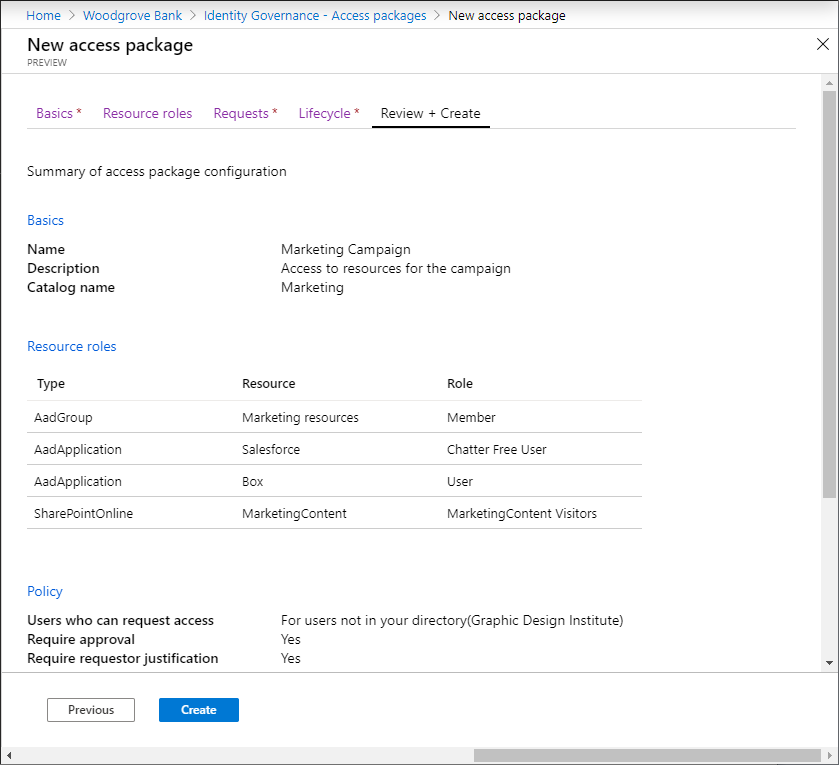
Select Create to create the access package and its initial policy.
The new access package appears in the list of access packages.
If the access package is intended to be visible to everyone in scope of the policies, then leave the Hidden setting of the access package at No. Optionally, if you intend to only allow users with the direct link to request the access package, edit the access package to change the Hidden setting to Yes. Then copy the link to request the access package and share it with users who need access.
You can next add more policies to the access package, configure separation of duties checks, or directly assign a user.
Create an access package programmatically
There are two ways to create an access package programmatically: through Microsoft Graph and through the PowerShell cmdlets for Microsoft Graph.
Create an access package by using Microsoft Graph
You can create an access package by using Microsoft Graph. A user in an appropriate role with an application that has the delegated EntitlementManagement.ReadWrite.All permission can call the API to:
- List the resources in the catalog and create an accessPackageResourceRequest for any resources that aren't yet in the catalog.
- Retrieve the roles and scopes of each resource in the catalog. This list of roles will then be used to select a role, when subsequently creating a resourceRoleScope.
- Create an accessPackage.
- Create a resourceRoleScope for each resource role needed in the access package.
- Create an assignmentPolicy for each policy needed in the access package.
Create an access package by using Microsoft PowerShell
You can also create an access package in PowerShell by using the cmdlets from the Microsoft Graph PowerShell cmdlets for Identity Governance module.
First, retrieve the ID of the catalog, and of the resource in that catalog and its scopes and roles, that you want to include in the access package. Use a script similar to the following example:
Connect-MgGraph -Scopes "EntitlementManagement.ReadWrite.All"

$catalog = Get-MgEntitlementManagementCatalog -Filter "displayName eq 'Marketing'" -All
if ($catalog -eq $null) { throw "catalog not found" }
$rsc = Get-MgEntitlementManagementCatalogResource -AccessPackageCatalogId $catalog.id -Filter "originSystem eq 'AadApplication'" -ExpandProperty scopes
if ($rsc -eq $null) { throw "resource not found" }
$filt = "(id eq '" + $rsc.Id + "')"
$rrs = Get-MgEntitlementManagementCatalogResourceRole -AccessPackageCatalogId $catalog.id -Filter $filt -ExpandProperty roles,scopes
Then, create the access package:
$params = @{
    displayName = "sales reps"
    description = "outside sales representatives"
    catalog = @{
        id = $catalog.id
    }
}
$ap = New-MgEntitlementManagementAccessPackage -BodyParameter $params
After you create the access package, assign the resource roles to it. For example, if you want to include the first resource role of the resource returned earlier as a resource role of the new access package, and the role has an ID, you can use a script similar to this one:
$rparams = @{
    role = @{
        id =  $rrs.Roles[0].Id
        displayName =  $rrs.Roles[0].DisplayName
        description =  $rrs.Roles[0].Description
        originSystem =  $rrs.Roles[0].OriginSystem
        originId =  $rrs.Roles[0].OriginId
        resource = @{
            id = $rrs.Id
            originId = $rrs.OriginId
            originSystem = $rrs.OriginSystem
        }
    }
    scope = @{
        id = $rsc.Scopes[0].Id
        originId = $rsc.Scopes[0].OriginId
        originSystem = $rsc.Scopes[0].OriginSystem
    }
}

New-MgEntitlementManagementAccessPackageResourceRoleScope -AccessPackageId $ap.Id -BodyParameter $rparams
If the role doesn't have an ID, then don't include the id parameter of the role structure in the request payload.
Finally, create the policies. In this policy, only the administrators or access package assignment managers can assign access, and there are no access reviews. For more examples, see Create an assignment policy through PowerShell and Create an assignmentPolicy.
$pparams = @{
    displayName = "New Policy"
    description = "policy for assignment"
    allowedTargetScope = "notSpecified"
    specificAllowedTargets = @(
    )
    expiration = @{
        endDateTime = $null
        duration = $null
        type = "noExpiration"
    }
    requestorSettings = @{
        enableTargetsToSelfAddAccess = $false
        enableTargetsToSelfUpdateAccess = $false
        enableTargetsToSelfRemoveAccess = $false
        allowCustomAssignmentSchedule = $true
        enableOnBehalfRequestorsToAddAccess = $false
        enableOnBehalfRequestorsToUpdateAccess = $false
        enableOnBehalfRequestorsToRemoveAccess = $false
        onBehalfRequestors = @(
        )
    }
    requestApprovalSettings = @{
        isApprovalRequiredForAdd = $false
        isApprovalRequiredForUpdate = $false
        stages = @(
        )
    }
    accessPackage = @{
        id = $ap.Id
    }
}
New-MgEntitlementManagementAssignmentPolicy -BodyParameter $pparams
For more information, see Create an access package in entitlement management for an application with a single role using PowerShell.