Azure OpenAI GPT-4 Turbo with Vision tool in Azure AI Foundry portal
Important
Items marked (preview) in this article are currently in public preview. This preview is provided without a service-level agreement, and we don't recommend it for production workloads. Certain features might not be supported or might have constrained capabilities. For more information, see Supplemental Terms of Use for Microsoft Azure Previews.
The prompt flow Azure OpenAI GPT-4 Turbo with Vision tool enables you to use your Azure OpenAI GPT-4 Turbo with Vision model deployment to analyze images and provide textual responses to questions about them.
Prerequisites
- An Azure subscription. You can create one for free.
- An Azure AI Foundry hub with a GPT-4 Turbo with Vision model deployed in one of the regions that support GPT-4 Turbo with Vision. When you deploy from your project's Deployments page, select
gpt-4as the model name andvision-previewas the model version.
Build with the Azure OpenAI GPT-4 Turbo with Vision tool
Create or open a flow in Azure AI Foundry. For more information, see Create a flow.
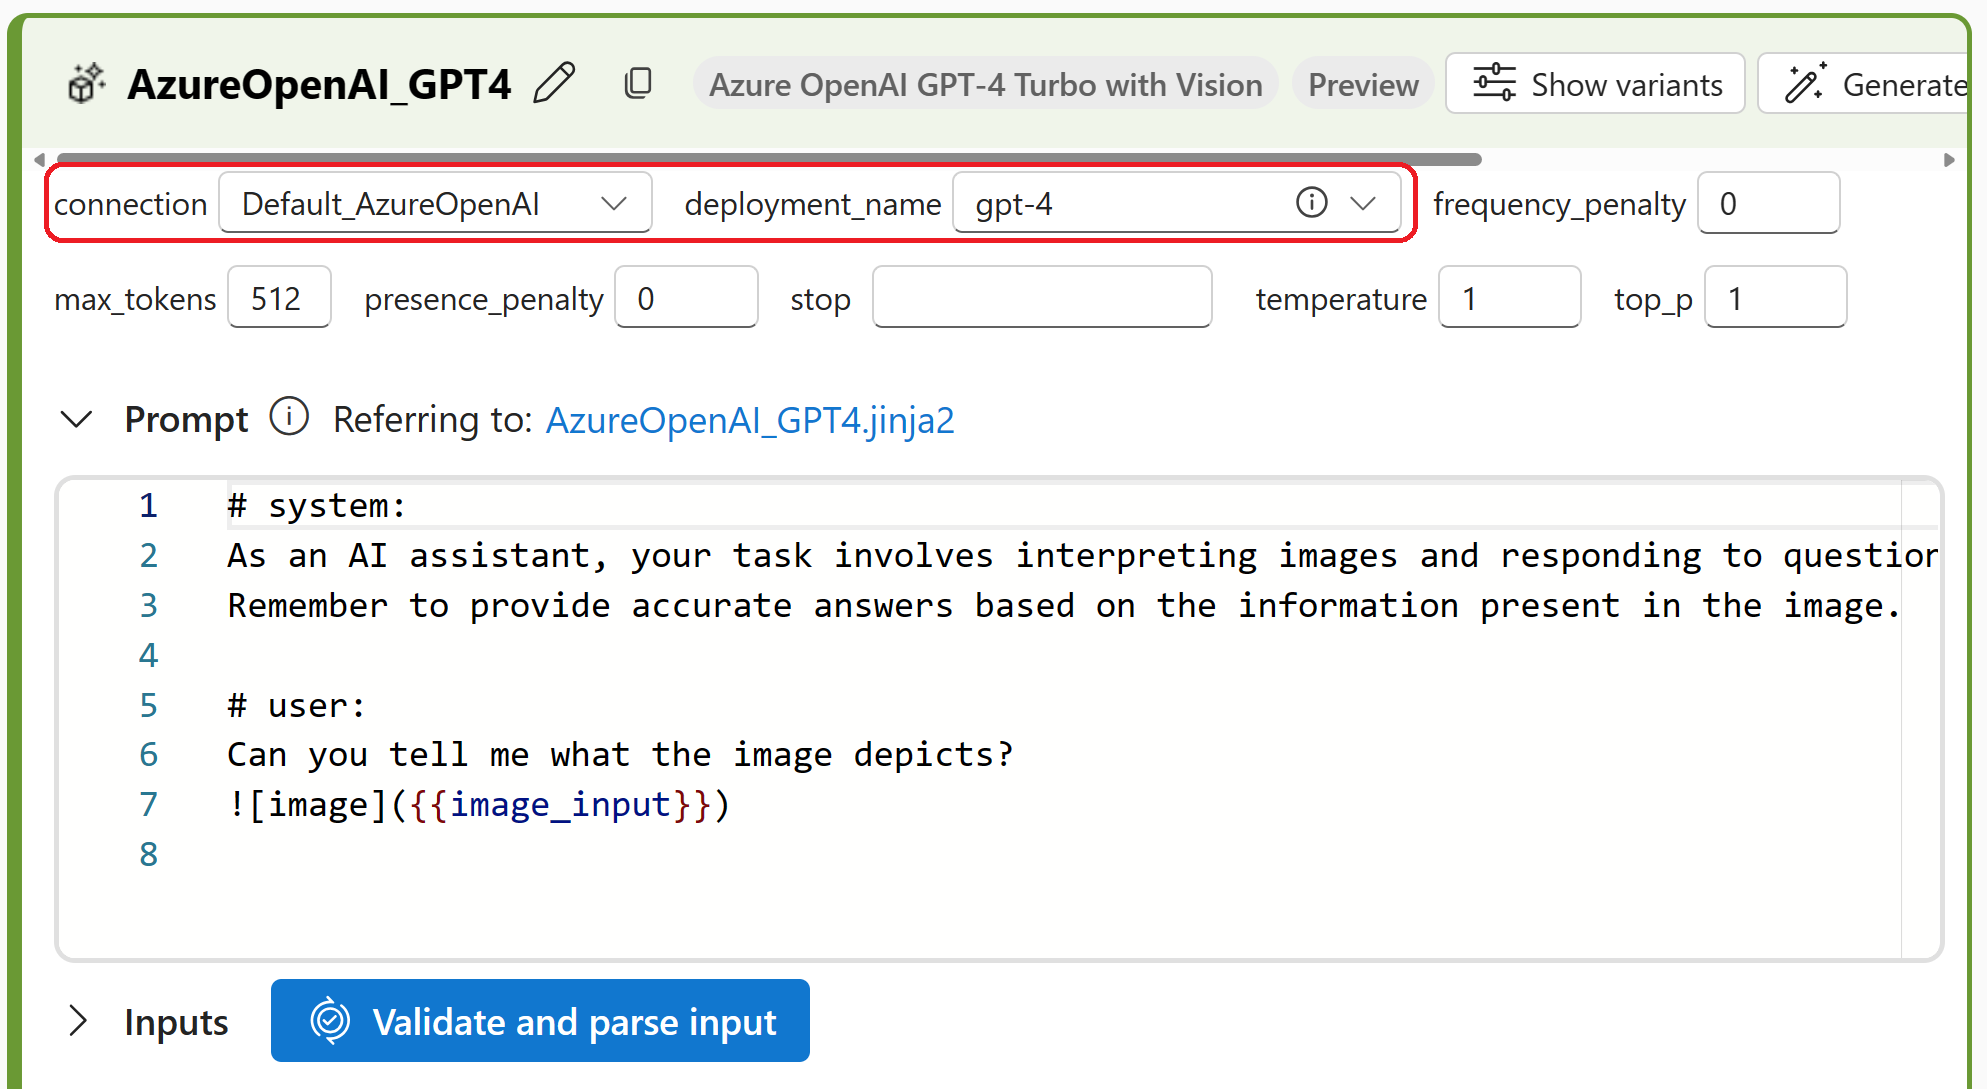
Select + More tools > Azure OpenAI GPT-4 Turbo with Vision to add the Azure OpenAI GPT-4 Turbo with Vision tool to your flow.
Select the connection to your Azure OpenAI Service. For example, you can select the Default_AzureOpenAI connection. For more information, see Prerequisites.
Enter values for the Azure OpenAI GPT-4 Turbo with Vision tool input parameters described in the Inputs table. For example, you can use this example prompt:
# system: As an AI assistant, your task involves interpreting images and responding to questions about the image. Remember to provide accurate answers based on the information present in the image. # user: Can you tell me what the image depicts? Select Validate and parse input to validate the tool inputs.
Specify an image to analyze in the
image_inputinput parameter. For example, you can upload an image or enter the URL of an image to analyze. Otherwise, you can paste or drag and drop an image into the tool.Add more tools to your flow, as needed. Or select Run to run the flow.
The outputs are described in the Outputs table.
Here's an example output response:
{
    "system_metrics": {
        "completion_tokens": 96,
        "duration": 4.874329,
        "prompt_tokens": 1157,
        "total_tokens": 1253
    },
    "output": "The image depicts a user interface for Azure's OpenAI GPT-4 service. It is showing a configuration screen where settings related to the AI's behavior can be adjusted, such as the model (GPT-4), temperature, top_p, frequency penalty, etc. There's also an area where users can enter a prompt to generate text, and an option to include an image input for the AI to interpret, suggesting that this particular interface supports both text and image inputs."
}
Inputs
The following input parameters are available.
| Name | Type | Description | Required |
|---|---|---|---|
| connection | AzureOpenAI | The Azure OpenAI connection to be used in the tool. | Yes |
| deployment_name | string | The language model to use. | Yes |
| prompt | string | The text prompt that the language model uses to generate its response. The Jinja template for composing prompts in this tool follows a similar structure to the chat API in the large language model (LLM) tool. To represent an image input within your prompt, you can use the syntax . Image input can be passed in the user, system, and assistant messages. |
Yes |
| max_tokens | integer | The maximum number of tokens to generate in the response. Default is 512. | No |
| temperature | float | The randomness of the generated text. Default is 1. | No |
| stop | list | The stopping sequence for the generated text. Default is null. | No |
| top_p | float | The probability of using the top choice from the generated tokens. Default is 1. | No |
| presence_penalty | float | The value that controls the model's behavior regarding repeating phrases. Default is 0. | No |
| frequency_penalty | float | The value that controls the model's behavior regarding generating rare phrases. Default is 0. | No |
Outputs
The following output parameters are available.
| Return type | Description |
|---|---|
| string | The text of one response of conversation |
Next steps
- Learn more about how to process images in prompt flow.
- Learn more about how to create a flow.
