Note
Access to this page requires authorization. You can try signing in or changing directories.
Access to this page requires authorization. You can try changing directories.
APPLIES TO: Premium | Premium v2
Set up a workspace to enable an API team to manage and productize their own APIs, while providing the API platform team with the tools to observe, govern, and maintain the API Management platform. After you create a workspace and assign permissions, workspace collaborators can create and manage their own APIs, products, subscriptions, and related resources.
Note
- The latest workspace features are supported in API Management REST API version 2023-09-01-preview or later.
- For pricing considerations, see API Management pricing.
Follow the steps in this article to:
- Create an API Management workspace and associate a workspace gateway using the Azure portal
- Optionally, isolate the workspace gateway in an Azure virtual network
- Assign permissions to the workspace
Note
- Currently, creating a workspace gateway is a long-running operation that can take up to 3 hours or more to complete.
- Associating multiple workspaces with a workspace gateway is available only for workspace gateways created after April 15, 2025. Learn more about shared workspace gateways.
Prerequisites
- An API Management instance. If you need to, create one in a supported tier.
- Owner or Contributor role on the resource group where the API Management instance is deployed, or equivalent permissions to create resources in the resource group.
- (Optional) A subnet in a new or existing Azure virtual network to isolate the workspace gateway's inbound and outbound traffic. For configuration options and requirements, see Network resource requirements for workspace gateways.
Create a workspace - portal
Sign in to the Azure portal, and navigate to your API Management instance.
In the left menu, under APIs, select Workspaces > + Add.
On the Basics tab, enter a descriptive Display name, resource Name, and optional Description for the workspace. Select Next.
On the Gateway tab, configure settings for the workspace gateway.
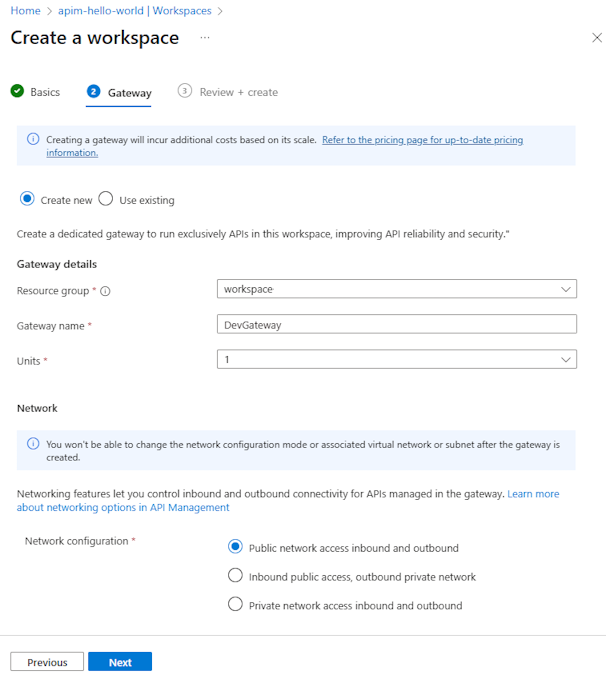
Select Create new to create a new workspace gateway, or select Use existing to associate the workspace with an existing gateway that has other workspaces deployed on it.
If you choose to create a new gateway:
In Gateway details, enter a new gateway name and select the number of scale Units. The gateway costs are based on the number of units. For more information, see API Management pricing.
In Network, select a Network configuration for your workspace gateway.
Important
Plan your workspace's network configuration carefully. You can't change the network configuration after you create the workspace.
If you select either Inbound public access, outbound private access (virtual network integration) or Inbound private access, outbound private access (virtual network injection), select a Virtual network and Subnet to isolate the workspace gateway, or create a new one. For network requirements, see Network resource requirements for workspace gateways.
Select Next. After validation completes, select Create.
Note
Creation of a new workspace gateway, if selected, can take up to several hours to complete. To track the deployment progress in the Azure portal, go to the gateway's resource group. In the left menu, under Settings, select Deployments.
After the deployment completes, the new workspace appears in the list on the Workspaces page. Select the workspace to manage its settings and resources.
Note
- To view the gateway runtime hostname and other gateway details, select the workspace in the portal. Under Deployment + infrastructure, select Gateways, and select the name of the workspace's gateway.
- While the workspace gateway is being created, runtime calls to the workspace's APIs won't succeed.
Assign users to workspace - portal
After creating a workspace, assign permissions to users to manage the workspace's resources. Each workspace user must be assigned both a service-scoped workspace RBAC role and a workspace-scoped RBAC role, or granted equivalent permissions using custom roles.
To manage the workspace gateway, we recommend also assigning workspace users an Azure-provided RBAC role scoped to the workspace gateway.
Note
For easier management, set up Microsoft Entra groups to assign workspace permissions to multiple users.
- For a list of built-in workspace roles, see How to use role-based access control in API Management.
- For steps to assign a role, see Assign Azure roles using the portal.
Assign a service-scoped role
Sign in to the Azure portal, and navigate to your API Management instance.
In the left menu, select Access control (IAM) > + Add.
Assign one of the following service-scoped roles to each member of the workspace:
- API Management Service Workspace API Developer
- API Management Service Workspace API Product Manager
Assign a workspace-scoped role
In the menu for your API Management instance, under APIs, select Workspaces > the name of the workspace that you created.
In the Workspace window, select Access control (IAM)> + Add.
Assign one of the following workspace-scoped roles to the workspace members so that they can manage workspace APIs and other resources.
- API Management Workspace Reader
- API Management Workspace Contributor
- API Management Workspace API Developer
- API Management Workspace API Product Manager
Assign a gateway-scoped role
Sign in to the Azure portal, and navigate to your API Management instance.
In the left menu, under APIs, select Workspaces > the name of your workspace.
In the left menu of the workspace, select Gateways, and select the workspace gateway.
In the left menu, select Access control (IAM) > + Add.
Assign one of the following roles to each member of the workspace. At minimum, we recommend assigning the Reader role to view the gateway's settings. Owners and Contributors can manage the gateway's settings including scaling the gateway.
- Owner
- Contributor
- Reader
Enable diagnostic settings for monitoring workspace APIs
Configure settings to collect Azure Monitor logs for the workspace and send them to a Log Analytics workspace so that the workspace team can monitor their own APIs while the API platform team can access centralized logs for the API Management instance. See the following diagram:
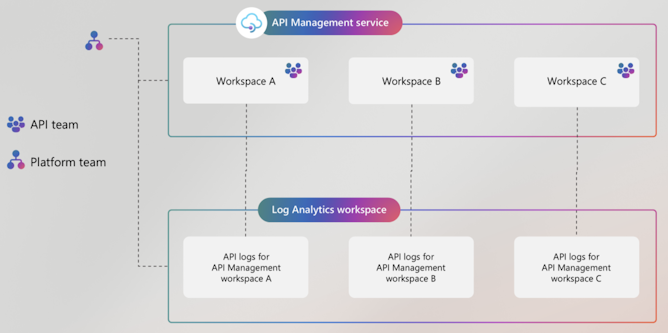
To collect Azure Monitor logs for the workspace, diagnostic settings are needed at both the service and workspace levels:
First, enable a diagnostics setting at the service level for collection of API Management gateway logs, if a setting isn't already enabled. We recommend sending logs to a Log Analytics workspace. For more information, see Configure diagnostic settings for API Management.
Then, enable a diagnostics setting at the workspace level to send API Management gateway logs to the same Log Analytics workspace. This setting collects logs for all workspace gateways associated with the workspace.
Important
A diagnostic setting at the service level configures logging across the API Management instance, including workspaces that have a workspace-level diagnostic setting enabled. If you don't enable a workspace-level diagnostic setting, the workspace's gateway logs won't be collected or aggregated into Log Analytics.
Note
By default, members of the workspace team assigned the built-in workspace RBAC roles don't have permissions to edit diagnostic settings in a workspace. The API platform team has those permissions.
To configure a workspace diagnostic setting for collection of workspace-level gateway logs:
Sign in to the Azure portal, and navigate to your API Management instance.
In the left menu, under APIs, select Workspaces > the name of your workspace.
In the left menu of the workspaces, under Monitoring, select Diagnostic settings > + Add diagnostic setting.
On the Diagnostic setting page, enter or select details for the setting:
- Diagnostic setting name: Enter a descriptive name.
- Category groups: Optionally make a selection for your scenario.
- Under Categories: Select Logs related to ApiManagement Gateway to collect gateway logs for APIs in this workspace.
- Under Destination details, select to send logs to the same Azure Log Analytics workspace specified in the service-level diagnostic setting and in other workspace-level diagnostic settings.
- Select Save.
Note
- Currently, only gateway logs can be collected for workspaces.
- Access workspace-level logs by navigating to Monitoring > Logs in the left menu of the workspace.
Get started with your workspace
Depending on their role in the workspace, users might have permissions to create APIs, products, subscriptions, and other resources, or they might have read-only access to some or all of them.
To get started managing, protecting, and publishing APIs in a workspace, see the following guidance.