Note
Access to this page requires authorization. You can try signing in or changing directories.
Access to this page requires authorization. You can try changing directories.
Azure App Service provides a highly scalable, self-patching web hosting service. App Service has built-in support for user authentication and authorization. This tutorial shows how to secure your apps with App Service authentication and authorization. It uses an Express.js with views front end. App Service authentication and authorization support all language runtimes. You can learn how to apply it to your preferred language by following this tutorial.
Azure App Service provides a highly scalable, self-patching web hosting service using the Linux operating system. App Service has built-in support for user authentication and authorization. This tutorial shows how to secure your apps with App Service authentication and authorization. It uses an Express.js with views front end. App Service authentication and authorization support all language runtimes. You can learn how to apply it to your preferred language by following this tutorial.
The authentication in this procedure is provided at the hosting platform layer by Azure App Service. You must deploy the front-end and back-end app and configure authentication for this web app to be used successfully.
After you complete this scenario, continue to the next tutorial to learn how to connect to Azure services as an authenticated user. Common scenarios include accessing Azure Storage or a database as the user who has specific abilities or access to specific tables or files.
In this tutorial, you:
- Enable built-in authentication and authorization
- Secure apps against unauthenticated requests
- Use Microsoft Entra ID as the identity provider
- Access a remote app on behalf of the signed-in user
- Secure service-to-service calls with token authentication
- Use access tokens from server code
Prerequisites
If you don't have an Azure account, create a free account before you begin.
Use the Bash environment in Azure Cloud Shell. For more information, see Get started with Azure Cloud Shell.

If you prefer to run CLI reference commands locally, install the Azure CLI. If you're running on Windows or macOS, consider running Azure CLI in a Docker container. For more information, see How to run the Azure CLI in a Docker container.
If you're using a local installation, sign in to the Azure CLI by using the az login command. To finish the authentication process, follow the steps displayed in your terminal. For other sign-in options, see Authenticate to Azure using Azure CLI.
When you're prompted, install the Azure CLI extension on first use. For more information about extensions, see Use and manage extensions with the Azure CLI.
Run az version to find the version and dependent libraries that are installed. To upgrade to the latest version, run az upgrade.
Get the user profile
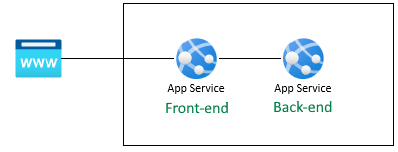
The front-end app is configured to securely use the back-end API. The front-end application provides a Microsoft sign-in for the user, then allows the user to get their fake profile from the back end. This tutorial uses a fake profile to simplify the steps to complete the scenario.
Before your source code runs on the front end, the App Service injects the authenticated accessToken from the App Service x-ms-token-aad-access-token header. The front-end source code then accesses and sends the accessToken to the back-end server. The front-end server sends the token as the bearerToken to securely access the back-end API. The back-end server validates the bearerToken before it passes it to your back-end source code. After your back-end source code receives the bearerToken, it can be used.
In the next tutorial in this series, the bearerToken is exchanged for a token with a scope to access the Microsoft Graph API. The Microsoft Graph API returns the user's profile information.
Clone the sample application
In the Azure Cloud Shell, run the following command to clone the sample repository.
git clone https://github.com/Azure-Samples/js-e2e-web-app-easy-auth-app-to-app
Create and deploy apps
Create the resource group, web app plan, and the web app, then deploy in a single step.
Change into the
frontendweb app directory.cd js-e2e-web-app-easy-auth-app-to-app/frontendCreate and deploy the front-end web app with the az webapp up command. The web app name has to be globally unique. Replace
<front-end-app-name>with a unique name.az webapp up --resource-group myAuthResourceGroup --name <front-end-app-name> --plan myPlan --sku FREE --os-type Windows --location "West Europe" --runtime "NODE:24LTS"Change into the
backendweb app directory.cd ../backendDeploy the back-end web app to same resource group and app plan. The web app name has to be globally unique. Replace
<back-end-app-name>with a unique string of letters and numbers.az webapp up --resource-group myAuthResourceGroup --name <back-end-app-name> --plan myPlan --os-type Windows --location "West Europe" --runtime "NODE:24LTS"
Change into the
frontendweb app directory.cd frontendCreate and deploy the front-end web app with the az webapp up command. The web app name has to be globally unique. Replace
<front-end-app-name>with a unique string of letters and numbers.az webapp up --resource-group myAuthResourceGroup --name <front-end-app-name> --plan myPlan --sku FREE --location "West Europe" --os-type Linux --runtime "NODE:24-lts"Change into the
backendweb app directory.cd ../backendDeploy the back-end web app to same resource group and app plan. The web app name has to be globally unique. Replace
<back-end-app-name>with a unique string of letters and numbers.az webapp up --resource-group myAuthResourceGroup --name <back-end-app-name> --plan myPlan --sku FREE --location "West Europe" --runtime "NODE:24-lts"
Configure app setting
The front-end application needs to the know the URL of the back-end application for API requests. Use the following Azure CLI command to configure the app setting. The URL should be https://<back-end-app-name>.azurewebsites.net.
az webapp config appsettings set --resource-group myAuthResourceGroup --name <front-end-app-name> --settings BACKEND_URL="https://<back-end-app-name>.azurewebsites.net"
Front end calls the back end
Browse to the front-end app and return the fake profile from the back end. This action validates that the front end is successfully requesting the profile from the back end, and the back end is returning the profile.
Open the front-end web app in a browser:
https://<front-end-app-name>.azurewebsites.net.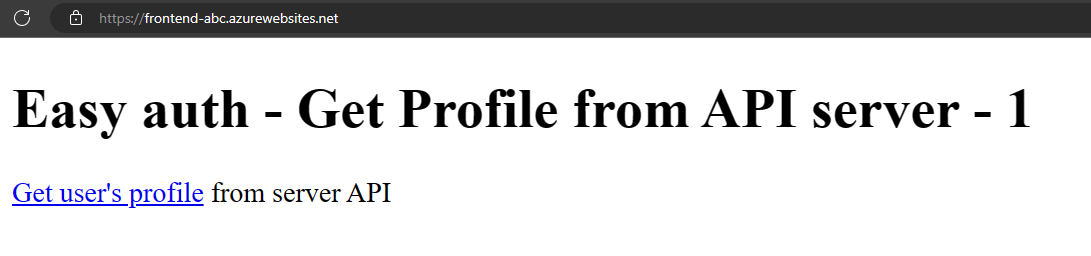
Select the Get user's profile link.
View the fake profile returned from the back end web app.
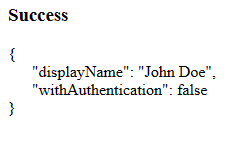
The
withAuthenticationvalue of false indicates the authentication isn't set up yet.
Configure authentication
In this section, enable authentication and authorization for the two web apps. This tutorial uses Microsoft Entra ID as the identity provider.
You also configure the front end app to:
- Grant the front end app access to the back-end app
- Configure App Service to return a usable token
- Use the token in your code
For more information, see Configure Microsoft Entra authentication for your App Services application.
Enable authentication and authorization for back-end app
In the Azure portal, search for and select Resource groups.
In Resource groups, find and select your resource group. In Overview, select your back-end app.
In your back-end app's left menu, select Settings > Authentication, and then select Add identity provider.
In the Add an identity provider page, for Identity provider, select Microsoft to sign in using Microsoft and Microsoft Entra identities.
Select a value for Client secret expiration.
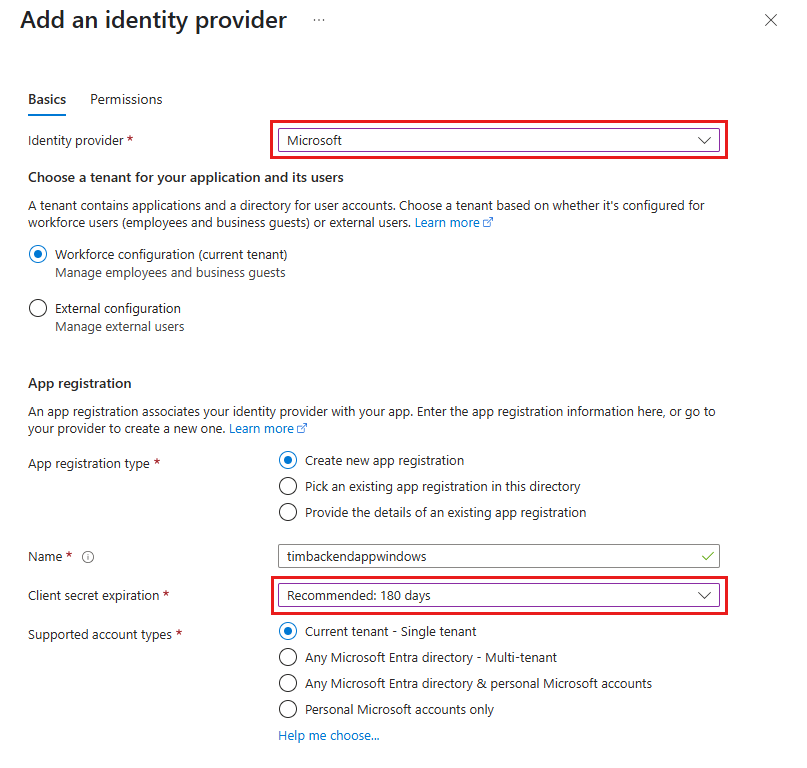
For the other values, accept the default settings and select Add.
The Authentication page opens. Copy the client ID of the Microsoft Entra application to Notepad. You need this value later.

If you stop here, you have a self-contained app that the App Service authentication and authorization secure. The remaining sections show you how to secure a multiple app solution by flowing the authenticated user from the front end to the back end.
Enable authentication and authorization for front-end app
In the Azure portal, search for and select Resource groups.
In Resource groups, find and select your resource group. In Overview, select your front-end app.
In your front-end app's left menu, select Settings > Authentication, and then select Add identity provider.
In the Add an identity provider page, for Identity provider, select Microsoft to sign in using Microsoft and Microsoft Entra identities.
Select a value for Client secret expiration. For the other values, accept the default settings and select Add.
The Authentication page opens. Copy the client ID of the Microsoft Entra application to Notepad. You need this value later.
Grant front-end app access to back-end app
You enabled authentication and authorization to both of your apps. To complete the authentication, you need to do three things:
- Expose the backend app as an API by defining a scope
- Grant the frontend app access to the backend app
- Configure App Service to return a usable token
- Use the token in your code
Note
Before you can grant the frontend app access to the backend, you must expose the backend API by setting an Application ID URI and defining at least one scope. This allows the backend to be selectable under "My APIs" when assigning API permissions.
Tip
If you run into errors and reconfigure your app's authentication/authorization settings, the tokens in the token store might not regenerate from the new settings. To make sure your tokens regenerate, you need to sign out and sign back in to your app. One approach is to use your browser in private mode. Close and reopen the browser in private mode after changing the settings in your apps.
In this section, you grant the front-end app access to the back-end app on the user's behalf. Technically, you give the front end's AD application the permissions to access the back end's AD application on the user's behalf.
In the Authentication page for the front-end app, under Identity provider, select your front-end app name. This app registration was automatically generated for you.
Select Manage > API permissions in the left menu.
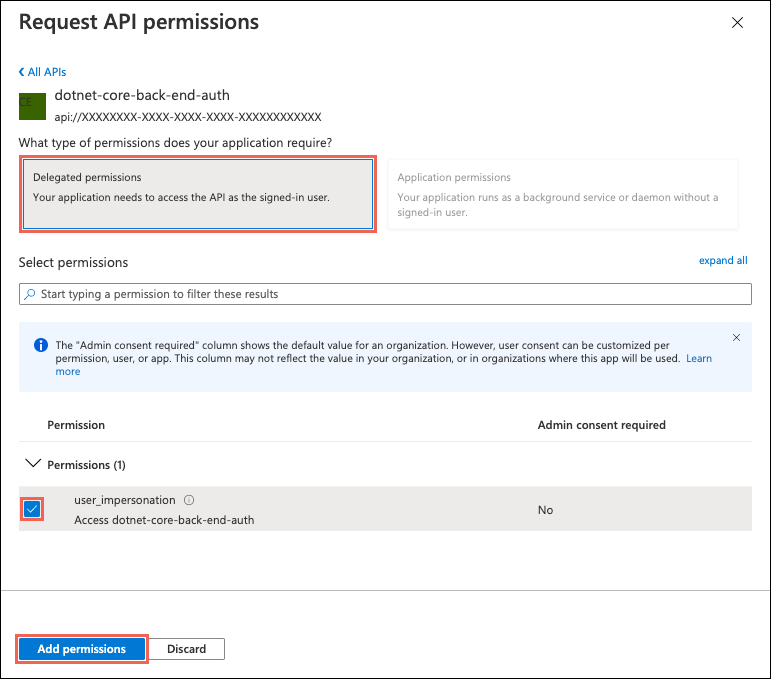
Select Add a permission, then select My APIs > <back-end-app-name>.
In the Request API permissions page for the back-end app, select Delegated permissions and user_impersonation, then select Add permissions.
Configure App Service to return a usable access token
The front-end app now has the required permissions to access the back-end app as the signed-in user. In this section, configure App Service authentication and authorization to give you a usable access token for accessing the back end. For this step, you need the back end's client ID, which you copied from Enable authentication and authorization for back-end app.
In the Cloud Shell, run the following commands on the front-end app to add the scope parameter to the authentication setting identityProviders.azureActiveDirectory.login.loginParameters. Replace <front-end-app-name> and <back-end-client-id>.
az extension add --name authV2
authSettings=$(az webapp auth show -g myAuthResourceGroup -n <front-end-app-name>)
authSettings=$(echo "$authSettings" | jq '.properties' | jq '.identityProviders.azureActiveDirectory.login += {"loginParameters":["scope=openid offline_access api://<back-end-client-id>/user_impersonation"]}')
az webapp auth set --resource-group myAuthResourceGroup --name <front-end-app-name> --body "$authSettings"
The commands add a loginParameters property with other custom scopes. Here's an explanation of the requested scopes:
openidis requested by App Service by default already. For more information, see OpenID Connect Scopes.- offline_access is included here for convenience, in case you want to refresh tokens.
api://<back-end-client-id>/user_impersonationis an exposed API in your back-end app registration. It's the scope that gives you a JWT that includes the back-end app as a token audience.
Tip
- To view the
api://<back-end-client-id>/user_impersonationscope in the Azure portal, go to the Authentication page for the back-end app, select the link under Identity provider, then select Expose an API in the left menu. - To configure the required scopes using a web interface instead, see Refresh auth tokens.
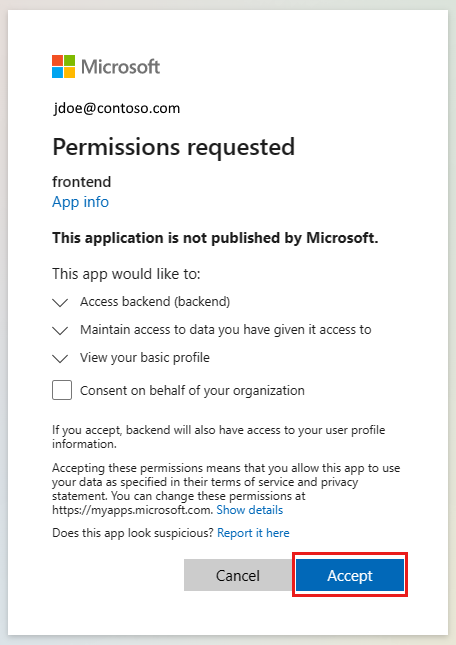
- Some scopes require admin or user consent. This requirement causes the consent request page appear when a user signs into the front-end app in the browser. To avoid this consent page, add the front end's app registration as an authorized client application in the Expose an API page. Select Add a client application and supply the client ID of the front end's app registration.
Your apps are now configured. The front end is now ready to access the back end with a proper access token.
For information on how to configure the access token for other providers, see Refresh identity provider tokens.
Configure backend App Service to accept a token only from the front-end App Service
You should also configure the back-end App Service to only accept a token from the front-end App Service. Not doing this configuration results in a 403: Forbidden error when you pass the token from the front end to the back end.
You can implement this approach by using the same Azure CLI process you used in the previous step.
Get the
appIdof the front-end App Service. You can get this value on the Authentication page of the front-end App Service.Run the following Azure CLI, substituting the
<back-end-app-name>and<front-end-app-id>.
authSettings=$(az webapp auth show -g myAuthResourceGroup -n <back-end-app-name>)
authSettings=$(echo "$authSettings" | jq '.properties' | jq '.identityProviders.azureActiveDirectory.validation.defaultAuthorizationPolicy.allowedApplications += ["<front-end-app-id>"]')
az webapp auth set --resource-group myAuthResourceGroup --name <back-end-app-name> --body "$authSettings"
Front end calls the authenticated back end
The front-end app needs to pass the user's authentication with the correct user_impersonation scope to the back end. The following steps review the code provided in the sample for this functionality.
View the front-end app's source code:
Use the front-end App Service injected
x-ms-token-aad-access-tokenheader to programmatically get the user's accessToken.// ./src/server.js const accessToken = req.headers['x-ms-token-aad-access-token'];Use the accessToken in the
Authenticationheader as thebearerTokenvalue.// ./src/remoteProfile.js // Get profile from backend const response = await fetch(remoteUrl, { cache: "no-store", // no caching -- for demo purposes only method: 'GET', headers: { 'Authorization': `Bearer ${accessToken}` } }); if (response.ok) { const { profile } = await response.json(); console.log(`profile: ${profile}`); } else { // error handling }This tutorial returns a fake profile to simplify the scenario. The next tutorial in this series demonstrates how to exchange the back-end
bearerTokenfor a new token with the scope of a downstream Azure service, such as Microsoft Graph.
Back end returns profile to front end
If the request from the front end isn't authorized, the back-end App Service rejects the request with a 401 HTTP error code before the request reaches your application code. When the back-end code is reached, because it includes an authorized token, extract the bearerToken to get the accessToken.
View the back-end app's source code:
// ./src/server.js
const bearerToken = req.headers['Authorization'] || req.headers['authorization'];

if (bearerToken) {
    const accessToken = bearerToken.split(' ')[1];
    console.log(`backend server.js accessToken: ${!!accessToken ? 'found' : 'not found'}`);

    // TODO: get profile from Graph API
    // provided in next article in this series
    // return await getProfileFromMicrosoftGraph(accessToken)

    // return fake profile for this tutorial
    return {
        "displayName": "John Doe",
        "withAuthentication": !!accessToken ? true : false
    }
}
Browse to the apps
Use the front end web site in a browser. The URL is
https://<front-end-app-name>.azurewebsites.net/.The browser requests your authentication to the web app. Complete the authentication.
After authentication completes, the front-end application returns the home page of the app.
Select Get user's profile. This action passes your authentication in the bearer token to the back end.
The back end responds with the fake hard-coded profile name:
John Doe.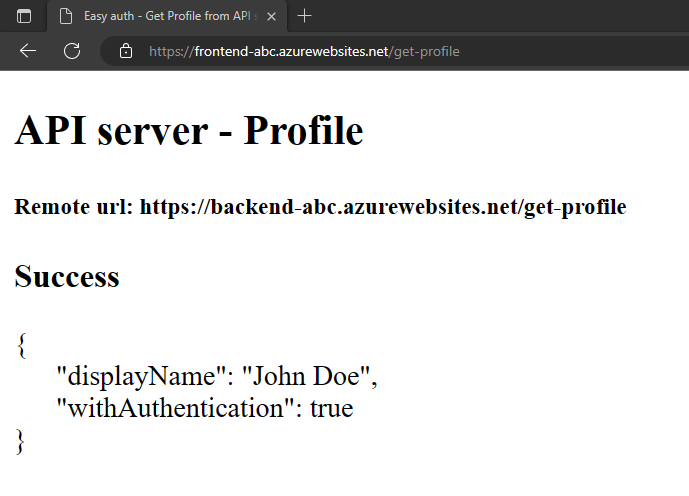
The
withAuthenticationvalue of true indicates that the authentication is set up now.
Clean up resources
In the preceding steps, you created Azure resources in a resource group.
Delete the resource group by running the following command in the Cloud Shell. This command may take a minute to run.
az group delete --name myAuthResourceGroupUse the authentication apps' Client ID, you previously found and made note of in the
Enable authentication and authorizationsections for the backend and frontend apps.Delete app registrations for both frontend and backend apps.
# delete app - do this for both frontend and backend client ids
az ad app delete <client-id>
Frequently asked questions
How do I test this authentication on my local development machine?
The authentication in this procedure is provided at the hosting platform layer by Azure App Service. There's no equivalent emulator. You must deploy the front-end and back-end app and configure authentication for each to use the authentication.
The app isn't displaying fake profile, how do I debug it?
The front-end and back-end apps both have /debug routes to help debug the authentication when this application doesn't return the fake profile. The front-end debug route provides the critical pieces to validate:
Environment variables:
- The
BACKEND_URLis configured correctly ashttps://<back-end-app-name>.azurewebsites.net. Don't include that trailing forward slash or the route.
- The
HTTP headers:
- The
x-ms-token-*headers are injected.
- The
Microsoft Graph profile name for signed in user is displayed.
Front-end app's scope for the token has
user_impersonation. If your scope doesn't include this value, it could be an issue of timing. Verify your front-end app'sloginparameters in Azure resources. Wait a few minutes for the replication of the authentication.
Did the application source code deploy correctly to each web app?
In the Azure portal for the web app, select Development Tools > Advanced Tools, then select Go. This action opens a new browser tab or window.
In the new browser tab, select Browse Directory > Site wwwroot.
Verify the following are in the directory:
- package.json
- node_modules.tar.gz
- /src/index.js
Verify the package.json
nameproperty is the same as the web name, eitherfrontendorbackend.If you changed the source code, and need to redeploy, use the az webapp up command from the directory that has the package.json file for that app.
Did the application start correctly?
Both the web apps should return something when the home page is requested. If you can't reach /debug on a web app, the app didn't start correctly. Review the error logs for that web app.
- In the Azure portal for the web app, select Development Tools > Advanced Tools, then select Go. This action opens a new browser tab or window.
- In the new browser tab, select Browse Directory > Deployment Logs.
- Review each log to find any reported issues.
Is the front-end app able to talk to the back-end app?
Because the front-end app calls the back-end app from server source code, this behavior isn't something you can see in the browser network traffic. Use the following list to determine the back-end profile request success:
The back-end web app returns any errors to the front-end app if it was reached. If it wasn't reached, the front-end app reports the status code and message.
- 401: The user didn't pass authentication correctly. This message can indicate the scope isn't set correctly.
- 404: The URL to the server doesn't match a route the server has
Use the back-end app's streaming logs to watch as you make the front-end request for the user's profile. There's debug information in the source code with
console.log, which helps determine where the failure happened.
What happens when the front-end token expires?
Your access token expires after some time. For information on how to refresh your access tokens without requiring users to reauthenticate with your app, see Refresh identity provider tokens.
If I have a browser-based app on the front-end app, can it talk to the back end directly?
This approach requires the server code to pass the access token to the JavaScript code running in the client browser. Because there's no way to safeguard the access token in the browser, we don't recommend this approach. Currently, we recommend the Backend-for-Frontend pattern.
If applied to the example in this tutorial, the browser code on the front-end app would make API calls in an authenticated session to its server code as an intermediary. The server code on the front-end app would then make the API calls to the back-end app by using the x-ms-token-aad-access-token header value as the bearer token. All calls from your browser code to the server code are protected by the authenticated session.
Next step
Advance to the next tutorial to learn how to use this user's identity to access an Azure service.