Add and manage TLS/SSL certificates in Azure App Service
Note
Starting June 1, 2024, all newly created App Service apps will have the option to generate a unique default hostname using the naming convention <app-name>-<random-hash>.<region>.azurewebsites.net. Existing app names will remain unchanged.
Example: myapp-ds27dh7271aah175.westus-01.azurewebsites.net
For further details, refer to Unique Default Hostname for App Service Resource.
You can add digital security certificates to use in your application code or to secure custom DNS names in Azure App Service, which provides a highly scalable, self-patching web hosting service. Currently called Transport Layer Security (TLS) certificates, also previously known as Secure Socket Layer (SSL) certificates, these private or public certificates help you secure internet connections by encrypting data sent between your browser, websites that you visit, and the website server.
The following table lists the options for you to add certificates in App Service:
| Option | Description |
|---|---|
| Create a free App Service managed certificate | A private certificate that's free of charge and easy to use if you just need to secure your custom domain in App Service. |
| Import an App Service certificate | A private certificate that's managed by Azure. It combines the simplicity of automated certificate management and the flexibility of renewal and export options. |
| Import a certificate from Key Vault | Useful if you use Azure Key Vault to manage your PKCS12 certificates. See Private certificate requirements. |
| Upload a private certificate | If you already have a private certificate from a third-party provider, you can upload it. See Private certificate requirements. |
| Upload a public certificate | Public certificates aren't used to secure custom domains, but you can load them into your code if you need them to access remote resources. |
Prerequisites
Create an App Service app. The app's App Service plan must be in the Basic, Standard, Premium, or Isolated tier. See Scale up an app to update the tier.
For a private certificate, make sure that it satisfies all requirements from App Service.
Free certificate only:
Map the domain where you want the certificate to App Service. For information, see Tutorial: Map an existing custom DNS name to Azure App Service.
For a root domain (like contoso.com), make sure your app doesn't have any IP restrictions configured. Both certificate creation and its periodic renewal for a root domain depends on your app being reachable from the internet.
Private certificate requirements
The free App Service managed certificate and the App Service certificate already satisfy the requirements of App Service. If you choose to upload or import a private certificate to App Service, your certificate must meet the following requirements:
- Exported as a password-protected PFX file, encrypted using triple DES.
- Contains private key at least 2048 bits long
- Contains all intermediate certificates and the root certificate in the certificate chain.
To secure a custom domain in a TLS binding, the certificate has more requirements:
- Contains an Extended Key Usage for server authentication (OID = 1.3.6.1.5.5.7.3.1)
- Signed by a trusted certificate authority
Note
Elliptic Curve Cryptography (ECC) certificates work with App Service but aren't covered by this article. For the exact steps to create ECC certificates, work with your certificate authority.
Note
After you add a private certificate to an app, the certificate is stored in a deployment unit that's bound to the App Service plan's resource group, region, and operating system combination, internally called a webspace. That way, the certificate is accessible to other apps in the same resource group, region, and OS combination. Private certificates uploaded or imported to App Service are shared with App Services in the same deployment unit.
You can add up to 1000 private certificates per webspace.
Create a free managed certificate
The free App Service managed certificate is a turn-key solution for securing your custom DNS name in App Service. Without any action from you, this TLS/SSL server certificate is fully managed by App Service and is automatically renewed continuously in six-month increments, 45 days before expiration, as long as the prerequisites that you set up stay the same. All the associated bindings are updated with the renewed certificate. You create and bind the certificate to a custom domain, and let App Service do the rest.
Important
Before you create a free managed certificate, make sure you have met the prerequisites for your app.
Free certificates are issued by DigiCert. For some domains, you must explicitly allow DigiCert as a certificate issuer by creating a CAA domain record with the value: 0 issue digicert.com.
Azure fully manages the certificates on your behalf, so any aspect of the managed certificate, including the root issuer, can change at anytime. These changes are outside your control. Make sure to avoid hard dependencies and "pinning" practice certificates to the managed certificate or any part of the certificate hierarchy. If you need the certificate pinning behavior, add a certificate to your custom domain using any other available method in this article.
The free certificate comes with the following limitations:
- Doesn't support wildcard certificates.
- Doesn't support usage as a client certificate by using certificate thumbprint, which is planned for deprecation and removal.
- Doesn't support private DNS.
- Isn't exportable.
- Isn't supported in an App Service Environment (ASE).
- Only supports alphanumeric characters, dashes (-), and periods (.).
- Only custom domains of length up to 64 characters are supported.
- Must have an A record pointing to your web app's IP address.
- Isn't supported on apps that aren't publicly accessible.
- Isn't supported with root domains that are integrated with Traffic Manager.
- Must meet all the above for successful certificate issuances and renewals.
In the Azure portal, from the left menu, select App Services > <app-name>.
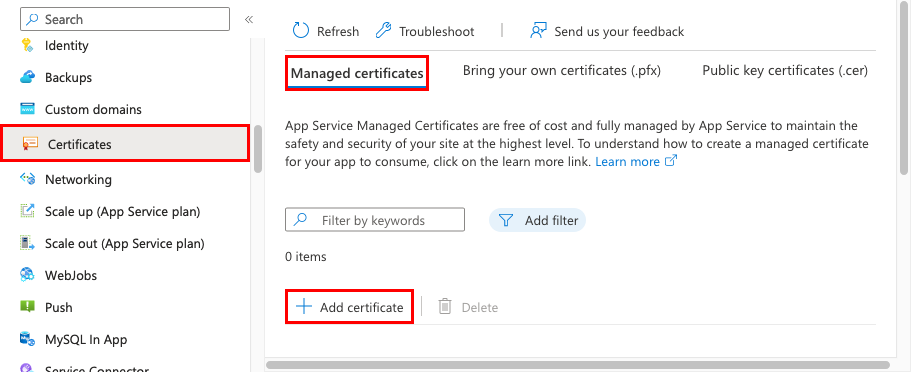
On your app's navigation menu, select Certificates. In the Managed certificates pane, select Add certificate.
Select the custom domain for the free certificate, and then select Validate. When validation completes, select Add. You can create only one managed certificate for each supported custom domain.
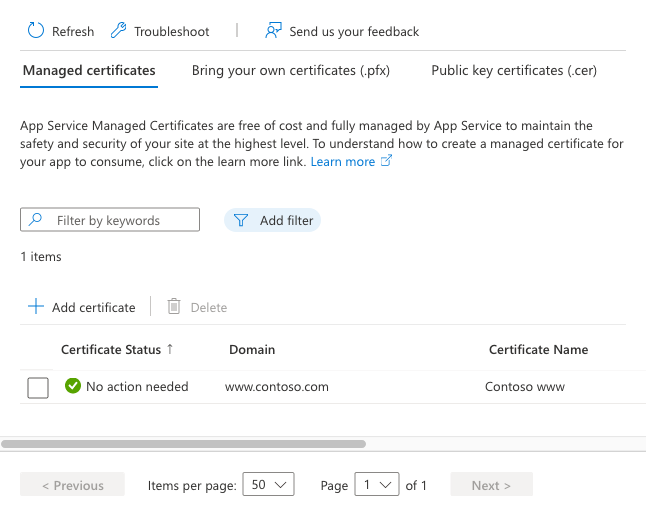
When the operation completes, the certificate appears in the Managed certificates list.
To secure a custom domain with this certificate, you still have to create a certificate binding. Follow the steps in Secure a custom DNS name with a TLS/SSL binding in Azure App Service.
Import an App Service certificate
To import an App Service certificate, first buy and configure an App Service certificate, then follow the steps here.
In the Azure portal, from the left menu, select App Services > <app-name>.
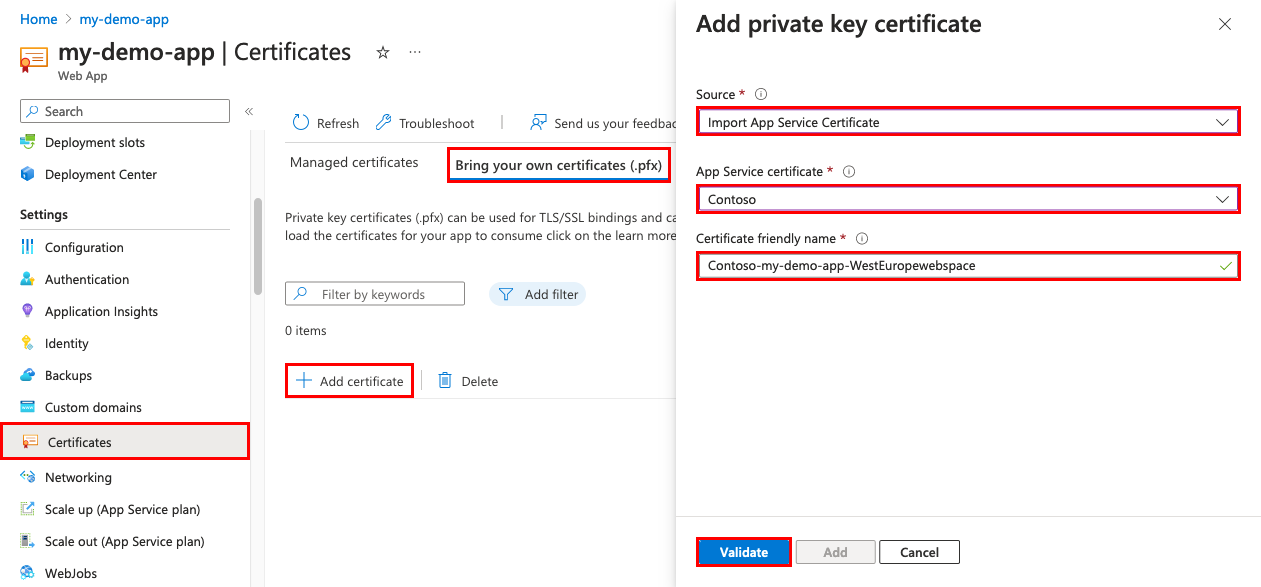
From your app's navigation menu, select Certificates > Bring your own certificates (.pfx) > Add certificate.
In Source, select Import App Service Certificate.
In App Service certificate, select the certificate you just created.
In Certificate friendly name, give the certificate a name in your app.
Select Validate. When validation succeeds, select Add.
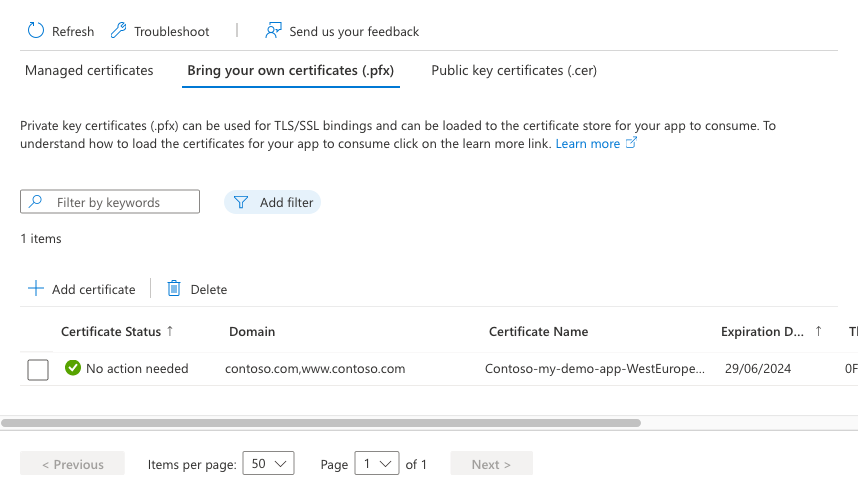
When the operation completes, the certificate appears in the Bring your own certificates list.
To secure a custom domain with this certificate, you still have to create a certificate binding. Follow the steps in Secure a custom DNS name with a TLS/SSL binding in Azure App Service.
Import a certificate from Key Vault
If you use Azure Key Vault to manage your certificates, you can import a PKCS12 certificate into App Service from Key Vault if you met the requirements.
Authorize App Service to read from the vault
By default, the App Service resource provider doesn't have access to your key vault. To use a key vault for a certificate deployment, you must authorize read access for the resource provider to the key vault.
Note
Currently, the Azure portal does not allow you to configure an App Service certificate in Key Vault to use the RBAC model. You can, however, use Azure CLI, Azure PowerShell, or an ARM template deployment to perform this configuration. For more information, see Provide access to Key Vault keys, certificates, and secrets with an Azure role-based access control.
| Resource provider | Service principal AppId | Key vault secret permissions | Key vault certificate permissions | Key vault RBAC permissions |
|---|---|---|---|---|
| Microsoft Azure App Service or Microsoft.Azure.WebSites | - abfa0a7c-a6b6-4736-8310-5855508787cd, which is the same for all Azure subscriptions - For Azure Government cloud environment, use 6a02c803-dafd-4136-b4c3-5a6f318b4714. |
Get | Get | Certificate User |
| Microsoft.Azure.CertificateRegistration | Get List Set Delete |
Get List |
Import a certificate from your vault to your app
In the Azure portal, from the left menu, select App Services > <app-name>.
From your app's navigation menu, select Certificates > Bring your own certificates (.pfx) > Add certificate.
In Source, select Import from Key Vault.
Select Select key vault certificate.
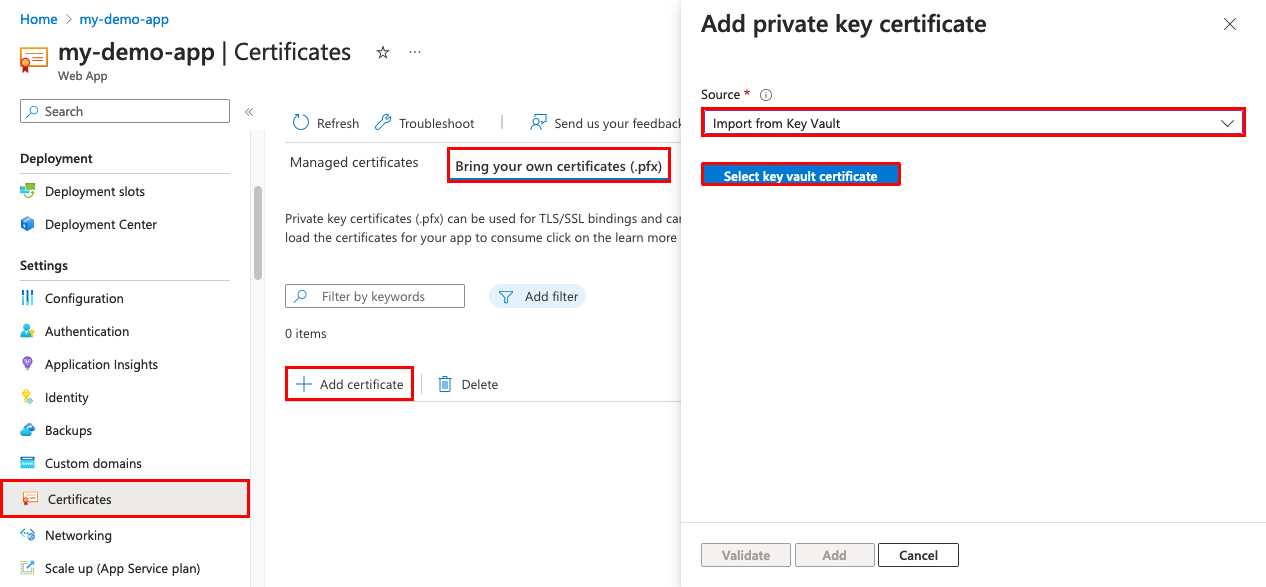
To help you select the certificate, use the following table:
Setting Description Subscription The subscription associated with the key vault. Key vault The key vault that has the certificate you want to import. Certificate From this list, select a PKCS12 certificate that's in the vault. All PKCS12 certificates in the vault are listed with their thumbprints, but not all are supported in App Service. When finished with your selection, select Select, Validate, then Add.
When the operation completes, the certificate appears in the Bring your own certificates list. If the import fails with an error, the certificate doesn't meet the requirements for App Service.
Note
If you update your certificate in Key Vault with a new certificate, App Service automatically syncs your certificate within 24 hours.
To secure a custom domain with this certificate, you still have to create a certificate binding. Follow the steps in Secure a custom DNS name with a TLS/SSL binding in Azure App Service.
Upload a private certificate
After you get a certificate from your certificate provider, make the certificate ready for App Service by following the steps in this section.
Merge intermediate certificates
If your certificate authority gives you multiple certificates in the certificate chain, you must merge the certificates following the same order.
In a text editor, open each received certificate.
To store the merged certificate, create a file named mergedcertificate.crt.
Copy the content for each certificate into this file. Make sure to follow the certificate sequence specified by the certificate chain, starting with your certificate and ending with the root certificate, for example:
-----BEGIN CERTIFICATE-----
<your entire Base64 encoded SSL certificate>
-----END CERTIFICATE-----

-----BEGIN CERTIFICATE-----
<The entire Base64 encoded intermediate certificate 1>
-----END CERTIFICATE-----

-----BEGIN CERTIFICATE-----
<The entire Base64 encoded intermediate certificate 2>
-----END CERTIFICATE-----

-----BEGIN CERTIFICATE-----
<The entire Base64 encoded root certificate>
-----END CERTIFICATE-----
Export merged private certificate to PFX
Now, export your merged TLS/SSL certificate with the private key that was used to generate your certificate request. If you generated your certificate request using OpenSSL, then you created a private key file.
Note
OpenSSL v3 changed default cipher from 3DES to AES256, but this can be overridden on the command line -keypbe PBE-SHA1-3DES -certpbe PBE-SHA1-3DES -macalg SHA1. OpenSSL v1 uses 3DES as default, so the PFX files generated are supported without any special modifications.
To export your certificate to a PFX file, run the following command, but replace the placeholders <private-key-file> and <merged-certificate-file> with the paths to your private key and your merged certificate file.
openssl pkcs12 -export -out myserver.pfx -inkey <private-key-file> -in <merged-certificate-file>When you're prompted, specify a password for the export operation. When you upload your TLS/SSL certificate to App Service later, you must provide this password.
If you used IIS or Certreq.exe to generate your certificate request, install the certificate to your local computer, and then export the certificate to a PFX file.
Upload certificate to App Service
You're now ready upload the certificate to App Service.
In the Azure portal, from the left menu, select App Services > <app-name>.
From your app's navigation menu, select Certificates > Bring your own certificates (.pfx) > Upload Certificate.
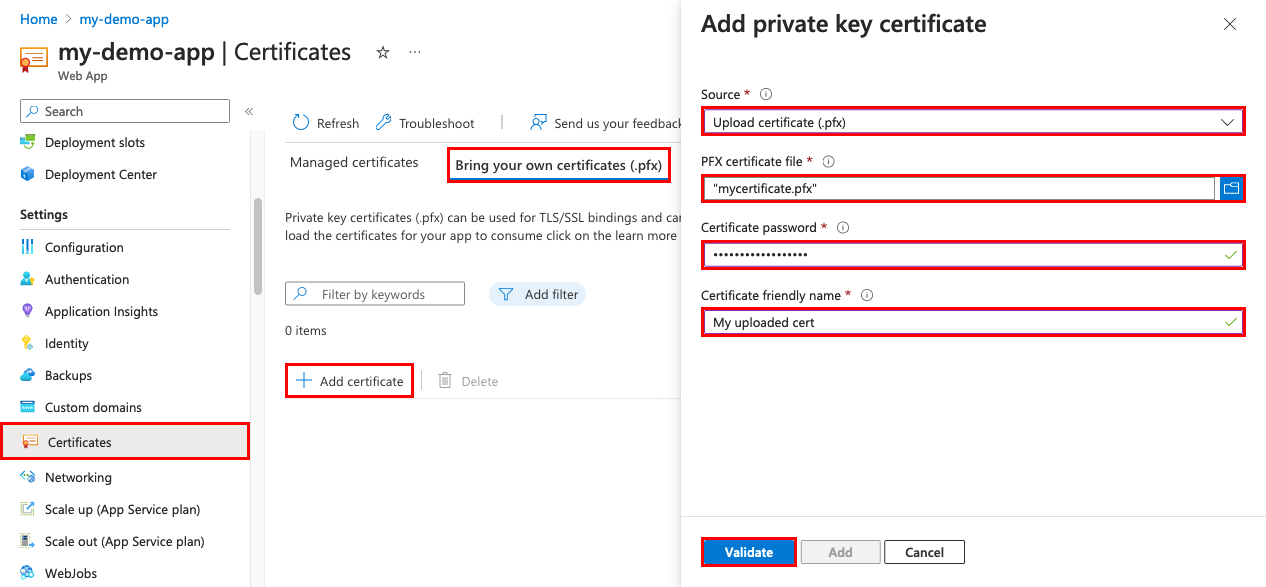
To help you upload the .pfx certificate, use the following table:
Setting Description PFX certificate file Select your .pfx file. Certificate password Enter the password that you created when you exported the PFX file. Certificate friendly name The certificate name that will be shown in your web app. When finished with your selection, select Select, Validate, then Add.
When the operation completes, the certificate appears in the Bring your own certificates list.
To secure a custom domain with this certificate, you still have to create a certificate binding. Follow the steps in Secure a custom DNS name with a TLS/SSL binding in Azure App Service.
Upload a public certificate
Public certificates are supported in the .cer format.
Note
After you upload a public certificate to an app, it is only accessible by the app it is uploaded to. Public certificates must be uploaded to each individual web app that needs access. For App Service Environment specific scenarios, refer to the documentation for certificates and the App Service Environment
You can upload up to 1000 public certificates per App Service Plan.
In the Azure portal, from the left menu, select App Services > <app-name>.
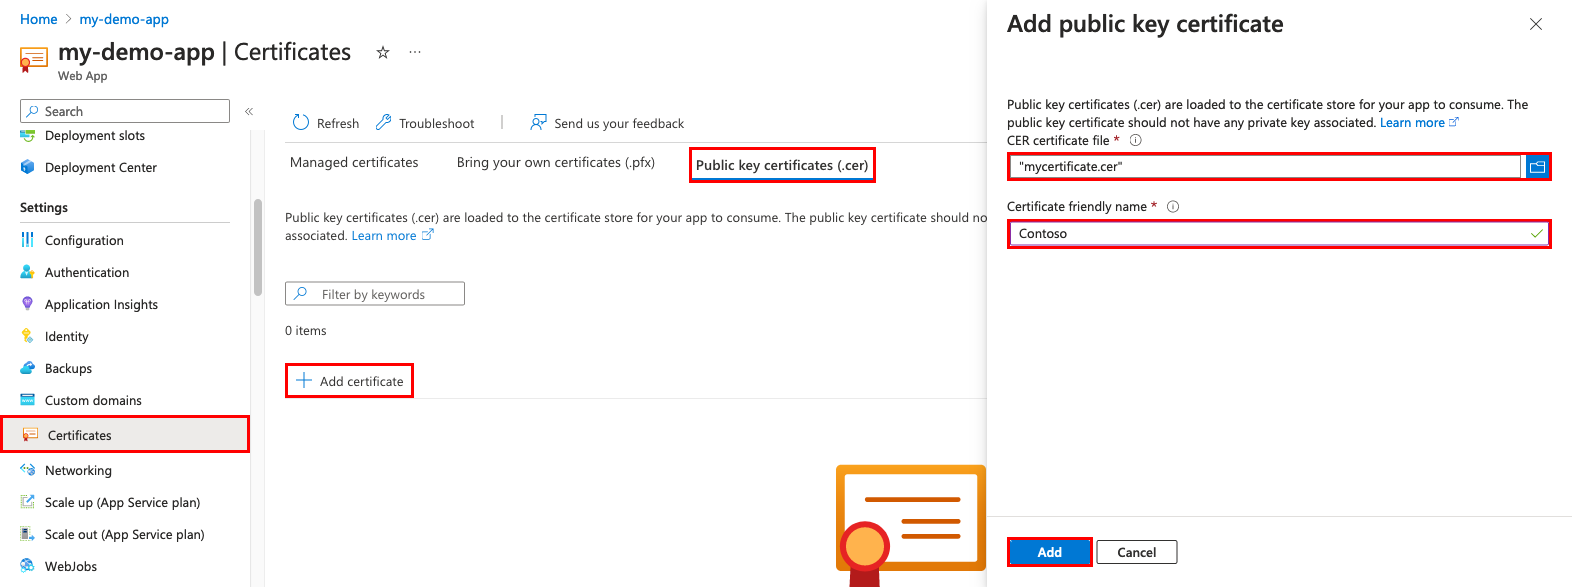
From your app's navigation menu, select Certificates > Public key certificates (.cer) > Add certificate.
To help you upload the .cer certificate, use the following table:
Setting Description CER certificate file Select your .cer file. Certificate friendly name The certificate name that will be shown in your web app. When you're done, select Add.
After the certificate is uploaded, copy the certificate thumbprint, and then review Make the certificate accessible.
Renew an expiring certificate
Before a certificate expires, make sure to add the renewed certificate to App Service, and update any certificate bindings where the process depends on the certificate type. For example, a certificate imported from Key Vault, including an App Service certificate, automatically syncs to App Service every 24 hours and updates the TLS/SSL binding when you renew the certificate. For an uploaded certificate, there's no automatic binding update. Based on your scenario, review the corresponding section:
- Renew an uploaded certificate
- Renew an App Service certificate
- Renew a certificate imported from Key Vault
Renew uploaded certificate
When you replace an expiring certificate, the way you update the certificate binding with the new certificate might adversely affect user experience. For example, your inbound IP address might change when you delete a binding, even if that binding is IP-based. This result is especially impactful when you renew a certificate that's already in an IP-based binding. To avoid a change in your app's IP address, and to avoid downtime for your app due to HTTPS errors, follow these steps in the specified sequence:
Go to the Custom domains page for your app, select the ... actions button, and select Update binding.
Select the new certificate and select Update.
Delete the existing certificate.
Renew a certificate imported from Key Vault
Note
To renew an App Service certificate, see Renew an App Service certificate.
To renew a certificate that you imported into App Service from Key Vault, review Renew your Azure Key Vault certificate.
After the certificate renews inside your key vault, App Service automatically syncs the new certificate, and updates any applicable certificate binding within 24 hours. To sync manually, follow these steps:
Go to your app's Certificate page.
Under Bring your own certificates (.pfx), select the ... details button for the imported key vault certificate, and then select Sync.
Frequently asked questions
How can I automate adding a bring-your-owncertificate to an app?
- Azure CLI: Bind a custom TLS/SSL certificate to a web app
- Azure PowerShell Bind a custom TLS/SSL certificate to a web app using PowerShell
Can I use a private CA (certificate authority) certificate for inbound TLS on my app?
You can use a private CA certificate for inbound TLS in an App Service Environment version 3 (ASEv3). This isn't possible in App Service (multi-tenant). For more information on App Service multi-tenant vs. single-tenant, see App Service Environment v3 and App Service public multitenant comparison.
Can I make outbound calls using a private CA (certificate authority) client certificate from my app?
This is only supported for Windows container apps in multi-tenant App Service. In addition, you can make outbound calls using a private CA client certificate with both code-based and container-based apps in an App Service Environment version 3 (ASEv3). For more information on App Service multi-tenant vs. single-tenant, see App Service Environment v3 and App Service public multitenant comparison.
Can I load a private CA (certificate authority) certificate in my App Service Trusted Root Store?
You can load your own CA certificate into the Trusted Root Store in an App Service Environment version 3 (ASEv3). You can't modify the list of Trusted Root Certificates in App Service (multi-tenant). For more information on App Service multi-tenant vs. single-tenant, see App Service Environment v3 and App Service public multitenant comparison.
More resources
Feedback
Coming soon: Throughout 2024 we will be phasing out GitHub Issues as the feedback mechanism for content and replacing it with a new feedback system. For more information see: https://aka.ms/ContentUserFeedback.
Submit and view feedback for