Note
Access to this page requires authorization. You can try signing in or changing directories.
Access to this page requires authorization. You can try changing directories.
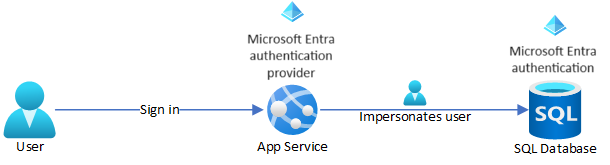
This tutorial shows you how to connect an Azure App Service app to a back-end Azure SQL database by impersonating the signed-in user, also called the on-behalf-of flow. To configure this flow, you enable App Service built-in authentication using the Microsoft Entra identity provider.
This connectivity method is more advanced than the managed identity approach in Tutorial: Access data with managed identity, and has the following advantages in enterprise scenarios:
- Eliminates connection secrets to back-end services, as does the managed identity approach.
- Gives the back-end database or other Azure services more control over how much access to grant to whom.
- Lets the app tailor its data presentation to the signed-in user.
In this tutorial, you add Microsoft Entra authentication to a .NET web app that has an Azure SQL Database back end. You learn how to:
- Enable Microsoft Entra authentication for Azure SQL Database.
- Disable other SQL Database authentication options.
- Add Microsoft Entra ID as the identity provider for your app.
- Configure SQL Database user impersonation permission.
- Configure App Service to provide a usable access token for SQL Database.
- Access your Azure SQL database on behalf of the signed-in Microsoft Entra user.
When you complete the tutorial, your app securely connects to SQL Database on behalf of the signed-in user.
Note
- Microsoft Entra ID isn't supported for on-premises SQL Server.
- Microsoft Entra authentication is different from Integrated Windows authentication in on-premises Active Directory (AD) Domain Services (DS). AD DS and Microsoft Entra ID use completely different authentication protocols. For more information, see Microsoft Entra Domain Services documentation.
Prerequisites
Have access to a Microsoft Entra tenant populated with users and groups.
Complete the tutorial at Tutorial: Build an ASP.NET Core and SQL Database app in Azure App Service, and use the completed app for this tutorial.
Alternatively, adapt the steps and use your own .NET app with SQL Database. The steps in this tutorial support the following .NET versions:
- .NET Framework 4.8 and above
- .NET 6.0 and above
Sign in to Azure Cloud Shell or prepare your environment to use the Azure CLI.
Use the Bash environment in Azure Cloud Shell. For more information, see Get started with Azure Cloud Shell.

If you prefer to run CLI reference commands locally, install the Azure CLI. If you're running on Windows or macOS, consider running Azure CLI in a Docker container. For more information, see How to run the Azure CLI in a Docker container.
If you're using a local installation, sign in to the Azure CLI by using the az login command. To finish the authentication process, follow the steps displayed in your terminal. For other sign-in options, see Authenticate to Azure using Azure CLI.
When you're prompted, install the Azure CLI extension on first use. For more information about extensions, see Use and manage extensions with the Azure CLI.
Run az version to find the version and dependent libraries that are installed. To upgrade to the latest version, run az upgrade.
1. Configure database server with Microsoft Entra authentication
Enable Microsoft Entra authentication to the Azure SQL database by assigning a Microsoft Entra user as the admin of the Azure SQL server. The Microsoft Entra admin must be a user that is created, imported, synced, or invited into Microsoft Entra ID. The Microsoft Entra user might not be the same as the Microsoft account user for the Azure subscription.
To add the Microsoft Entra ID user as admin of the Azure SQL server, run the following Azure CLI commands.
Use
az ad user listwith thedisplay-name,filter, orupnparameter to get the object ID for the Microsoft Entra ID user you want to make admin. For example, the following command lists information for a Microsoft Entra ID user with thedisplay-nameof Firstname Lastname.az ad user list --display-name "Firstname Lastname"Copy the
idvalue from the output to use in the next step.Tip
You can run
az ad user liststandalone to show information for all the users in the Microsoft Entra directory.Add the Microsoft Entra ID user as an admin on your Azure SQL server by using
az sql server ad-admin createwith theobject-idparameter. In the following command, replace<group-name>with your server's resource group name,<server-name>with your server's name minus the.database.windows.netsuffix, and<entra-id>with theidoutput from the precedingaz ad user listcommand.az sql server ad-admin create --resource-group <group-name> --server-name <server-name> --display-name ADMIN --object-id <entra-id>Restrict database server authentication to Microsoft Entra authentication only. This step disables SQL username and password authentication.
az sql server ad-only-auth enable --resource-group <group-name> --name <server-name>
- For more information on creating a Microsoft Entra user, see Add or delete users using Microsoft Entra ID.
- For more information on allowed Microsoft Entra users for SQL Database, see Microsoft Entra features and limitations in SQL Database.
- For more information on adding an Azure SQL server admin, see Provision a Microsoft Entra administrator for your server.
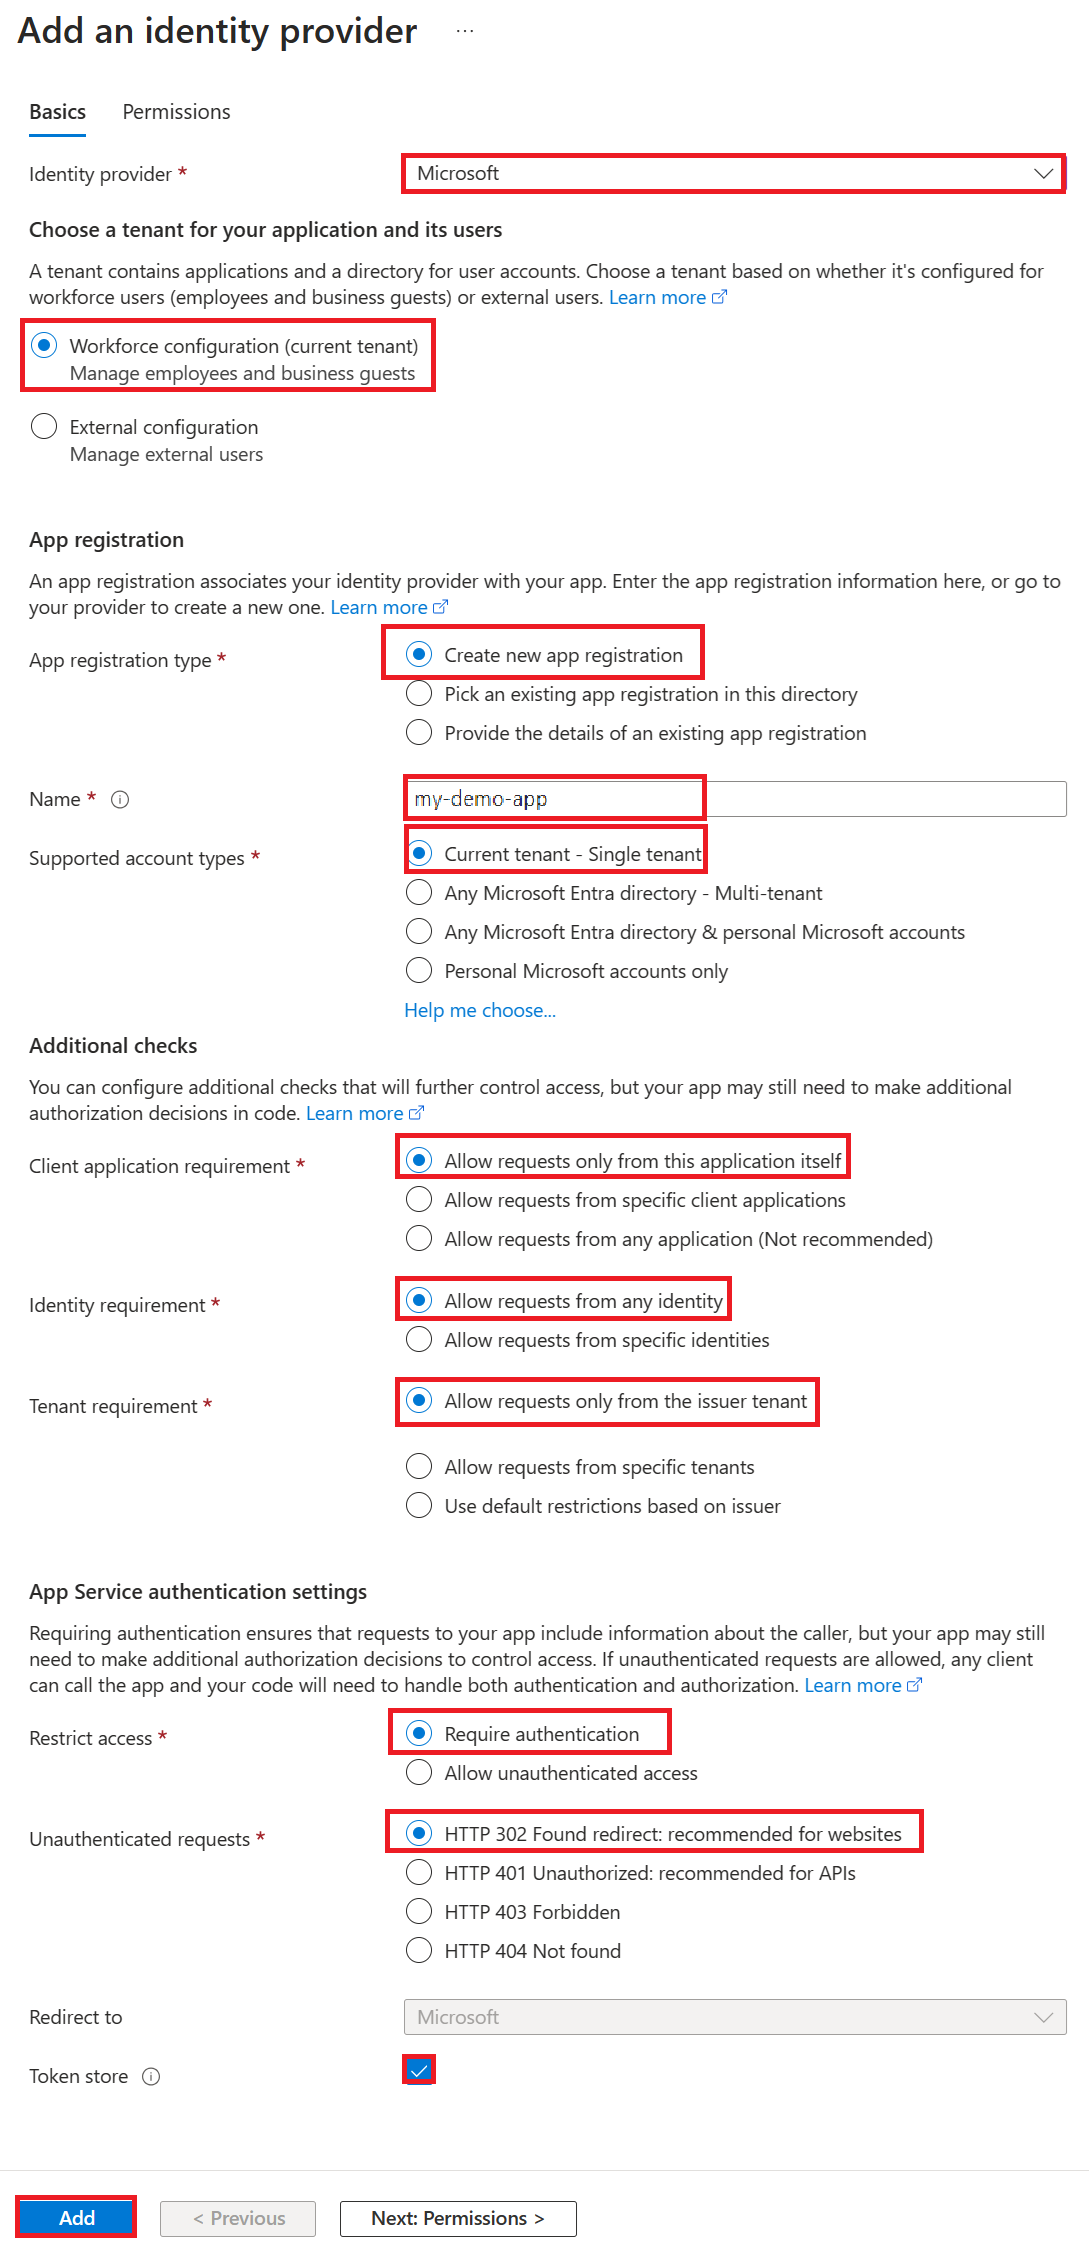
2. Enable Microsoft Entra ID authentication for your app
Add Microsoft Entra ID as an identity provider for your app. For more information, see Configure Microsoft Entra authentication for your App Services application.
On the Azure portal page for your app, select Authentication under Settings in the left navigation menu.
On the Authentication page, select Add identity provider, or select Add provider in the Identity provider section.
On the Add an identity provider page, select Microsoft as the provider.
For Client secret expiration, select one of the dropdown list options, such as Recommended: 180 days.
Keep all of the default settings, and select Add.

Note
If you reconfigure your app's authentication settings, the tokens in the token store might not regenerate from the new settings. To make sure your tokens regenerate, sign out and sign back in to your app. An easy method is to use your browser in private mode. Close and reopen the browser in private mode after changing the settings in your apps.
3. Configure SQL Database user impersonation
Grant your app permissions to access SQL Database on behalf of the signed-in Microsoft Entra user.
On the app's Authentication page, select your app name under Identity provider.
The app registration page opens. This registration was automatically generated when you added the Microsoft Entra provider.
Select API permissions under Manage in the left navigation menu.
On the API permissions page, select Add a permission.
On the Request API permissions screen, select the APIs my organization uses tab.
Enter Azure SQL Database in the search box and select the result.
Under What type of permissions does your application require, select Delegated permissions, then select the checkbox next to user_impersonation, and then select Add permissions.
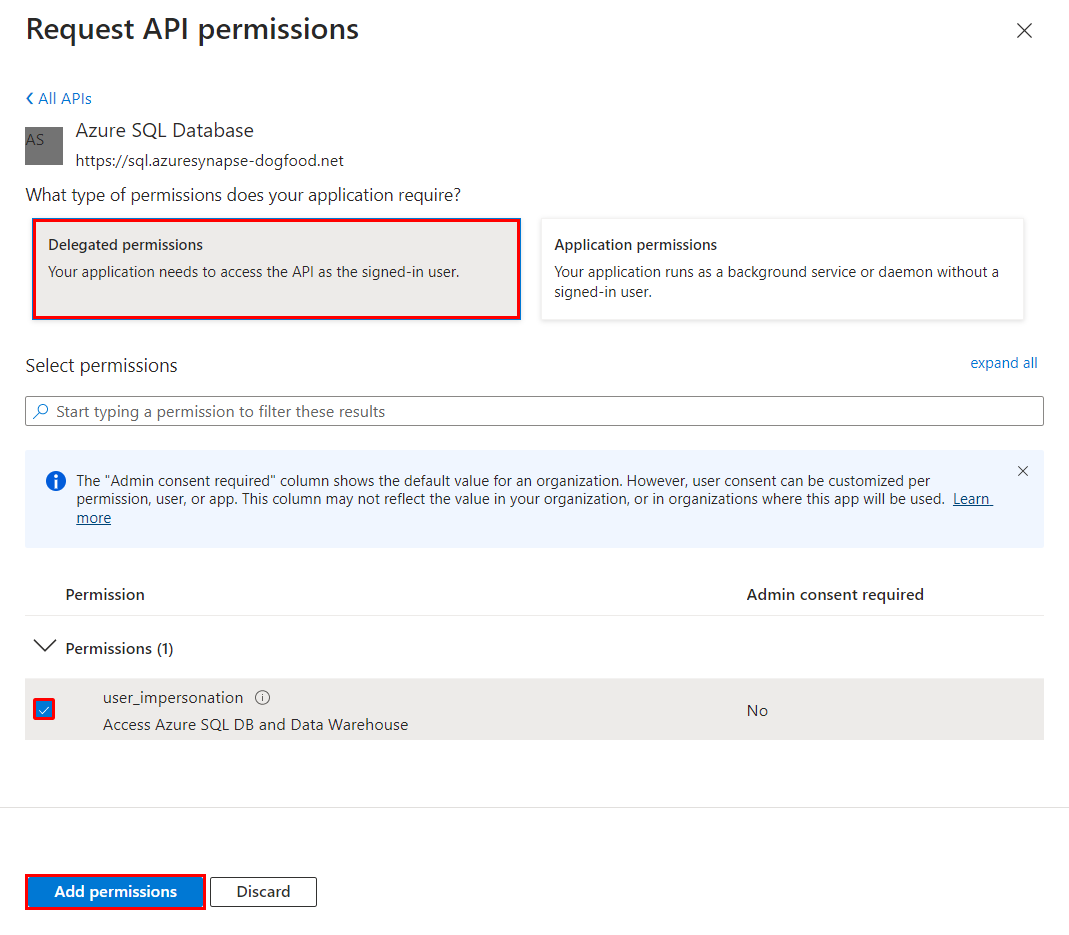
The app registration in Microsoft Entra now has the required permissions to connect to SQL Database by impersonating the signed-in user.
4. Configure App Service to return a usable access token
To configure your app to provide a usable access token for SQL Database, you add https://database.windows.net/user_impersonation as a scope to the app's Microsoft Entra provider loginParameters. The following command adds the loginParameters property with custom scopes to the Microsoft Entra identity provider login settings.
Of the requested scopes, App Service already requests openid, profile, and email scopes by default. The offline_access scope is included so you can refresh tokens. For more information, see OpenID Connect scopes.
The https://database.windows.net/user_impersonation scope refers to Azure SQL Database and provides a JSON Web Token (JWT) that specifies SQL Database as the token recipient. This command uses jq for JSON processing, which is already installed in Cloud Shell.
authSettings=$(az webapp auth show --resource-group <group-name> --name <app-name>)
authSettings=$(echo "$authSettings" | jq '.properties' | jq '.identityProviders.azureActiveDirectory.login += {"loginParameters":["scope=openid profile email offline_access https://database.windows.net/user_impersonation"]}')
az webapp auth set --resource-group <group-name> --name <app-name> --body "$authSettings"
Tip
To configure the required scope using a web interface instead of Azure CLI, use Configure the Microsoft Entra provider to supply refresh tokens, adding https://database.windows.net/user_impersonation to the requested scopes.
Your app is now configured to generate an access token that SQL Database accepts.
Note
Access tokens expire after some time. For information on how to refresh your access tokens without requiring users to reauthenticate with your app, see Refresh auth tokens.
5. Use the access token in your application code
Update your application code to add the access token supplied by App Service authentication to the connection object.
Note
This code doesn't work locally. For more information and alternatives for local debugging, see Debug locally when you use App Service authentication.
In your
DbContextobject in DatabaseContext.cs or other file that configures the database context, change the default constructor to add the Microsoft Entra ID access token to the connection object.public MyDatabaseContext (DbContextOptions<MyDatabaseContext> options, IHttpContextAccessor accessor) : base(options) { var conn = Database.GetDbConnection() as SqlConnection; conn.AccessToken = accessor.HttpContext.Request.Headers["X-MS-TOKEN-AAD-ACCESS-TOKEN"]; }If you have a connection string called
defaultConnectionin App Service that uses SQL authentication with a username and password, use the following command to remove the connection secrets. Replace<group-name>,<app-name>,<db-server-name>, and<db-name>with your values.az webapp config connection-string set --resource-group <group-name> --name <app-name> --connection-string-type SQLAzure --settings defaultConnection="server=tcp:<db-server-name>.database.windows.net;database=<db-name>;"
6. Publish your changes
If you used Visual Studio Code in the browser to make your code changes in your GitHub fork, select Source Control from the left menu. Enter a commit message like OBO connect and select Commit.
The commit triggers a GitHub Actions deployment to App Service. Wait a few minutes for the deployment to finish.
You can also publish your changes in Git Bash by using the following commands:
git commit -am "configure managed identity"
git push azure main
If your code is in Visual Studio:
Right-click your project in Solution Explorer and select Publish.
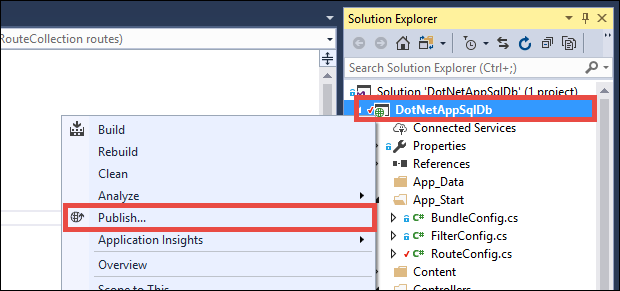
On the Publish page, select Publish.

When the new app page shows your app, the app is connecting to the Azure SQL database on behalf of the signed-in Microsoft Entra user. You should be able to use and edit your app as usual.
7. Clean up resources
In the preceding steps, you created Azure resources in a resource group. When you no longer need these resources, delete the resource group by running the following command:
az group delete --name <group-name>
This command might take some time to run.
Frequently asked questions
- Why do I get a "Login failed for user '<token-identified principal>'" error?
- How do I add other Microsoft Entra users or groups in Azure SQL Database?
- How do I debug locally when using App Service authentication?
- What happens when access tokens expire?
Why do I get a "Login failed for user '<token-identified principal>'" error?
The most common causes for a Login failed for user '<token-identified principal>' error are:
- Microsoft Entra authentication not configured for the Azure SQL database. See Configure database server with Microsoft Entra authentication.
- No valid token in the
X-MS-TOKEN-AAD-ACCESS-TOKENrequest header. This code doesn't work in local environments. For more information and alternatives, see Debug locally when you use App Service authentication. - User doesn't have permission to connect to the database. To add users and permissions, see Add other Microsoft Entra users or groups in Azure SQL Database.
How do I add other Microsoft Entra users or groups in Azure SQL Database?
To add more users or groups, connect to your database server using sqlcmd or SQL Server Management Studio (SSMS), and create contained database users mapped to Microsoft Entra identities.
The following Transact-SQL example adds a Microsoft Entra identity to SQL Server and gives the identity some database roles:
CREATE USER [<user-or-group-name>] FROM EXTERNAL PROVIDER;
ALTER ROLE db_datareader ADD MEMBER [<user-or-group-name>];
ALTER ROLE db_datawriter ADD MEMBER [<user-or-group-name>];
ALTER ROLE db_ddladmin ADD MEMBER [<user-or-group-name>];
GO
How do I debug locally when using App Service authentication?
Because App Service authentication is an Azure feature, the code in this tutorial doesn't work in your local environment. Unlike an app running in Azure, your local code doesn't benefit from the App Service authentication middleware. You can use the following alternatives for local debugging:
- Connect to SQL Database from your local environment with
Active Directory Interactiveauthentication. This authentication flow doesn't sign in the user itself, but connects to the back-end database with the signed-in user so you can test database authorization locally. - Manually copy the access token into your code in place of the
X-MS-TOKEN-AAD-ACCESS-TOKENrequest header. - If you deploy from Visual Studio, use remote debugging of your App Service app.
What happens when access tokens expire?
Your access token expires after some time. For information on how to refresh your access tokens without requiring users to reauthenticate with your app, see Refresh identity provider tokens.