Note
Access to this page requires authorization. You can try signing in or changing directories.
Access to this page requires authorization. You can try changing directories.
The Configuration Manager connector runs on-premises and brings inventory from your Configuration Manager-managed machines into Azure. You select the device collections to include, and the connector uses their inventory data to represent those machines in Azure.
The connector provides connected inventory without installing the Azure Connected Machine agent on each managed machine. Configuration Manager remains the source of inventory and the management authority for those machines.
How the connector works
The connector uses your Configuration Manager site server to make selected inventory available in Azure:
- The Configuration Manager site server connects to Azure Arc by using the Azure Connected Machine agent.
- You select the device collections to include through the Configuration Manager console.
- The connector makes the selected machines and their inventory visible in Azure.
Connected inventory includes server roles, services, and applications from the data available in Configuration Manager. The managed machines don't need the Connected Machine agent for this inventory representation.
Inventory and agent deployment
The Configuration Manager connector provides a read-only inventory representation. It doesn't transfer management of the selected machines to Azure or deploy the Connected Machine agent to them.
Use the connector when you want visibility into Configuration Manager inventory in Azure. To use Azure Arc capabilities that require an agent on each machine, use an agent deployment option instead. Inventory representation alone doesn't enable those capabilities.
The connector is separate from the existing Configuration Manager deployment methods:
- Connect machines using a Configuration Manager script installs the Connected Machine agent on the target machines.
- Connect machines using a Configuration Manager custom task sequence installs the Connected Machine agent as part of a task sequence.
Deploy the connector
Deploy the connector on the Configuration Manager site server, not on each managed machine. Use the Azure portal to generate the onboarding script. After completing connector setup, approve the console extension and select the device collections to include.
Prerequisites
Before you begin, prepare the following items:
- An Azure subscription, a resource group, and the Microsoft Entra tenant ID for your deployment.
- An Azure account with permissions to connect the site server to Azure Arc and create, update, and remove connected inventory resources in the target resource group.
- Administrator access to the Configuration Manager site server and access to approve and install Configuration Manager console extensions.
- Azure Connected Machine agent version 1.70 or later on the Configuration Manager site server.
- Windows PowerShell 5.1 on the site server, with access to the Configuration Manager SMS Provider in
root\SMS. - Connectivity that meets the Azure Arc-enabled servers network requirements, plus access to PowerShell Gallery and the NuGet package provider download if
Az.Accountsisn't installed. - A small device collection for initial validation.
Important
The portal-generated onboarding script disables Arc VM extension deployment on the site server and disables automatic SQL Server extension deployment through the ArcSQLServerExtensionDeployment=Disabled tag. This restriction is separate from the Configuration Manager console extension, which you approve and install after onboarding.
Generate and run the onboarding script
Generate and run the connector-specific onboarding script:
Sign in to the Azure portal, and search for and select Azure Arc.
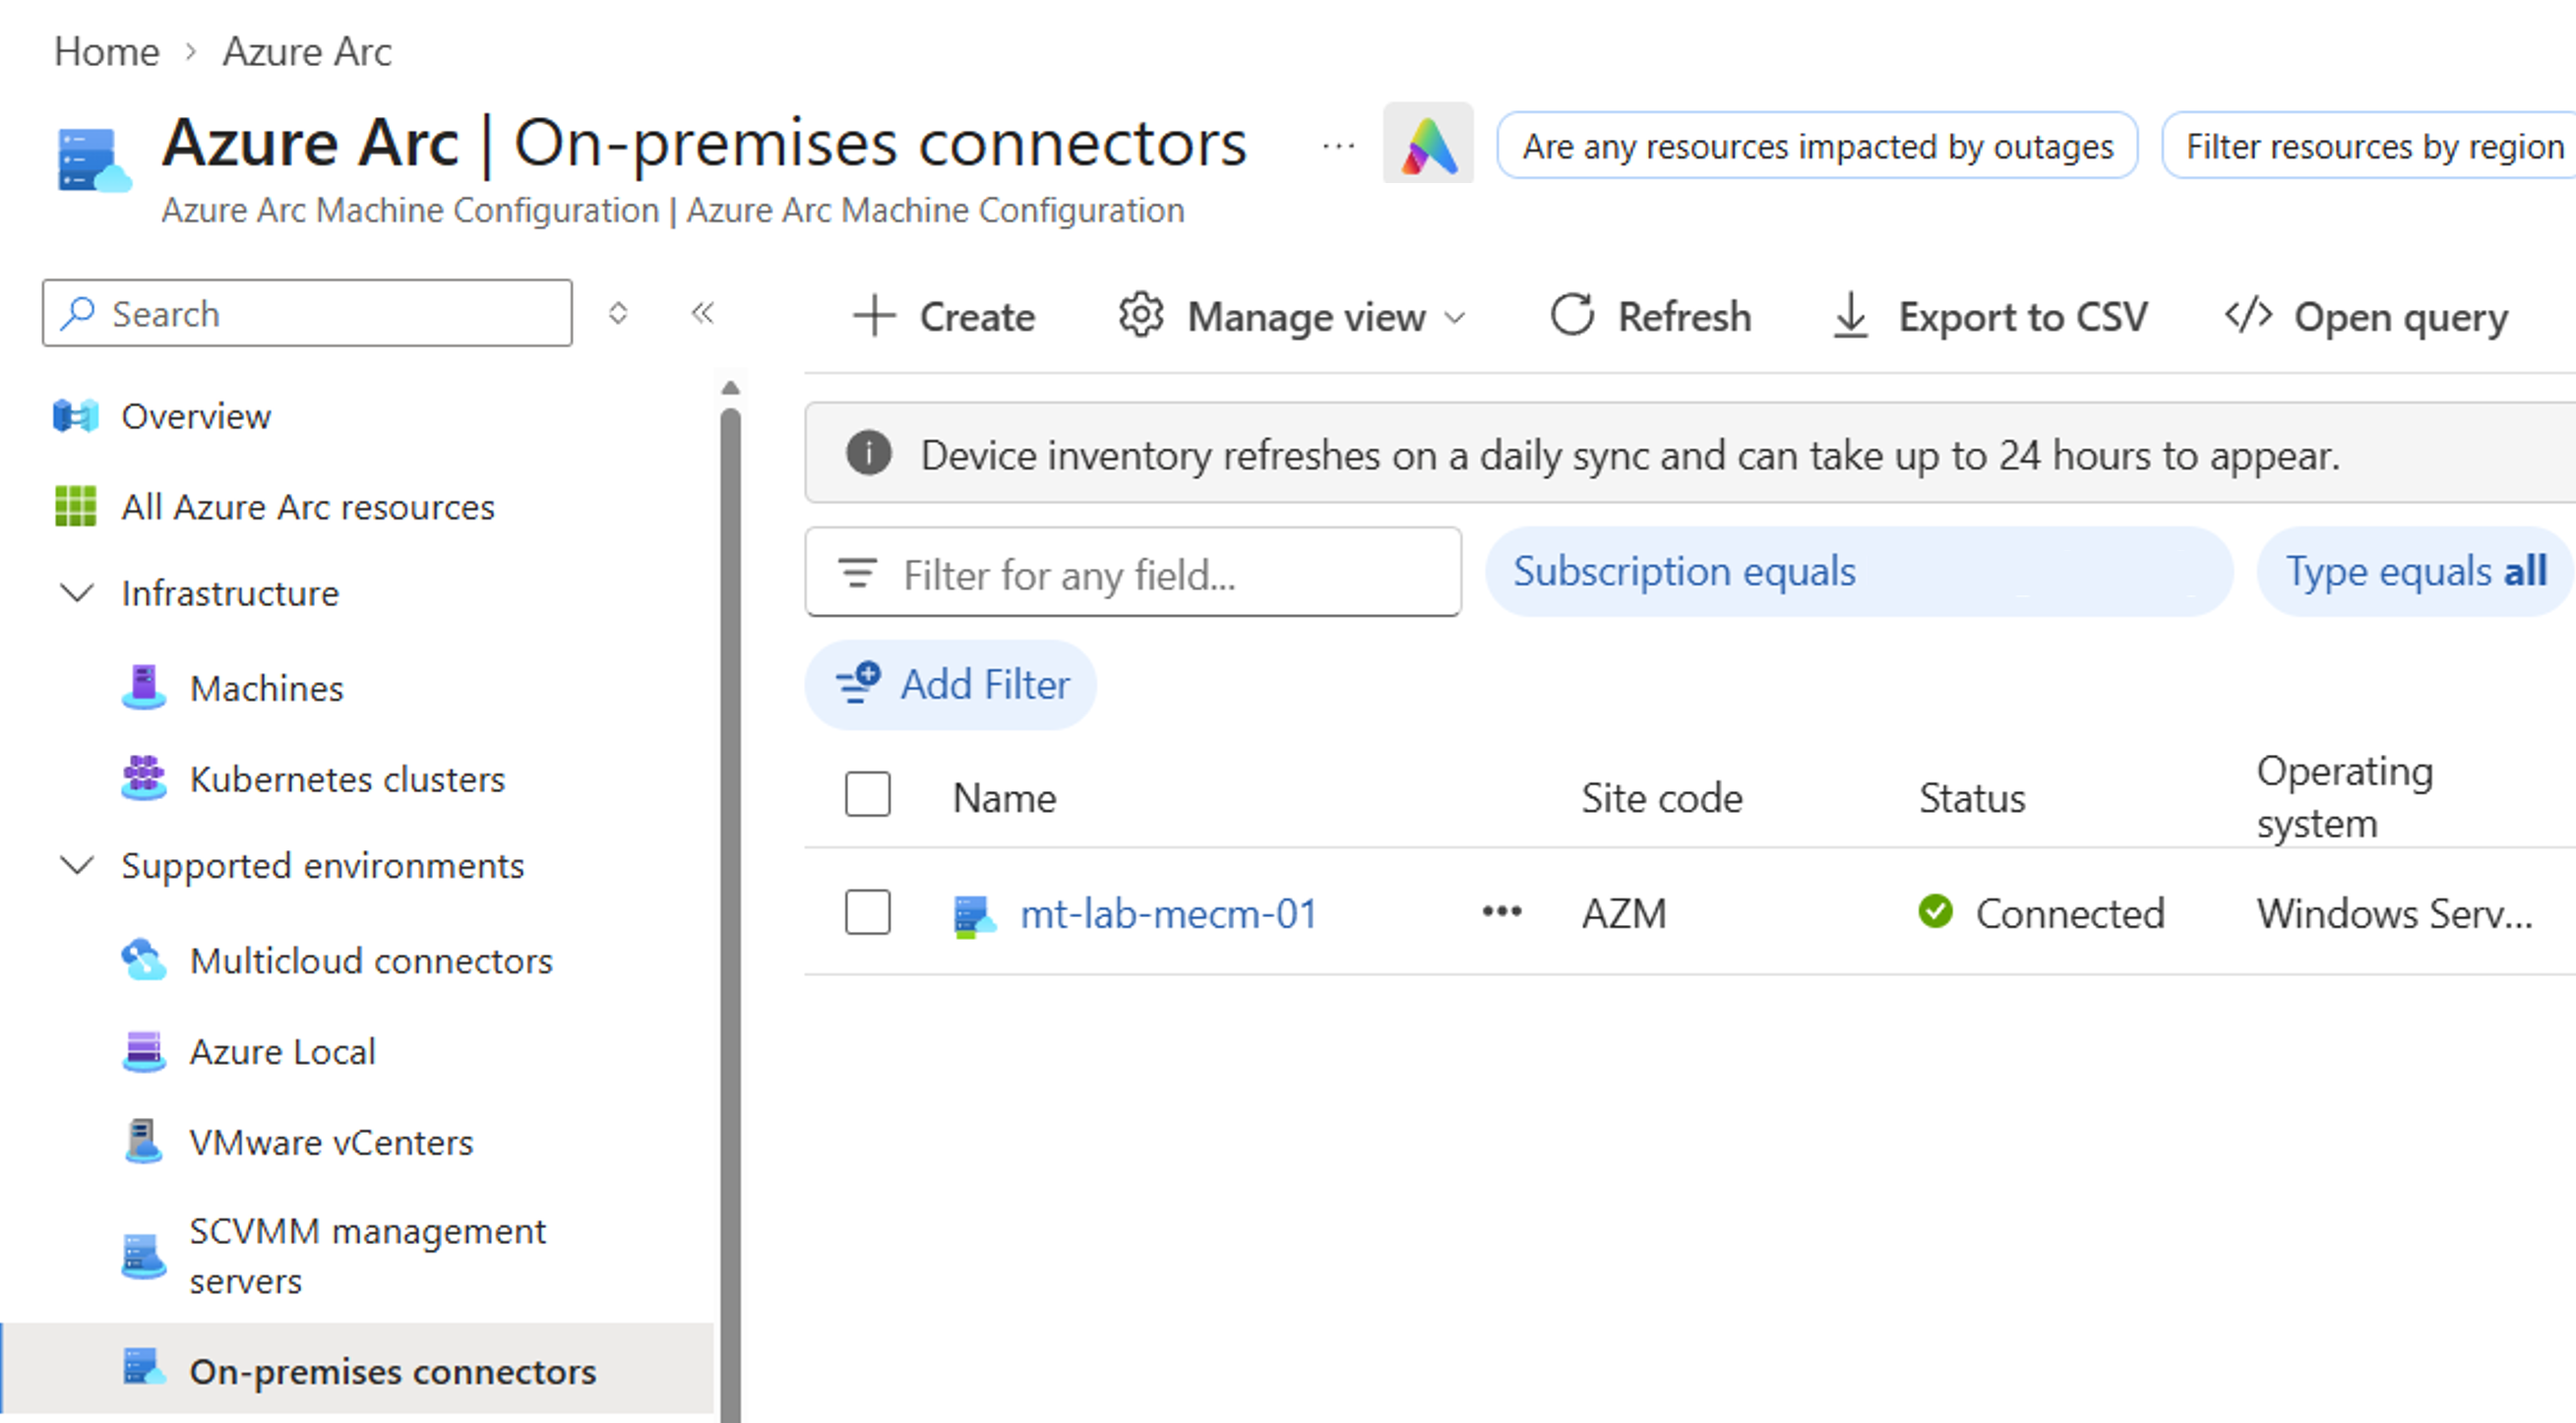
Under Supported environments, select On-premises connectors, and then select Create.
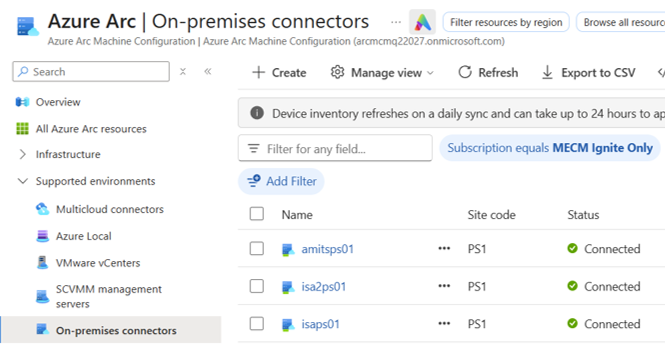
On Onboard a Configuration Manager site server, complete the Basics tab:
- Select the Subscription and Resource group for the connector.
- Select the Region in which to create the Azure resource.
- Set Operating system to Windows.
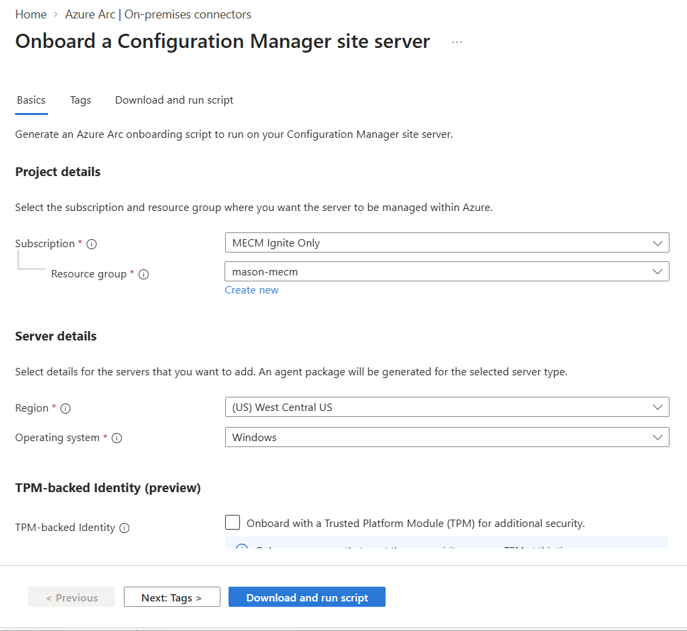
Select Next: Tags, and optionally add physical location or custom tags.
Select Download and run script. Download or copy the generated script and save it as a
.ps1file on the Configuration Manager site server.Review the script and confirm that its subscription, resource group, tenant, and location match your intended deployment.
Open Windows PowerShell as Administrator on the site server. Run the saved script, and complete the Azure sign-in flow when prompted. For example, if you saved the script as
Onboard-ConfigurationManagerConnector.ps1:& .\Onboard-ConfigurationManagerConnector.ps1Wait for the
Console extension publishedmessage. If an error appears, resolve it before continuing; returning to the PowerShell prompt doesn't confirm that onboarding succeeded.
The generated script installs the Azure Connected Machine agent, discovers the Configuration Manager site code, connects the site server as a Configuration Manager connector, and enables automatic agent upgrade. It also installs Az.Accounts if needed, disables Arc VM extension deployment on the site server, and publishes the Configuration Manager console extension.
Approve and install the console extension
After the onboarding script finishes successfully, install the published console extension:
- In the Configuration Manager console, go to Administration > Overview > Updates and Servicing > Console Extensions.
- Approve the Azure Arc console extension if your hierarchy settings require approval.
- Install the extension, and then close and restart the Configuration Manager console.
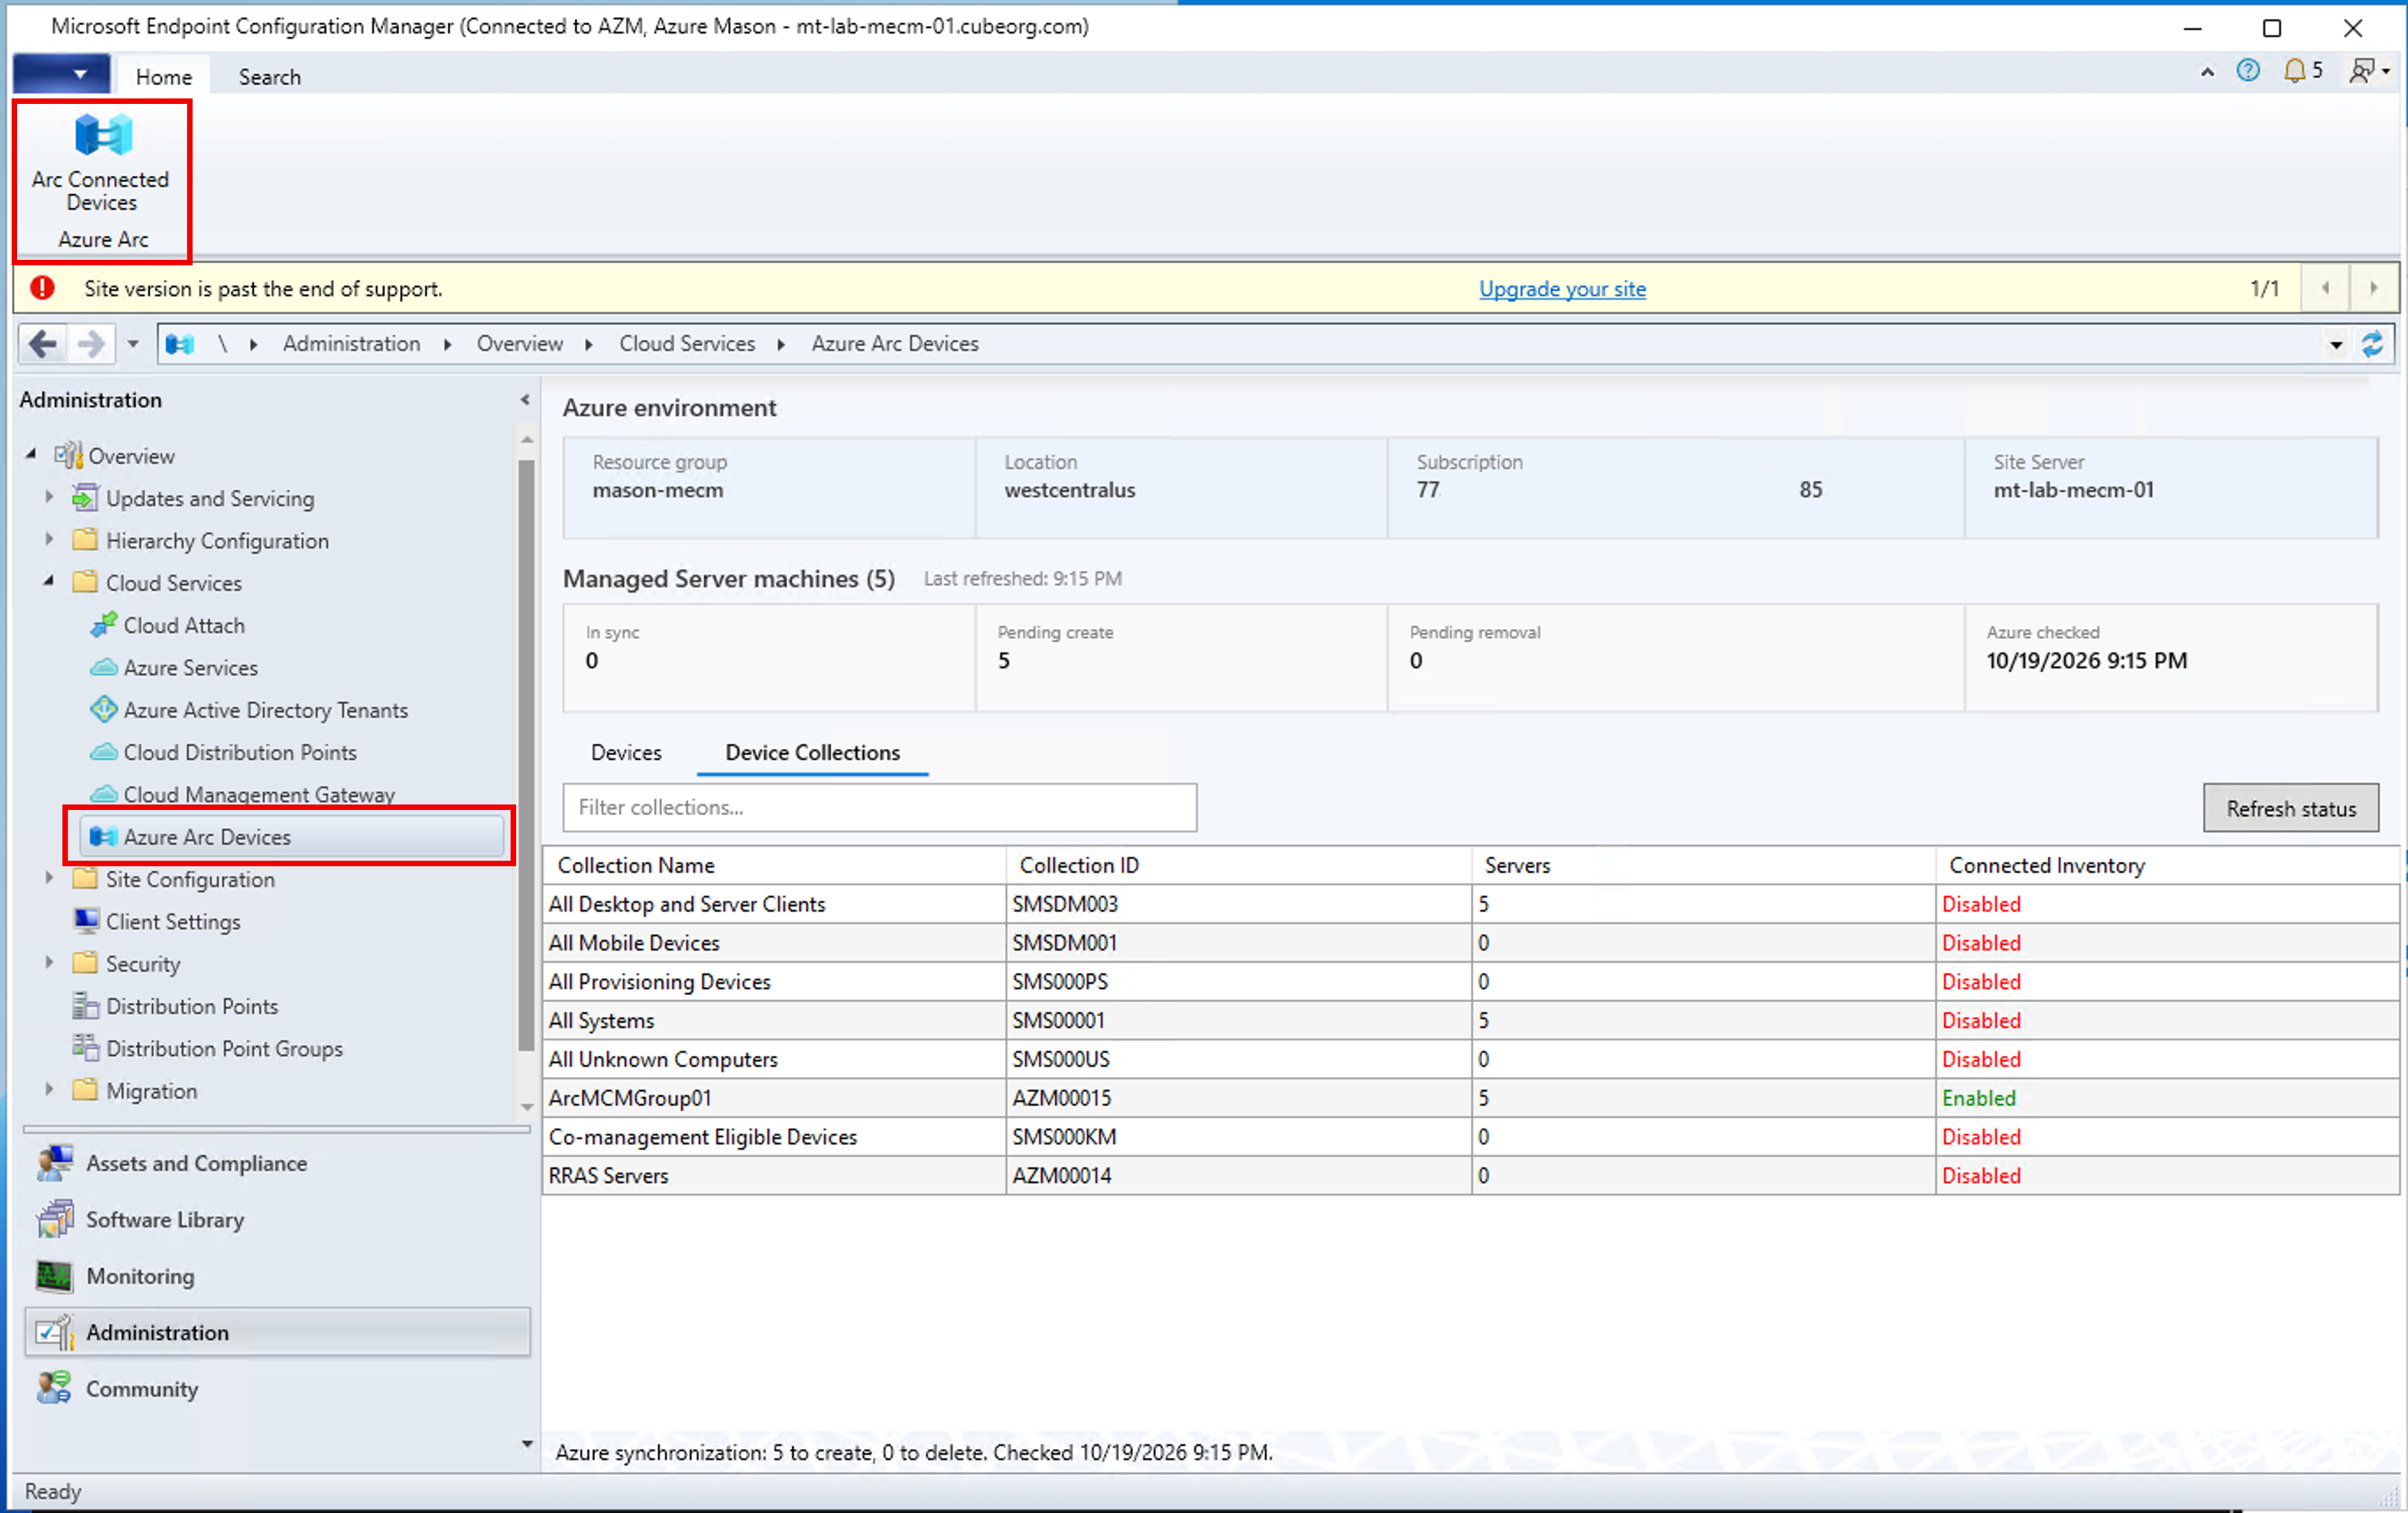
- Go to Administration > Overview > Cloud Services > Azure Arc Devices and confirm that the workspace opens.
Select device collections
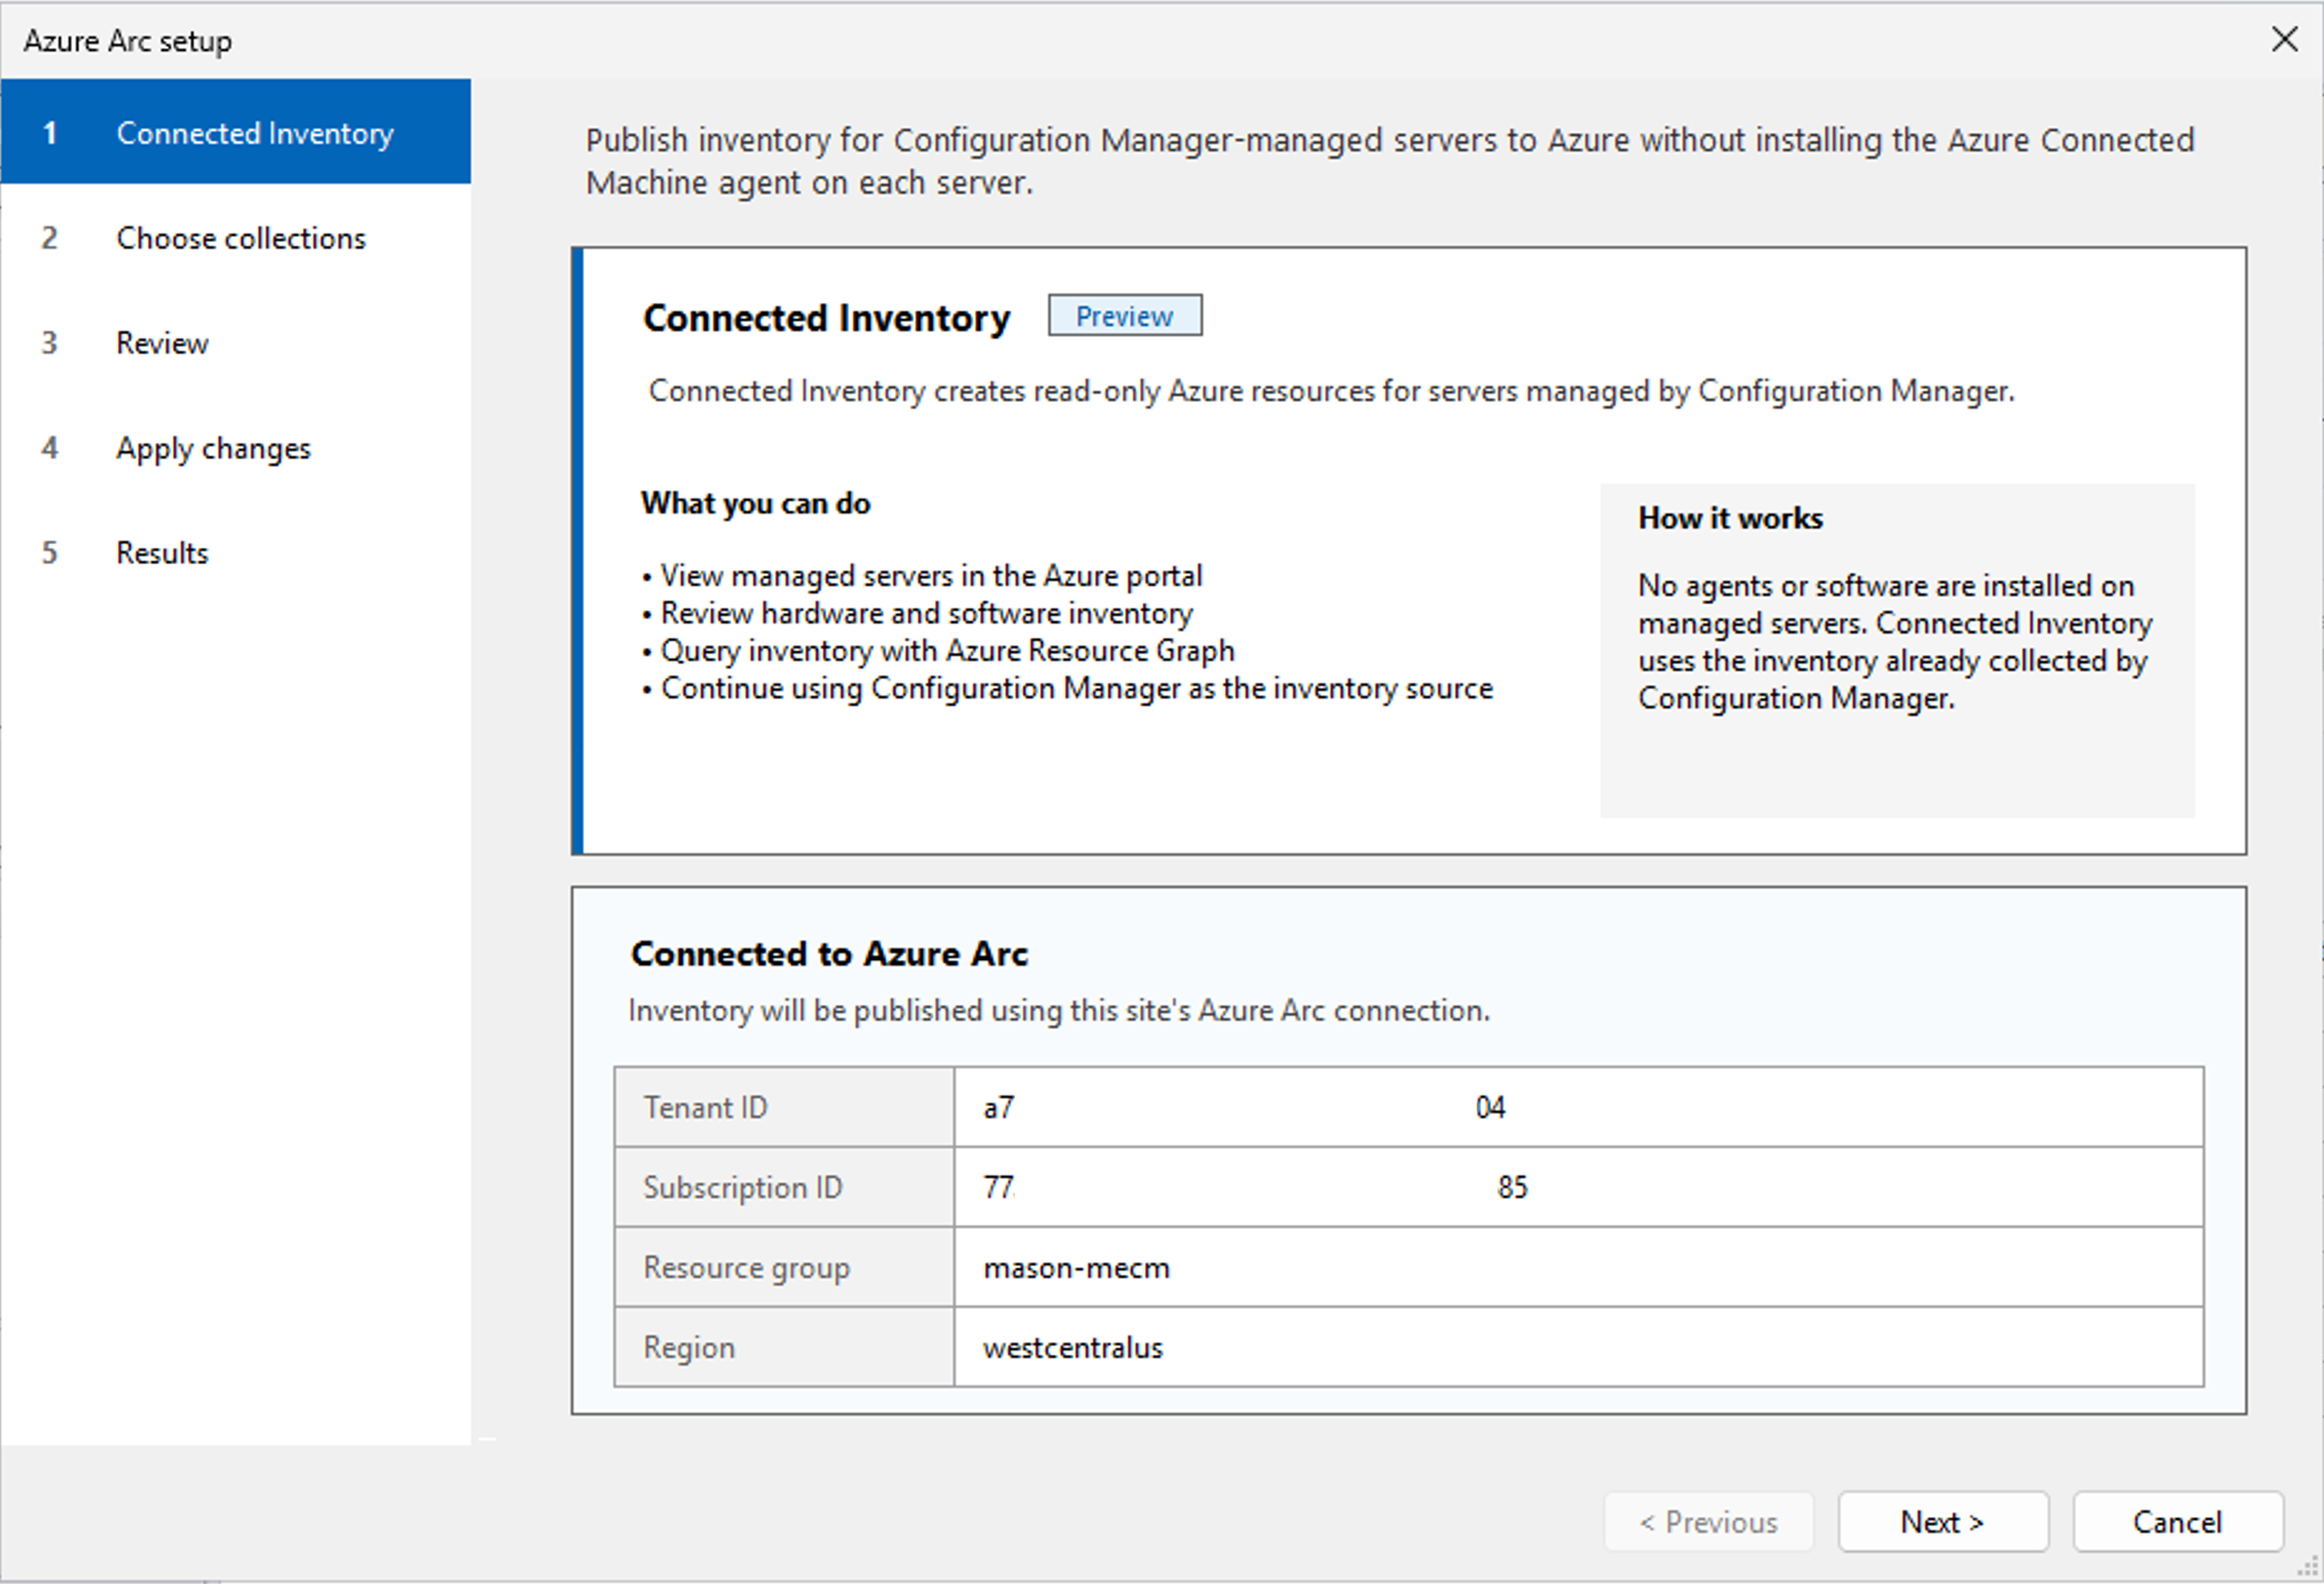
Use the Connected Inventory wizard to choose which managed machines appear in Azure:
In the Configuration Manager console, go to Administration > Overview > Cloud Services > Azure Arc Devices, and select Arc Connected Devices from the ribbon or context menu.
On Connected Inventory, review the inventory capabilities and Azure connection details, and then select Next.
On Choose collections, select your test device collection. You can select more than one collection.
On Review changes, confirm the collections to include or remove, and then select Apply.
Monitor Apply changes, and review Results for success, no-change, or error information. Resolve errors before continuing.
Close the wizard and review the refreshed Azure Arc Devices workspace.
Important
Don't select All Systems (SMS00001) unless you intend to include every managed client in the site in connected inventory.
Validate deployment
Confirm the site server connection and the selected inventory:
On the site server, run the following commands:
azcmagent show
azcmagent config get extensions.allowlist
azcmagent config get extensions.enabled
Confirm that the agent status is
Connectedand that the subscription, resource group, tenant, and location match your deployment. The extension settings should beAllow/Noneandfalse, respectively.To confirm that the selected machines appear in Azure, see View machine inventory.
View machine inventory
Use the Azure portal to browse connected machines and their inventory, or Azure Resource Graph to query connectors and managed machines.
Device inventory refreshes daily and can take up to 24 hours to appear. If devices are missing, confirm the collection selection and wizard results in Configuration Manager. Also, check the subscription and filter selections in the Azure portal.
Sign in to the Azure portal.
Go to Azure Arc > On-premises connectors, and select your site server.
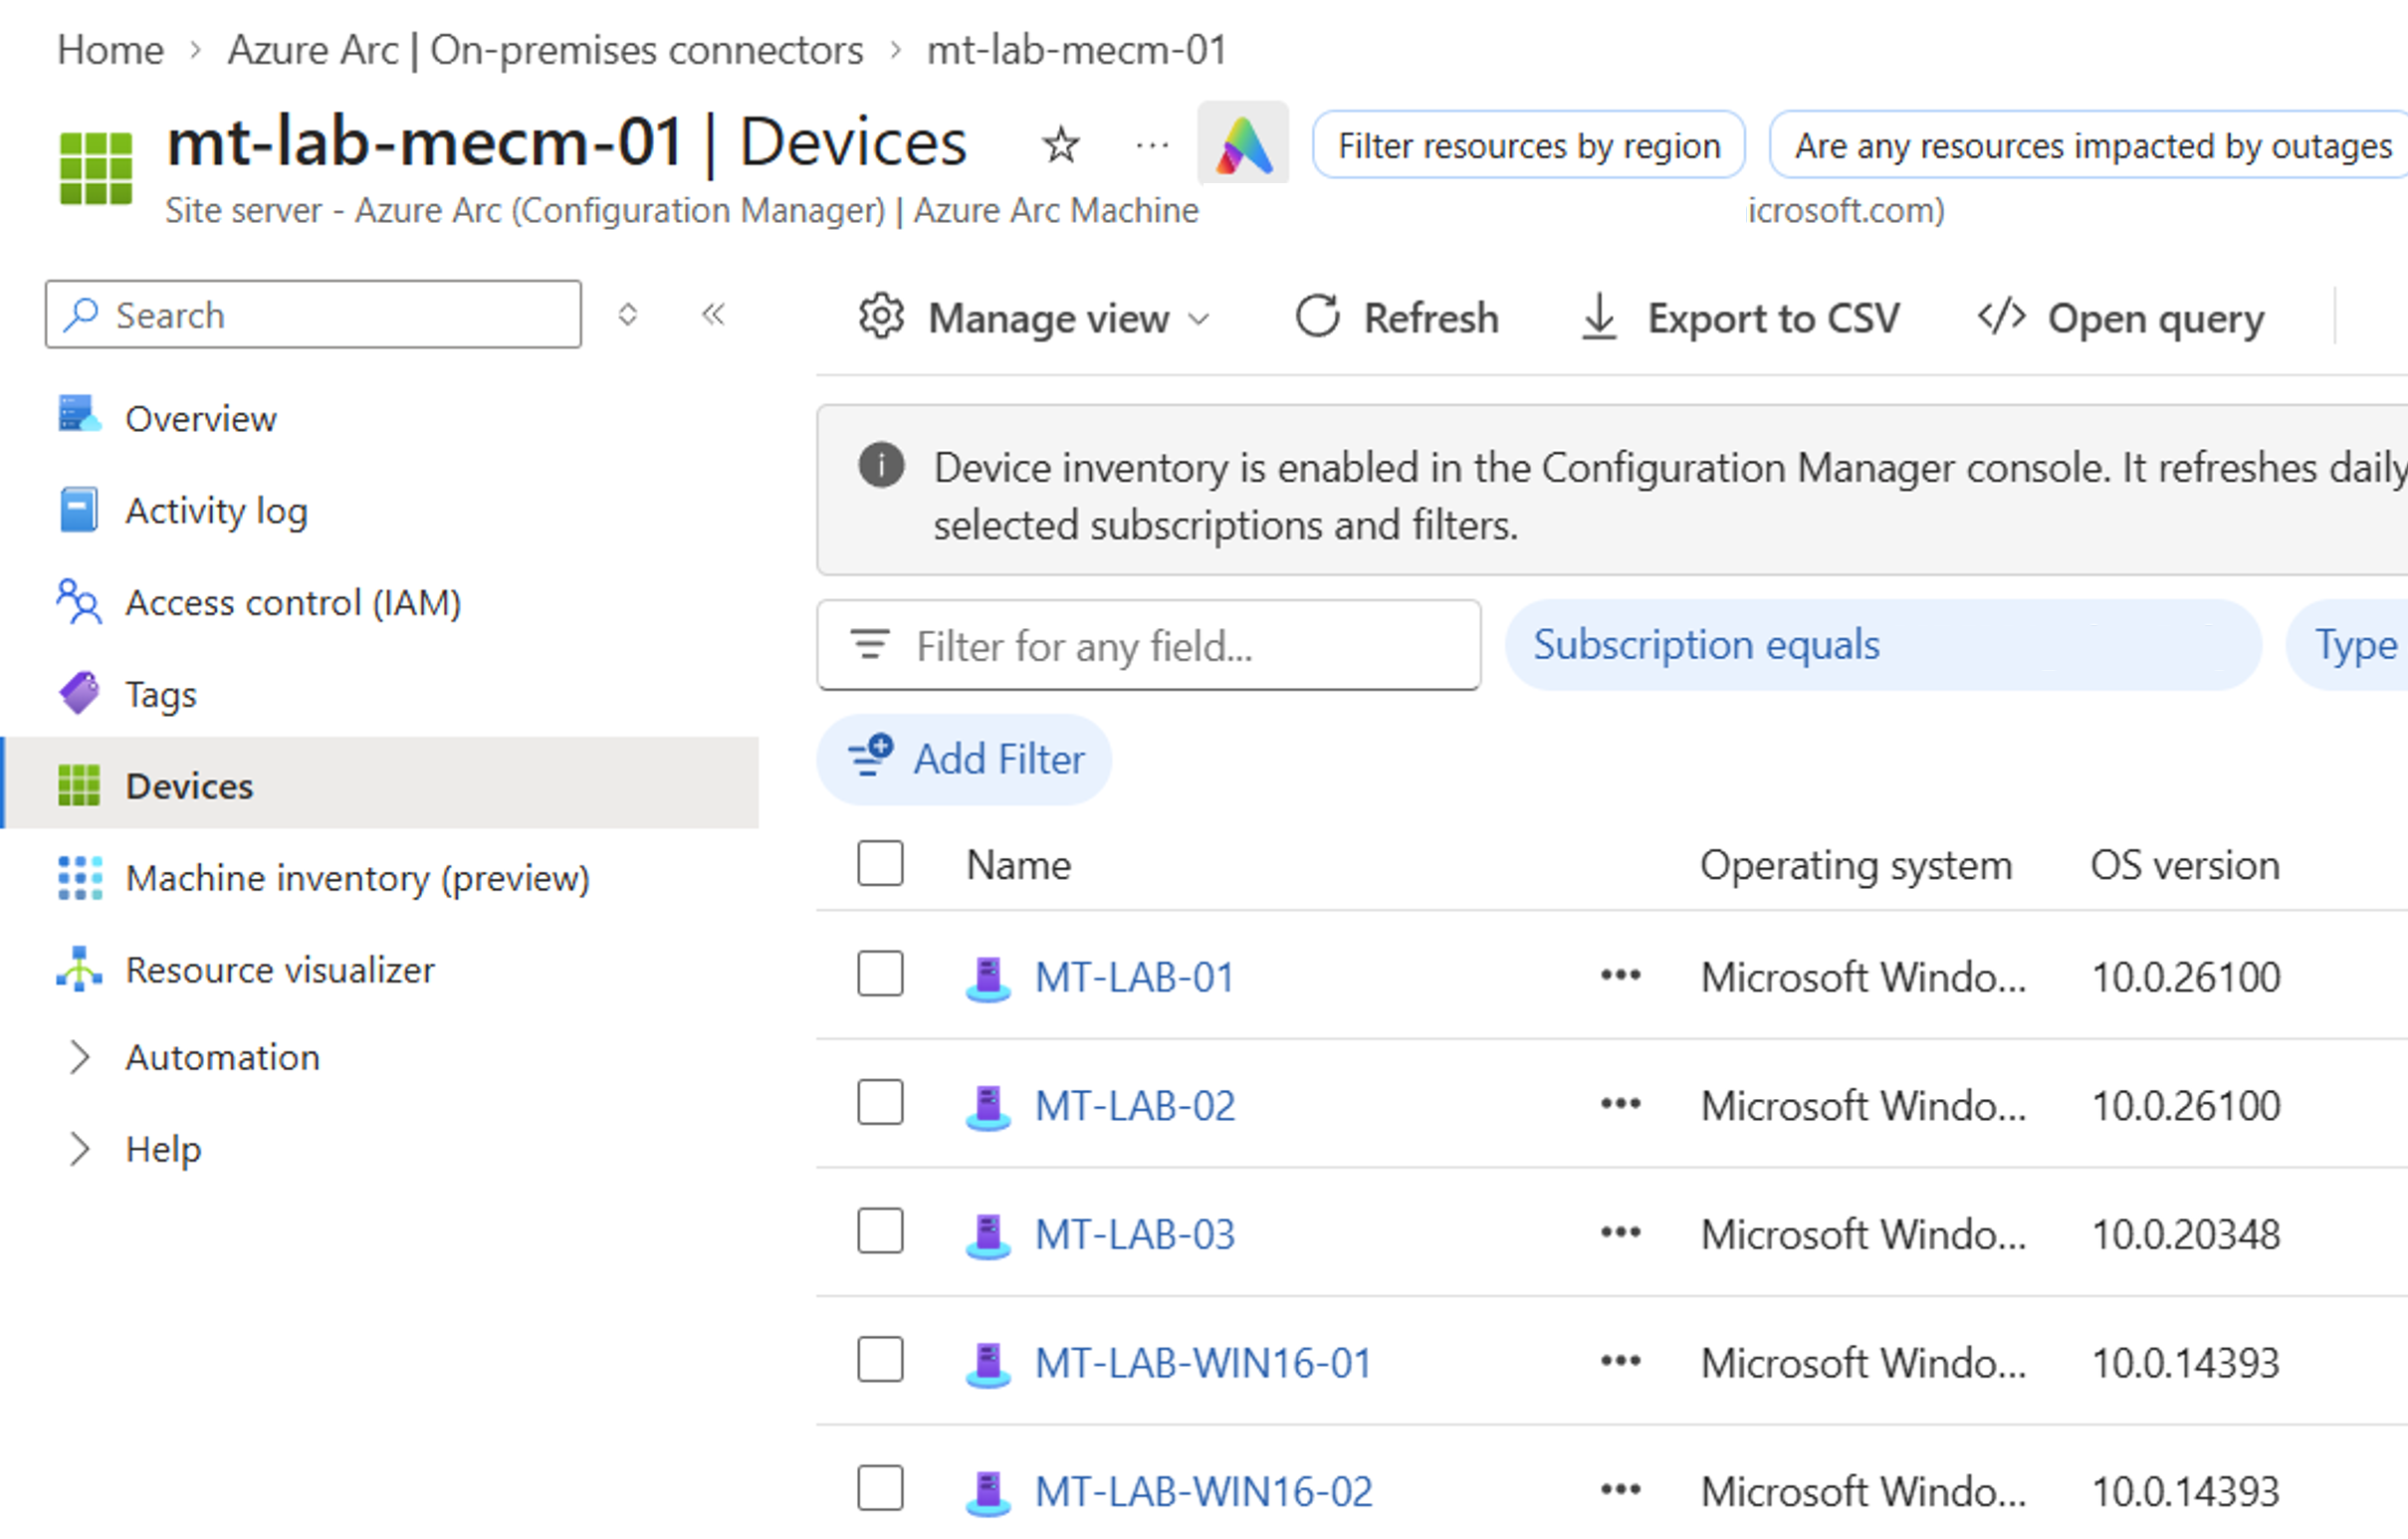
Select Devices to view the managed machines included in connected inventory.
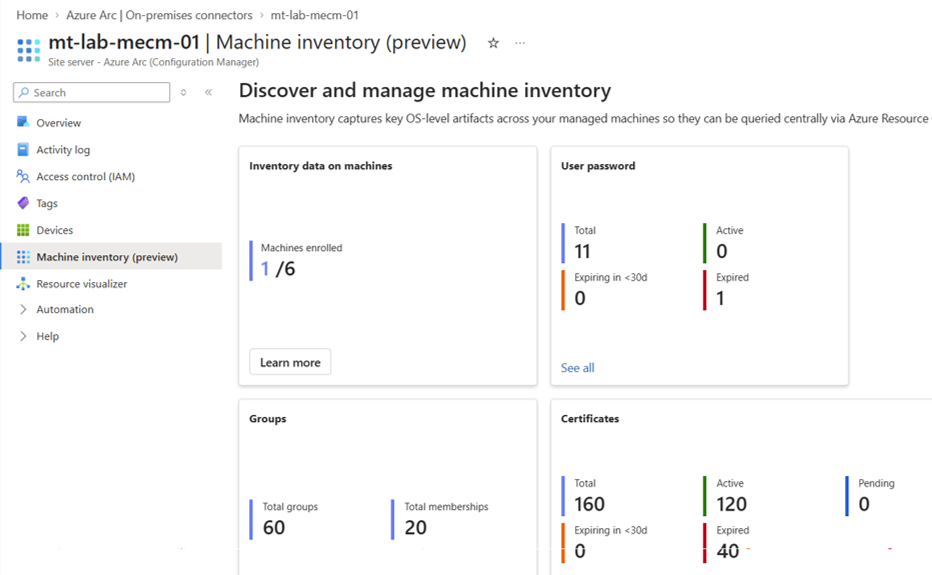
Select Machine inventory (preview) to explore the available inventory.
Troubleshoot
Use the following steps to troubleshoot missing inventory data.
For Azure Connected Machine agent onboarding issues, see Troubleshoot Azure Connected Machine agent onboarding.
Inventory data doesn't appear in Azure
If connected inventory is enabled for Configuration Manager-managed machines but no inventory data appears in the Azure portal or Azure Resource Graph (ARG), confirm that the site server collects inventory data from its managed machines.
- In the Configuration Manager console, go to Administration > Client Settings > Default Client Settings, and open its properties.
- In the dialog box, select Hardware Inventory. Under Device Settings, next to Hardware inventory classes, select Set Classes.
- In the Hardware Inventory Classes dialog box, expand Services (
Win32_Service), and make sure State is selected. - Select OK in each dialog box to save your changes.
- Go to Assets and Compliance > Devices, and select a device.
- On the ribbon, select Client Notification > Download Computer Policy.
- With the device still selected, select Client Notification > Collect Hardware Inventory.
- Wait for Configuration Manager to collect the inventory data and synchronize it to Azure. Inventory refreshes daily and can take up to 24 hours to appear. Then check the Azure portal or Azure Resource Graph for the device's inventory.
Related content
- Learn about the Azure Connected Machine agent.
- Compare Azure Connected Machine agent deployment options.
- Explore more Azure Resource Graph sample queries for Azure Arc-enabled servers.