Note
Access to this page requires authorization. You can try signing in or changing directories.
Access to this page requires authorization. You can try changing directories.
Important
Azure Cache for Redis announced its retirement timeline for all SKUs. We recommend moving your existing Azure Cache for Redis instances to Azure Managed Redis as soon as you can.
For more details about the retirement:
This article describes the configurations available for your Azure Cache for Redis instances. This article also covers the default Redis server configuration for Azure Cache for Redis instances.
Note
For more information on configuring and using premium cache features, see How to configure persistence and How to configure Virtual Network support.
Configure Azure Cache for Redis settings
In the Azure portal, search for and select Azure Cache for Redis.
On the Azure Cache for Redis page, select Create > Azure Cache for Redis.
On the Basics tab of the New Redis Cache page, configure the following settings:
- Subscription: Select the subscription to use.
- Resource group: Select a resource group, or select Create new and enter a new resource group name. Putting all your app resources in the same resource group lets you easily manage or delete them together.
- Name: Enter a cache name that's unique in the region. The name must:
- Be a string of 1 to 63 characters.
- Contain only numbers, letters, and hyphens.
- Start and end with a number or letter.
- Not contain consecutive hyphens.
- Region: Select an Azure region near other services that use your cache.
- Cache SKU: Select a SKU to determine the available sizes, performance, and features for your cache.
- Cache size: Select a cache size. For more information, see Azure Cache for Redis overview.

Select the Networking tab, or select Next: Networking.
On the Networking tab, select a connectivity method to use for the cache. Private Endpoint is recommended for security. If you select Private Endpoint, select Add private endpoint and create the private endpoint.
Select the Advanced tab, or select Next: Advanced.
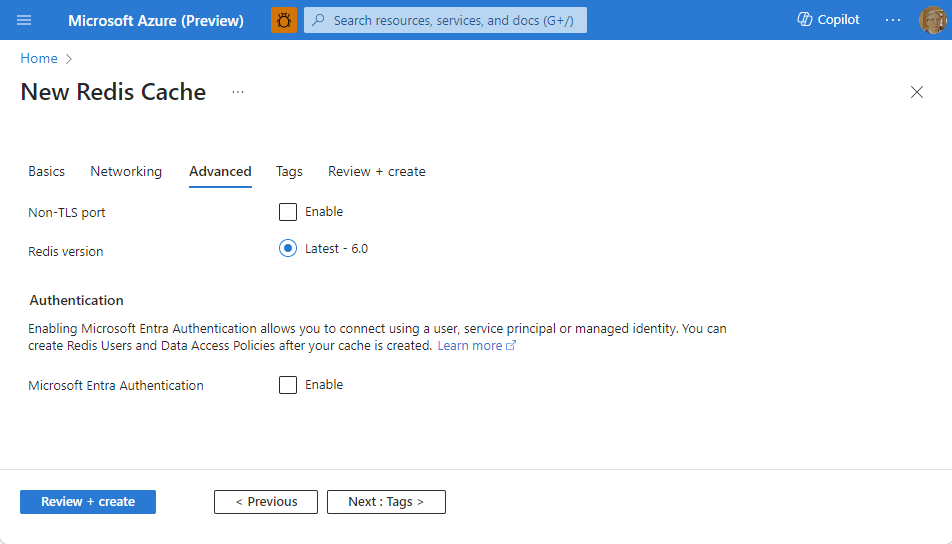
On the Advanced pane, configure the following options:
- Select Microsoft Entra Authentication or Access Keys Authentication. Microsoft Entra Authentication is enabled by default.
- Choose whether to Enable the non-TLS port.
- For a Premium cache, you can configure or disable Availability zones. You can't disable availability zones after the cache is created. For a Standard cache, availability zones are allocated automatically. Availability zones aren't available for Basic SKU.
- For a Premium cache, configure the settings for Replica count, Clustering and Shard count, System-assigned managed identity, and Data persistence.
The following image shows the Advanced tab for the Standard SKU.
Important
Use Microsoft Entra ID with managed identities to authorize requests against your cache if possible. Authorization using Microsoft Entra ID and managed identity provides better security and is easier to use than shared access key authorization. For more information about using managed identities with your cache, see Use Microsoft Entra ID for cache authentication.
Optionally, select the Tags tab or select Next: Tags, and enter tag names and values to categorize your cache resources.
Select Review + create, and once validation passes, select Create.
The new cache deployment takes several minutes. You can monitor deployment progress on the portal Azure Cache for Redis page. When the cache Status displays Running, the cache is ready to use.
You can view and configure the following settings using the Resource Menu. The settings that you see depend on the tier of your cache. For example, you don't see Reboot when using the Enterprise tier.
- Overview
- Activity log
- Access control (IAM)
- Tags
- Diagnose and solve problems
- Events
- Settings
- Administration
- Monitoring
- Automation
- Support & troubleshooting settings
Overview
The Overview section provides you with basic information about your cache, such as name, ports, pricing tier, and selected cache metrics.
Activity log
Select Activity log to view actions done to your cache. You can also use filtering to expand this view to include other resources. For more information on working with audit logs, see Audit operations with Resource Manager. For more information on monitoring the activity log, see Activity log.
Access control (IAM)
The Access control (IAM) section provides support for Azure role-based access control (Azure RBAC) in the Azure portal. This configuration helps organizations meet their access management requirements simply and precisely. For more information, see Azure role-based access control in the Azure portal.
Tags
The Tags section helps you organize your resources. For more information, see Using tags to organize your Azure resources.
Diagnose and solve problems
Select Diagnose and solve problems to be provided with common issues and strategies for resolving them.
Events
Select Events to add event subscriptions to your cache. Use events to build reactive, event-driven apps with the fully managed event routing service that is built into Azure.
The Event Grid helps you build automation into your cloud infrastructure, create serverless apps, and integrate across services and clouds. For more information, see What is Azure Event Grid.
Redis console
You can securely issue commands to your Azure Cache for Redis instances using the Redis Console, which is available in the Azure portal for Basic, Standard and Premium cache tiers.
Important
The Redis Console doesn't work when a cache has any of the following:
- Virtual Network. When your cache is part of a VNet, only clients in the VNet can access the cache. Because Redis Console runs in your local browser, which is outside the VNet, it can't connect to your cache.
- Private Link
- Access Keys disabled
Note
To access Redis Console, you would need at least Contributor built-in role.
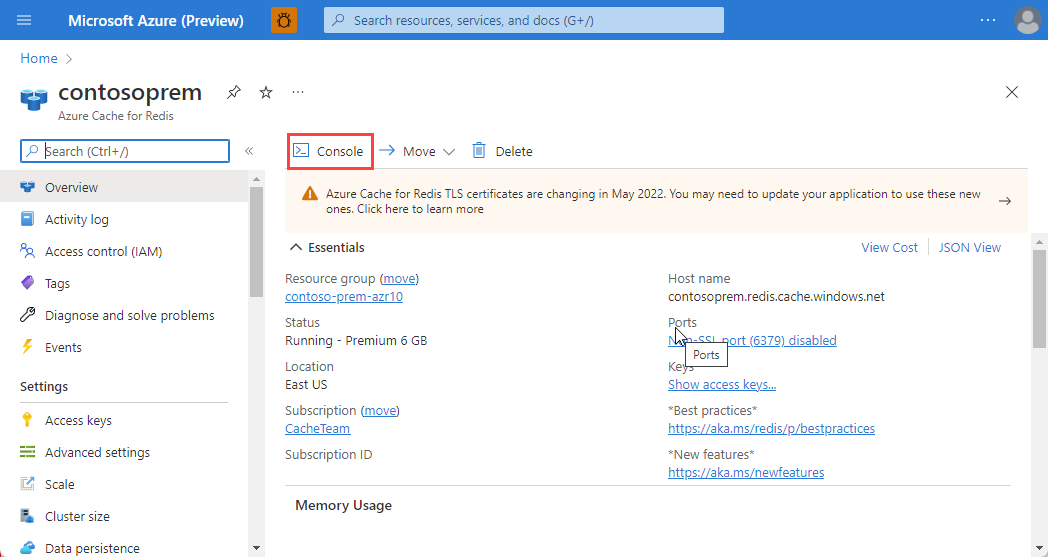
To access the Redis Console, select Console tab in the working pane of Resource menu.
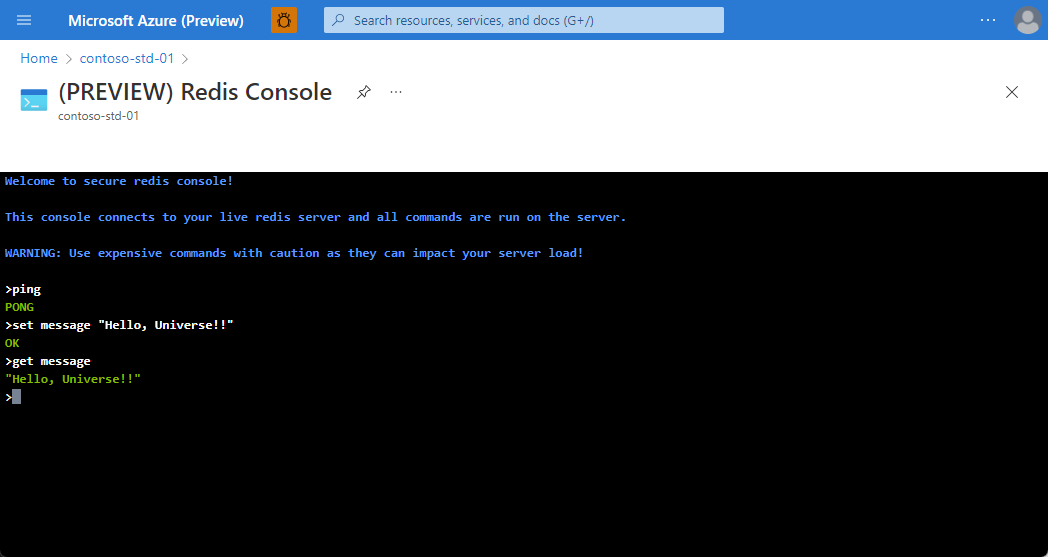
To issue commands against your cache instance, type the command you want into the console.
Note
Not all Redis commands are supported in Azure Cache for Redis. For a list of Redis commands that are disabled for Azure Cache for Redis, see Redis commands not supported in Azure Cache for Redis section. For more information about Redis commands, see https://redis.io/commands.
Using the Redis Console with a premium clustered cache
When using the Redis Console with a premium clustered cache, you can issue commands to a single shard of the cache. To issue a command to a specific shard, first connect to the shard you want by selecting it on the shard picker.
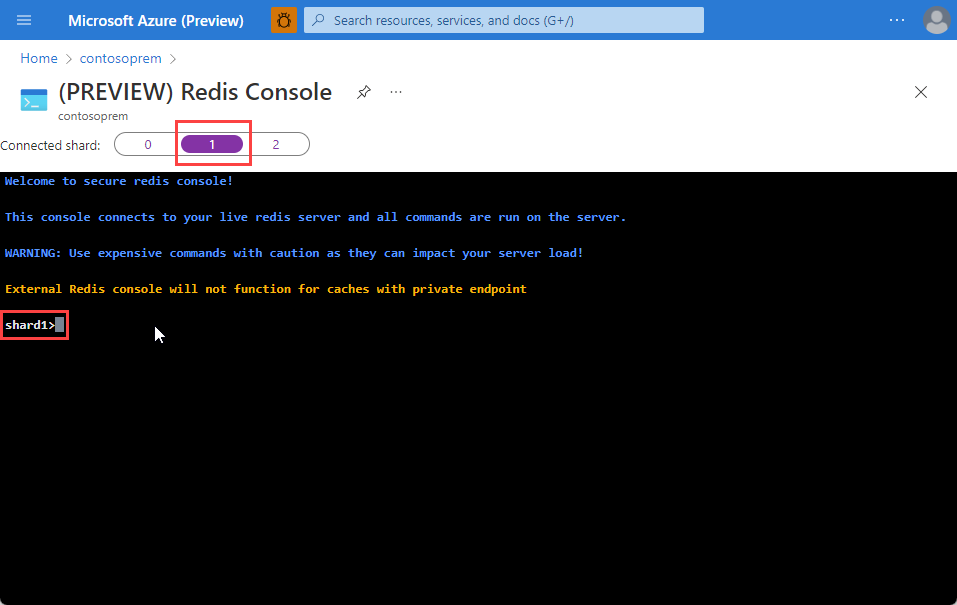
If you attempt to access a key that is stored in a different shard than the connected shard, you receive an error message similar to the following message:
shard1>get myKey
(error) MOVED 866 13.90.202.154:13000 (shard 0)
shard1>get myKey
(error) MOVED 866 13.90.202.154:13000 (shard 0)
In the previous example, shard 1 is the selected shard, but myKey is located in shard 0, as indicated by the (shard 0) portion of the error message. In this example, to access myKey, select shard 0 using the shard picker, and then issue the desired command.
Move your cache to a new subscription
You can move your cache to a new subscription by selecting Move.
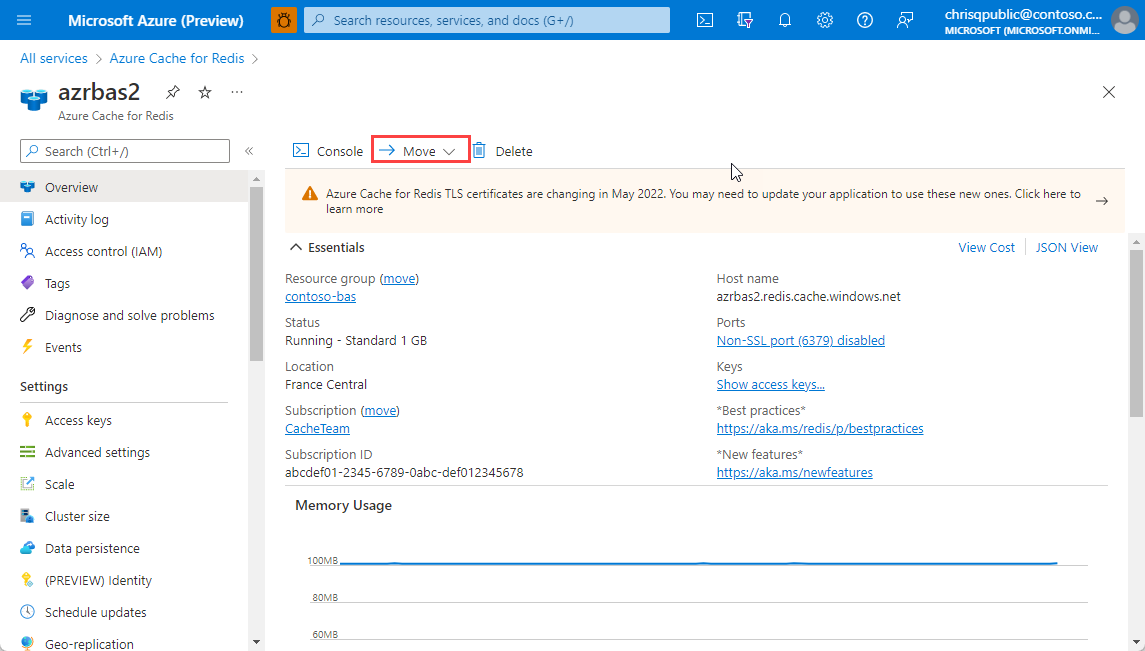
For information on moving resources from one resource group to another, and from one subscription to another, see Move resources to new resource group or subscription.
Settings
The Settings section allows you to access and configure the following settings for your cache.
- Authentication
- Advanced settings
- Scale
- Cluster size
- Data persistence
- Schedule updates
- Geo-replication
- Private endpoint
- Virtual Network
- Firewall
- Properties
- Locks
Authentication
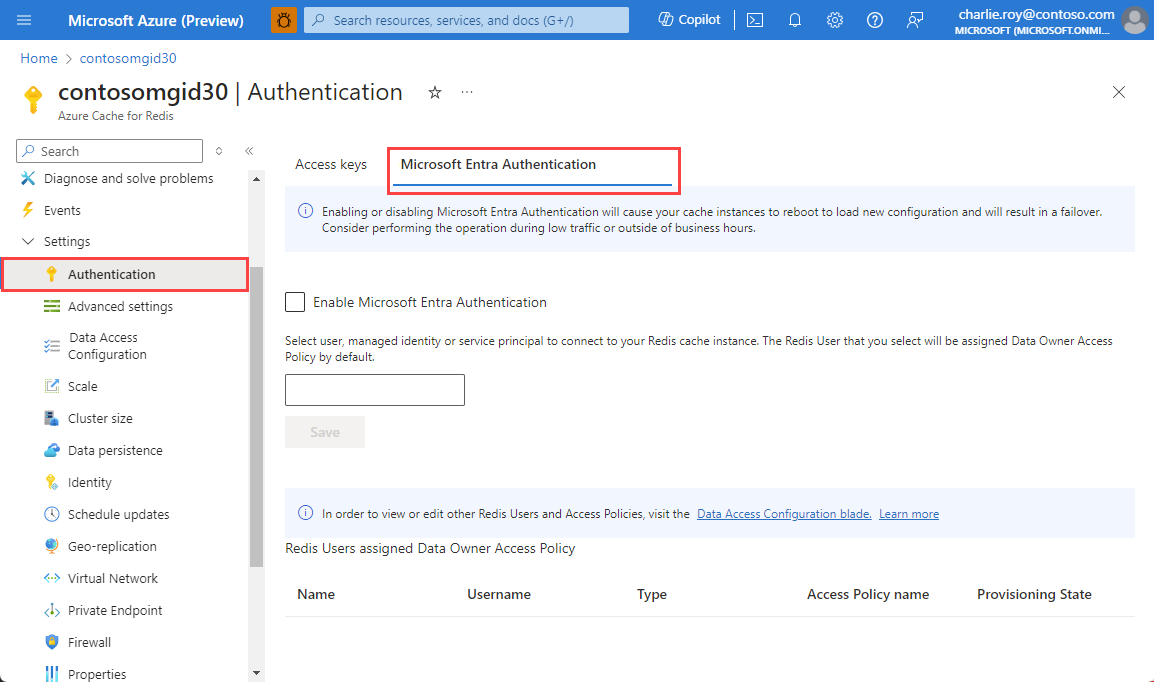
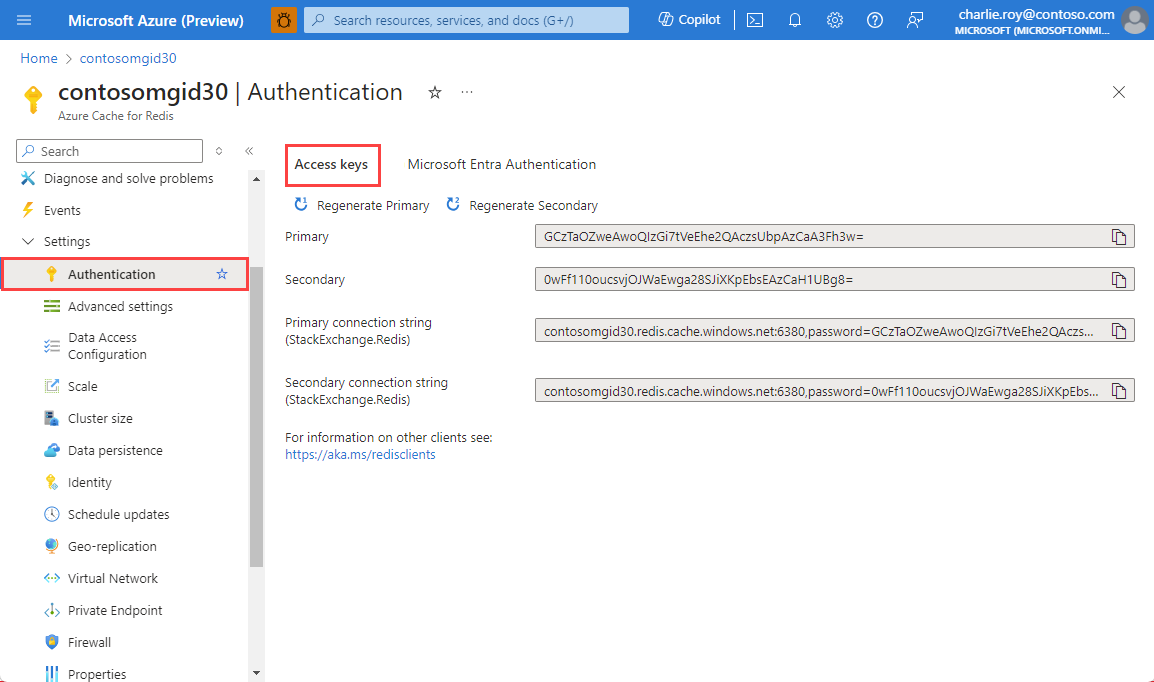
You have two options for authentication: access keys and Microsoft Entra Authentication.
Select Access keys to view or regenerate the access keys for your cache. These keys are used by the clients connecting to your cache.
Advanced settings
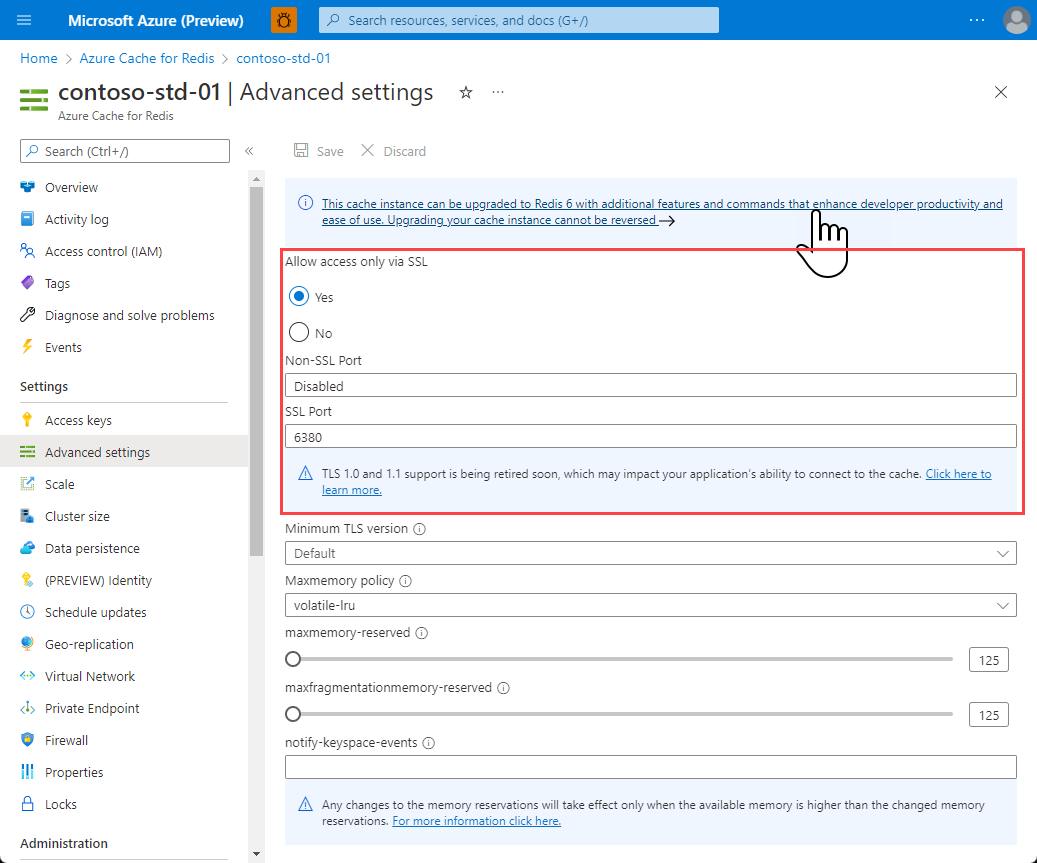
The following settings are configured on the Advanced settings on the left.
Access Ports
By default, non-TLS/SSL access is disabled for new caches. To enable the non-TLS port, Select No for Allow access only via SSL on the Advanced settings on the left and then Select Save.
Note
TLS access to Azure Cache for Redis supports TLS 1.0, 1.1 and 1.2 currently, but versions 1.0 and 1.1 are being retired soon. Please read our Remove TLS 1.0 and 1.1 page for more details.
Memory policies
Use the Maxmemory policy, maxmemory-reserved, and maxfragmentationmemory-reserved settings from Advanced settings from the Resource menu on the left to configure the memory policies for the cache. When you create a cache, the values maxmemory-reserved and maxfragmentationmemory-reserved default to 10% of maxmemory, which is the cache size.
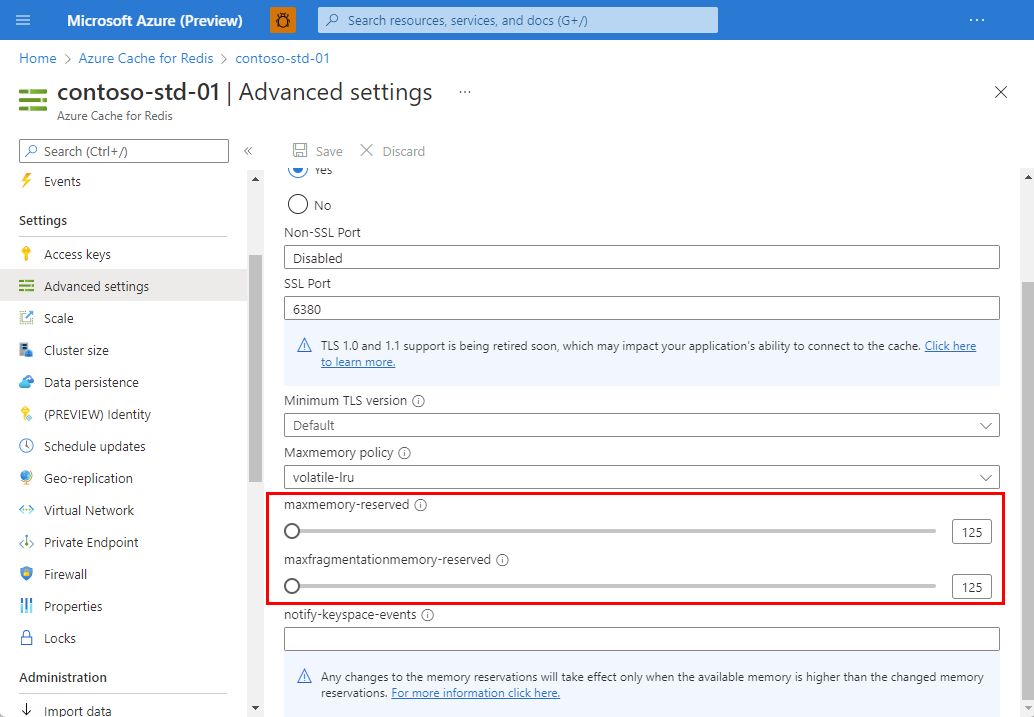
Maxmemory policy configures the eviction policy for the cache and allows you to choose from the following eviction policies:
volatile-lru: The default eviction policy. It removes the least recently used key out of all the keys with an expiration set.allkeys-lru: Removes the least recently used key.volatile-random: Removes a random key that has an expiration set.allkeys-random: Removes a random key.volatile-ttl: Removes the key with the shortest time to live based on the expiration set for it.noeviction: No eviction policy. Returns an error message if you attempt to insert data.volatile-lfu: Evicts the least frequently used keys out of all keys with an expire field set.allkeys-lfu: Evicts the least frequently used keys out of all keys.
For more information about maxmemory policies, see Eviction policies.
The maxmemory-reserved setting configures the amount of memory in MB per instance in a cluster that is reserved for noncache operations, such as replication during failover. Setting this value allows you to have a more consistent Redis server experience when your load varies. This value should be set higher for workloads that write large amounts of data. When memory is reserved for such operations, it's unavailable for storage of cached data. The minimum and maximum values on the slider are 10% and 60%, shown in megabytes. You must set the value in that range.
The maxfragmentationmemory-reserved setting configures the amount of memory in MB per instance in a cluster that is reserved to accommodate for memory fragmentation. When you set this value, the Redis server experience is more consistent when the cache is full or close to full and the fragmentation ratio is high. When memory is reserved for such operations, it's unavailable for storage of cached data. The minimum and maximum values on the slider are 10% and 60%, shown in megabytes. You must set the value in that range.
When choosing a new memory reservation value (maxmemory-reserved or maxfragmentationmemory-reserved), consider how this change might affect a cache that is already running with large amounts of data in it. For instance, if you have a 53-GB cache with 49 GB of data, then change the reservation value to 8 GB, this change drops the max available memory for the system down to 45 GB. If either your current used_memory or your used_memory_rss values are higher than the new limit of 45 GB, then the system has to evict data until both used_memory and used_memory_rss are below 45 GB. Eviction can increase server load and memory fragmentation. For more information on cache metrics such as used_memory and used_memory_rss, see Create your own metrics.
Important
The maxmemory-reserved and maxfragmentationmemory-reserved settings are available for Basic,Standard and Premium caches.
Keyspace notifications (advanced settings)
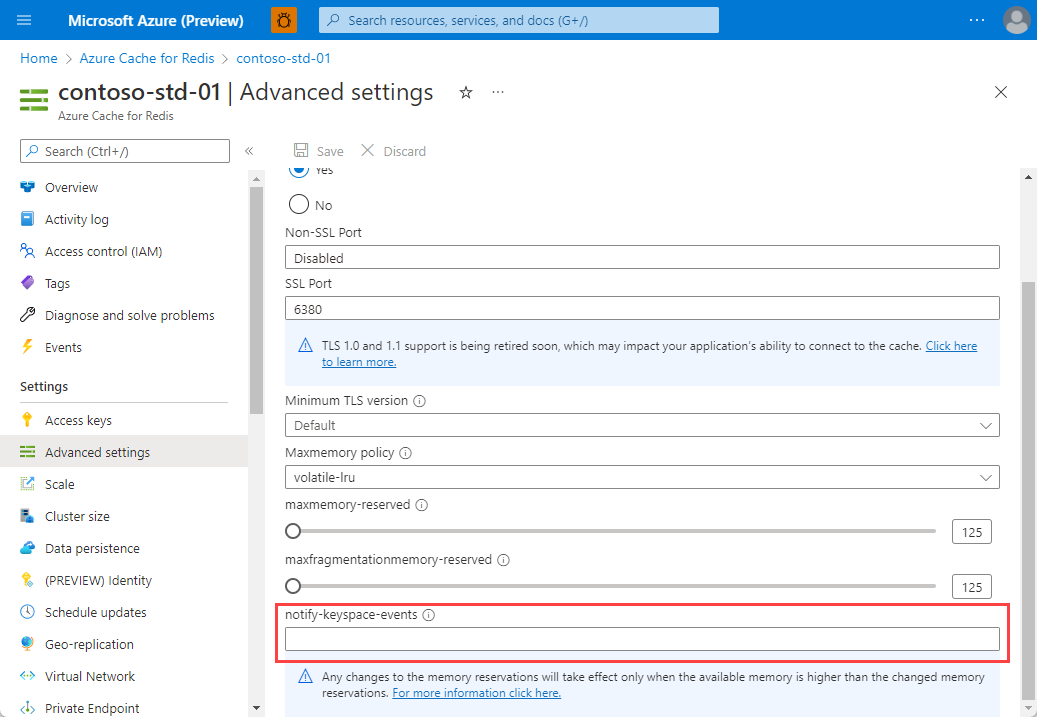
Redis keyspace notifications are configured on the Advanced settings on the left. Keyspace notifications allow clients to receive notifications when certain events occur.
 )
)
Important
Keyspace notifications and the notify-keyspace-events setting are only available for Standard and Premium caches.
For more information, see Redis Keyspace Notifications. For sample code, see the KeySpaceNotifications.cs file in the Hello world sample.
Scale
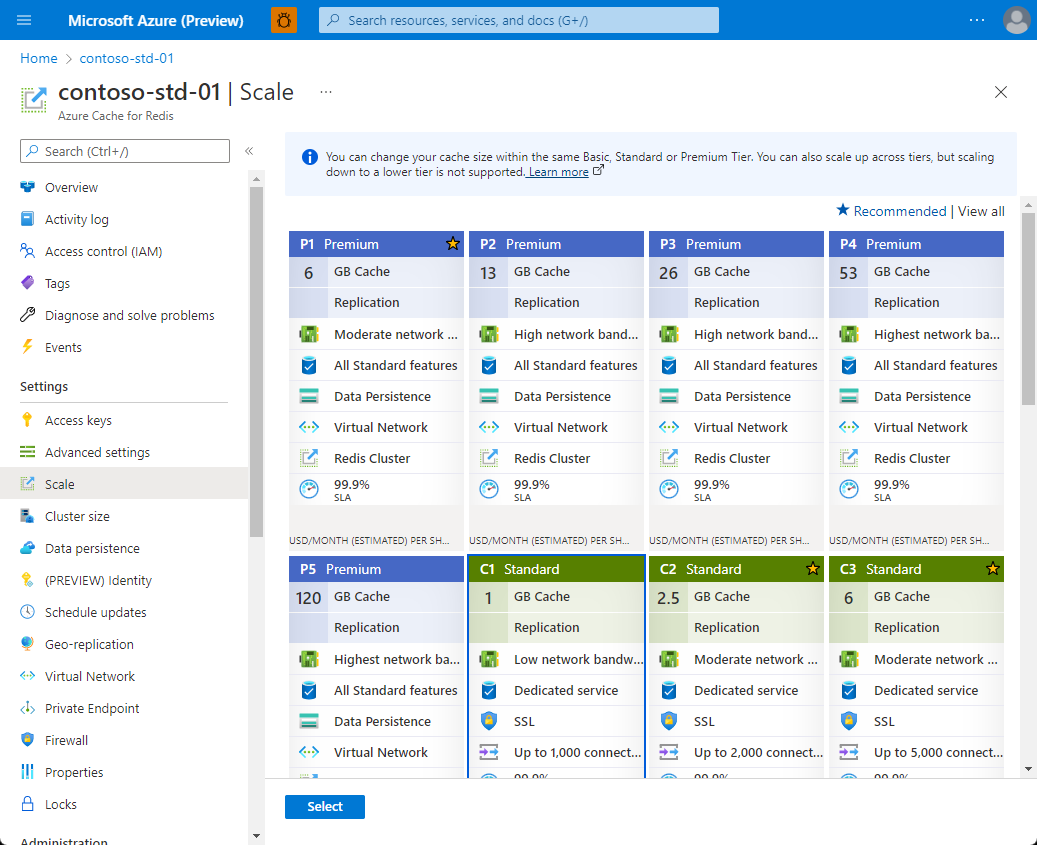
Select Scale to view or change the pricing tier for your cache. For more information on scaling, see How to Scale Azure Cache for Redis.
Cluster Size
Select Cluster Size to change the cluster size for a running premium cache with clustering enabled.
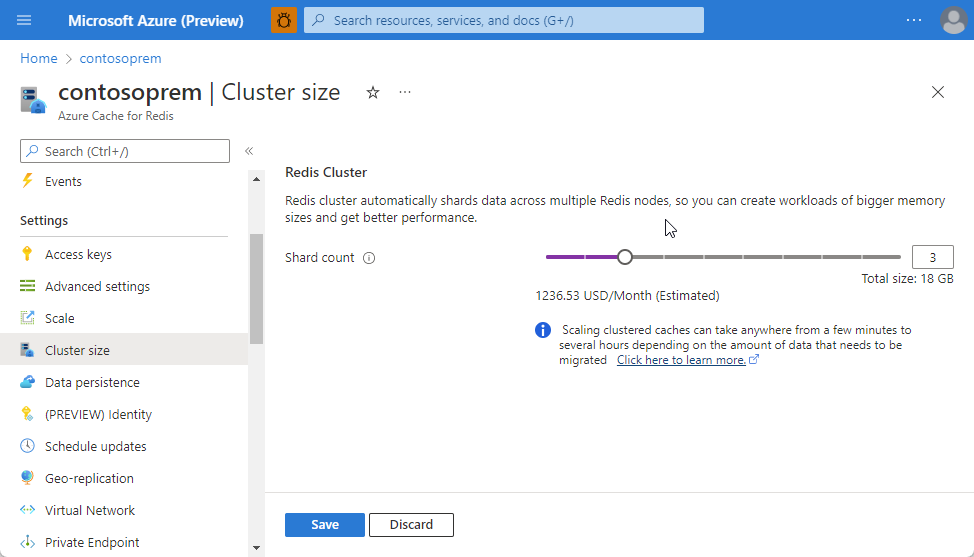
To change the cluster size, use the slider or type a number between 1 and 10 in the Shard count text box. Then, select OK to save.
Data persistence
Select Data persistence to enable, disable, or configure data persistence for your premium cache. Azure Cache for Redis offers Redis persistence using either RDB persistence or AOF persistence.
For more information, see How to configure persistence for a Premium Azure Cache for Redis.
Important
Redis data persistence is for Premium caches, Enterprise caches (Preview), and Enterprise Flash caches (Preview).
Identity
Use Identity to configure managed identities. Managed identities are a common tool used in Azure to help developers minimize the burden of managing secrets and sign-in information.
Presently, you can only use managed identities for storage. For more information, see Managed identity for storage.
Note
Managed identity functionality is only available in the Premium tier for use with storage.
Schedule updates
The Schedule updates section allows you to choose a maintenance window for Redis server updates for your cache.
Important
The maintenance window applies only to Redis server updates, and not to any Azure updates or updates to the operating system of the VMs that host the cache.
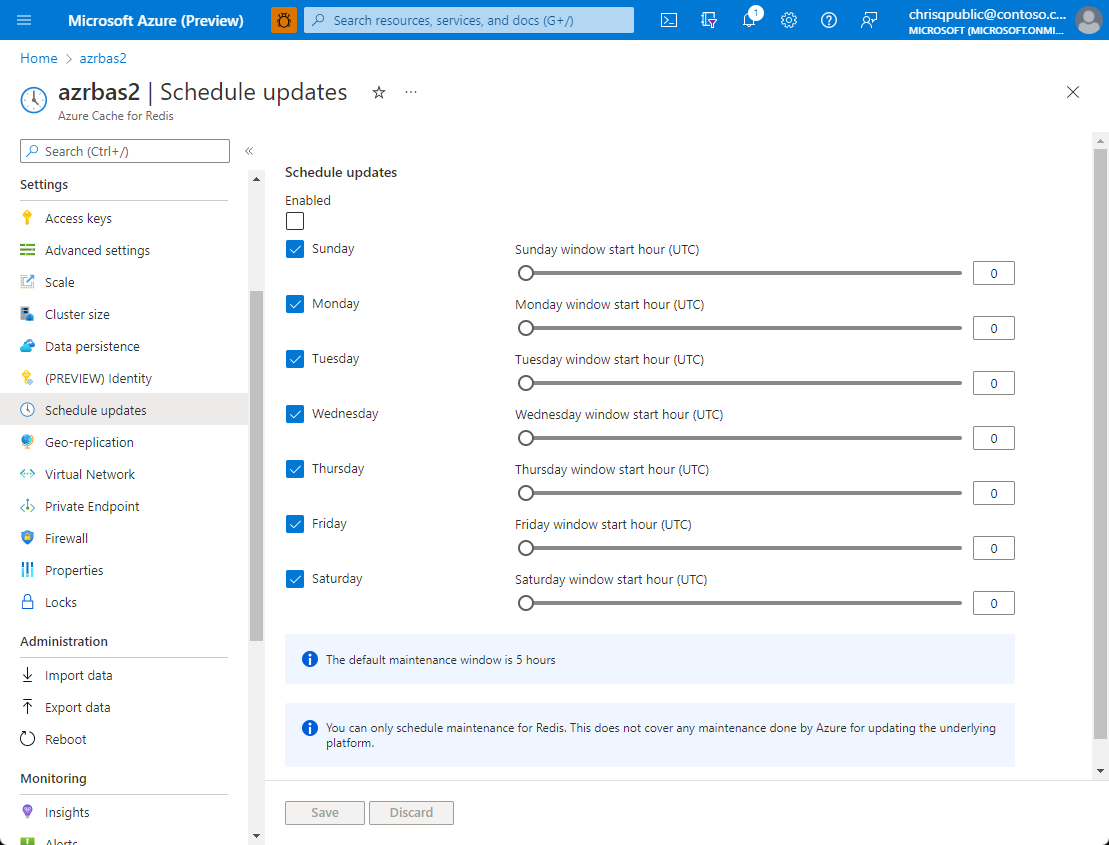
To specify a maintenance window, check the days you want. Then, specify the maintenance window start hour for each day, and select OK. The maintenance window time is in UTC.
For more information and instructions, see Update channel and Schedule updates.
Geo-replication
Geo-replication, on the Resource menu, provides a mechanism for linking two Premium tier Azure Cache for Redis instances. One cache is named as the primary linked cache, and the other as the secondary linked cache. The secondary linked cache becomes read-only, and data written to the primary cache is replicated to the secondary linked cache. This functionality can be used to replicate a cache across Azure regions.
Important
Geo-replication is only available for Premium tier caches. For more information and instructions, see How to configure Geo-replication for Azure Cache for Redis.
Virtual Network
The Virtual Network section allows you to configure the virtual network settings for your cache. Virtual networks are limited to Premium caches. For information on creating a premium cache with VNET support and updating its settings, see How to configure Virtual Network Support for a Premium Azure Cache for Redis.
Important
Virtual network settings are only available for premium caches that were configured with VNet support during cache creation.
Private endpoint
The Private Endpoint section allows you to configure the private endpoint settings for your cache. Private endpoint is supported on all cache tiers Basic, Standard, Premium, and Enterprise. We recommend using private endpoint instead of VNets. Private endpoints are easy to set up or remove, are supported on all tiers, and can connect your cache to multiple different VNets at once.
For more information, see Azure Cache for Redis with Azure Private Link.
Firewall
- Firewall rules configuration is available for all Basic, Standard, and Premium tiers.
- Firewall rules configuration isn't available for Enterprise nor Enterprise Flash tiers.
Select Firewall to view and configure firewall rules for cache.
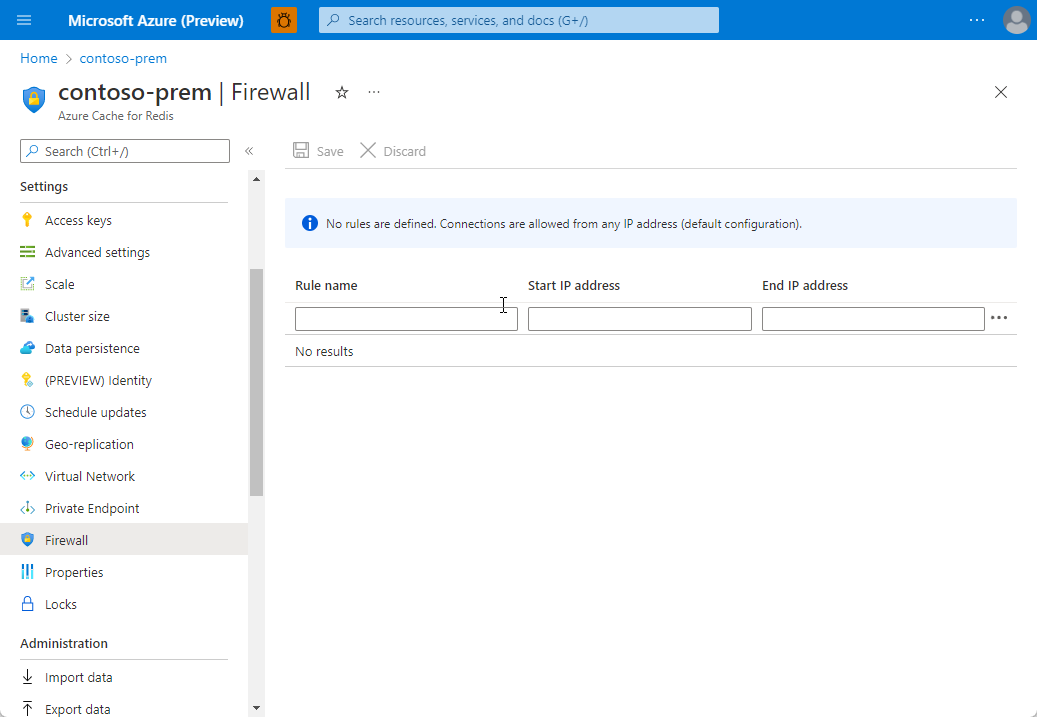
You can specify firewall rules with a start and end IP address range. When firewall rules are configured, only client connections from the specified IP address ranges can connect to the cache. When a firewall rule is saved, there's a short delay before the rule is effective. This delay is typically less than one minute.
Important
Connections from Azure Cache for Redis monitoring systems are always permitted, even if firewall rules are configured.
Properties
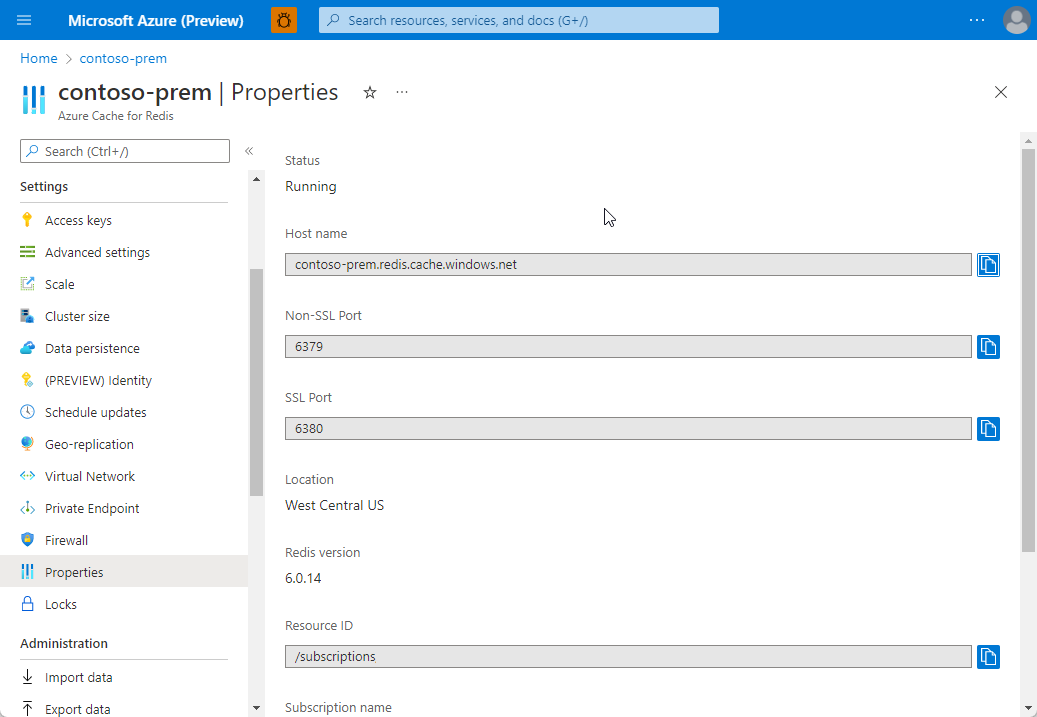
Select Properties to view information about your cache, including the cache endpoint and ports.
Locks
The Locks section allows you to lock a subscription, resource group, or resource to prevent other users in your organization from accidentally deleting or modifying critical resources. For more information, see Lock resources with Azure Resource Manager.
Administration settings
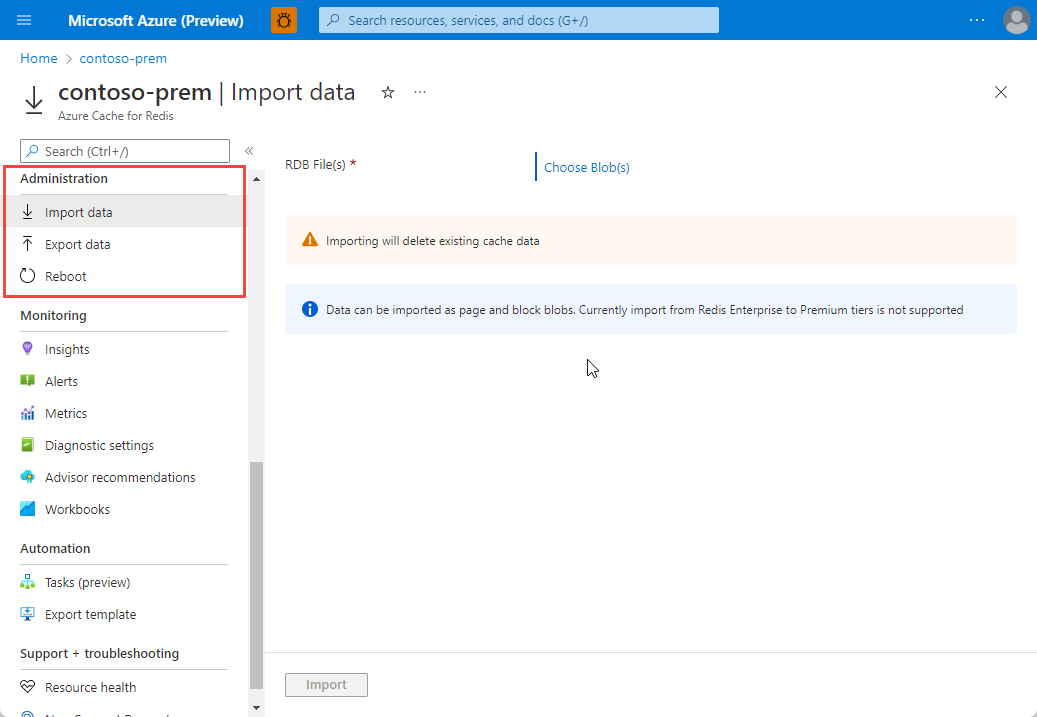
The settings in the Administration section allow you to perform the following administrative tasks for your cache.
Import/Export
Import/Export is an Azure Cache for Redis data management operation that allows you to import and export data in the cache. You can import and export an Azure Cache for Redis Database (RDB) snapshot from a premium cache to a page blob in an Azure Storage Account. Use Import/Export to migrate between different Azure Cache for Redis instances or populate the cache with data before use.
You can use import with Redis-compatible RDB files from any Redis server running in any cloud or environment:
- including Redis running on Linux
- Windows
- any cloud provider such as Amazon Web Services and others
Importing data is an easy way to create a cache with prepopulated data. During the import process, Azure Cache for Redis loads the RDB files from Azure storage into memory, and then inserts the keys into the cache.
Export allows you to export the data stored in Azure Cache for Redis to Redis compatible RDB files. You can use this feature to move data from one Azure Cache for Redis instance to another or to another Redis server. During the export process, a temporary file is created on the VM that hosts the Azure Cache for Redis server instance. The temporary file is uploaded to the designated storage account. When the export operation completes with either a status of success or failure, the temporary file is deleted.
Important
Import/Export is only available for Premium tier caches. For more information and instructions, see Import and Export data in Azure Cache for Redis.
Reboot
The Reboot item allows you to reboot the nodes of your cache. This reboot capability enables you to test your application for resiliency if there's a failure of a cache node.
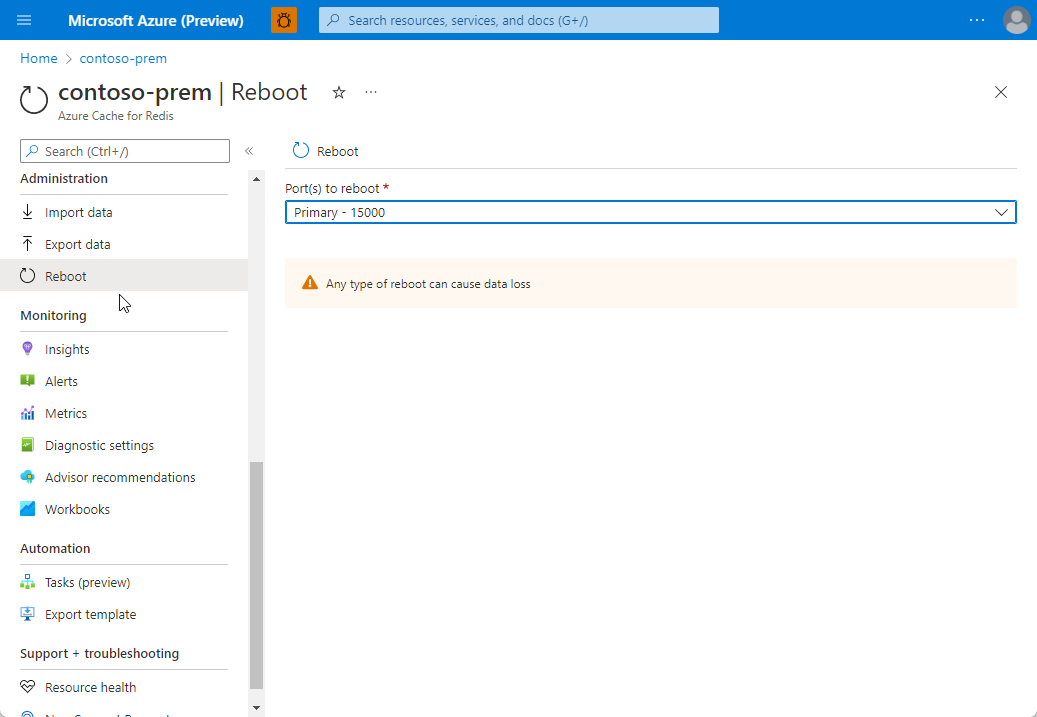
If you have a premium cache with clustering enabled, you can select which shards of the cache to reboot.
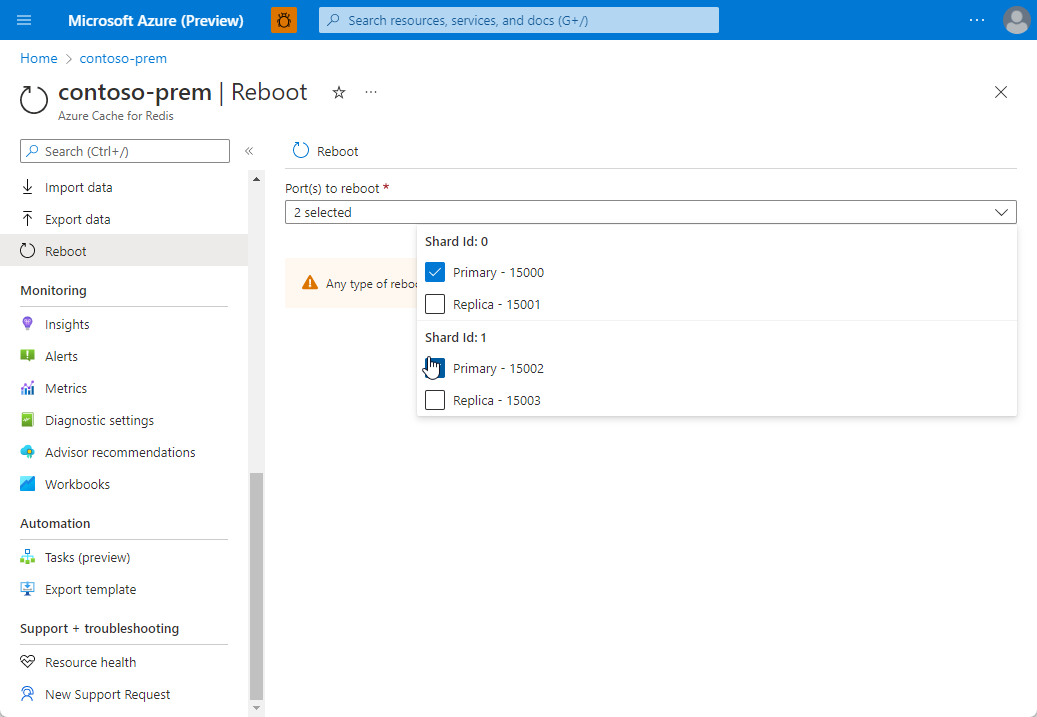
To reboot one or more nodes of your cache, select the desired nodes and select Reboot. If you have a premium cache with clustering enabled, select the shards to reboot, and then select Reboot. After a few minutes, the selected node(s) reboot, and are back online a few minutes later.
Important
Reboot is not yet available for the Enterprise tier. Reboot is available for all other tiers. For more information and instructions, see Azure Cache for Redis administration - Reboot.
Monitoring
The Monitoring section allows you to configure diagnostics and monitoring for your Azure Cache for Redis instance.
- For more information on Azure Cache for Redis monitoring and diagnostics, see Monitor Azure Cache for Redis.
- For information on how to set up and use Azure Cache for Redis monitoring and diagnostics, see Monitor Azure Cache for Redis.
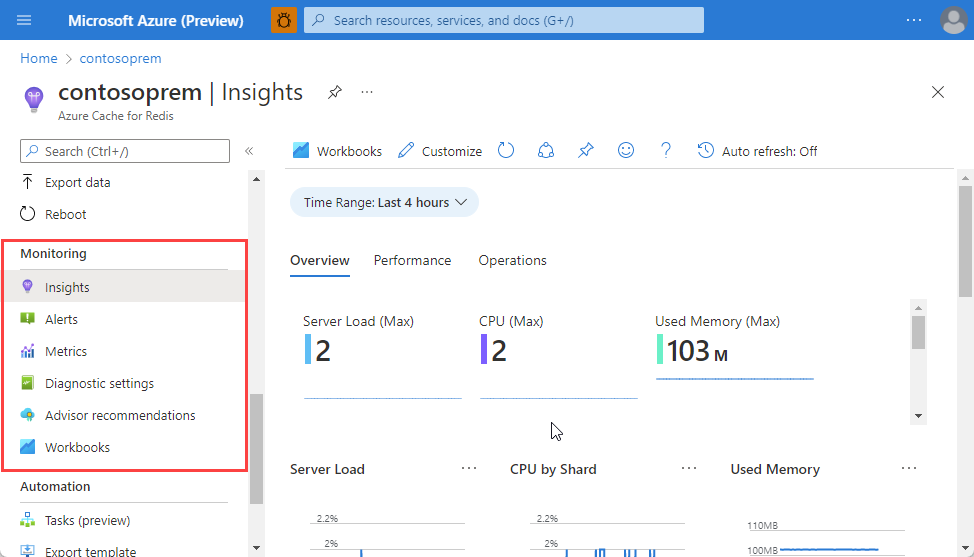
Insights
Use Insights to see groups of predefined tiles and charts to use as starting point for your cache metrics. For more information, see Insights.
Metrics
Select Metrics to create your own custom chart to track the metrics you want to see for your cache. For more information, see Create your own metrics.
Alerts
Select Alerts to configure alerts based on Azure Cache for Redis metrics. For more information, see Create alerts.
Diagnostic settings
By default, cache metrics in Azure Monitor are stored for 30 days and then deleted. To persist your cache metrics for longer than 30 days, select Diagnostics settings to configure the storage account used to store cache diagnostics.
Note
In addition to archiving your cache metrics to storage, you can also stream them to an Event hub or send them to Azure Monitor logs.
Advisor recommendations
The Advisor recommendations displays recommendations for your cache. During normal operations, no recommendations are displayed.
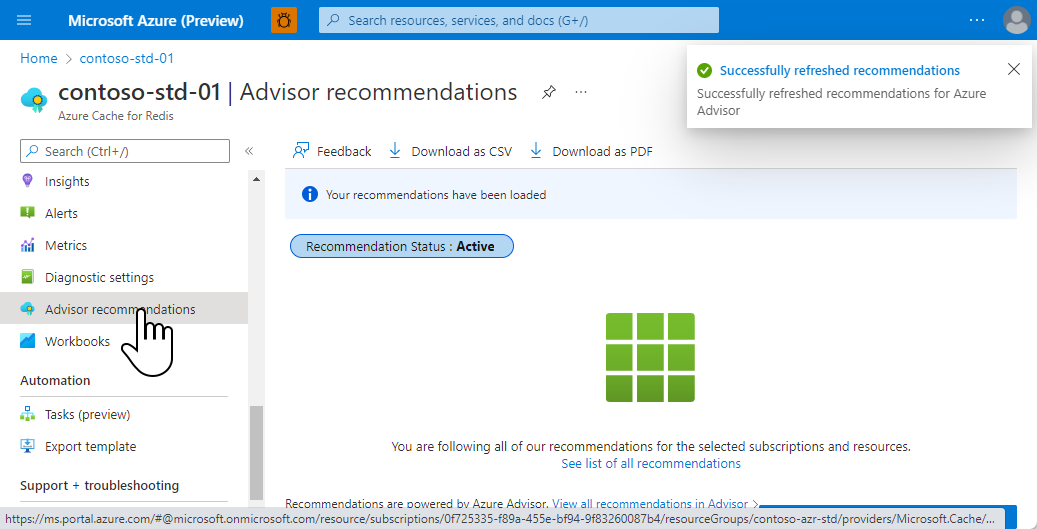
If any conditions occur during the operations of your cache such as imminent changes, high memory usage, network bandwidth, or server load, an alert is displayed in the Overview of the Resource menu.

Further information can be found on the Recommendations in the working pane of the Azure portal.
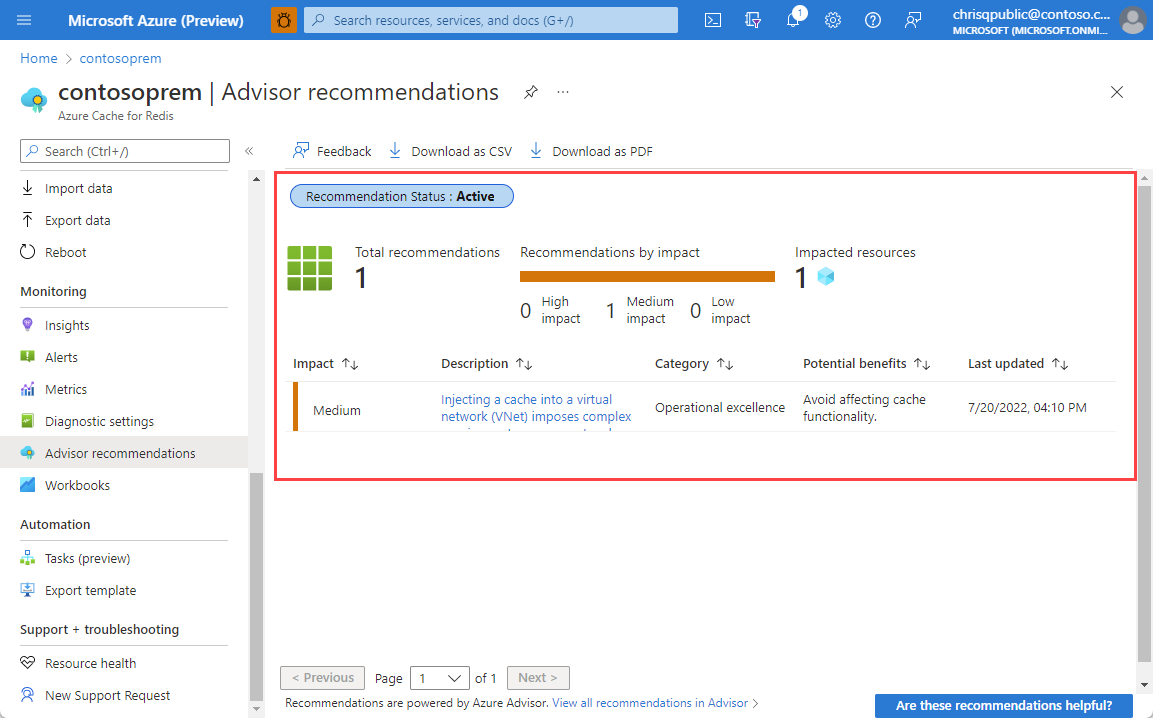
You can monitor these metrics on the Monitoring section of the Resource menu.
| Azure Cache for Redis metric | More information |
|---|---|
| Network bandwidth usage | Cache performance - available bandwidth |
| Connected clients | Default Redis server configuration - max clients |
| Server load | Redis Server Load |
| Memory usage | Cache performance - size |
To upgrade your cache, select Upgrade now to change the pricing tier and scale your cache. For more information on choosing a pricing tier, see Choosing the right tier.
Workbooks
Organize your metrics into groups so that you display metric information in a coherent and effective way.
Automation
Azure Automation delivers a cloud-based automation, operating system updates, and configuration service that supports consistent management across your Azure and non-Azure environments.
Tasks
Select Tasks to help you manage Azure Cache for Redis resources more easily. These tasks vary in number and availability, based on the resource type. Presently, you can only use the Send monthly cost for resource template to create a task while in preview.
For more information, see Manage Azure resources and monitor costs by creating automation tasks.
Export template
Select Export template to build and export a template of your deployed resources for future deployments. For more information about working with templates, see Deploy resources with Azure Resource Manager templates.
Support & troubleshooting settings
The settings in the Support + troubleshooting section provide you with options for resolving issues with your cache.
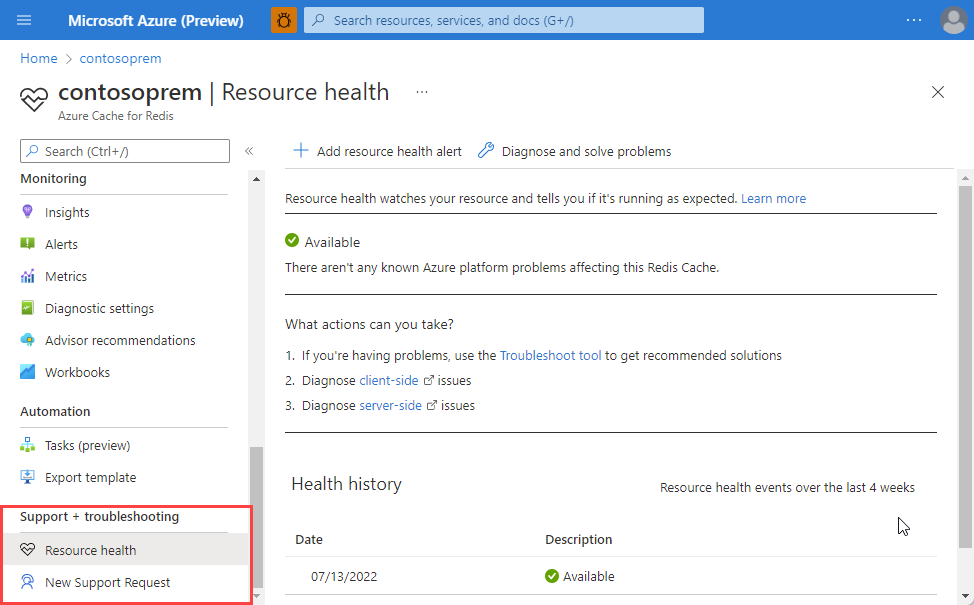
Resource health
Resource health watches your resource and tells you if it's running as expected. For more information about the Azure Resource health service, see Azure Resource health overview.
Note
Resource health is currently unable to report on the health of Azure Cache for Redis instances hosted in a virtual network. For more information, see Do all cache features work when hosting a cache in a VNET?
New support request
Select New support request to open a support request for your cache.
Default Redis server configuration
New Azure Cache for Redis instances are configured with the following default Redis configuration values:
Note
The settings in this section cannot be changed using the StackExchange.Redis.IServer.ConfigSet method. If this method is called with one of the commands in this section, an exception similar to the following example is thrown:
StackExchange.Redis.RedisServerException: ERR unknown command 'CONFIG'
Any values that are configurable, such as max-memory-policy, are configurable through the Azure portal or command-line management tools such as Azure CLI or PowerShell.
| Setting | Default value | Description |
|---|---|---|
databases |
16 | The default number of databases is 16 but you can configure a different number based on the pricing tier.1 The default database is DB 0, you can select a different one on a per-connection basis using connection.GetDatabase(dbid) where dbid is a number between 0 and databases - 1. |
maxclients |
Depends on the pricing tier2 | This value is the maximum number of connected clients allowed at the same time. Once the limit is reached Redis closes all the new connections, returning a 'max number of clients reached' error. |
maxmemory-reserved |
10% of maxmemory |
The allowed range for maxmemory-reserved is 10% - 60% of maxmemory. If you try to set these values lower than 10% or higher than 60%, they're reevaluated and set to the 10% minimum and 60% maximum. The values are rendered in megabytes. |
maxfragmentationmemory-reserved |
10% of maxmemory |
The allowed range for maxfragmentationmemory-reserved is 10% - 60% of maxmemory. If you try to set these values lower than 10% or higher than 60%, they're reevaluated and set to the 10% minimum and 60% maximum. The values are rendered in megabytes. |
maxmemory-policy |
volatile-lru |
Maxmemory policy is the setting used by the Redis server to select what to remove when maxmemory (the size of the cache that you selected when you created the cache) is reached. With Azure Cache for Redis, the default setting is volatile-lru. This setting removes the keys with an expiration set using an LRU algorithm. This setting can be configured in the Azure portal. For more information, see Memory policies. |
maxmemory-samples |
3 | To save memory, LRU and minimal TTL algorithms are approximated algorithms instead of precise algorithms. By default Redis checks three keys and picks the one that was used less recently. |
lua-time-limit |
5,000 | Max execution time of a Lua script in milliseconds. If the maximum execution time is reached, Redis logs that a script is still in execution after the maximum allowed time, and starts to reply to queries with an error. |
lua-event-limit |
500 | Max size of script event queue. |
client-output-buffer-limit normal / client-output-buffer-limit pubsub |
0 0 0 / 32mb 8mb 60 |
The client output buffer limits can be used to force disconnection of clients that aren't reading data from the server fast enough for some reason. A common reason is that a Pub/Sub client can't consume messages as fast as the publisher can produce them. For more information, see https://redis.io/topics/clients. |
Databases
1The limit for databases is different for each Azure Cache for Redis pricing tier and can be set at cache creation. If no databases setting is specified during cache creation, the default is 16.
- Basic and Standard caches
- C0 (250 MB) cache - up to 16 databases
- C1 (1 GB) cache - up to 16 databases
- C2 (2.5 GB) cache - up to 16 databases
- C3 (6 GB) cache - up to 16 databases
- C4 (13 GB) cache - up to 32 databases
- C5 (26 GB) cache - up to 48 databases
- C6 (53 GB) cache - up to 64 databases
- Premium caches
- P1 (6 GB - 60 GB) - up to 16 databases
- P2 (13 GB - 130 GB) - up to 32 databases
- P3 (26 GB - 260 GB) - up to 48 databases
- P4 (53 GB - 530 GB) - up to 64 databases
- P5 (120 GB - 1200 GB) - up to 64 databases
- All premium caches with Redis cluster enabled - Redis cluster only supports use of database 0 so the
databaseslimit for any premium cache with Redis cluster enabled is effectively 1 and the Select command isn't allowed.
For more information about databases, see What are Redis databases?
Note
The databases setting can be configured only during cache creation and only using PowerShell, CLI, or other management clients. For an example of configuring databases during cache creation using PowerShell, see New-AzRedisCache.
Maxclients
2The maxclients property is different for each Azure Cache for Redis pricing tier.
- Basic and Standard caches
- C0 (250 MB) cache - up to 256 connections
- C1 (1 GB) cache - up to 1,000 connections
- C2 (2.5 GB) cache - up to 2,000 connections
- C3 (6 GB) cache - up to 5,000 connections
- C4 (13 GB) cache - up to 10,000 connections
- C5 (26 GB) cache - up to 15,000 connections
- C6 (53 GB) cache - up to 20,000 connections
- Premium caches
- P1 (6 GB - 60 GB) - up to 7,500 connections
- P2 (13 GB - 130 GB) - up to 15,000 connections
- P3 (26 GB - 260 GB) - up to 30,000 connections
- P4 (53 GB - 530 GB) - up to 40,000 connections
- P5: (120 GB - 1200 GB) - up to 40,000 connections
Note
While each size of cache allows up to a certain number of connections, each connection to Redis has overhead associated with it. An example of such overhead would be CPU and memory usage as a result of TLS/SSL encryption. The maximum connection limit for a given cache size assumes a lightly loaded cache. If load from connection overhead plus load from client operations exceeds capacity for the system, the cache can experience capacity issues even if you have not exceeded the connection limit for the current cache size.
Redis commands not supported in Azure Cache for Redis
Configuration and management of Azure Cache for Redis instances is managed by Microsoft, which disables the following commands. If you try to invoke them, you receive an error message similar to "(error) ERR unknown command".
- ACL
- BGREWRITEAOF
- BGSAVE
- CLUSTER - Cluster write commands are disabled, but read-only cluster commands are permitted.
- CONFIG
- DEBUG
- MIGRATE
- PSYNC
- REPLICAOF
- REPLCONF - Azure cache for Redis instances don't allow customers to add external replicas. This command is normally only sent by servers.
- SAVE
- SHUTDOWN
- SLAVEOF
- SYNC
For cache instances using active geo-replication, the following commands are also blocked to prevent accidental data loss:
- FLUSHALL
- FLUSHDB
Important
Because configuration and management of Azure Cache for Redis instances is managed by Microsoft, some commands are disabled. The commands are listed above. If you try to invoke them, you receive an error message similar to "(error) ERR unknown command".
For more information about Redis commands, see https://redis.io/commands.
