Note
Access to this page requires authorization. You can try signing in or changing directories.
Access to this page requires authorization. You can try changing directories.
In this article, you'll develop, build, and deploy a serverless Java app to Azure Functions by using Quarkus. This article uses Quarkus Funqy and its built-in support for the Azure Functions HTTP trigger for Java. Using Quarkus with Azure Functions gives you the power of the Quarkus programming model with the scale and flexibility of Azure Functions. When you finish, you'll run serverless Quarkus applications on Azure Functions and continue to monitor your app on Azure.
Prerequisites
- The Azure CLI installed on your own computer.
- An Azure account. If you don't have an Azure account, create a free account before you begin.
- Java JDK 17 with
JAVA_HOMEconfigured appropriately. This article was written with Java 17 in mind, but Azure Functions and Quarkus also support older versions of Java. - Apache Maven 3.8.1+.
Create the app project
Use the following command to clone the sample Java project for this article. The sample is on GitHub.
git clone https://github.com/Azure-Samples/quarkus-azure
cd quarkus-azure
git checkout 2023-01-10
cd functions-quarkus
If you see a message about being in detached HEAD state, this message is safe to ignore. Because this article does not require any commits, detached HEAD state is appropriate.
Explore the sample function. Open the functions-quarkus/src/main/java/io/quarkus/GreetingFunction.java file.
Run the following command. The @Funq annotation makes your method (in this case, funqyHello) a serverless function.
@Funq
public String funqyHello() {
    return "hello funqy";
}
Azure Functions Java has its own set of Azure-specific annotations, but these annotations aren't necessary when you're using Quarkus on Azure Functions in a simple capacity as we're doing here. For more information about Azure Functions Java annotations, see the Azure Functions Java developer guide.
Unless you specify otherwise, the function's name is the same as the method name. You can also use the following command to define the function name with a parameter to the annotation:
@Funq("alternateName")
public String funqyHello() {
    return "hello funqy";
}
The name is important. It becomes a part of the REST URI to invoke the function, as shown later in the article.
Test the function locally
Use mvn to run Quarkus dev mode on your local terminal. Running Quarkus in this way enables live reload with background compilation. When you modify your Java files and/or your resource files and refresh your browser, these changes will automatically take effect.
A browser refresh triggers a scan of the workspace. If the scan detects any changes, the Java files are recompiled and the application is redeployed. Your redeployed application services the request. If there are any problems with compilation or deployment, an error page will let you know.
In the following procedure, replace yourResourceGroupName with a resource group name. Function app names must be globally unique across all of Azure. Resource group names must be globally unique within a subscription. This article achieves the necessary uniqueness by prepending the resource group name to the function name. Consider prepending a unique identifier to any names you create that must be unique. A useful technique is to use your initials followed by today's date in mmdd format.
The resource group is not necessary for this part of the instructions, but it's required later. For simplicity, the Maven project requires you to define the property.
Invoke Quarkus dev mode:
mvn -DskipTests -DresourceGroup=<yourResourceGroupName> quarkus:devThe output should look like this:
...
--/ __ \/ / / / _ | / _ \/ //_/ / / / __/
-/ /_/ / /_/ / __ |/ , _/ ,< / /_/ /\ \
--\___\_\____/_/ |_/_/|_/_/|_|\____/___/
INFO  [io.quarkus] (Quarkus Main Thread) quarkus-azure-function 1.0-SNAPSHOT on JVM (powered by Quarkus xx.xx.xx.) started in 1.290s. Listening on: http://localhost:8080

INFO  [io.quarkus] (Quarkus Main Thread) Profile dev activated. Live Coding activated.
INFO  [io.quarkus] (Quarkus Main Thread) Installed features: [cdi, funqy-http, smallrye-context-propagation, vertx]

--
Tests paused
Press [r] to resume testing, [o] Toggle test output, [:] for the terminal, [h] for more options>
Access the function by using the
CURLcommand on your local terminal:curl localhost:8080/api/funqyHelloThe output should look like this:
"hello funqy"
Add dependency injection to the function
The open-standard technology Jakarta EE Contexts and Dependency Injection (CDI) provides dependency injection in Quarkus.
Add a new function that uses dependency injection.
Create a GreetingService.java file in the functions-quarkus/src/main/java/io/quarkus directory. Use the following code as the source code of the file:
package io.quarkus;

import javax.enterprise.context.ApplicationScoped;

@ApplicationScoped
public class GreetingService {

    public String greeting(String name) {
        return "Welcome to build Serverless Java with Quarkus on Azure Functions, " + name;
    }

}
Save the file.
GreetingServiceis an injectable bean that implements agreeting()method. The method returns aWelcome...string message with anameparameter.Open the existing functions-quarkus/src/main/java/io/quarkus/GreetingFunction.java file. Replace the class with the following code to add a new
gServicefield and thegreetingmethod:package io.quarkus; import javax.inject.Inject; import io.quarkus.funqy.Funq; public class GreetingFunction { @Inject GreetingService gService; @Funq public String greeting(String name) { return gService.greeting(name); } @Funq public String funqyHello() { return "hello funqy"; } }Save the file.
Access the new
greetingfunction by using thecurlcommand on your local terminal:curl -d '"Dan"' -X POST localhost:8080/api/greetingThe output should look like this:
"Welcome to build Serverless Java with Quarkus on Azure Functions, Dan"Important
Live Coding (also called dev mode) allows you to run the app and make changes on the fly. Quarkus will automatically recompile and reload the app when changes are made. This is a powerful and efficient style of developing that you'll use throughout this article.
Before you move forward to the next step, stop Quarkus dev mode by selecting Ctrl+C.
Deploy the app to Azure
If you haven't already, sign in to your Azure subscription by using the following az login command and follow the on-screen directions:
az loginNote
If multiple Azure tenants are associated with your Azure credentials, you must specify which tenant you want to sign in to. You can do this by using the
--tenantoption. For example:az login --tenant contoso.onmicrosoft.com.Continue the process in the web browser. If no web browser is available or if the web browser fails to open, use device code flow with
az login --use-device-code.After you sign in successfully, the output on your local terminal should look similar to the following:
xxxxxxx-xxxxx-xxxx-xxxxx-xxxxxxxxx 'Microsoft'
[
    {
        "cloudName": "AzureCloud",
        "homeTenantId": "xxxxxx-xxxx-xxxx-xxxx-xxxxxxx",
        "id": "xxxxxx-xxxx-xxxx-xxxx-xxxxxxxx",
        "isDefault": true,
        "managedByTenants": [],
        "name": "Contoso account services",
        "state": "Enabled",
        "tenantId": "xxxxxxx-xxxx-xxxx-xxxxx-xxxxxxxxxx",
        "user": {
        "name": "user@contoso.com",
        "type": "user"
        }
    }
]
Build and deploy the functions to Azure.
The pom.xml file that you generated in the previous step uses
azure-functions-maven-plugin. Runningmvn installgenerates configuration files and a staging directory thatazure-functions-maven-pluginrequires. ForyourResourceGroupName, use the value that you used previously.mvn clean install -DskipTests -DtenantId=<your tenantId from shown previously> -DresourceGroup=<yourResourceGroupName> azure-functions:deployDuring deployment, sign in to Azure. The
azure-functions-maven-pluginplug-in is configured to prompt for Azure sign-in each time the project is deployed. During the build, output similar to the following appears:[INFO] Auth type: DEVICE_CODE To sign in, use a web browser to open the page https://microsoft.com/devicelogin and enter the code AXCWTLGMP to authenticate.Do as the output says and authenticate to Azure by using the browser and the provided device code. Many other authentication and configuration options are available. The complete reference documentation for
azure-functions-maven-pluginis available at Azure Functions: Configuration Details.After authentication, the build should continue and finish. Make sure that output includes
BUILD SUCCESSnear the end.Successfully deployed the artifact to https://quarkus-demo-123451234.azurewebsites.netYou can also find the URL to trigger your function on Azure in the output log:
[INFO] HTTP Trigger Urls:
[INFO] 	 quarkus : https://quarkus-azure-functions-http-archetype-20220629204040017.azurewebsites.net/api/{*path}
It will take a while for the deployment to finish. In the meantime, let's explore Azure Functions in the Azure portal.
Access and monitor the serverless function on Azure
Sign in to the portal and ensure that you've selected the same tenant and subscription that you used in the Azure CLI.
Type function app on the search bar at the top of the Azure portal and select the Enter key. Your function app should be deployed and show up with the name
<yourResourceGroupName>-function-quarkus.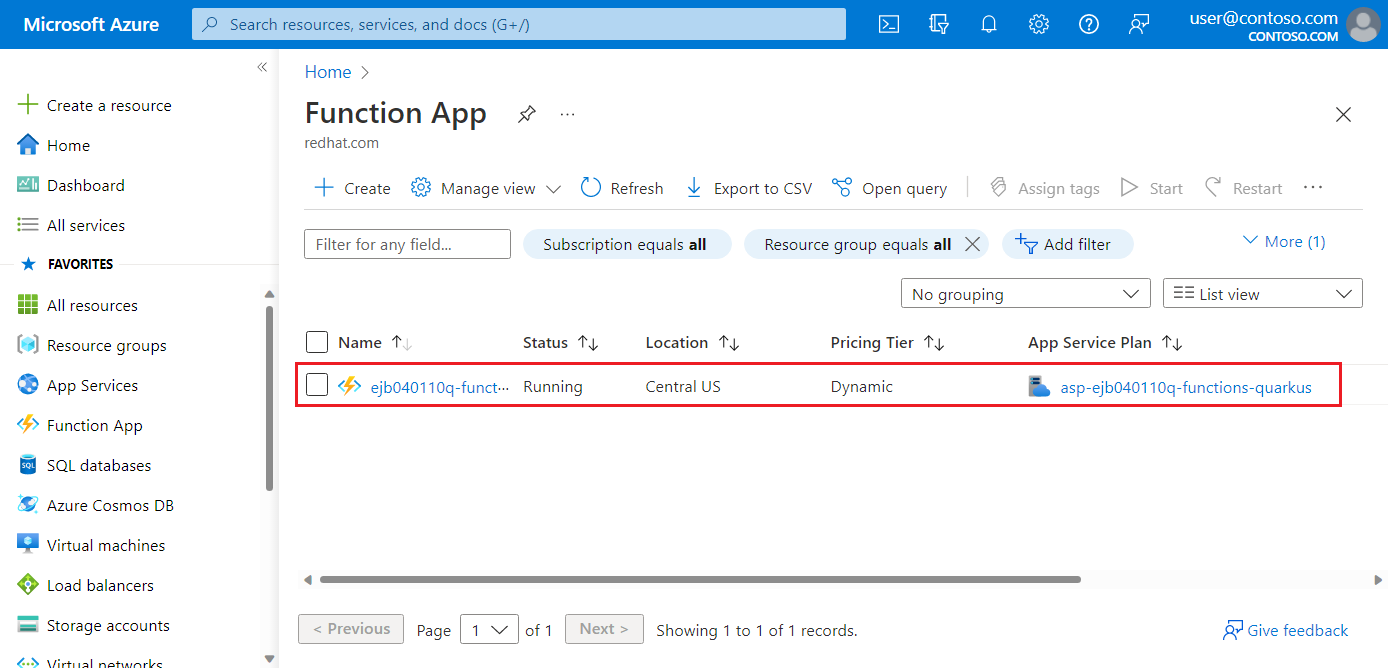
Select the function app to show detailed information, such as Location, Subscription, URL, Metrics, and App Service Plan. Then, select the URL value.
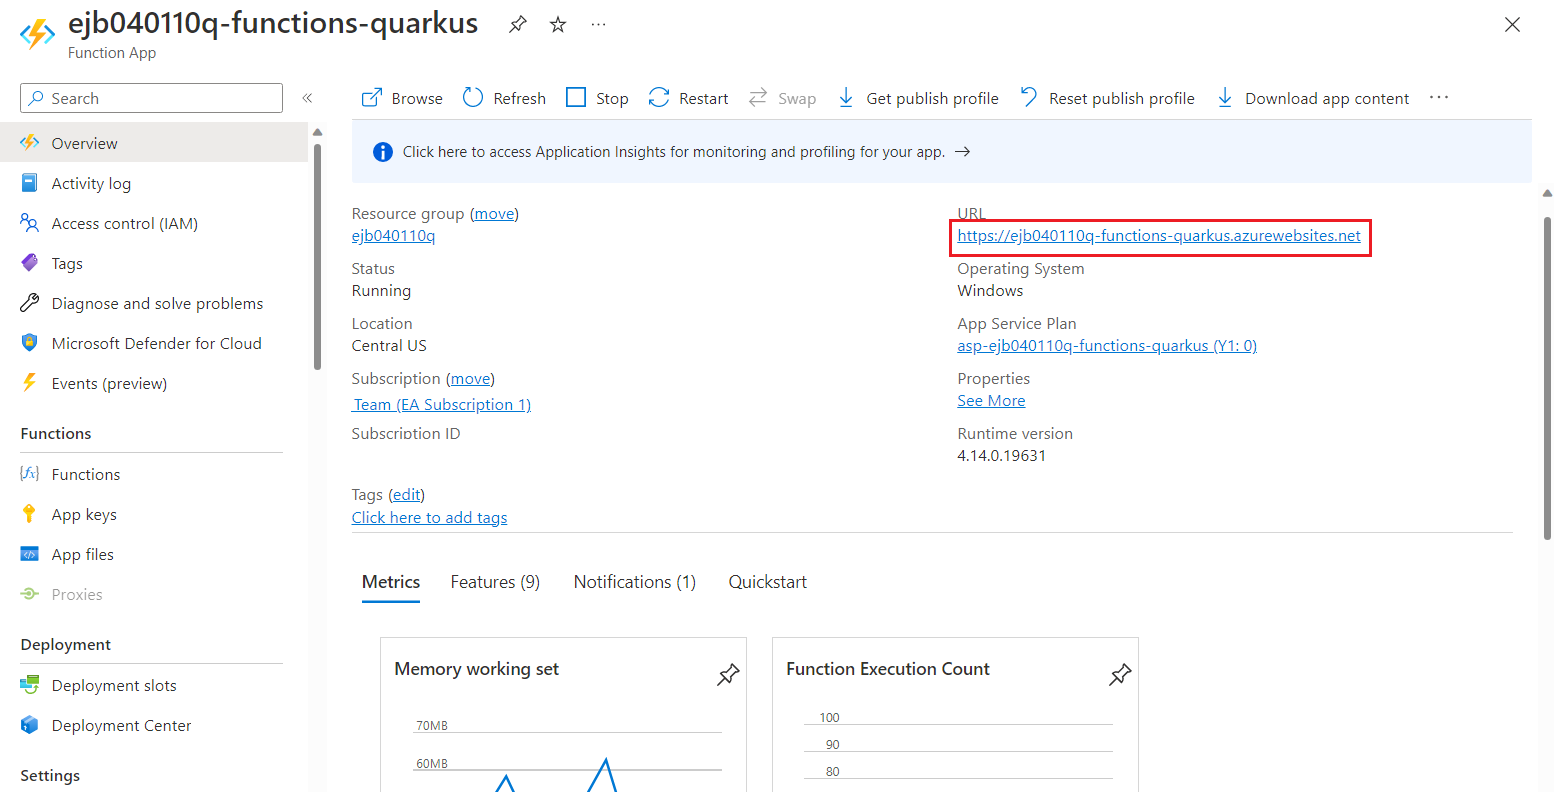
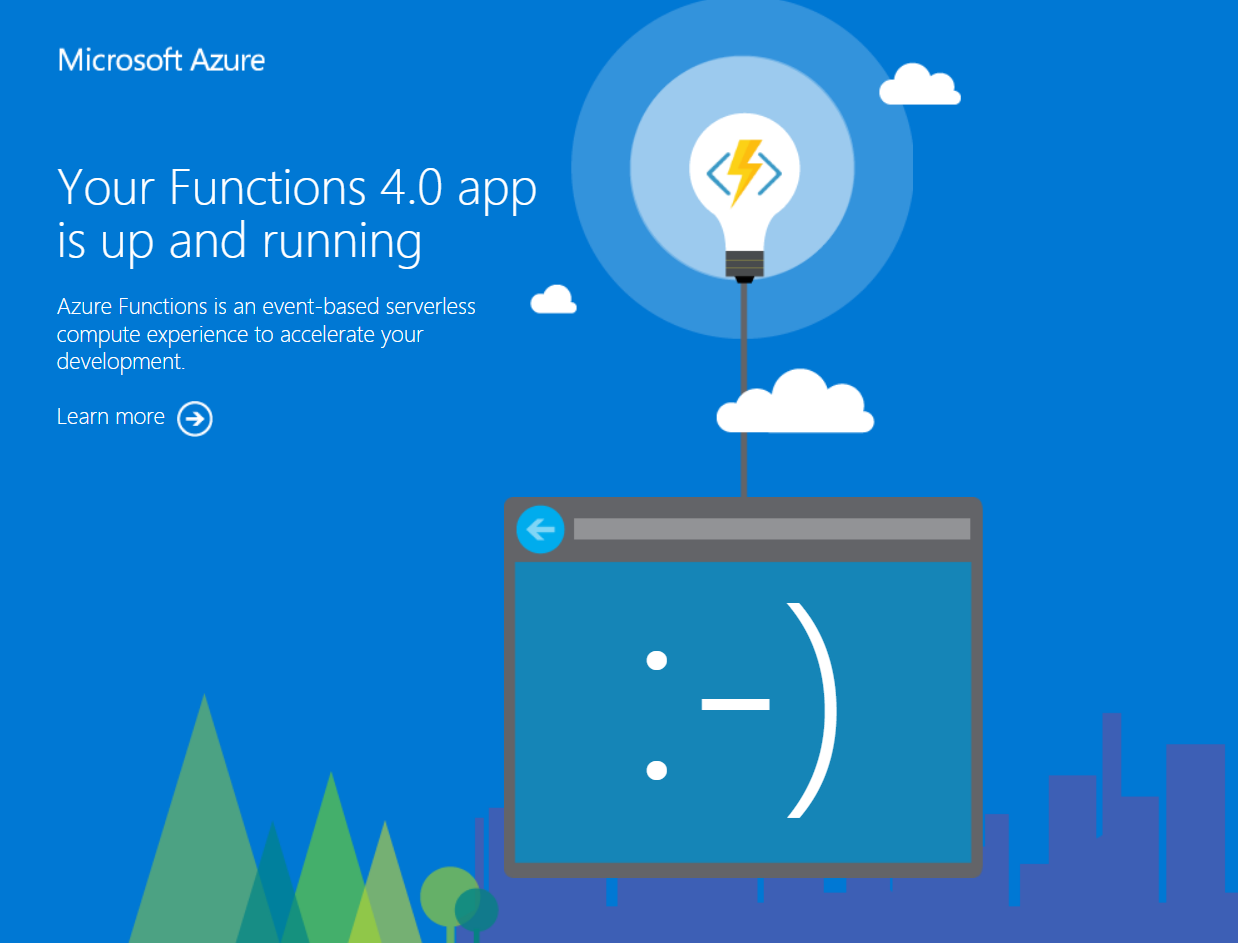
Confirm that the welcome page says your function app is "up and running."
Invoke the
greetingfunction by using the followingcurlcommand on your local terminal.Important
Replace
YOUR_HTTP_TRIGGER_URLwith your own function URL that you find in the Azure portal or output.curl -d '"Dan on Azure"' -X POST https://YOUR_HTTP_TRIGGER_URL/api/greetingThe output should look similar to the following:
"Welcome to build Serverless Java with Quarkus on Azure Functions, Dan on Azure"You can also access the other function (
funqyHello) by using the followingcurlcommand:curl https://YOUR_HTTP_TRIGGER_URL/api/funqyHelloThe output should be the same as what you observed earlier:
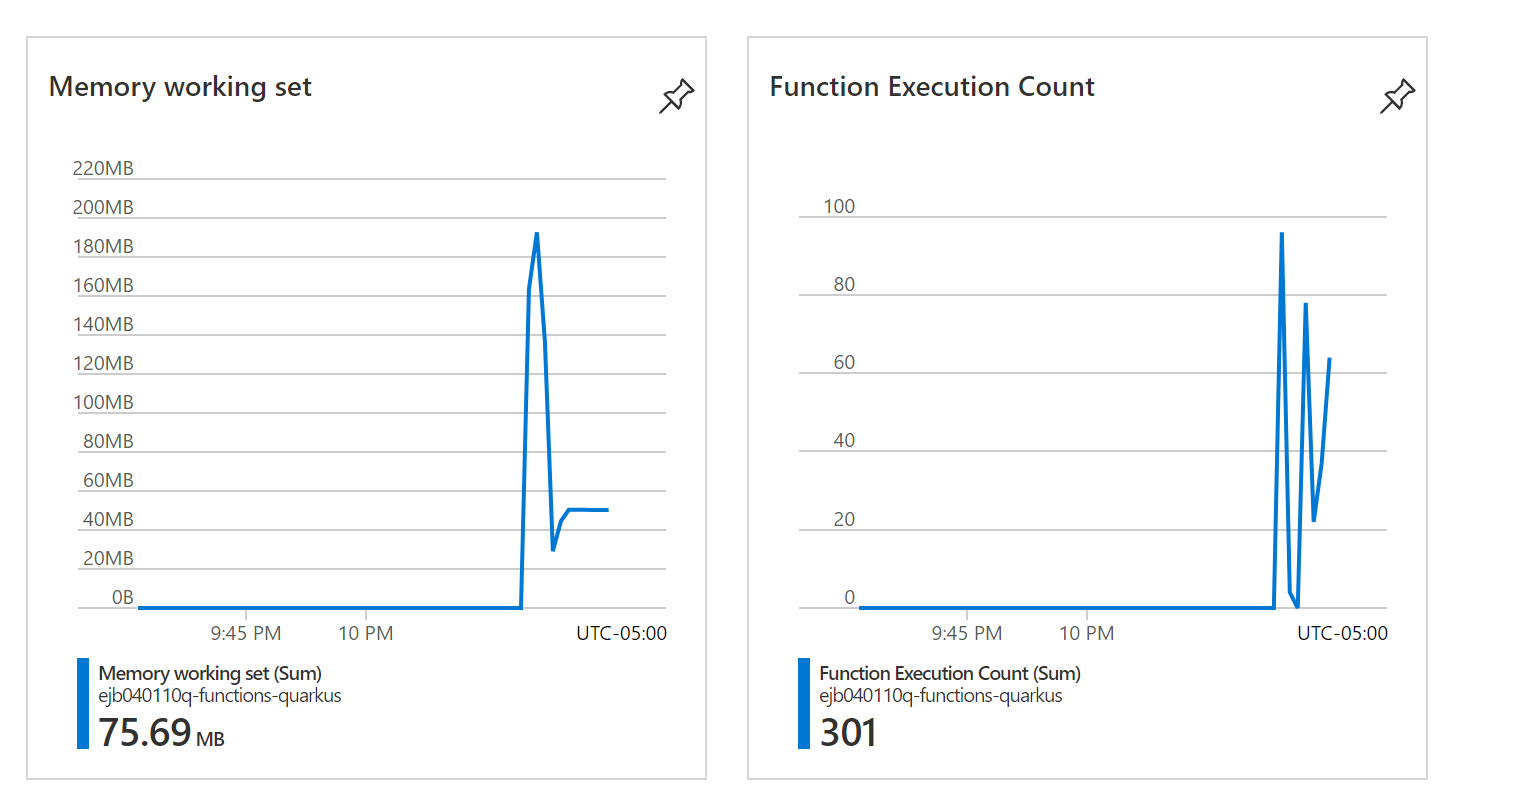
"hello funqy"If you want to exercise the basic metrics capability in the Azure portal, try invoking the function within a shell
forloop:for i in {1..100}; do curl -d '"Dan on Azure"' -X POST https://YOUR_HTTP_TRIGGER_URL/api/greeting; doneAfter a while, you'll see some metrics data in the portal.
Now that you've opened your Azure function in the portal, here are more features that you can access from the portal:
- Monitor the performance of your Azure function. For more information, see Monitoring Azure Functions.
- Explore telemetry. For more information, see Analyze Azure Functions telemetry in Application Insights.
- Set up logging. For more information, see Enable streaming execution logs in Azure Functions.
Clean up resources
If you don't need these resources, you can delete them by running the following command:
az group delete --name <yourResourceGroupName> --yes
Next steps
In this article, you learned how to:
- Run Quarkus dev mode.
- Deploy a Funqy app to Azure functions by using
azure-functions-maven-plugin. - Examine the performance of the function in the portal.
To learn more about Azure Functions and Quarkus, see the following articles and references: