Note
Access to this page requires authorization. You can try signing in or changing directories.
Access to this page requires authorization. You can try changing directories.
Applies to: ![]() Azure SQL Managed Instance
Azure SQL Managed Instance
This article teaches you how to prepare your environment for a Managed Instance link so that you can replicate between SQL Server installed to Windows or Linux and Azure SQL Managed Instance.
Note
You can automate preparing your environment for the Managed Instance link by using a downloadable script. For more information, see the Automating link setup blog.
Prerequisites
To create a link between SQL Server and Azure SQL Managed Instance, you need the following prerequisites:
- An active Azure subscription. If you don't have one, create a free account.
- A Supported version of SQL Server with the required service update.
- Azure SQL Managed Instance with an appropriate update policy. Get started if you don't have one.
- A server that you intend to be the initial primary. This choice determines where you should create the link from.
- Configuring a link from a SQL Managed Instance primary to a SQL Server 2025 secondary is only supported with SQL managed instances configured with the SQL Server 2025 update policy.
- Configuring a link from a SQL Managed Instance primary to a SQL Server 2022 secondary is only supported starting with SQL Server 2022 CU10 and with SQL managed instances configured with the SQL Server 2022 update policy.
Caution
When you create your SQL managed instance to use with the link feature, take into account the memory requirements for any In-Memory OLTP (Online Transaction Processing) features SQL Server uses. For more information, see Overview of Azure SQL Managed Instance resource limits.
Permissions
For SQL Server, you should have sysadmin permissions.
For Azure SQL Managed Instance, you should be a member of the SQL Managed Instance Contributor, or have the following permissions for a custom role:
| Microsoft.Sql/ resource | Necessary permissions |
|---|---|
| Microsoft.Sql/managedInstances | /read, /write |
| Microsoft.Sql/managedInstances/hybridCertificate | /action |
| Microsoft.Sql/managedInstances/databases | /read, /delete, /write, /completeRestore/action, /readBackups/action, /restoreDetails/read |
| Microsoft.Sql/managedInstances/distributedAvailabilityGroups | /read, /write, /delete, /setRole/action |
| Microsoft.Sql/managedInstances/endpointCertificates | /read |
| Microsoft.Sql/managedInstances/hybridLink | /read, /write, /delete |
| Microsoft.Sql/managedInstances/serverTrustCertificates | /write, /delete, /read |
Match performance capacity between replicas
When you use the link feature, it's important to match the performance capacity between SQL Server and SQL Managed Instance. This matching helps you avoid performance problems if the secondary replica can't keep up with replication from the primary replica, or after failover. Performance capacity includes CPU cores (or vCores in Azure), memory, and I/O throughput.
Prepare your SQL Server instance
To prepare your SQL Server instance, you need to validate that:
- You're on the minimum supported version.
- You've created a database master key in the
masterdatabase. - You've enabled the availability groups feature.
- You've added the proper trace flags at startup.
- Your backups use checksums.
- You've enabled accelerated database recovery if you're on SQL Server 2019 or later, and plan to use it on the target SQL managed instance.
- You've enabled Service Broker if you plan to use it on the target SQL managed instance.
You need to restart SQL Server for these changes to take effect.
Install service updates
Ensure that your SQL Server version has the appropriate servicing update installed, as listed in the version supportability table. If you need to install any updates, you must restart your SQL Server instance during the update.
To check your SQL Server version, run the following Transact-SQL (T-SQL) script on SQL Server:
-- Run on SQL Server
-- Shows the version and CU of the SQL Server
USE master;
GO
SELECT @@VERSION as 'SQL Server version';
Create a database master key in the master database
The link uses certificates to encrypt authentication and communication between SQL Server and SQL Managed Instance. The database master key protects the certificates used by the link. If you already have a database master key, you can skip this step.
Create database master key in the master database. Insert your password in place of <strong_password> in the following script, and keep it in a confidential and secure place. Run this T-SQL script on SQL Server:
-- Run on SQL Server
-- Create a master key
USE master;
GO
CREATE MASTER KEY ENCRYPTION BY PASSWORD = '<strong_password>';
To make sure that you have the database master key, use the following T-SQL script on SQL Server:
-- Run on SQL Server
USE master;
GO
SELECT * FROM sys.symmetric_keys WHERE name LIKE '%DatabaseMasterKey%';
Enable availability groups
The link feature relies on the Always On availability groups feature, which is disabled by default. For more information, see Enable the Always On availability groups feature.
Note
For SQL Server on Linux, see Enable Always On availability groups.
To confirm the availability groups feature is enabled, run the following T-SQL script on SQL Server:
-- Run on SQL Server
-- Is the availability groups feature enabled on this SQL Server
DECLARE @IsHadrEnabled sql_variant = (select SERVERPROPERTY('IsHadrEnabled'))
SELECT
    @IsHadrEnabled as 'Is HADR enabled',
    CASE @IsHadrEnabled
        WHEN 0 THEN 'Availability groups DISABLED.'
        WHEN 1 THEN 'Availability groups ENABLED.'
        ELSE 'Unknown status.'
    END
    as 'HADR status'
Important
For SQL Server 2016 (13.x), if you need to enable the availability groups feature, you must complete the extra steps documented in Prepare SQL Server 2016 prerequisites - Azure SQL Managed Instance link. These extra steps aren't required for SQL Server 2017 (14.x) and later versions supported by the link.
If the availability groups feature isn't enabled, follow these steps to enable it:
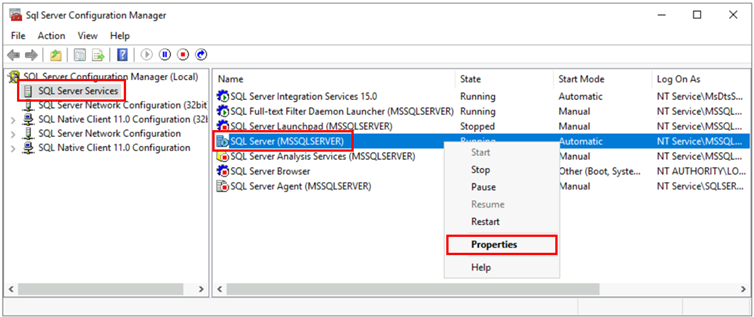
Select SQL Server Services from the left pane.
Right-click the SQL Server service, and then select Properties.
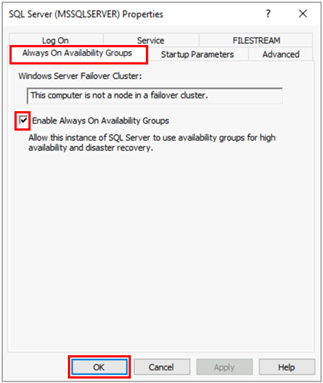
Go to the Always On Availability Groups tab.
Select the Enable Always On Availability Groups checkbox, and then select OK.
- If using SQL Server 2016 (13.x), and if Enable Always On Availability Groups option is disabled with the message
This computer is not a node in a failover cluster, follow the extra steps described in Prepare SQL Server 2016 prerequisites - Azure SQL Managed Instance link. Once you complete these other steps, come back and retry this step again.
- If using SQL Server 2016 (13.x), and if Enable Always On Availability Groups option is disabled with the message
Select OK in the dialog.
Restart the SQL Server service.
Enable startup trace flags
To optimize the performance of your link, we recommend enabling the following trace flags at startup:
-T1800: This trace flag optimizes performance when the log files for the primary and secondary replicas in an availability group are hosted on disks with different sector sizes, such as 512 bytes and 4 KB. If both primary and secondary replicas have a disk sector size of 4 KB, this trace flag isn't required. For more information, see KB3009974.-T9567: This trace flag enables compression of the data stream for availability groups during automatic seeding. The compression increases the load on the processor but can significantly reduce transfer time during seeding.
Note
For SQL Server on Linux, see Enable trace flags.
To enable these trace flags at startup, use the following steps:
Open SQL Server Configuration Manager.
Select SQL Server Services from the left pane.
Right-click the SQL Server service, and then select Properties.
Go to the Startup Parameters tab. In Specify a startup parameter, enter
-T1800and select Add to add the startup parameter. Then enter-T9567and select Add to add the other trace flag. Select Apply to save your changes.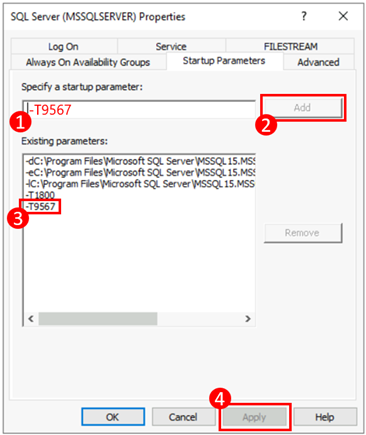
Select OK to close the Properties window.
For more information, see the syntax to enable trace flags.
Use backups with checksums
When you create a link, the initial seeding between the primary and secondary replicas is done by taking a full backup of the database on the primary replica, transferring it to the secondary replica, and restoring it there. When you take the full backup, we recommend that you use the WITH CHECKSUM option to ensure that the backup is valid and doesn't have any corruption. For more information, see BACKUP (Transact-SQL).
Restart SQL Server and validate the configuration
After you've ensured that you're on a supported version of SQL Server, enabled the Always On availability groups feature, and added your startup trace flags, restart your SQL Server instance to apply all of these changes:
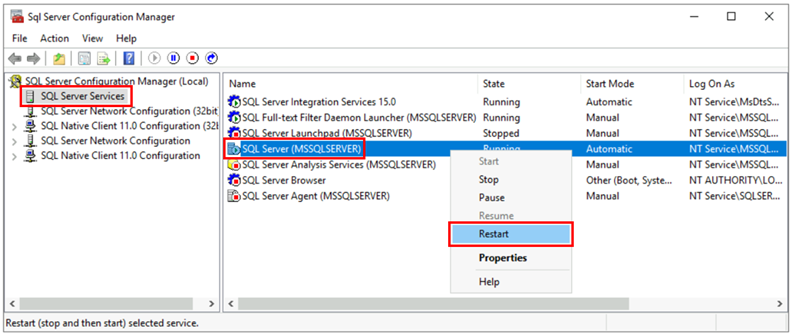
Open SQL Server Configuration Manager.
Select SQL Server Services from the left pane.
Right-click the SQL Server service, and then select Restart.
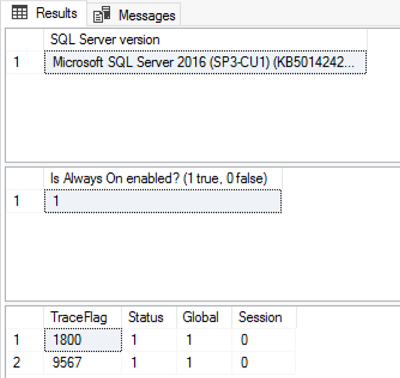
After the restart, run the following T-SQL script on SQL Server to validate the configuration of your SQL Server instance:
-- Run on SQL Server
-- Shows the version and CU of SQL Server
USE master;
GO
SELECT @@VERSION as 'SQL Server version';
GO
-- Shows if the Always On availability groups feature is enabled
SELECT SERVERPROPERTY ('IsHadrEnabled') as 'Is Always On enabled? (1 true, 0 false)';
GO
-- Lists all trace flags enabled on SQL Server
DBCC TRACESTATUS;
Your SQL Server version should be one of the supported versions applied with the appropriate service updates, the Always On availability groups feature should be enabled, and you should have the trace flags -T1800 and -T9567 enabled. The following screenshot is an example of the expected outcome for a properly configured SQL Server instance:
Enable accelerated database recovery
For SQL Server 2019 and later versions, enable accelerated database recovery, and ensure the persistent version store (PVS) is set to PRIMARY. If accelerated database recovery isn't enabled on the source SQL Server database, you can't enable it on the target SQL managed instance after the database is migrated. If the persistent version store (PVS) isn't set to PRIMARY, you can experience issues with restore operations on the target SQL managed instance.
For SQL Server 2017 and earlier versions, accelerated database recovery isn't supported, so this step isn't necessary.
To configure accelerated database recovery properly on the source SQL Server database, follow these steps:
Enable accelerated database recovery by running the following Transact-SQL script on SQL Server:
ALTER DATABASE [<database name>] SET ACCELERATED_DATABASE_RECOVERY = ON;The persistent version store (PVS) must be set to
PRIMARYon the source database, which is the default configuration. If this was changed previously, you must change it back to PRIMARY before starting the migration.
Enable Service Broker
Service Broker is enabled by default for all versions of SQL Server. If Service Broker was disabled and you plan to use it on SQL Managed Instance, enable Service Broker on the source SQL Server database before you migrate to SQL Managed Instance. If Service Broker isn't enabled on the source SQL Server database, you can't use it on the target SQL managed instance.
To check if Service Broker is enabled, run the following Transact-SQL script on SQL Server instance:
SELECT name AS [Database Name], is_broker_enabled AS [Service Broker Enabled]
FROM sys.databases
WHERE name = '<database name>';
If Service Broker is disabled, enable it by running the following Transact-SQL script on the source SQL Server database:
USE master;
GO

ALTER DATABASE [<database name>]
    SET ENABLE_BROKER;
GO
Configure network connectivity
For the link to work, you must have network connectivity between SQL Server and SQL Managed Instance. The network option that you choose depends on whether or not your SQL Server instance is on an Azure network.
SQL Server on Azure Virtual Machines
Deploying SQL Server on Azure Virtual Machines in the same Azure virtual network that hosts SQL Managed Instance is the simplest method, because network connectivity automatically exists between the two instances. For more information, see Quickstart: Configure an Azure VM to connect to Azure SQL Managed Instance.
If your SQL Server on Azure Virtual Machines instance is in a different virtual network from your SQL managed instance, you need to connect the two virtual networks. Virtual networks don't have to be in the same subscription for this scenario to work.
There are two options to connect virtual networks:
- Azure virtual network peering
- VNet-to-VNet VPN gateway (Azure portal, PowerShell, Azure CLI)
Peering is preferable because it uses the Microsoft backbone network. So, from a connectivity perspective, there's no noticeable difference in latency between virtual machines in a peered virtual network and in the same virtual network. Virtual network peering is supported between networks in the same region. Global virtual network peering is supported for instances hosted in subnets created after September 22, 2020. For more information, see Frequently asked questions (FAQ).
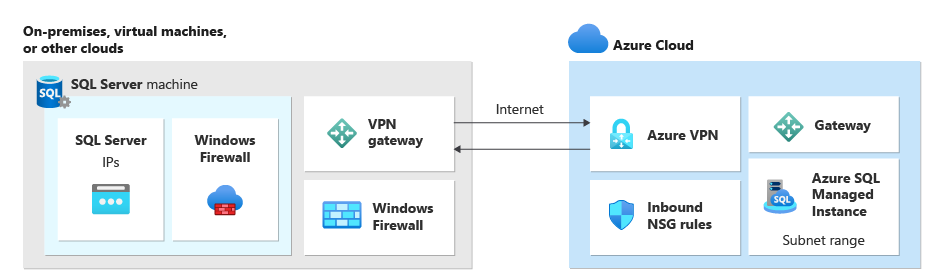
SQL Server outside Azure
If your SQL Server instance is hosted outside Azure, establish a VPN connection between SQL Server and SQL Managed Instance by using either of these options:
Tip
We recommend ExpressRoute for the best network performance when you're replicating data. Provision a gateway with enough bandwidth for your use case.
Network ports between the environments
Regardless of the connectivity mechanism, there are requirements that must be met for the network traffic to flow between the environments:
The Network Security Group (NSG) rules on the subnet hosting SQL Managed Instance needs to allow:
- Inbound port 5022 and port range 11000-11999 to receive traffic from the source SQL Server IP
- Outbound port 5022 to send traffic to the destination SQL Server IP
All firewalls on the network hosting SQL Server, and the host OS needs to allow:
- Inbound port 5022 opened to receive traffic from the source IP range of the MI subnet /24 (for example 10.0.0.0/24)
- Outbound ports 5022, and the port range 11000-11999 opened to send traffic to the destination IP range of MI subnet (example 10.0.0.0/24)
The following table describes port actions for each environment:
| Environment | What to do |
|---|---|
| SQL Server (in Azure) | Open both inbound and outbound traffic on port 5022 for the network firewall to the entire subnet IP range of SQL Managed Instance. If necessary, do the same on the SQL Server host OS (Windows/Linux) firewall. To allow communication on port 5022, create a network security group (NSG) rule in the virtual network that hosts the virtual machine (VM). |
| SQL Server (outside Azure) | Open both inbound and outbound traffic on port 5022 for the network firewall to the entire subnet IP range of SQL Managed Instance. If necessary, do the same on the SQL Server host OS (Windows/Linux) firewall. |
| SQL Managed Instance | Create an NSG rule in the Azure portal to allow inbound and outbound traffic from the IP address and the networking that hosts SQL Server on port 5022 and port range 11000-11999. |
To open ports in Windows Firewall, use the following PowerShell script on the Windows host OS of the SQL Server instance:
New-NetFirewallRule -DisplayName "Allow TCP port 5022 inbound" -Direction inbound -Profile Any -Action Allow -LocalPort 5022 -Protocol TCP
New-NetFirewallRule -DisplayName "Allow TCP port 5022 outbound" -Direction outbound -Profile Any -Action Allow -LocalPort 5022 -Protocol TCP
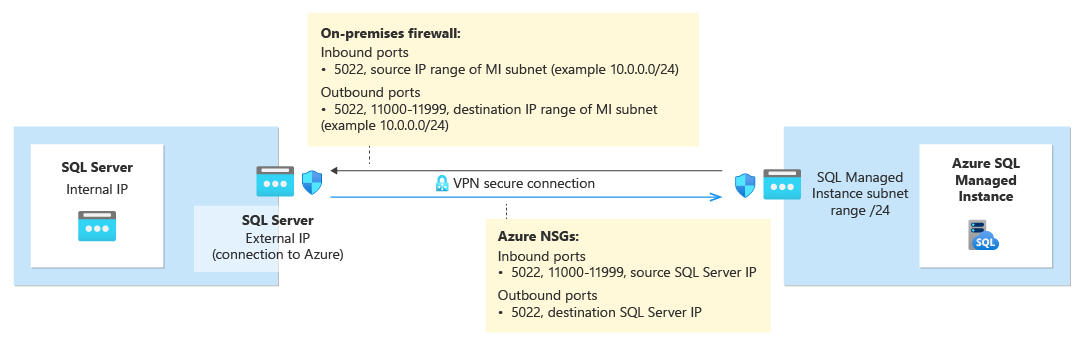
The following diagram shows an example of an on-premises network environment, indicating that all firewalls in the environment need to have open ports, including the OS firewall hosting the SQL Server, and any corporate firewalls and/or gateways:
Important
- Ports need to be open in every firewall in the networking environment, including the host server, and any corporate firewalls or gateways on the network. In corporate environments, you might need to show your network administrator the information in this section to help open additional ports in the corporate networking layer.
- While you can choose to customize the endpoint on the SQL Server side, port numbers for SQL Managed Instance can't be changed or customized.
- IP address ranges of subnets hosting managed instances, and SQL Server must not overlap.
Add URLs to allow list
Depending on your network security settings, it might be necessary to add URLs to your allow list for the SQL Managed Instance FQDN and some of the Resource Management endpoints used by Azure.
The following lists the resources that should be added to your allow list:
- The fully qualified domain name (FQDN) of your SQL Managed Instance. For example:
managedinstance.a1b2c3d4e5f6.database.windows.net. - Microsoft Entra Authority
- Microsoft Entra Endpoint Resource ID
- Resource Manager Endpoint
- Service Endpoint
Follow the steps in the Configure SSMS for government clouds section to access the Tools interface in SQL Server Management Studio (SSMS) and identify the specific URLs for the resources within your cloud you need to add to your allow list.
Test network connectivity
Bidirectional network connectivity between SQL Server and SQL Managed Instance is necessary for the link to work. After you open ports on the SQL Server side and configure an NSG rule on the SQL Managed Instance side, test connectivity by using either SQL Server Management Studio (SSMS) or Transact-SQL.
Test the network by creating a temporary SQL Agent job on both SQL Server and SQL Managed Instance to check the connection between the two instances. When you use Network Checker in SSMS, the job is automatically created for you, and deleted after the test completes. You need to manually delete the SQL Agent job if you test your network by using T-SQL.
Note
Executing PowerShell scripts by the SQL Server Agent on SQL Server on Linux is not currently supported, so it's not currently possible to execute Test-NetConnection from the SQL Server Agent job on SQL Server on Linux.
To use the SQL Agent to test network connectivity, you need the following requirements:
- The user doing the test must have permissions to create a job (either as a sysadmin or belongs to the SQLAgentOperator role for
msdb) for both SQL Server and SQL Managed Instance. - The SQL Server Agent service must be running on SQL Server. Since the Agent is on by default on SQL Managed Instance, no additional action is necessary.
Consider the following:
- To avoid false negatives, all firewalls along the network path must allow Internet Control Message Protocol (ICMP) traffic.
- To avoid false positives, all firewalls along the network path must allow traffic on the proprietary SQL Server UCS protocol. Blocking the protocol can lead to a successful connection test, but the link fails to create.
- Advanced firewall setups with packet-level guardrails in place need to be properly configured to properly allow traffic between SQL Server and SQL Managed Instance.
To test network connectivity between SQL Server and SQL Managed Instance in SSMS, follow these steps:
Connect to the instance that will be the primary replica in SSMS.
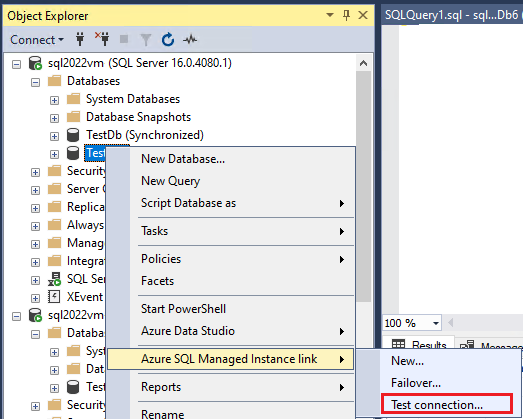
In Object Explorer, expand databases, and right-click the database you intend to link with the secondary. Select Tasks > Azure SQL Managed Instance link > Test Connection to open the Network Checker wizard:
Select Next on the Introduction page of the Network Checker wizard.
If all requirements are met on the Prerequisites page, select Next. Otherwise resolve any unmet prerequisites, and then select Re-run Validation.
On the Login page, select Login to connect to the other instance that will be the secondary replica. Select Next.
Check details on the Specify Network Options page and provide an IP address, if necessary. Select Next.
On the Summary page, review the actions the wizard takes and then select Finish to test the connection between the two replicas.
Review the Results page to validate connectivity exists between the two replicas, and then select Close to finish.


Caution
Proceed with the next steps only if you've validated network connectivity between your source and target environments. Otherwise, troubleshoot network connectivity issues before proceeding.
Migrate a certificate of a TDE-protected database (optional)
If you're linking a SQL Server database protected by Transparent Data Encryption (TDE) to a SQL managed instance, you must migrate the corresponding encryption certificate from the on-premises or Azure VM SQL Server instance to the SQL managed instance before using the link. For detailed steps, see Migrate a certificate of a TDE-protected database to Azure SQL Managed Instance.
SQL Managed Instance databases that are encrypted with service-managed TDE keys can't be linked to SQL Server. You can only link an encrypted database to SQL Server if it was encrypted with a customer-managed key and the destination server has access to the same key used to encrypt the database. For more information, see Set up SQL Server TDE with Azure Key Vault.
Note
Azure Key Vault is supported by SQL Server on Linux starting with Cumulative Update 14 for SQL Server 2022.
Install SSMS
SQL Server Management Studio (SSMS) is the easiest way to use the Managed Instance link. Install the latest version of SQL Server Management Studio (SSMS) on your client machine.
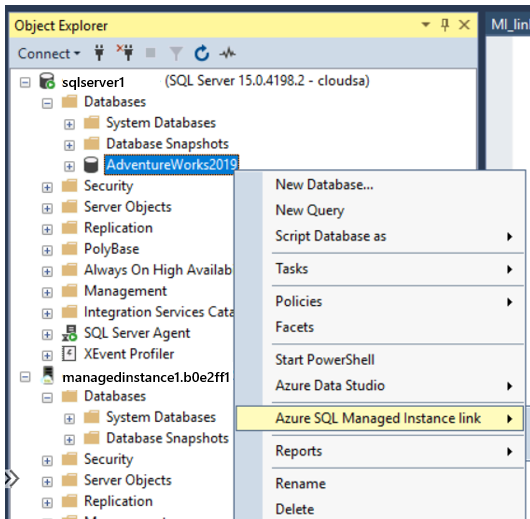
After installation finishes, open SSMS and connect to your supported SQL Server instance. Right-click a user database and validate that the Azure SQL Managed Instance link option appears on the menu.
Configure SSMS for government clouds
If you want to deploy your SQL Managed Instance to a government cloud, you need to modify your SQL Server Management Studio (SSMS) settings to use the correct cloud. If you're not deploying your SQL Managed Instance to a government cloud, skip this step.
To update your SSMS settings, follow these steps:
- Open SSMS.
- From the menu, select Tools and then choose Options.
- Expand Azure Services and select Azure Cloud.
- Under Select an Azure Cloud, use the dropdown list to choose AzureUSGovernment, or another government cloud, such as AzureChinaCloud:

If you want to go back to the public cloud, choose AzureCloud from the dropdown list.
Related content
To use the link:
- Configure link between SQL Server and SQL Managed instance with SSMS
- Configure link between SQL Server and SQL Managed instance with scripts
- Fail over the link
- Migrate with the link
- Best practices for maintaining the link
To learn more about the link:
For other replication and migration scenarios, consider: