Configure link with SSMS - Azure SQL Managed Instance
Applies to: ![]() Azure SQL Managed Instance
Azure SQL Managed Instance
This article teaches you how to configure a link between SQL Server and Azure SQL Managed Instance by using SQL Server Management Studio (SSMS). With the link, databases from your initial primary are replicated to your secondary replica in near-real time.
After the link is created, you can then fail over to your secondary replica for the purpose of migration, or disaster recovery.
Note
- It's also possible to configure the link by using scripts.
- Configuring Azure SQL Managed Instance as your initial primary is supported starting with SQL Server 2022 CU10.
Overview
Use the link feature to replicate databases from your initial primary to your secondary replica. For SQL Server 2022, the initial primary can be either SQL Server or Azure SQL Managed Instance. For SQL Server 2019 and earlier versions, the initial primary must be SQL Server. After the link is configured, the database from the initial primary is replicated to the secondary replica.
You can choose to leave the link in place for continuous data replication in a hybrid environment between the primary and secondary replica, or you can fail over the database to the secondary replica, to migrate to Azure, or for disaster recovery. For SQL Server 2019 and earlier versions, failing over to Azure SQL Managed Instance breaks the link and fail back is unsupported. With SQL Server 2022, you have the option to maintain the link and fail back and forth between the two replicas.
If you plan to use your secondary managed instance for only disaster recovery, you can save on licensing costs by activating the hybrid failover benefit.
Use the instructions in this article to manually set up the link between SQL Server and Azure SQL Managed Instance. After the link is created, your source database gets a read-only copy on your target secondary replica.
Prerequisites
To replicate your databases to your secondary replica through the link, you need the following prerequisites:
- An active Azure subscription. If you don't have one, create a free account.
- Supported version of SQL Server with required service update installed.
- Azure SQL Managed Instance. Get started if you don't have it.
- SQL Server Management Studio v19.2 or later.
- A properly prepared environment.
Consider the following:
- The link feature supports one database per link. To replicate multiple databases from an instance, create a link for each individual database. For example, to replicate 10 databases to SQL Managed Instance, create 10 individual links.
- Collation between SQL Server and SQL Managed Instance should be the same. A mismatch in collation could cause a mismatch in server name casing and prevent a successful connection from SQL Server to SQL Managed Instance.
- Error 1475 on your initial SQL Server primary indicates that you need to start a new backup chain by creating a full backup without the
COPY ONLYoption. - To establish a link, or fail over, from SQL Managed Instance to SQL Server 2022, your managed instance must be configured with the SQL Server 2022 update policy. Data replication and failover from SQL Managed Instance to SQL Server 2022 is not supported by instances configured with the Always-up-to-date update policy.
- While you can establish a link from SQL Server 2022 to a SQL managed instance configured with the Always-up-to-date update policy, after failover to SQL Managed Instance, you will no longer be able to replicate data or fail back to SQL Server 2022.
Permissions
For SQL Server, you should have sysadmin permissions.
For Azure SQL Managed Instance, you should be a member of the SQL Managed Instance Contributor, or have the following custom role permissions:
| Microsoft.Sql/ resource | Necessary permissions |
|---|---|
| Microsoft.Sql/managedInstances | /read, /write |
| Microsoft.Sql/managedInstances/hybridCertificate | /action |
| Microsoft.Sql/managedInstances/databases | /read, /delete, /write, /completeRestore/action, /readBackups/action, /restoreDetails/read |
| Microsoft.Sql/managedInstances/distributedAvailabilityGroups | /read, /write, /delete, /setRole/action |
| Microsoft.Sql/managedInstances/endpointCertificates | /read |
| Microsoft.Sql/managedInstances/hybridLink | /read, /write, /delete |
| Microsoft.Sql/managedInstances/serverTrustCertificates | /write, /delete, /read |
Prepare databases
If SQL Server is your initial primary, you need to create a backup of your database. Since Azure SQL Managed Instance takes backups automatically, skip this step if SQL Managed Instance is your initial primary.
Use SSMS to back up your database on SQL Server. Follow these steps:
- Connect to your SQL Server in SQL Server Management Studio (SSMS).
- In Object Explorer, right-click the database, hover over Tasks and then choose Back up.
- Choose Full for backup type.
- Ensure the Back up to option has the backup path to a disk with sufficient free storage space available.
- Select OK to complete the full backup.
For more information, see Create a Full Database Backup.
Note
The link supports replicating user databases only. Replication of system databases is not supported. To replicate instance-level objects (stored in master or msdb), script them out and run T-SQL scripts on the destination instance.
Create link to replicate database
In the following steps, use the New Managed Instance link wizard in SSMS to create a link between your initial primary and your secondary replica.
After you create the link, your source database gets a read-only copy on your target secondary replica.
Open SSMS and connect to your initial primary.
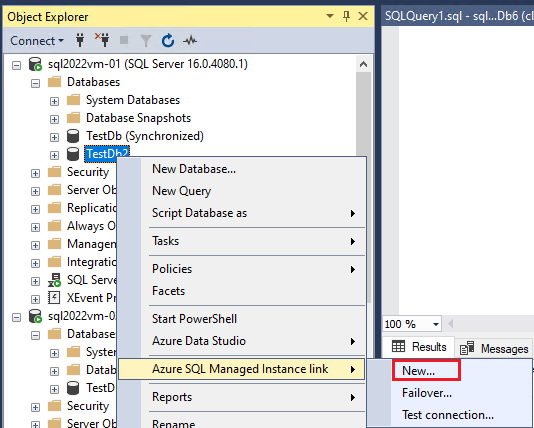
In Object Explorer, right-click the database you want to link to the secondary, hover over Azure SQL Managed Instance link, and select New... to open the New Managed Instance link wizard. If your SQL Server version isn't supported, the option isn't available in the context menu.
On the Introduction page of the wizard, select Next.
On the Specify Link Options page, provide a name for your link - if you select multiple databases, then the database name is automatically appended to the end of the name you provide so you don't have to include it yourself. Check the boxes if you want to enable connectivity troubleshooting and, for SQL Server 2022, if you plan to use the link for two-way disaster recovery. Select Next.
On the Requirements page, the wizard validates requirements to establish a link to your secondary. Select Next after all the requirements are validated, or resolve any requirements that aren't met and then select Re-run Validation.
On the Select Databases page, choose the database you want to replicate to your secondary replica via the link. Selecting multiple databases create multiple distributed availability groups, one for each link. Select Next.
On the Specify Secondary Replica page, select Add secondary replica add your secondary replica. If your initial primary is SQL Server, this opens the Sign In to Azure window. If your initial primary is SQL Managed Instance, this opens the Connect to server dialog box.
- For a SQL Server initial primary, sign in to Azure, choose the subscription, resource group, and secondary SQL Server managed instance from the dropdown. Select Login to open the Connect to Server dialog box and then connect to the SQL Managed Instance you want to replicate your database to. When you see Login successful on the Sign in window, select OK to close window and go back to the New Managed Instance link wizard.
- For a SQL Managed Instance initial primary, connect to the SQL Server instance you want to replicate your database to.
Note
If you want establish a link to an availability group that already exists, then provide the IP address of the existing listener in the Endpoint URL field on the Endpoints tab of the Specify Secondary Replica page.
After adding your secondary replica, use the tabs in the wizard to modify Endpoint settings if you need to, and review information about backups and the link endpoint in the remaining tabs. Select Next when you're ready to proceed.
If SQL Managed Instance is your initial primary, the next page in the wizard is the Login to Azure page. Sign in again if you need to, and then select Next. This page isn't available when SQL Server is your initial primary.
On the Validation page, make sure all validations are successful. If any fail, resolve them, and then rerun the validation. Select Next when ready.
On the Summary page, review your configuration once more. Optionally, select Script to generate a script so you can easily recreate the same link in the future. Select Finish when you're ready to create the link.
The Executing actions page displays the progress of each action.
After all steps finish, the Results page shows check marks next to the successfully completed actions. You can now close the window.
View a replicated database
After the link is created, your database is replicated to the secondary replica. Depending on database size and network speed, the database might initially be in a Restoring state on the secondary replica. After initial seeding finishes, the database is restored to the secondary replica and ready for read-only workloads.
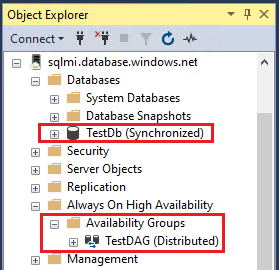
On either replica, use Object Explorer in SSMS to view the Synchronized state of the replicated database.
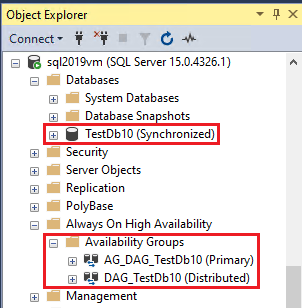
Expand Always On High Availability and Availability Groups to view the distributed availability group created for each link.
Regardless of which instance is primary, you can also right-click the linked distributed availability group on SQL Server and select Show Dashboard to view the dashboard for the distributed availability group, which shows the status of the linked database in the distributed availability group.
Take first transaction log backup
If SQL Server is your initial primary, it's important to take the first transaction log backup on SQL Server after initial seeding completes, when the database is no longer in the Restoring... state on Azure SQL Managed Instance. Then take SQL Server transaction log backups regularly to minimize excessive log growth while SQL Server is in the primary role.
If SQL Managed Instance is your primary, you don't need to take any action as Azure SQL Managed Instance takes log backups automatically.
Drop a link
If you want to drop the link, either because it's no longer needed, or because it's in an irreparable state and needs to be recreated, you can do so with SQL Server Management Studio (SSMS).
You can delete the link from the following menu options in Object Explorer of SSMS, after connecting to your instance:
- Always On Availability Groups > Availability Groups > Right-click the distributed availability group name associated with the link > Delete...
- Databases > Right-click the database associated with the link > Azure SQL Managed Instance link > Delete...
Troubleshoot
If you encounter an error message when you create the link, select the error to open a window with additional details about the error.
If you encounter an error when working with the link, the SSMS wizard stops execution at the step that failed, and can't be restarted again. Address the issue, and, if necessary, clean up the environment to revert back to the original state by removing the distributed availability group and availability group if it was created while setting up the link. Then launch the wizard again to start over.
Related content
To use the link:
- Prepare environment for the Managed Instance link
- Configure link between SQL Server and SQL Managed instance with scripts
- Fail over the link
- Migrate with the link
- Best practices for maintaining the link
To learn more about the link:
For other replication and migration scenarios, consider: