How to set up Windows Authentication for Microsoft Entra ID with the incoming trust-based flow
This article describes how to implement the incoming trust-based authentication flow to allow Active Directory (AD) joined clients running Windows 10, Windows Server 2012, or higher versions of Windows to authenticate to an Azure SQL Managed Instance using Windows Authentication.
This article also includes steps to rotate a Kerberos Key for your service account in Microsoft Entra ID (formerly Azure Active Directory) and Trusted Domain Object, and steps to remove a Trusted Domain Object and all Kerberos settings, if desired.
Enabling the incoming trust-based authentication flow is one step in setting up Windows Authentication for Azure SQL Managed Instance using Microsoft Entra ID and Kerberos. The modern interactive flow is available for enlightened clients running Windows 10 20H1, Windows Server 2022, or a higher version of Windows.
Note
Microsoft Entra ID was previously known as Azure Active Directory (Azure AD).
Permissions
To complete the steps outlined in this article, you need:
- An on-premises Active Directory administrator username and password.
- Microsoft Entra Global Administrator account username and password.
Prerequisites
To implement the incoming trust-based authentication flow, first, ensure that the following prerequisites have been met:
| Prerequisite | Description |
|---|---|
| Client must run Windows 10, Windows Server 2012, or a higher version of Windows. | |
| Clients must be joined to AD. The domain must have a functional level of Windows Server 2012 or higher. | You can determine if the client is joined to AD by running the dsregcmd command: dsregcmd.exe /status |
| Azure AD Hybrid Authentication Management Module. | This PowerShell module provides management features for on-premises setup. |
| Azure tenant. | |
| Azure subscription under the same Microsoft Entra tenant you plan to use for authentication. | |
| Microsoft Entra Connect installed. | Hybrid environments where identities exist both in Microsoft Entra ID and AD. |
Create and configure the Microsoft Entra Kerberos Trusted Domain Object
To create and configure the Microsoft Entra Kerberos Trusted Domain Object, you install the Azure AD Hybrid Authentication Management PowerShell module.
You'll then use the Azure AD Hybrid Authentication Management PowerShell module to set up a Trusted Domain Object in the on-premises AD domain and register trust information with Microsoft Entra ID. This creates an in-bound trust relationship into the on-premises AD, which enables Microsoft Entra ID to trust on-premises AD.
Set up the Trusted Domain Object
To set up the Trusted Domain Object, first install the Azure AD Hybrid Authentication Management PowerShell module.
Install the Azure AD Hybrid Authentication Management PowerShell module
Start a Windows PowerShell session with the Run as administrator option.
Install the Azure AD Hybrid Authentication Management PowerShell module using the following script. The script:
- Enables TLS 1.2 for communication.
- Installs the NuGet package provider.
- Registers the PSGallery repository.
- Installs the PowerShellGet module.
- Installs the Azure AD Hybrid Authentication Management PowerShell module.
- The Azure AD Hybrid Authentication Management PowerShell uses the AzureADPreview module, which provides advanced Microsoft Entra management feature.
- To protect against unnecessary installation conflicts with the Azure AD PowerShell module, this command includes the –AllowClobber option flag.
[Net.ServicePointManager]::SecurityProtocol = [Net.SecurityProtocolType]::Tls12

Install-PackageProvider -Name NuGet -Force

if (@(Get-PSRepository | ? {$_.Name -eq "PSGallery"}).Count -eq 0){
    Register-PSRepository -DefaultSet-PSRepository -Name "PSGallery" -InstallationPolicy Trusted
}

Install-Module -Name PowerShellGet -Force

Install-Module -Name AzureADHybridAuthenticationManagement -AllowClobber
Create the Trusted Domain Object
Start a Windows PowerShell session with the Run as administrator option.
Set the common parameters. Customize the script below prior to running it.
- Set the
$domainparameter to your on-premises Active Directory domain name. - When prompted by
Get-Credential, enter an on-premises Active Directory administrator username and password. - Set the
$cloudUserNameparameter to the username of a Global Administrator privileged account for Microsoft Entra cloud access.
Note
If you wish to use your current Windows login account for your on-premises Active Directory access, you can skip the step where credentials are assigned to the
$domainCredparameter. If you take this approach, do not include the-DomainCredentialparameter in the PowerShell commands following this step.$domain = "your on-premesis domain name, for example contoso.com" $domainCred = Get-Credential $cloudUserName = "Azure AD user principal name, for example admin@contoso.onmicrosoft.com"- Set the
Check the current Kerberos Domain Settings.
Run the following command to check your domain's current Kerberos settings:
Get-AzureAdKerberosServer -Domain $domain `
    -DomainCredential $domainCred `
    -UserPrincipalName $cloudUserName
If this is the first time calling any Microsoft Entra Kerberos command, you're prompted for Microsoft Entra cloud access.
- Enter the password for your Microsoft Entra Global Administrator account.
- If your organization uses other modern authentication methods such as Microsoft Entra multifactor authentication or Smart Card, follow the instructions as requested for sign in.
If this is the first time you're configuring Microsoft Entra Kerberos settings, the Get-AzureAdKerberosServer cmdlet displays empty information, as in the following sample output:
ID                  :
UserAccount         :
ComputerAccount     :
DisplayName         :
DomainDnsName       :
KeyVersion          :
KeyUpdatedOn        :
KeyUpdatedFrom      :
CloudDisplayName    :
CloudDomainDnsName  :
CloudId             :
CloudKeyVersion     :
CloudKeyUpdatedOn   :
CloudTrustDisplay   :
If your domain already supports FIDO authentication, the
Get-AzureAdKerberosServercmdlet displays Microsoft Entra service account information, as in the following sample output. TheCloudTrustDisplayfield returns an empty value.ID : 25614 UserAccount : CN=krbtgt-AzureAD, CN=Users, DC=aadsqlmi, DC=net ComputerAccount : CN=AzureADKerberos, OU=Domain Controllers, DC=aadsqlmi, DC=net DisplayName : krbtgt_25614 DomainDnsName : aadsqlmi.net KeyVersion : 53325 KeyUpdatedOn : 2/24/2022 9:03:15 AM KeyUpdatedFrom : ds-aad-auth-dem.aadsqlmi.net CloudDisplayName : krbtgt_25614 CloudDomainDnsName : aadsqlmi.net CloudId : 25614 CloudKeyVersion : 53325 CloudKeyUpdatedOn : 2/24/2022 9:03:15 AM CloudTrustDisplay :Add the Trusted Domain Object.
Run the Set-AzureAdKerberosServer PowerShell cmdlet to add the Trusted Domain Object. Be sure to include
-SetupCloudTrustparameter. If there's no Microsoft Entra service account, this command creates a new Microsoft Entra service account. This command will only create the requested Trusted Domain object if there's a Microsoft Entra service account.Set-AzureADKerberosServer -Domain $domain -UserPrincipalName $cloudUserName -DomainCredential $domainCred -SetupCloudTrustNote
On a multiple domain forest, to avoid the error LsaCreateTrustedDomainEx 0x549 when running the command on a child domain:
- Run the command on root domain (include
-SetupCloudTrustparameter). - Run the same command on the child domain without the
-SetupCloudTrustparameter.
After creating the Trusted Domain Object, you can check the updated Kerberos Settings using the
Get-AzureAdKerberosServerPowerShell cmdlet, as shown in the previous step. If theSet-AzureAdKerberosServercmdlet has been run successfully with the-SetupCloudTrustparameter, theCloudTrustDisplayfield should now returnMicrosoft.AzureAD.Kdc.Service.TrustDisplay, as in the following sample output:ID : 25614 UserAccount : CN=krbtgt-AzureAD, CN=Users, DC=aadsqlmi, DC=net ComputerAccount : CN=AzureADKerberos, OU=Domain Controllers, DC=aadsqlmi, DC=net DisplayName : krbtgt_25614 DomainDnsName : aadsqlmi.net KeyVersion : 53325 KeyUpdatedOn : 2/24/2022 9:03:15 AM KeyUpdatedFrom : ds-aad-auth-dem.aadsqlmi.net CloudDisplayName : krbtgt_25614 CloudDomainDnsName : aadsqlmi.net CloudId : 25614 CloudKeyVersion : 53325 CloudKeyUpdatedOn : 2/24/2022 9:03:15 AM CloudTrustDisplay : Microsoft.AzureAD.Kdc.Service.TrustDisplayNote
Azure sovereign clouds require setting the
TopLevelNamesproperty, which is set towindows.netby default. Azure sovereign cloud deployments of SQL Managed Instance use a different top-level domain name, such asusgovcloudapi.netfor Azure US Government. Set your Trusted Domain Object to that top-level domain name using the following PowerShell command:Set-AzureADKerberosServer -Domain $domain -DomainCredential $domainCred -CloudCredential $cloudCred -SetupCloudTrust -TopLevelNames "usgovcloudapi.net,windows.net". You can verify the setting with the following PowerShell command:Get-AzureAdKerberosServer -Domain $domain -DomainCredential $domainCred -UserPrincipalName $cloudUserName | Select-Object -ExpandProperty CloudTrustDisplay.- Run the command on root domain (include
Configure the Group Policy Object (GPO)
Identify your Microsoft Entra tenant ID.
Deploy the following Group Policy setting to client machines using the incoming trust-based flow:
Edit the Administrative Templates\System\Kerberos\Specify KDC proxy servers for Kerberos clients policy setting.
Select Enabled.
Under Options, select Show.... This opens the Show Contents dialog box.
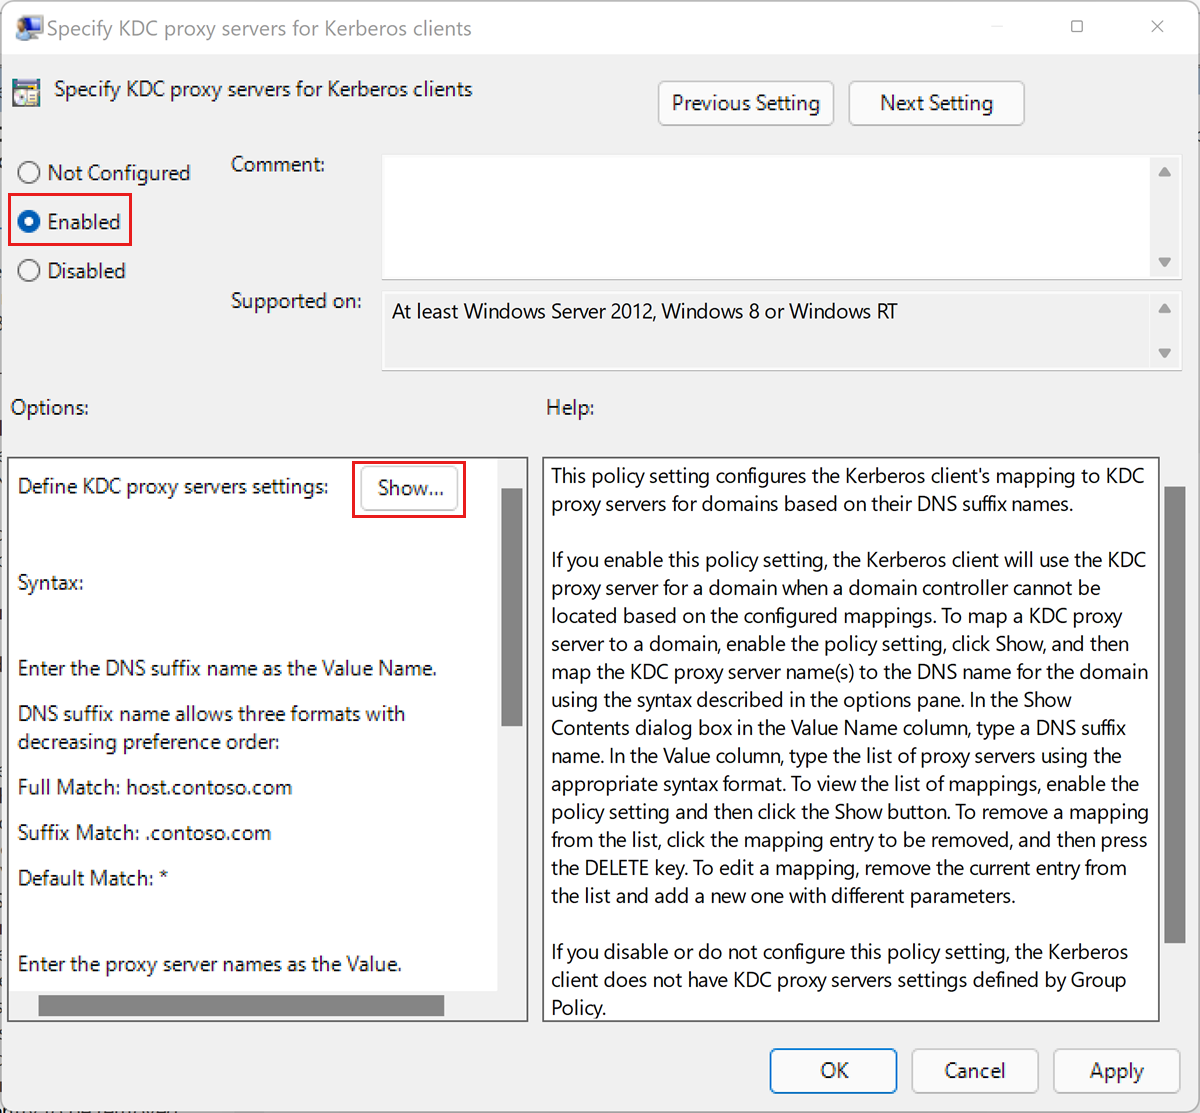
Define the KDC proxy servers settings using mappings as follows. Substitute your Microsoft Entra tenant ID for the
your_Azure_AD_tenant_idplaceholder. Note the space followinghttpsand before the closing/in the value mapping.Value name Value KERBEROS.MICROSOFTONLINE.COM <https login.microsoftonline.com:443: your_Azure_AD_tenant_id/kerberos />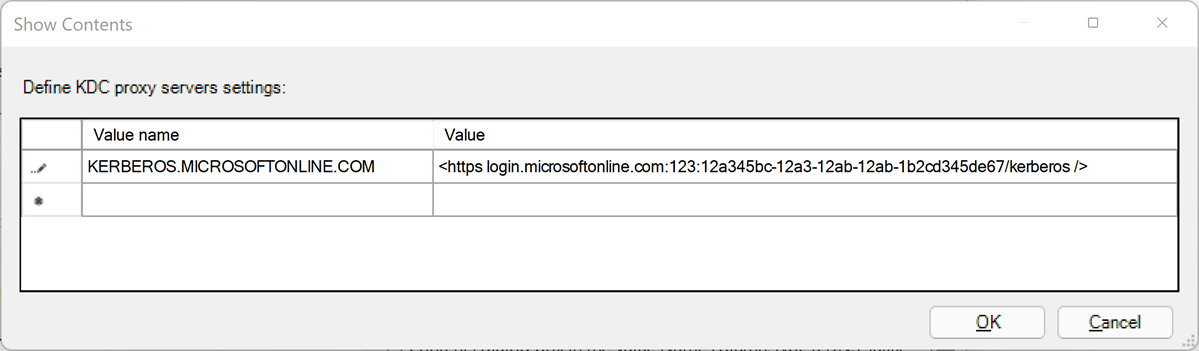
Select OK to close the 'Show Contents' dialog box.
Select Apply on the 'Specify KDC proxy servers for Kerberos clients' dialog box.


Rotate the Kerberos Key
You may periodically rotate the Kerberos Key for the created Microsoft Entra service account and Trusted Domain Object for management purposes.
Set-AzureAdKerberosServer -Domain $domain `
   -DomainCredential $domainCred `
   -UserPrincipalName $cloudUserName -SetupCloudTrust `
   -RotateServerKey
Once the key is rotated, it takes several hours to propagate the changed key between the Kerberos KDC servers. Due to this key distribution timing, you can rotate the key once within 24 hours. If you need to rotate the key again within 24 hours for any reason, for example, just after creating the Trusted Domain Object, you can add the -Force parameter:
Set-AzureAdKerberosServer -Domain $domain `
   -DomainCredential $domainCred `
   -UserPrincipalName $cloudUserName -SetupCloudTrust `
   -RotateServerKey -Force
Remove the Trusted Domain Object
You can remove the added Trusted Domain Object using the following command:
Remove-AzureADKerberosServerTrustedDomainObject -Domain $domain `
   -DomainCredential $domainCred `
   -UserPrincipalName $cloudUserName
This command will only remove the Trusted Domain Object. If your domain supports FIDO authentication, you can remove the Trusted Domain Object while maintaining the Microsoft Entra service account required for the FIDO authentication service.
Remove all Kerberos Settings
You can remove both the Microsoft Entra service account and the Trusted Domain Object using the following command:
Remove-AzureAdKerberosServer -Domain $domain `
   -DomainCredential $domainCred `
   -UserPrincipalName $cloudUserName
Next steps
Learn more about implementing Windows Authentication for Microsoft Entra principals on Azure SQL Managed Instance: