Note
Access to this page requires authorization. You can try signing in or changing directories.
Access to this page requires authorization. You can try changing directories.
The Azure VMware Solution private gives you the ability to deploy a vSphere cluster in Azure. For each private cloud created, there's one vSAN cluster by default. You can add, delete, and scale clusters. The minimum number of hosts per cluster is three. More hosts can be added one at a time, up to a maximum of 16 hosts per cluster. The maximum number of clusters per private cloud is 12. The initial deployment of Azure VMware Solution has three hosts.
You use vCenter Server and NSX-T Manager to manage most other aspects of cluster configuration or operation. All local storage of each host in a cluster is under the control of vSAN.
Tip
You can always extend the cluster and add more clusters later if you need to go beyond the initial deployment number.
Because Azure VMware Solution doesn't allow you to manage your private cloud with your cloud vCenter Server at launch, you need to do more steps for the configuration. This tutorial covers these steps and related prerequisites.
In this tutorial, learn how to:
- Create an Azure VMware Solution private cloud
- Verify the private cloud deployed
Prerequisites
- Appropriate administrative rights and permission to create a private cloud. You must be at minimum contributor level in the subscription.
- Follow the information you gathered in the planning tutorial to deploy Azure VMware Solution.
- Ensure you have the appropriate networking configured as described in the Network planning checklist.
- Hosts provisioned and the Microsoft.AVS resource provider is registered.
Create a private cloud
You can create an Azure VMware Solution private cloud using the Azure portal or the Azure CLI.
Sign in to the Azure portal.
Note
If you need access to the Azure US Gov portal, go to https://portal.azure.us/
Select Create a resource.
In the Search services and marketplace text box, type
Azure VMware Solutionand select it from the search results.On the Azure VMware Solution window, select Create.
If you need more hosts, request a host quota increase.
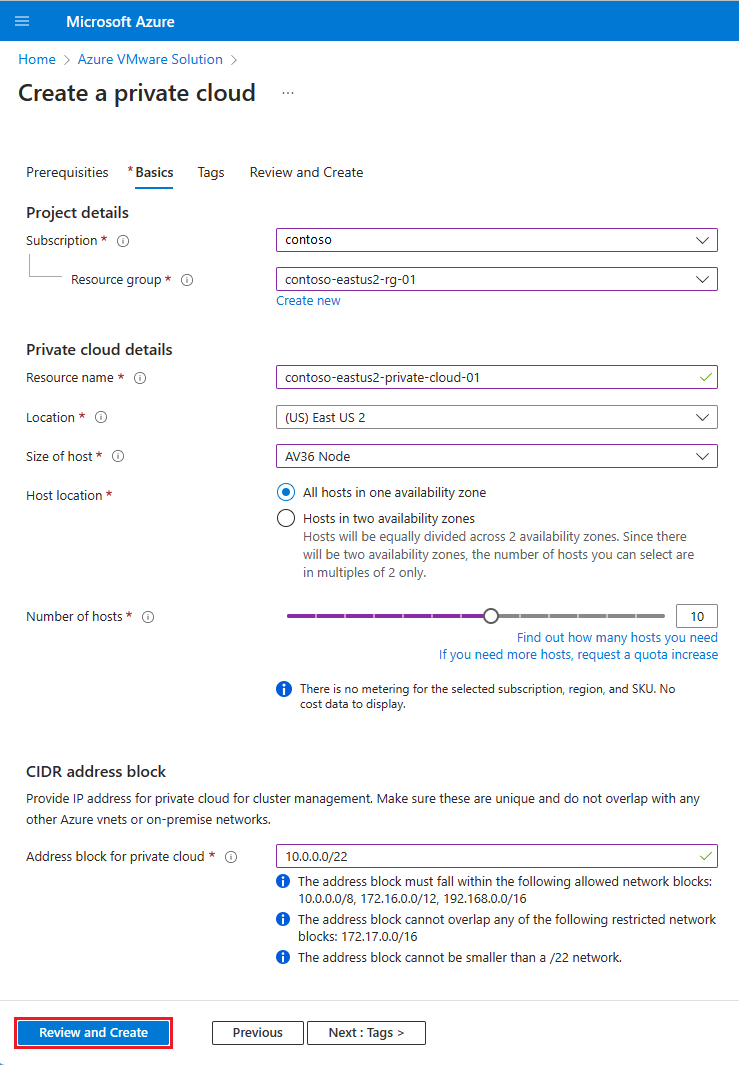
On the Basics tab, enter values for the fields and then select Review + Create.
Tip
You gathered this information during the planning phase of this quick start.
Field Value Subscription Select the subscription you plan to use for the deployment. All resources in an Azure subscription are billed together. Resource group Select the resource group for your private cloud. An Azure resource group is a logical container into which Azure resources are deployed and managed. Alternatively, you can create a new resource group for your private cloud. Resource name Provide the name of your Azure VMware Solution private cloud. Location Select a location, such as (US) East US 2. It's the region you defined during the planning phase. Size of host Select the AV36, AV36P or AV52 SKU. Host Location Select All hosts in one availability zone for a standard private cloud or Hosts in two availability zones for stretched clusters. Number of hosts Number of hosts allocated for the private cloud cluster. The default value is 3, which you can increase or decrease after deployment. If these nodes aren't listed as available, contact support to request a quota increase. You can also select the link labeled If you need more hosts, request a quota increase in the Azure portal. Address block for private cloud Provide an IP address block for the private cloud. The CIDR represents the private cloud management network and is used for the cluster management services, such as vCenter Server and NSX-T Manager. Use /22 address space, for example, 10.175.0.0/22. The address should be unique and not overlap with other Azure Virtual Networks and with on-premises networks. 
Verify the information entered, and if correct, select Create.
Note
This step takes an estimated 4+ hours. Adding a single host in an existing cluster takes an estimated 1 hour. If you are adding a new cluster with maximum nodes (16), it can take an estimated 4+ hours.
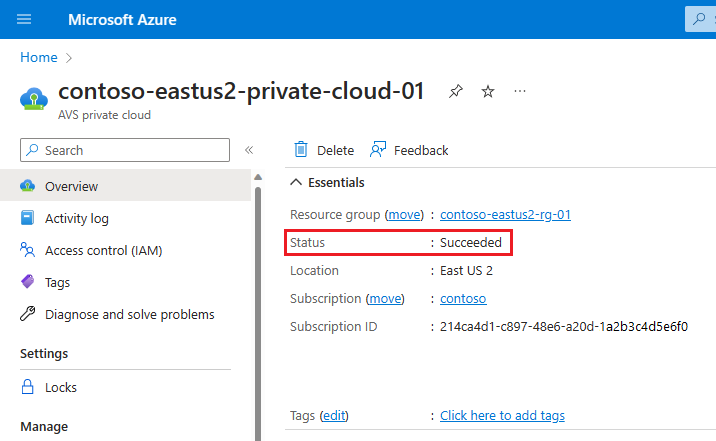
Verify that the deployment was successful. Navigate to the resource group you created and select your private cloud. You see the status of Succeeded when the deployment is finished.

Next steps
In this tutorial, you learned how to:
- Create an Azure VMware Solution private cloud
- Verify the private cloud deployed
- Delete an Azure VMware Solution private cloud
Continue to the next tutorial to learn how to create a jump box. You use the jump box to connect to your environment to manage your private cloud locally.
