Quickstart: Send WhatsApp messages using Advanced Messages
Azure Communication Services enables you to send and receive WhatsApp messages. In this quickstart, get started integrating your app with Azure Communication Advanced Messages SDK and start sending/receiving WhatsApp messages. Completing this quickstart incurs a small cost of a few USD cents or less in your Azure account.
Prerequisites
WhatsApp Business Account registered with your Azure Communication Services resource
Active WhatsApp phone number to receive messages
.NET development environment (such as Visual Studio, Visual Studio Code, or .NET CLI)
Setting up
Create the .NET project
To create your project, follow the tutorial at Create a .NET console application using Visual Studio.
To compile your code, press Ctrl+F7.
Install the package
Install the Azure.Communication.Messages NuGet package to your C# project.
- Open the NuGet Package Manager at
Project>Manage NuGet Packages.... - Search for the package
Azure.Communication.Messages. - Install the latest release.
Set up the app framework
Open the Program.cs file in a text editor.
Replace the contents of your Program.cs with the following code:
using System;
using System.Collections.Generic;
using System.Threading.Tasks;
using Azure;
using Azure.Communication.Messages;

namespace AdvancedMessagingQuickstart
{
    class Program
    {
        public static async Task Main(string[] args)
        {
            Console.WriteLine("Azure Communication Services - Send WhatsApp Messages");

            // Quickstart code goes here
        }
    }
}
To use the Advanced Messaging features, we add a using directive to include the Azure.Communication.Messages namespace.
using Azure.Communication.Messages;
Object model
The following classes and interfaces handle some of the major features of the Azure Communication Services Advance Messaging SDK for .NET.
| Name | Description |
|---|---|
| NotificationMessagesClient | This class connects to your Azure Communication Services resource. It sends the messages. |
| MessageTemplate | This class defines which template you use and the content of the template properties for your message. |
| TemplateNotificationContent | This class defines the "who" and the "what" of the template message you intend to send. |
| TextNotificationContent | This class defines the "who" and the "what" of the text message you intend to send. |
| MediaNotificationContent | This class defines the "who" and the "what" of the media message you intend to send. |
Code examples
Follow these steps to add the necessary code snippets to the Main function of your Program.cs file.
- Authenticate the client
- Set channel registration ID
- Set recipient list
- Start sending messages between a business and a WhatsApp user
- Send a text message to a WhatsApp user
- Send a media message to a WhatsApp user
Authenticate the client
The NotificationMessagesClient is used to connect to your Azure Communication Services resource.
For simplicity, this quickstart uses a connection string to authenticate. In production environments, we recommend using service principals.
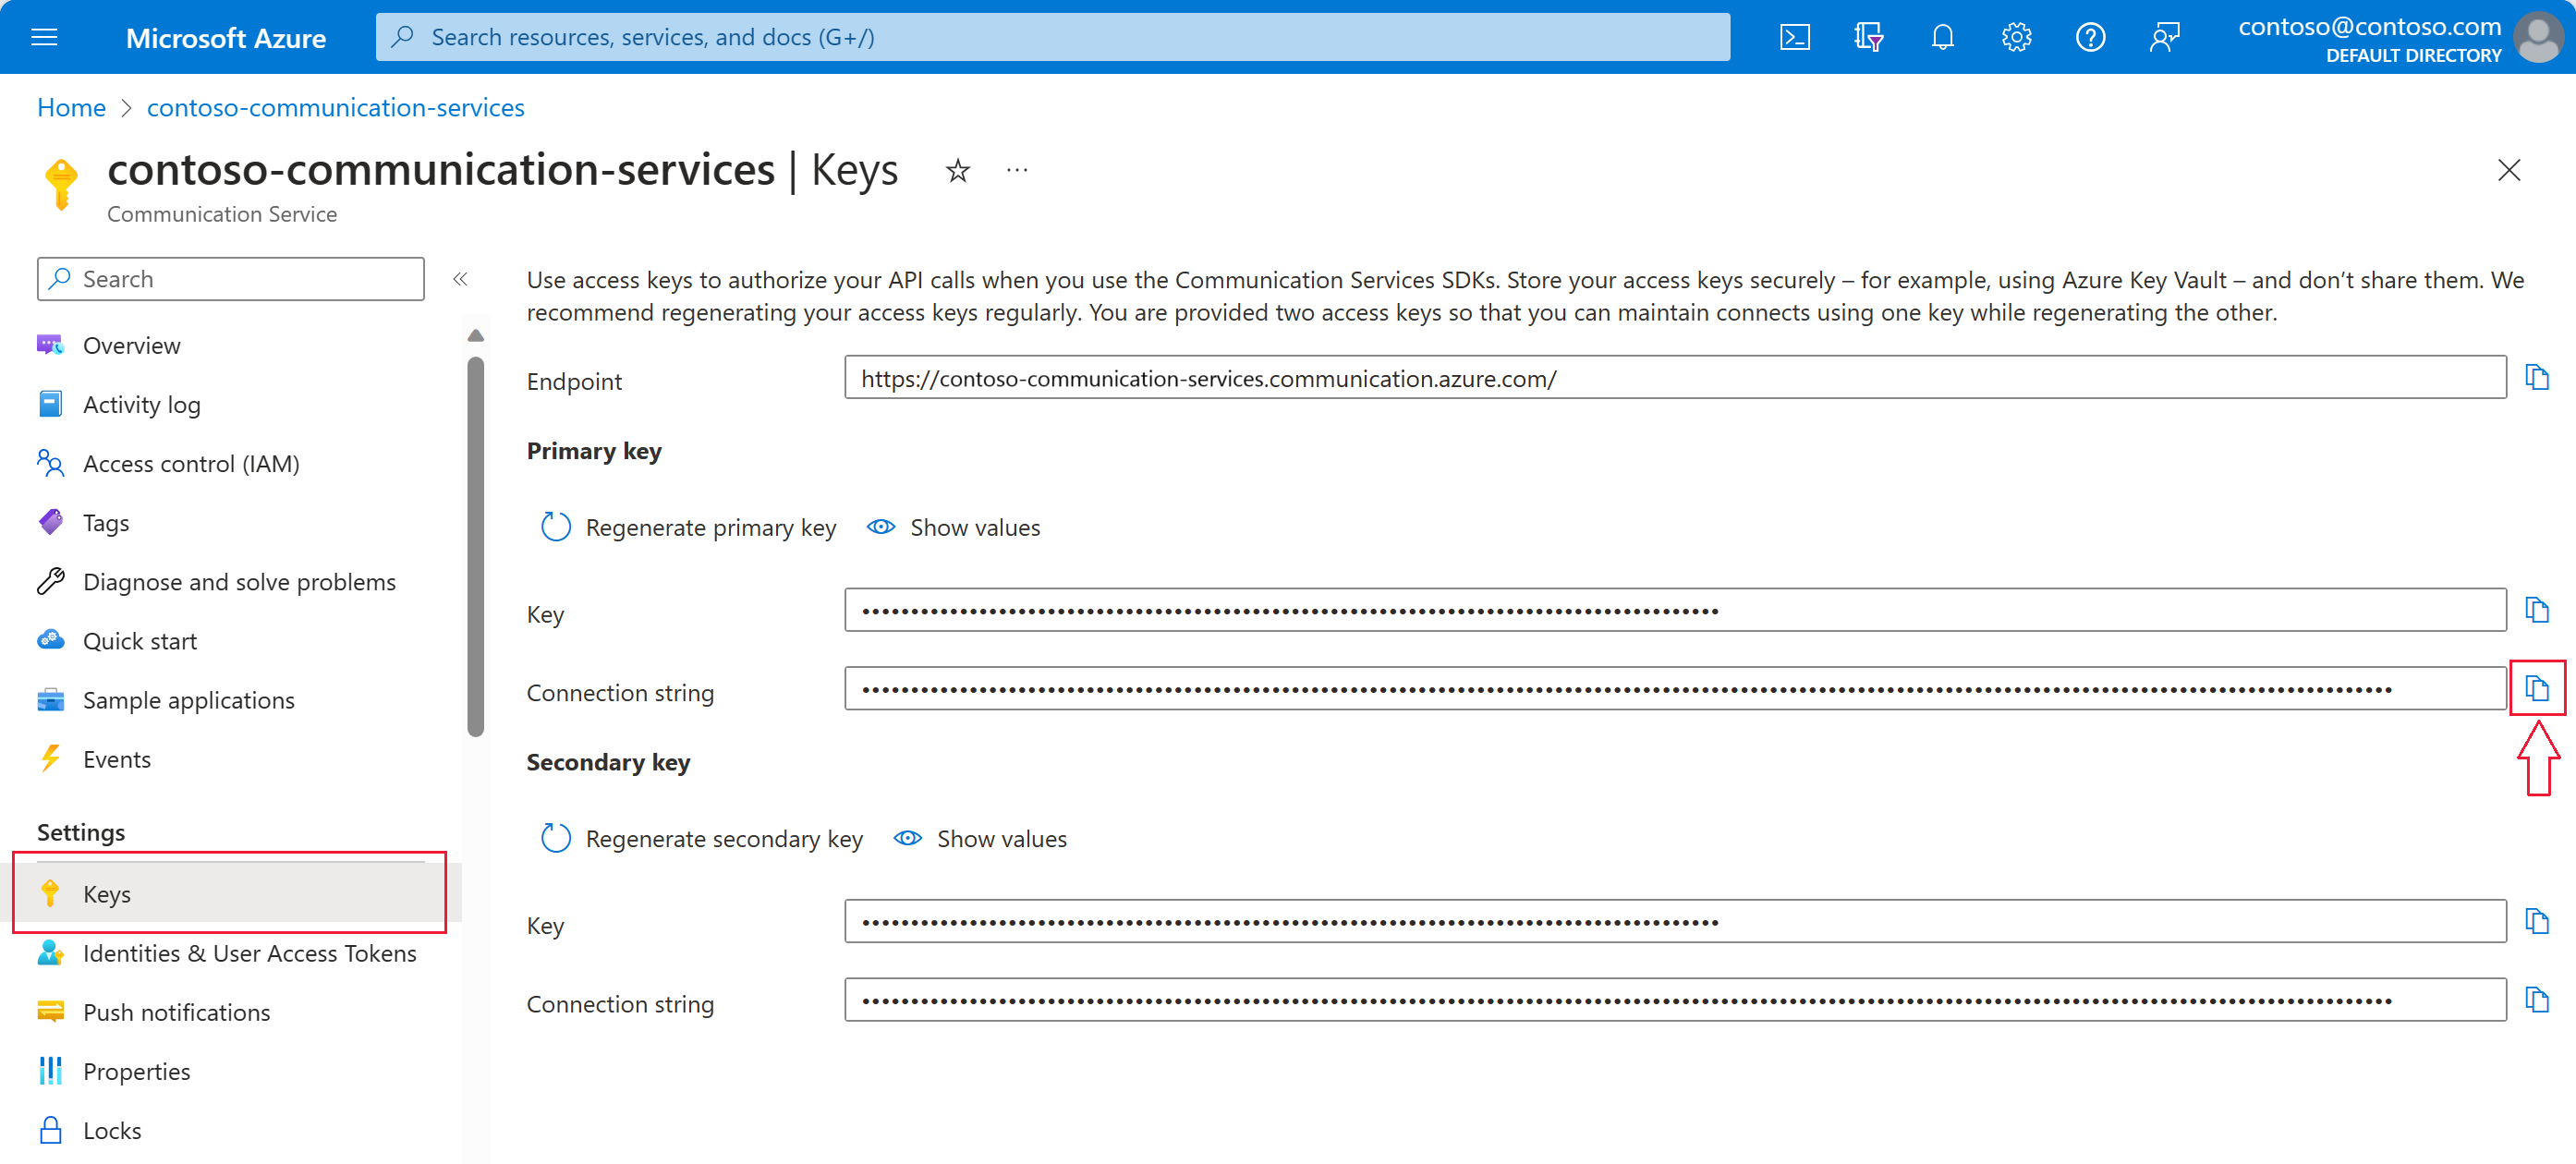
Get the connection string from your Azure Communication Services resource in the Azure portal. On the left, navigate to the Keys tab. Copy the Connection string field for the primary key. The connection string is in the format endpoint=https://{your Azure Communication Services resource name}.communication.azure.com/;accesskey={secret key}.

Set the environment variable COMMUNICATION_SERVICES_CONNECTION_STRING to the value of your connection string.
Open a console window and enter the following command:
setx COMMUNICATION_SERVICES_CONNECTION_STRING "<your connection string>"
After you add the environment variable, you might need to restart any running programs that will need to read the environment variable, including the console window. For example, if you're using Visual Studio as your editor, restart Visual Studio before running the example.
For more information on how to set an environment variable for your system, follow the steps at Store your connection string in an environment variable.
To instantiate a NotificationMessagesClient, add the following code to the Main method:
// Retrieve connection string from environment variable
string connectionString =
    Environment.GetEnvironmentVariable("COMMUNICATION_SERVICES_CONNECTION_STRING");

// Instantiate the client
var notificationMessagesClient = new NotificationMessagesClient(connectionString);

Set channel registration ID
The Channel Registration ID GUID was created during channel registration. You can look it up in the portal on the Channels tab of your Azure Communication Services resource.

Assign it to a variable called channelRegistrationId.
var channelRegistrationId = new Guid("<your channel registration ID GUID>");
Set recipient list
You need to supply a real phone number that has a WhatsApp account associated with it. This WhatsApp account receives the template, text, and media messages sent in this quickstart. For this quickstart, this phone number may be your personal phone number.
The recipient phone number can't be the business phone number (Sender ID) associated with the WhatsApp channel registration. The Sender ID appears as the sender of the text and media messages sent to the recipient.
The phone number should include the country code. For more information on phone number formatting, see WhatsApp documentation for Phone Number Formats.
Note
Only one phone number is currently supported in the recipient list.
Create the recipient list like this:
var recipientList = new List<string> { "<to WhatsApp phone number>" };
Example:
// Example only
var recipientList = new List<string> { "+14255550199" };
Start sending messages between a business and a WhatsApp user
Conversations between a WhatsApp Business Account and a WhatsApp user can be initiated in one of two ways:
- The business sends a template message to the WhatsApp user.
- The WhatsApp user sends any message to the business number.
Regardless of how the conversation was started, a business can only send template messages until the user sends a message to the business. Only after the user sends a message to the business, the business is allowed to send text or media messages to the user during the active conversation. Once the 24 hour conversation window expires, the conversation must be reinitiated. To learn more about conversations, see the definition at WhatsApp Business Platform.
(Option 1) Initiate conversation from business - Send a template message
Initiate a conversation by sending a template message.
First, create a MessageTemplate using the values for a template.
Note
To check which templates you have available, see the instructions at List templates. If you don't have a template to use, proceed to Option 2.
Here's MessageTemplate creation using a default template, sample_template.
If sample_template isn't available to you, skip to Option 2. For advanced users, see the page Templates to understand how to send a different template with Option 1.
The Messages SDK allows Contoso to send templated WhatsApp messages to WhatsApp users. To send a template message, you need:
- Authenticated NotificationMessagesClient
- WhatsApp Channel ID
- Recipient Phone Number in E16 format
- Template details
- Name like 'sample_template'
- Language like 'en_us'
- Parameters if any
// Assemble the template content
string templateName = "sample_template";
string templateLanguage = "en_us";
var messageTemplate = new MessageTemplate(templateName, templateLanguage);
For more examples of how to assemble your MessageTemplate and how to create your own template, refer to the following resource:
For further WhatsApp requirements on templates, refer to the WhatsApp Business Platform API references:
Assemble then send the template message:
// Assemble template message
var templateContent =
    new TemplateNotificationContent(channelRegistrationId, recipientList, messageTemplate);

// Send template message
Response<SendMessageResult> sendTemplateMessageResult =
    await notificationMessagesClient.SendAsync(templateContent);
Now, the user needs to respond to the template message. From the WhatsApp user account, reply to the template message received from the WhatsApp Business Account. The content of the message is irrelevant for this scenario.
Important
The recipient must respond to the template message to initiate the conversation before text or media message can be delivered to the recipient.
(Option 2) Initiate conversation from user
The other option to initiate a conversation between a WhatsApp Business Account and a WhatsApp user is to have the user initiate the conversation. To do so, from your personal WhatsApp account, send a message to your business number (Sender ID).

Send a text message to a WhatsApp user
The Messages SDK allows Contoso to send WhatsApp text messages, which initiated WhatsApp users initiated. To send a text message, you need:
- Authenticated NotificationMessagesClient
- WhatsApp channel ID
- Recipient phone number in E16 format
- Message body/text to be sent
Important
To send a text message to a WhatsApp user, the WhatsApp user must first send a message to the WhatsApp Business Account. For more information, see Start sending messages between business and WhatsApp user.
In this example, we reply to the WhatsApp user with the text "Thanks for your feedback.\n From Notification Messaging SDK".
Assemble then send the text message:
// Assemble text message
var textContent =
    new TextNotificationContent(channelRegistrationId, recipientList, "Thanks for your feedback.\n From Notification Messaging SDK");

// Send text message
Response<SendMessageResult> sendTextMessageResult =
    await notificationMessagesClient.SendAsync(textContent);
Send a media message to a WhatsApp user
The Messages SDK allows Contoso to send WhatsApp media messages to WhatsApp users. To send an embedded media message, you need:
- Authenticated NotificationMessagesClient
- WhatsApp channel ID
- Recipient phone number in E16 format
- Uri of the Media
Important
To send a text message to a WhatsApp user, the WhatsApp user must first send a message to the WhatsApp Business Account. For more information, see Start sending messages between business and WhatsApp user.
Important
As of SDK version 1.1.0, MediaNotificationContent is being deprecated for images. We encourage you to use ImageNotificationContent for sending images and explore other content-specific classes for other media types like DocumentNotificationContent, VideoNotificationContent, and AudioNotificationContent.
Below are example code snippets for sending different types of media messages, including images, documents, videos, and audio files.
Sending an image content
Assemble the image message:
var imageLink = new Uri("https://example.com/image.jpg");
var imageNotificationContent = new ImageNotificationContent(channelRegistrationId, recipientList, imageLink)
{
    Caption = "Check out this image."
};
Send the image message:
var imageResponse = await notificationMessagesClient.SendAsync(imageNotificationContent);
Sending a document
Assemble the document content:
var documentLink = new Uri("https://example.com/document.pdf");
var documentNotificationContent = new DocumentNotificationContent(channelRegistrationId, recipientList, documentLink)
{
    Caption = "Check out this document.",
    FileName = "document.pdf"
};
Send the document message:
var documentResponse = await notificationMessagesClient.SendAsync(documentNotificationContent);
Sending a video content
Assemble the video message:
var videoLink = new Uri("https://example.com/video.mp4");
var videoNotificationContent = new VideoNotificationContent(channelRegistrationId, recipientList, videoLink)
{
    Caption = "Check out this video."
};
Send the video message:
var videoResponse = await notificationMessagesClient.SendAsync(videoNotificationContent);
Sending an audio content
Assemble the audio message:
var audioLink = new Uri("https://example.com/audio.mp3");
var audioNotificationContent = new AudioNotificationContent(channelRegistrationId, recipientList, audioLink);
Send the audio message:
var audioResponse = await notificationMessagesClient.SendAsync(audioNotificationContent);
Run the code
Build and run your program.
To send a text or media message to a WhatsApp user, there must be an active conversation between the WhatsApp Business Account and the WhatsApp user.
If you don't have an active conversation, for the purposes of this quickstart, you should add a wait between sending the template message and sending the text message. This added delay gives you enough time to reply to the business on the user's WhatsApp account. For reference, the full example at Sample code prompts for manual user input before sending the next message.
If successful, you receive three messages on the user's WhatsApp account.
- To compile your code, press Ctrl+F7.
- To run the program without debugging, press Ctrl+F5.
Full sample code
using System;
using System.Collections.Generic;
using System.Linq;
using System.Threading.Tasks;
using Azure;
using Azure.Communication.Messages;

namespace AdvancedMessagingQuickstart
{
    class Program
    {
        public static async Task Main(string[] args)
        {
            Console.WriteLine("Azure Communication Services - Send WhatsApp Messages\n");

            string connectionString = Environment.GetEnvironmentVariable("COMMUNICATION_SERVICES_CONNECTION_STRING");
            NotificationMessagesClient notificationMessagesClient =
                new NotificationMessagesClient(connectionString);

            var channelRegistrationId = new Guid("<Your Channel ID>");
            var recipientList = new List<string> { "<Recipient's WhatsApp Phone Number>" };

            // Send sample template sample_template
            string templateName = "sample_template";
            string templateLanguage = "en_us";
            MessageTemplate sampleTemplate = new MessageTemplate(templateName, templateLanguage);
            TemplateNotificationContent templateContent =
                new TemplateNotificationContent(channelRegistrationId, recipientList, sampleTemplate);
            Response<SendMessageResult> sendTemplateMessageResult =
                await notificationMessagesClient.SendAsync(templateContent);

            PrintResult(sendTemplateMessageResult);
            Console.WriteLine("Template message sent.\nWait until the WhatsApp user responds " +
                "to the template message, then press any key to continue.\n");
            Console.ReadKey();

            // Send a text message
            string messageText = "Thanks for your feedback.";
            TextNotificationContent textContent =
                new TextNotificationContent(channelRegistrationId, recipientList, messageText);
            Response<SendMessageResult> sendTextMessageResult =
                await notificationMessagesClient.SendAsync(textContent);

            PrintResult(sendTextMessageResult);
            Console.WriteLine($"Text message sent to my phoneNumber.\nPress any key to continue.\n");
            Console.ReadKey();

            // Send a media message
            Uri uri = new Uri("https://aka.ms/acsicon1");
            ImageNotificationContent imageContent =
                new ImageNotificationContent(channelRegistrationId, recipientList, uri);
            Response<SendMessageResult> sendMediaMessageResult =
                await notificationMessagesClient.SendAsync(imageContent);

            PrintResult(sendMediaMessageResult);
            Console.WriteLine("Media message sent.\nPress any key to exit.\n");
            Console.ReadKey();
        }

        public static void PrintResult(Response<SendMessageResult> result)
        {
            Console.WriteLine($"Response: {result.GetRawResponse().Status} " +
                $"({result.GetRawResponse().ReasonPhrase})");
            Console.WriteLine($"Date: " +
                $"{result.GetRawResponse().Headers.First(header => header.Name == "Date").Value}");
            Console.WriteLine($"ClientRequestId: {result.GetRawResponse().ClientRequestId}");
            Console.WriteLine($"MS-CV: " +
                $"{result.GetRawResponse().Headers.First(header => header.Name == "MS-CV").Value}");
            foreach (var receipts in result.Value.Receipts)
            {
                Console.WriteLine($"MessageId: {receipts.MessageId}");
            }
            Console.WriteLine($"\n");
        }
    }
}
Prerequisites
WhatsApp Business Account registered with your Azure Communication Services resource
Active WhatsApp phone number to receive messages
Java Development Kit (JDK) version 8 or later
Setting up
To set up an environment for sending messages, take the steps in the following sections.
Create a new Java application
Open your terminal or command window and navigate to the directory where you would like to create your Java application. Run the following command to generate the Java project from the maven-archetype-quickstart template.
mvn archetype:generate -DgroupId="com.communication.quickstart" -DartifactId="communication-quickstart" -DarchetypeArtifactId="maven-archetype-quickstart" -DarchetypeVersion="1.4" -DinteractiveMode="false"
The generate goal creates a directory with the same name as the artifactId value. Under this directory, the src/main/java directory contains the project source code, the src/test/java directory contains the test source, and the pom.xml file is the project's Project Object Model (POM).
Install the package
Open the pom.xml file in your text editor. Add the following dependency element to the group of dependencies.
<dependency>
    <groupId>com.azure</groupId>
    <artifactId>azure-communication-messages</artifactId>
    <version>1.0.0</version>
</dependency>
Set up the app framework
Open /src/main/java/com/communication/quickstart/App.java in a text editor, add import directives, and remove the System.out.println("Hello world!"); statement:
package com.communication.quickstart;

import com.azure.communication.messages.*;
import com.azure.communication.messages.models.*;

import java.util.ArrayList;
import java.util.List;
public class App
{
    public static void main( String[] args )
    {
        // Quickstart code goes here.
    }
}
Object model
The following classes and interfaces handle some of the major features of the Azure Communication Services Advance Messaging SDK for Java.
| Name | Description |
|---|---|
| NotificationMessagesClientBuilder | This class creates the Notification Messages Client. You provide it with an endpoint and a credential. |
| NotificationMessagesClient | This class is needed to send WhatsApp messages and download media files. |
| NotificationMessagesAsyncClient | This class is needed to send WhatsApp messages and download media files asynchronously. |
| SendMessageResult | This class contains the result from the Advance Messaging service for send notification message. |
| MessageTemplateClientBuilder | This class creates the Message Template Client. You provide it with an endpoint and a credential. |
| MessageTemplateClient | This class is needed to get the list of WhatsApp templates. |
| MessageTemplateAsyncClient | This class is needed to get the list of WhatsApp templates asynchronously. |
Code examples
Follow these steps to add the necessary code snippets to the main function of your App.java file.
- Authenticate the client
- Set channel registration ID
- Set recipient list
- Start sending messages between a business and a WhatsApp user
- Send a text message to a WhatsApp user
- Send a media message to a WhatsApp user
Authenticate the client
There are a few different options available for authenticating a Message client:
To authenticate a client, you instantiate an NotificationMessagesClient or MessageTemplateClient with your connection string. You can also initialize the client with any custom HTTP client that implements the com.azure.core.http.HttpClient interface.
For simplicity, this quickstart uses a connection string to authenticate. In production environments, we recommend using service principals.
Get the connection string from your Azure Communication Services resource in the Azure portal. On the left, navigate to the Keys tab. Copy the Connection string field for the Primary key. The connection string is in the format endpoint=https://{your Azure Communication Services resource name}.communication.azure.com/;accesskey={secret key}.
Set the environment variable COMMUNICATION_SERVICES_CONNECTION_STRING to the value of your connection string.
Open a console window and enter the following command:
setx COMMUNICATION_SERVICES_CONNECTION_STRING "<your connection string>"
For more information on how to set an environment variable for your system, follow the steps at Store your connection string in an environment variable.
To instantiate a NotificationMessagesClient, add the following code to the main method:
// You can get your connection string from your resource in the Azure portal.
String connectionString = System.getenv("COMMUNICATION_SERVICES_CONNECTION_STRING");

NotificationMessagesClient notificationClient = new NotificationMessagesClientBuilder()
    .connectionString(connectionString)
    .buildClient();
Set channel registration ID
The Channel Registration ID GUID was created during channel registration. You can look it up in the portal on the Channels tab of your Azure Communication Services resource.
Assign it to a variable called channelRegistrationId.
String channelRegistrationId = "<your channel registration id GUID>";
Set recipient list
You need to supply a real phone number that has a WhatsApp account associated with it. This WhatsApp account receives the text and media messages sent in this quickstart. For this quickstart, this phone number may be your personal phone number.
The recipient phone number can't be the business phone number (Sender ID) associated with the WhatsApp channel registration. The Sender ID appears as the sender of the text and media messages sent to the recipient.
The phone number should include the country code. For more information on phone number formatting, see WhatsApp documentation for Phone Number Formats.
Note
Only one phone number is currently supported in the recipient list.
Create the recipient list like this:
List<String> recipientList = new ArrayList<>();
recipientList.add("<to WhatsApp phone number>");
Example:
// Example only
List<String> recipientList = new ArrayList<>();
recipientList.add("+14255550199");
Start sending messages between a business and a WhatsApp user
Conversations between a WhatsApp Business Account and a WhatsApp user can be initiated in one of two ways:
- The business sends a template message to the WhatsApp user.
- The WhatsApp user sends any message to the business number.
Regardless of how the conversation was started, a business can only send template messages until the user sends a message to the business. Only after the user sends a message to the business, the business is allowed to send text or media messages to the user during the active conversation. Once the 24 hour conversation window expires, the conversation must be reinitiated. To learn more about conversations, see the definition at WhatsApp Business Platform.
(Option 1) Initiate conversation from business - Send a template message
Initiate a conversation by sending a template message.
First, create a MessageTemplate using the values for a template.
Note
To check which templates you have available, see the instructions at List templates. If you don't have a template to use, proceed to Option 2.
Here's MessageTemplate creation using a default template, sample_template.
If sample_template isn't available to you, skip to Option 2. For advanced users, see the page Templates to understand how to send a different template with Option 1.
Messages SDK allows Contoso to send templated WhatsApp messages to WhatsApp users. To send template messages below details are required:
- WhatsApp Channel ID
- Recipient Phone Number in E16 format
- Template details
- Name like 'sample_template'
- Language like 'en_us'
- Parameters if any
// Assemble the template content
String templateName = "sample_template";
String templateLanguage = "en_us";
MessageTemplate messageTemplate = new MessageTemplate(templateName, templateLanguage);

// Assemble template message
TemplateNotificationContent templateContent = new TemplateNotificationContent(channelRegistrationId, recipientList, messageTemplate);

// Send template message
SendMessageResult templateMessageResult = notificationClient.send(templateContent);

// Process result
for (MessageReceipt messageReceipt : templateMessageResult.getReceipts()) {
    System.out.println("Message sent to:" + messageReceipt.getTo() + " and message id:" + messageReceipt.getMessageId());
}
Now, the user needs to respond to the template message. From the WhatsApp user account, reply to the template message received from the WhatsApp Business Account. The content of the message is irrelevant for this scenario.
Important
The recipient must respond to the template message to initiate the conversation before text or media message can be delivered to the recipient.
(Option 2) Initiate conversation from user
The other option to initiate a conversation between a WhatsApp Business Account and a WhatsApp user is to have the user initiate the conversation. To do so, from your personal WhatsApp account, send a message to your business number (Sender ID).

Send a text message to a WhatsApp user
Messages SDK allows Contoso to send text WhatsApp messages, which initiated WhatsApp users initiated. To send text messages below details are required:
- WhatsApp Channel ID
- Recipient Phone Number in E16 format
- Message body/text to be sent
Important
To send a text message to a WhatsApp user, the WhatsApp user must first send a message to the WhatsApp Business Account. For more information, see Start sending messages between business and WhatsApp user.
In this example, we reply to the WhatsApp user with the text "Thanks for your feedback.\n From Notification Messaging SDK".
Assemble then send the text message:
// Assemble text message
TextNotificationContent textContent = new TextNotificationContent(channelRegistrationId, recipientList, "“Thanks for your feedback.\n From Notification Messaging SDK");

// Send text message
SendMessageResult textMessageResult = notificationClient.send(textContent);

// Process result
for (MessageReceipt messageReceipt : textMessageResult.getReceipts()) {
    System.out.println("Message sent to:" + messageReceipt.getTo() + " and message id:" + messageReceipt.getMessageId());
}
Send a media message to a WhatsApp user
Messages SDK allows Contoso to send media (Image, Video, Audio or Document) messages to WhatsApp users. To send an embedded media message, you need:
- WhatsApp Channel ID
- Recipient Phone Number in E16 format
- URL of the Image, Video, Document or Audio media
Important
To send a media message to a WhatsApp user, the WhatsApp user must first send a message to the WhatsApp Business Account. For more information, see Start sending messages between business and WhatsApp user.
Important
As of SDK version 1.1.0, MediaNotificationContent is being deprecated for images. We encourage you to use ImageNotificationContent for sending images and explore other content-specific classes for other media types like DocumentNotificationContent, VideoNotificationContent, and AudioNotificationContent.
Sending an Image Message
Assemble then send the image message:
// Assemble image message
String imageUrl = "https://example.com/image.jpg";
ImageNotificationContent imageContent = new ImageNotificationContent(channelRegistrationId, recipientList, imageUrl);

// Send image message
SendMessageResult imageMessageResult = notificationClient.send(imageContent);

// Process result
for (MessageReceipt messageReceipt : imageMessageResult.getReceipts()) {
    System.out.println("Message sent to:" + messageReceipt.getTo() + " and message id:" + messageReceipt.getMessageId());
}
Sending a Video Message
Assemble then send the video message:
// Assemble video message
String videoUrl = "https://example.com/video.mp4";
VideoNotificationContent videoContent = new VideoNotificationContent(channelRegistrationId, recipientList, videoUrl);

// Send video message
SendMessageResult videoMessageResult = notificationClient.send(videoContent);

// Process result
for (MessageReceipt messageReceipt : videoMessageResult.getReceipts()) {
    System.out.println("Message sent to:" + messageReceipt.getTo() + " and message id:" + messageReceipt.getMessageId());
}
Sending an Audio Message
Assemble then send the audio message:
// Assemble audio message
String audioUrl = "https://example.com/audio.mp3";
AudioNotificationContent audioContent = new AudioNotificationContent(channelRegistrationId, recipientList, audioUrl);

// Send audio message
SendMessageResult audioMessageResult = notificationClient.send(audioContent);

// Process result
for (MessageReceipt messageReceipt : audioMessageResult.getReceipts()) {
    System.out.println("Message sent to:" + messageReceipt.getTo() + " and message id:" + messageReceipt.getMessageId());
}
Sending a Document Message
Assemble then send the document message:
// Assemble document message
String docUrl = "https://example.com/document.pdf";
DocumentNotificationContent docContent = new DocumentNotificationContent(channelRegistrationId, recipientList, docUrl);

// Send document message
SendMessageResult docMessageResult = notificationClient.send(docContent);

// Process result
for (MessageReceipt messageReceipt : docMessageResult.getReceipts()) {
    System.out.println("Message sent to:" + messageReceipt.getTo() + " and message id:" + messageReceipt.getMessageId());
}
Run the code
Navigate to the directory that contains the pom.xml file and compile the project by using the
mvncommand.mvn compileRun the app by executing the following
mvncommand.mvn exec:java -D"exec.mainClass"="com.communication.quickstart.App" -D"exec.cleanupDaemonThreads"="false"
Full sample code
Find the finalized code for this quickstart on GitHub.
Prerequisites
WhatsApp Business Account registered with your Azure Communication Services resource
Active WhatsApp phone number to receive messages
Node.js Active LTS and Maintenance LTS versions (8.11.1 and 10.14.1 are recommended)
- In a terminal or command window, run
node --versionto check that Node.js is installed
- In a terminal or command window, run
Setting up
To set up an environment for sending messages, take the steps in the following sections.
Create a new Node.js application
Create a new directory for your app and navigate to it by opening your terminal or command window, then run the following command.
mkdir advance-messages-quickstart && cd advance-messages-quickstartRun the following command to create a package.json file with default settings.
npm init -yUse a text editor to create a file called send-messages.js in the project root directory.
Add the following code snippet to the file send-messages.js.
async function main() {
    // Quickstart code goes here.
}

main().catch((error) => {
    console.error("Encountered an error while sending message: ", error);
    process.exit(1);
});
In the following sections, you added all the source code for this quickstart to the send-messages.js file that you created.
Install the package
Use the npm install command to install the Azure Communication Services Advance Messaging SDK for JavaScript.
npm install @azure-rest/communication-messages --save
The --save option lists the library as a dependency in your package.json file.
Object model
The following classes and interfaces handle some of the major features of the Azure Communication Services Advance Messaging SDK for JavaScript.
| Name | Description |
|---|---|
| MessageClient | This class connects to your Azure Communication Services resource. It sends the messages. |
| MessageTemplate | This class defines which template you use and the content of the template properties for your message. |
Code examples
Follow these steps to add the necessary code snippets to the main function of your send-messages.js file.
- Authenticate the client
- Set channel registration ID
- Set recipient list
- Start sending messages between a business and a WhatsApp user
- Send a text message to a WhatsApp user
- Send a media message to a WhatsApp user
Authenticate the client
The following code retrieves the connection string for the resource from an environment variable named COMMUNICATION_SERVICES_CONNECTION_STRING using the dotenv package.
For simplicity, this quickstart uses a connection string to authenticate. In production environments, we recommend using service principals.
Get the connection string from your Azure Communication Services resource in the Azure portal. On the left, navigate to the Keys tab. Copy the Connection string field for the Primary key. The connection string is in the format endpoint=https://{your Azure Communication Services resource name}.communication.azure.com/;accesskey={secret key}.
Set the environment variable COMMUNICATION_SERVICES_CONNECTION_STRING to the value of your connection string.
Open a console window and enter the following command:
setx COMMUNICATION_SERVICES_CONNECTION_STRING "<your connection string>"
For more information on how to set an environment variable for your system, follow the steps at Store your connection string in an environment variable.
To instantiate a MessageClient, add the following code to the Main method:
const MessageClient = require("@azure-rest/communication-messages").default;

// Set Connection string
const connectionString = process.env["COMMUNICATION_SERVICES_CONNECTION_STRING"];

// Instantiate the client
const client = MessageClient(connectionString);
Set channel registration ID
The Channel Registration ID GUID was created during channel registration. You can look it up in the portal on the Channels tab of your Azure Communication Services resource.
Assign it to a variable called channelRegistrationId.
const channelRegistrationId = "<your channel registration id GUID>";
Set recipient list
You need to supply a real phone number that has a WhatsApp account associated with it. This WhatsApp account receives the template, text, and media messages sent in this quickstart. For this quickstart, this phone number may be your personal phone number.
The recipient phone number can't be the business phone number (Sender ID) associated with the WhatsApp channel registration. The Sender ID appears as the sender of the text and media messages sent to the recipient.
The phone number should include the country code. For more information on phone number formatting, see WhatsApp documentation for Phone Number Formats.
Note
Only one phone number is currently supported in the recipient list.
Create the recipient list like this:
const recipientList = ["<to WhatsApp phone number>"];
Example:
// Example only
const recipientList = ["+14255550199"];
Start sending messages between a business and a WhatsApp user
Conversations between a WhatsApp Business Account and a WhatsApp user can be initiated in one of two ways:
- The business sends a template message to the WhatsApp user.
- The WhatsApp user sends any message to the business number.
Regardless of how the conversation was started, a business can only send template messages until the user sends a message to the business. Only after the user sends a message to the business, the business is allowed to send text or media messages to the user during the active conversation. Once the 24 hour conversation window expires, the conversation must be reinitiated. To learn more about conversations, see the definition at WhatsApp Business Platform.
(Option 1) Initiate conversation from business - Send a template message
Initiate a conversation by sending a template message.
First, create a MessageTemplate using the values for a template.
Note
To check which templates you have available, see the instructions at List templates. If you don't have a template to use, proceed to Option 2.
Here's MessageTemplate creation using a default template, sample_template.
If sample_template isn't available to you, skip to Option 2. For advanced users, see the page Templates to understand how to send a different template with Option 1.
Messages SDK allows Contoso to send templated WhatsApp messages to WhatsApp users. To send template messages below details are required:
- WhatsApp Channel ID
- Recipient Phone Number in E16 format
- Template details
- Name like 'sample_template'
- Language like 'en_us'
- Parameters if any
// Assemble the template content
const template = {
    name: "sample_template",
    language: "en_US"
};
For more examples of how to assemble your MessageTemplate and how to create your own template, refer to the following resource:
For further WhatsApp requirements on templates, refer to the WhatsApp Business Platform API references:
// Send template message
const templateMessageResult = await client.path("/messages/notifications:send").post({
    contentType: "application/json",
    body: {
        channelRegistrationId: channelRegistrationId,
        to: recipientList,
        kind: "template",
        template: template
    }
});

// Process result
if (templateMessageResult.status === "202") {
    templateMessageResult.body.receipts.forEach((receipt) => {
        console.log("Message sent to:"+receipt.to+" with message id:"+receipt.messageId);
    });
} else {
    throw new Error("Failed to send message");
}
Now, the user needs to respond to the template message. From the WhatsApp user account, reply to the template message received from the WhatsApp Business Account. The content of the message is irrelevant for this scenario.
Important
The recipient must respond to the template message to initiate the conversation before text or media message can be delivered to the recipient.
(Option 2) Initiate conversation from user
The other option to initiate a conversation between a WhatsApp Business Account and a WhatsApp user is to have the user initiate the conversation. To do so, from your personal WhatsApp account, send a message to your business number (Sender ID).
Send a text message to a WhatsApp user
Messages SDK allows Contoso to send text WhatsApp messages, which initiated WhatsApp users initiated. To send text messages below details are required:
- WhatsApp Channel ID
- Recipient Phone Number in E16 format
- Message body/text to be sent
Important
To send a text message to a WhatsApp user, the WhatsApp user must first send a message to the WhatsApp Business Account. For more information, see Start sending messages between business and WhatsApp user.
In this example, we reply to the WhatsApp user with the text "Thanks for your feedback.\n From Notification Messaging SDK".
Assemble and send the media message:
// Send text message
const textMessageResult = await client.path("/messages/notifications:send").post({
    contentType: "application/json",
    body: {
        channelRegistrationId: channelRegistrationId,
        to: recipientList,
        kind: "text",
        content: "Thanks for your feedback.\n From Notification Messaging SDK"
    }
});

// Process result
if (textMessageResult.status === "202") {
    textMessageResult.body.receipts.forEach((receipt) => {
        console.log("Message sent to:"+receipt.to+" with message id:"+receipt.messageId);
    });
} else {
    throw new Error("Failed to send message");
}
Send a media message to a WhatsApp user
Messages SDK allows Contoso to send media (Image, Video, Audio or Document) messages to WhatsApp users. To send an embedded media message, you need:
- WhatsApp Channel ID
- Recipient Phone Number in E16 format
- URL of the Image, Video, Document or Audio media
Important
To send a media message to a WhatsApp user, the WhatsApp user must first send a message to the WhatsApp Business Account. For more information, see Start sending messages between business and WhatsApp user.
Important
As of SDK version 2.0.0, MediaNotificationContent is being deprecated for images. We encourage you to use ImageNotificationContent for sending images and explore other content-specific classes for other media types like DocumentNotificationContent, VideoNotificationContent, and AudioNotificationContent.
Sending image content
To send an image message, provide a URL to an image. As an example,
const url = "https://example.com/image.jpg";
Assemble and send the media message:
// Send image message
const mediaMessageResult = await client.path("/messages/notifications:send").post({
    contentType: "application/json",
    body: {
        channelRegistrationId: channelRegistrationId,
        to: recipientList,
        kind: "image",
        mediaUri: url
    }
});

// Process result
if (mediaMessageResult.status === "202") {
    mediaMessageResult.body.receipts.forEach((receipt) => {
        console.log("Message sent to:"+receipt.to+" with message id:"+receipt.messageId);
    });
} else {
    throw new Error("Failed to send message");
}
Sending video content
To send a video message, provide a URL to a video. As an example,
const url = "https://example.com/video.mp4";
Assemble and send the video message:
// Send video message
const mediaMessageResult = await client.path("/messages/notifications:send").post({
    contentType: "application/json",
    body: {
        channelRegistrationId: channelRegistrationId,
        to: recipientList,
        kind: "video",
        mediaUri: url
    }
});

// Process result
if (mediaMessageResult.status === "202") {
    mediaMessageResult.body.receipts.forEach((receipt) => {
        console.log("Message sent to:"+receipt.to+" with message id:"+receipt.messageId);
    });
} else {
    throw new Error("Failed to send message");
}
Sending audio content
To send an audio message, provide a URL to an audio file. As an example,
const url = "https://example.com/audio.mp3";
Assemble and send the audio message:
// Send audio message
const mediaMessageResult = await client.path("/messages/notifications:send").post({
    contentType: "application/json",
    body: {
        channelRegistrationId: channelRegistrationId,
        to: recipientList,
        kind: "audio",
        mediaUri: url
    }
});

// Process result
if (mediaMessageResult.status === "202") {
    mediaMessageResult.body.receipts.forEach((receipt) => {
        console.log("Message sent to:"+receipt.to+" with message id:"+receipt.messageId);
    });
} else {
    throw new Error("Failed to send message");
}
Sending document content
To send a document message, provide a URL to a document. As an example,
const url = "https://example.com/document.pdf";
Assemble and send the document message:
// Send document message
const mediaMessageResult = await client.path("/messages/notifications:send").post({
    contentType: "application/json",
    body: {
        channelRegistrationId: channelRegistrationId,
        to: recipientList,
        kind: "document",
        mediaUri: url
    }
});

// Process result
if (mediaMessageResult.status === "202") {
    mediaMessageResult.body.receipts.forEach((receipt) => {
        console.log("Message sent to:"+receipt.to+" with message id:"+receipt.messageId);
    });
} else {
    throw new Error("Failed to send message");
}
Run the code
Use the node command to run the code you added to the send-messages.js file.
node ./send-messages.js
Full sample code
You can download the sample app from GitHub.
Prerequisites
WhatsApp Business Account registered with your Azure Communication Services resource.
Active WhatsApp phone number to receive messages.
Python 3.7+ for your operating system.
Setting up
Create a new Python application
In a terminal or console window, create a new folder for your application and navigate to it.
mkdir messages-quickstart && cd messages-quickstart
Install the package
You need to use the Azure Communication Messages client library for Python version 1.0.0 or above.
From a console prompt, execute the following command:
pip install azure-communication-messages
Set up the app framework
Create a new file called messages-quickstart.py and add the basic program structure.
type nul > messages-quickstart.py
Basic program structure
import os

class MessagesQuickstart(object):
    print("Azure Communication Services - Advanced Messages SDK Quickstart")

if __name__ == '__main__':
    messages = MessagesQuickstart()
Object model
The following classes and interfaces handle some of the major features of the Azure Communication Services Messages SDK for Python.
| Name | Description |
|---|---|
| NotificationMessagesClient | This class connects to your Azure Communication Services resource. It sends the messages. |
| MessageTemplate | This class defines which template you use and the content of the template properties for your message. |
| TemplateNotificationContent | This class defines the "who" and the "what" of the template message you intend to send. |
| TextNotificationContent | This class defines the "who" and the "what" of the text message you intend to send. |
| ImageNotificationContent | This class defines the "who" and the "what" of the image media message you intend to send. |
| DocumentNotificationContent | This class defines the "who" and the "what" of the Document media message you intend to send. |
| VideoNotificationContent | This class defines the "who" and the "what" of the Video media message you intend to send. |
| AudioNotificationContent | This class defines the "who" and the "what" of the Audio media message you intend to send. |
Code examples
Follow these steps to add the necessary code snippets to the messages-quickstart.py python program.
- Authenticate the client
- Set channel registration ID
- Set recipient list
- Start sending messages between a business and a WhatsApp user
- Send a text message to a WhatsApp user
- Send a media message to a WhatsApp user
Authenticate the client
Messages sending is done using NotificationMessagesClient. NotificationMessagesClient is authenticated using your connection string acquired from Azure Communication Services resource in the Azure portal. For more information on connection strings, see access-your-connection-strings-and-service-endpoints.
Get Azure Communication Resource connection string from Azure portal as given in screenshot. On the left, navigate to the Keys tab. Copy the Connection string field for the primary key. The connection string is in the format endpoint=https://{your Azure Communication Services resource name}.communication.azure.com/;accesskey={secret key}.
Set the environment variable COMMUNICATION_SERVICES_CONNECTION_STRING to the value of your connection string.
Open a console window and enter the following command:
setx COMMUNICATION_SERVICES_CONNECTION_STRING "<your connection string>"
After you add the environment variable, you might need to restart any running programs that will need to read the environment variable, including the console window. For example, if you're using Visual Studio as your editor, restart Visual Studio before running the example.
For more information on how to set an environment variable for your system, follow the steps at Store your connection string in an environment variable.
    # Get a connection string to our Azure Communication Services resource.
    connection_string = os.getenv("COMMUNICATION_SERVICES_CONNECTION_STRING")

    def send_template_message(self):
        from azure.communication.messages import NotificationMessagesClient

        # Create NotificationMessagesClient Client
        messaging_client = NotificationMessagesClient.from_connection_string(self.connection_string)
Set channel registration ID
The Channel Registration ID GUID was created during channel registration. You can look it up in the portal on the Channels tab of your Azure Communication Services resource.
Assign it to a variable called channelRegistrationId.
channelRegistrationId = os.getenv("WHATSAPP_CHANNEL_ID_GUID")
Set recipient list
You need to supply a real phone number that has a WhatsApp account associated with it. This WhatsApp account receives the template, text, and media messages sent in this quickstart. For this quickstart, this phone number may be your personal phone number.
The recipient phone number can't be the business phone number (Sender ID) associated with the WhatsApp channel registration. The Sender ID appears as the sender of the text and media messages sent to the recipient.
The phone number should include the country code. For more information on phone number formatting, see WhatsApp documentation for Phone Number Formats.
Note
Only one phone number is currently supported in the recipient list.
Set the recipient list like this:
phone_number = os.getenv("RECIPIENT_WHATSAPP_PHONE_NUMBER")
Usage Example:
    # Example only
    to=[self.phone_number],
Start sending messages between a business and a WhatsApp user
Conversations between a WhatsApp Business Account and a WhatsApp user can be initiated in one of two ways:
- The business sends a template message to the WhatsApp user.
- The WhatsApp user sends any message to the business number.
Regardless of how the conversation was started, a business can only send template messages until the user sends a message to the business. Only after the user sends a message to the business, the business is allowed to send text or media messages to the user during the active conversation. Once the 24 hour conversation window expires, the conversation must be reinitiated. To learn more about conversations, see the definition at WhatsApp Business Platform.
(Option 1) Initiate conversation from business - Send a template message
Initiate a conversation by sending a template message.
First, create a MessageTemplate using the values for a template.
Note
To check which templates you have available, see the instructions at List templates. If you don't have a template to use, proceed to Option 2.
Here's MessageTemplate creation using a default template, sample_template.
If sample_template isn't available to you, skip to Option 2. For advanced users, see the page Templates to understand how to send a different template with Option 1.
Messages SDK allows Contoso to send templated WhatsApp messages to WhatsApp users. To send template messages below details are required:
- WhatsApp Channel ID
- Recipient Phone Number in E16 format
- Template details
- Name like 'sample_template'
- Language like 'en_us'
- Parameters if any
For more examples of how to assemble your MessageTemplate and how to create your own template, refer to the following resource:
For further WhatsApp requirements on templates, refer to the WhatsApp Business Platform API references:
To send WhatsApp template message, add given code in the send_template_message(self) function.
        input_template: MessageTemplate = MessageTemplate(
            name="<<template_name>>",
            language="<<template_language>>")
        template_options = TemplateNotificationContent(
            channel_registration_id=self.channelRegistrationId,
            to=[self.phone_number],
            template=input_template
        )

        # calling send() with whatsapp template details
        message_responses = messaging_client.send(template_options)
        response = message_responses.receipts[0]

        if (response is not None):
            print("WhatsApp Templated Message with message id {} was successfully sent to {}."
            .format(response.message_id, response.to))
        else:
            print("Message failed to send")
Add send_template_message() call to the main method.
    # Calling send_template_message()
    messages.send_template_message()
Now, the user needs to respond to the template message. From the WhatsApp user account, reply to the template message received from the WhatsApp Business Account. The content of the message is irrelevant for this scenario.
Important
The recipient must respond to the template message to initiate the conversation before text or media message can be delivered to the recipient.
(Option 2) Initiate conversation from user
The other option to initiate a conversation between a WhatsApp Business Account and a WhatsApp user is to have the user initiate the conversation. To do so, from your personal WhatsApp account, send a message to your business number (Sender ID).
Send a text message to a WhatsApp user
Messages SDK allows Contoso to send text WhatsApp messages, which initiated WhatsApp users initiated. To send text messages below details are required:
- WhatsApp Channel ID
- Recipient Phone Number in E16 format
- Message body/text to be sent
Important
To send a text message to a WhatsApp user, the WhatsApp user must first send a message to the WhatsApp Business Account. For more information, see Start sending messages between business and WhatsApp user.
In this example, we reply to the WhatsApp user with the text "Thanks for your feedback.\n From Notification Messaging SDK."
    def send_text_message(self):
        from azure.communication.messages import NotificationMessagesClient
        from azure.communication.messages.models import ( TextNotificationContent)

        # Create NotificationMessagesClient Client
        messaging_client = NotificationMessagesClient.from_connection_string(self.connection_string)
        text_options = TextNotificationContent (
            channel_registration_id=self.channelRegistrationId,
            to= [self.phone_number],
            content="Thanks for your feedback.\n From Notification Messaging SDK",
        )

        # calling send() with whatsapp message details
        message_responses = messaging_client.send(text_options)
        response = message_responses.receipts[0]

        if (response is not None):
            print("WhatsApp Text Message with message id {} was successfully sent to {}."
            .format(response.message_id, response.to))
        else:
            print("Message failed to send")
To run send_text_message(), update the main method
    #Calling send_text_message()
    messages.send_text_message()
Send an Image media message to a WhatsApp user
Messages SDK allows Contoso to send Image WhatsApp messages to WhatsApp users. To send Image embedded messages below details are required:
- WhatsApp Channel ID
- Recipient Phone Number in E16 format
- MediaUri of the Image
Important
To send a text message to a WhatsApp user, the WhatsApp user must first send a message to the WhatsApp Business Account. For more information, see Start sending messages between business and WhatsApp user.
An example of media_uri used in sending media WhatsApp message.
input_media_uri: str = "https://aka.ms/acsicon1"
    def send_image_message(self):
        from azure.communication.messages import NotificationMessagesClient
        from azure.communication.messages.models import ( ImageNotificationContent)

        # Create NotificationMessagesClient Client
        messaging_client = NotificationMessagesClient.from_connection_string(self.connection_string)
        input_media_uri: str = "https://aka.ms/acsicon1"
        image_message_options = ImageNotificationContent(
            channel_registration_id=self.channelRegistrationId,
            to=[self.phone_number],
            media_uri=input_media_uri
        )

        # calling send() with whatsapp image message
        message_responses = messaging_client.send(image_message_options)
        response = message_responses.receipts[0]

        if (response is not None):
            print("WhatsApp Image containing Message with message id {} was successfully sent to {}"
            .format(response.message_id, response.to))
        else:
            print("Message failed to send")
To run send_text_message(), update the main method
    # Calling send_image_message()
    messages.send_image_message()
Send a document media message to a WhatsApp user
Messages SDK allows Contoso to send Image WhatsApp messages to WhatsApp users. To send Image embedded messages below details are required:
- WhatsApp Channel ID
- Recipient Phone Number in E16 format
- MediaUri of the document
Important
To send a document message to a WhatsApp user, the WhatsApp user must first send a message to the WhatsApp Business Account. For more information, see Start sending messages between business and WhatsApp user.
An example of media_uri used in sending media WhatsApp message.
input_media_uri: str = "##DocumentLinkPlaceholder##"
    def send_document_message(self):
        from azure.communication.messages import NotificationMessagesClient
        from azure.communication.messages.models import ( DocumentNotificationContent)

        # Create NotificationMessagesClient Client
        messaging_client = NotificationMessagesClient.from_connection_string(self.connection_string)
        input_media_uri: str = "##DocumentLinkPlaceholder##"
        documents_options = DocumentNotificationContent(
            channel_registration_id=self.channelRegistrationId,
            to=[self.phone_number],
            caption="Hello World via Advanced Messaging SDK.This is document message",
            file_name="Product roadmap timeline.pptx",
            media_uri=input_media_uri,
        )

        # calling send() with whatsapp image message
        message_responses = messaging_client.send(documents_options)
        response = message_responses.receipts[0]

        if (response is not None):
            print("WhatsApp Document containing Message with message id {} was successfully sent to {}"
            .format(response.message_id, response.to))
        else:
            print("Message failed to send")
To run send_text_message(), update the main method
    # Calling send_image_message()
    messages.send_image_message()
Send an audio media message to a WhatsApp user
Messages SDK allows Contoso to send Image WhatsApp messages to WhatsApp users. To send Image embedded messages below details are required:
- WhatsApp Channel ID
- Recipient Phone Number in E16 format
- MediaUri of the Audio
Important
To send a audio message to a WhatsApp user, the WhatsApp user must first send a message to the WhatsApp Business Account. For more information, see Start sending messages between business and WhatsApp user.
An example of media_uri used in sending media WhatsApp message.
input_media_uri: str = "##AudioLinkPlaceholder##"
    def send_audio_message(self):
        from azure.communication.messages import NotificationMessagesClient
        from azure.communication.messages.models import ( AudioNotificationContent)

        # Create NotificationMessagesClient Client
        messaging_client = NotificationMessagesClient.from_connection_string(self.connection_string)
        input_media_uri: str = "##AudioLinkPlaceholder##"
        audio_options = AudioNotificationContent(
            channel_registration_id=self.channelRegistrationId,
            to=[self.phone_number],
            media_uri=input_media_uri,
        )

        # calling send() with whatsapp image message
        message_responses = messaging_client.send(audio_options)
        response = message_responses.receipts[0]

        if (response is not None):
            print("WhatsApp Audio containing Message with message id {} was successfully sent to {}"
            .format(response.message_id, response.to))
        else:
            print("Message failed to send")
To run send_text_message(), update the main method
    # Calling send_image_message()
    messages.send_image_message()
Send a video media message to a WhatsApp user
Messages SDK allows Contoso to send Image WhatsApp messages to WhatsApp users. To send Image embedded messages below details are required:
- WhatsApp Channel ID
- Recipient Phone Number in E16 format
- MediaUri of the Video
Important
To send a video message to a WhatsApp user, the WhatsApp user must first send a message to the WhatsApp Business Account. For more information, see Start sending messages between business and WhatsApp user.
An example of media_uri used in sending media WhatsApp message.
input_media_uri: str = "##VideoLinkPlaceholder##"
    def send_video_message(self):
        from azure.communication.messages import NotificationMessagesClient
        from azure.communication.messages.models import ( VideoNotificationContent)

        # Create NotificationMessagesClient Client
        messaging_client = NotificationMessagesClient.from_connection_string(self.connection_string)
        input_media_uri: str = "##VideoLinkPlaceholder##"
        video_options = VideoNotificationContent(
            channel_registration_id=self.channelRegistrationId,
            to=[self.phone_number],
            media_uri=input_media_uri,
        )

        # calling send() with whatsapp image message
        message_responses = messaging_client.send(image_message_options)
        response = message_responses.receipts[0]

        if (response is not None):
            print("WhatsApp Video containing Message with message id {} was successfully sent to {}"
            .format(response.message_id, response.to))
        else:
            print("Message failed to send")
To run send_text_message(), update the main method
    # Calling send_image_message()
    messages.send_image_message()
Run the code
To run the code, make sure you are on the directory where your messages-quickstart.py file is.
python messages-quickstart.py
Azure Communication Services - Advanced Messages Quickstart
WhatsApp Templated Message with message id <<GUID>> was successfully sent to <<ToRecipient>>
WhatsApp Text Message with message id <<GUID>> was successfully sent to <<ToRecipient>>
WhatsApp Image containing Message with message id <<GUID>> was successfully sent to <<ToRecipient>>
Full sample code
import os

class MessagesQuickstart(object):
    print("Azure Communication Services - Advanced Messages SDK Quickstart using connection string.")
    # Advanced Messages SDK implementations goes in this section.

    connection_string = os.getenv("COMMUNICATION_SERVICES_CONNECTION_STRING")
    phone_number = os.getenv("RECIPIENT_PHONE_NUMBER")
    channelRegistrationId = os.getenv("WHATSAPP_CHANNEL_ID")

    def send_template_message(self):
        from azure.communication.messages import NotificationMessagesClient
        from azure.communication.messages.models import ( TemplateNotificationContent , MessageTemplate )

        # client creation
        messaging_client = NotificationMessagesClient.from_connection_string(self.connection_string)
        input_template: MessageTemplate = MessageTemplate(
            name="<<TEMPLATE_NAME>>",
            language="<<LANGUAGE>>")
        template_options = TemplateNotificationContent(
            channel_registration_id=self.channelRegistrationId,
            to=[self.phone_number],
            template=input_template
        )

        # calling send() with WhatsApp template details.
        message_responses = messaging_client.send(template_options)
        response = message_responses.receipts[0]

        if (response is not None):
            print("WhatsApp Templated Message with message id {} was successfully sent to {}"
            .format(response.message_id, response.to))
        else:
            print("Message failed to send")

    def send_text_message(self):
        from azure.communication.messages import NotificationMessagesClient
        from azure.communication.messages.models import ( TextNotificationContent )

        # client creation
        messaging_client = NotificationMessagesClient.from_connection_string(self.connection_string)

        text_options = TextNotificationContent (
            channel_registration_id=self.channelRegistrationId,
            to= [self.phone_number],
            content="Hello World via ACS Advanced Messaging SDK.",
        )

        # calling send() with WhatsApp message details
        message_responses = messaging_client.send(text_options)
        response = message_responses.receipts[0]

        if (response is not None):
            print("WhatsApp Text Message with message id {} was successfully sent to {}"
            .format(response.message_id, response.to))
        else:
            print("Message failed to send")

    def send_image_message(self):
        from azure.communication.messages import NotificationMessagesClient
        from azure.communication.messages.models import ( ImageNotificationContent)

        # Create NotificationMessagesClient Client
        messaging_client = NotificationMessagesClient.from_connection_string(self.connection_string)
        input_media_uri: str = "https://aka.ms/acsicon1"
        image_message_options = ImageNotificationContent(
            channel_registration_id=self.channelRegistrationId,
            to=[self.phone_number],
            media_uri=input_media_uri
        )

        # calling send() with whatsapp image message
        message_responses = messaging_client.send(image_message_options)
        response = message_responses.receipts[0]

        if (response is not None):
            print("WhatsApp Image containing Message with message id {} was successfully sent to {}"
            .format(response.message_id, response.to))
        else:
            print("Message failed to send")

    def send_document_message(self):
        from azure.communication.messages import NotificationMessagesClient
        from azure.communication.messages.models import ( DocumentNotificationContent)

        # Create NotificationMessagesClient Client
        messaging_client = NotificationMessagesClient.from_connection_string(self.connection_string)
        input_media_uri: str = "##DocumentLinkPlaceholder##"
        documents_options = DocumentNotificationContent(
            channel_registration_id=self.channelRegistrationId,
            to=[self.phone_number],
            caption="Hello World via Advanced Messaging SDK.This is document message",
            file_name="Product roadmap timeline.pptx",
            media_uri=input_media_uri,
        )

        # calling send() with whatsapp image message
        message_responses = messaging_client.send(documents_options)
        response = message_responses.receipts[0]

        if (response is not None):
            print("WhatsApp Document containing Message with message id {} was successfully sent to {}"
            .format(response.message_id, response.to))
        else:
            print("Message failed to send")

    def send_audio_message(self):
        from azure.communication.messages import NotificationMessagesClient
        from azure.communication.messages.models import ( AudioNotificationContent)

        # Create NotificationMessagesClient Client
        messaging_client = NotificationMessagesClient.from_connection_string(self.connection_string)
        input_media_uri: str = "##AudioLinkPlaceholder##"
        audio_options = AudioNotificationContent(
            channel_registration_id=self.channelRegistrationId,
            to=[self.phone_number],
            media_uri=input_media_uri,
        )

        # calling send() with whatsapp image message
        message_responses = messaging_client.send(audio_options)
        response = message_responses.receipts[0]

        if (response is not None):
            print("WhatsApp Audio containing Message with message id {} was successfully sent to {}"
            .format(response.message_id, response.to))
        else:
            print("Message failed to send")

    def send_video_message(self):
        from azure.communication.messages import NotificationMessagesClient
        from azure.communication.messages.models import ( VideoNotificationContent)

        # Create NotificationMessagesClient Client
        messaging_client = NotificationMessagesClient.from_connection_string(self.connection_string)
        input_media_uri: str = "##VideoLinkPlaceholder##"
        video_options = VideoNotificationContent(
            channel_registration_id=self.channelRegistrationId,
            to=[self.phone_number],
            media_uri=input_media_uri,
        )

        # calling send() with whatsapp image message
        message_responses = messaging_client.send(image_message_options)
        response = message_responses.receipts[0]

        if (response is not None):
            print("WhatsApp Video containing Message with message id {} was successfully sent to {}"
            .format(response.message_id, response.to))
        else:
            print("Message failed to send")

if __name__ == '__main__':
    messages = MessagesQuickstart()
    messages.send_template_message()
    messages.send_text_message()
    messages.send_image_message()
    messages.send_document_message()
    messages.send_audio_message()
    messages.send_video_message()
Note
Please update all placeholder variables in the above code.
Other Samples
You can review and download other sample codes for Python Messages SDK on GitHub.
Next steps
In this quickstart, you tried out the Advanced Messaging for WhatsApp SDK. Next you might also want to see the following articles: