Note
Access to this page requires authorization. You can try signing in or changing directories.
Access to this page requires authorization. You can try changing directories.
This article guides you in planning how to better manage your Azure costs. When you sign up for Azure, there are several steps you can take to better understand your spending:
- Review your estimated costs before adding services using the pricing calculator, Azure price sheet or while adding services in the Azure portal.
- Monitor costs with budgets, alerts, and cost analysis.
- Review the charges on your invoice by comparing them with the detailed usage files.
- Integrate billing and cost data with your own reporting system using billing and consumption APIs.
- Use additional resources and tools for Enterprise Agreement (EA), Cloud Solution Provider (CSP), or Azure Sponsorship customers.
- Take advatanage of some of the most popular Azure services offered for free for 12 months and available with the Azure free account. Along with the recommendations listed below, also see Avoid getting charged for free account.
If you need to cancel your Azure subscription, see Cancel your Azure subscription.
Get estimated costs before adding Azure services
Use one of the following tools to estimate the cost of using an Azure service:
- Azure pricing calculator
- Azure price sheet
- Azure portal
The examples in the following sections use pricing in US Dollars and all mentioned prices are for example purposes only. They are not intended to imply actual costs.
Estimate cost online using the pricing calculator
The Azure pricing calculator helps you turn anticipated usage into an estimated cost, which makes it easier to plan and budget for your Azure usage. Whether you're a small business owner or an enterprise-level organization, the web-based tool helps you make informed decisions about your cloud spending. When you log in, the calculator also provides a cost estimate for your Azure consumption with your negotiated or discounted prices. To learn more, visit our article explaining how to use the Azure pricing calculator.
Review prices
If you have access to Azure through an Enterprise Agreement (EA) or a Microsoft Customer Agreement (MCA), you can view and download the price sheet for your Azure account. The price sheet is an excel file that contains prices for all Azure services. For more information, see View and download your Azure pricing.
For other subscription types, you can get standard retail prices with the Azure Retail Prices API.
Review estimated costs in the Azure portal
You can view the estimated cost per month while adding a service in the Azure portal. For example, when you choose the size of your Windows VM, you can see the estimated monthly cost for the compute hours:
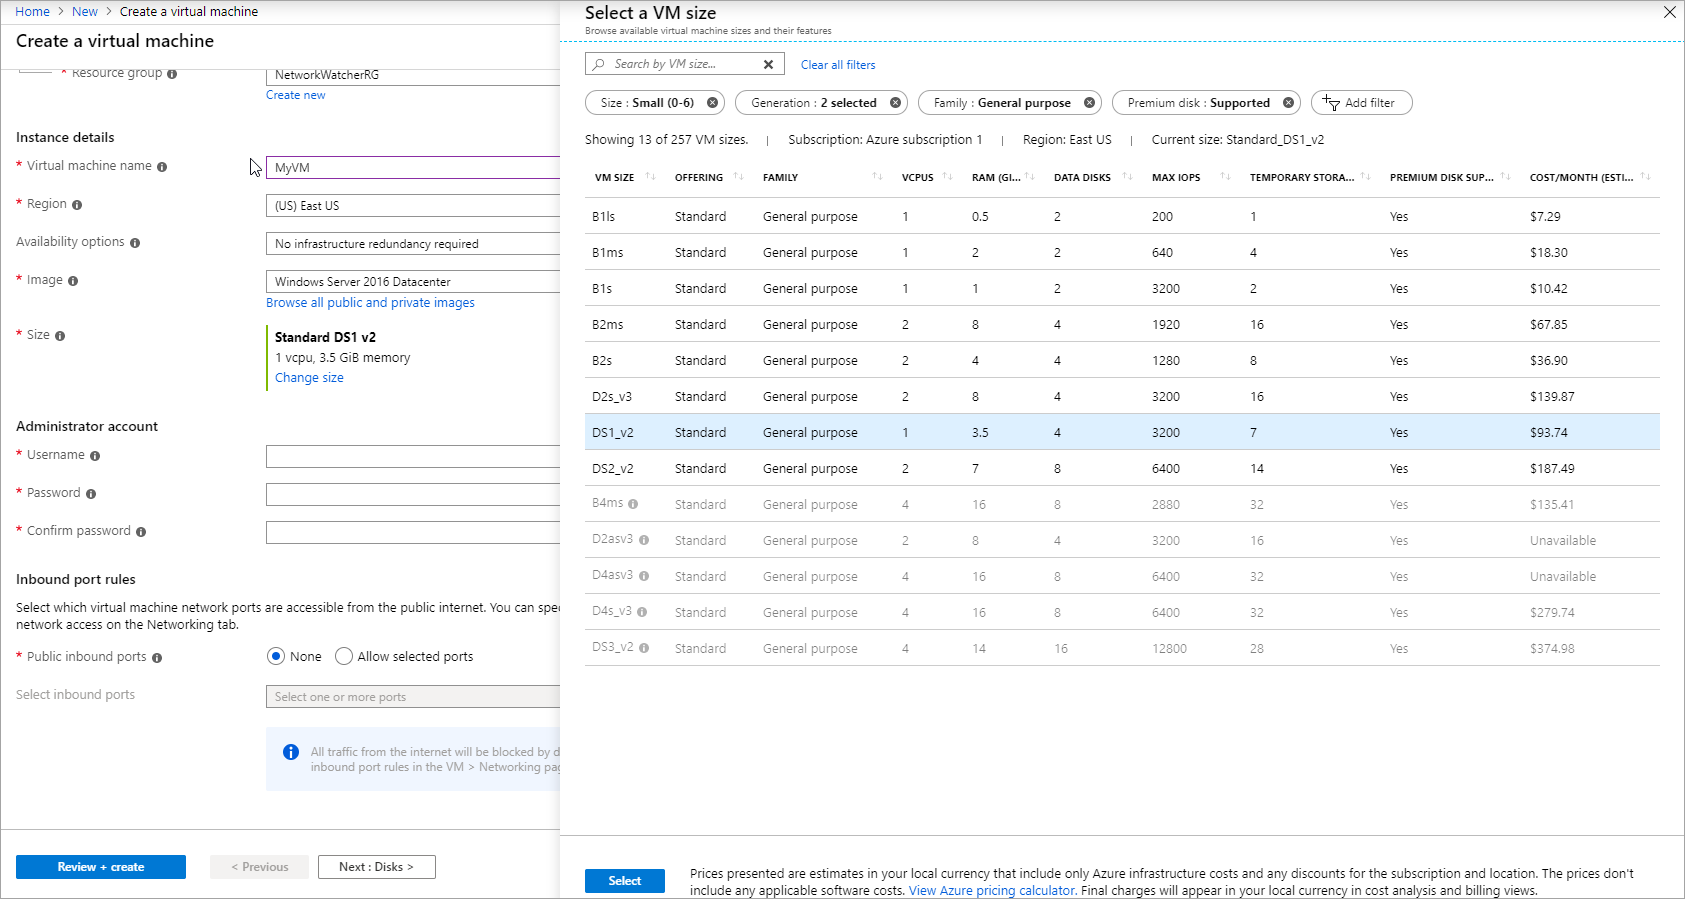
The mentioned prices are for example purposes only. They are not intended to imply actual costs.
Monitor costs when using Azure services
You can view and monitor costs with the following capabilities:
- Budget and cost alerts
- Tags
- Cost analysis
Track costs with budgets and cost alerts
Create budgets to manage costs and create alerts that automatically notify you and your stakeholders of spending anomalies and overspending. You can create a budget as early as when you create a subscription, to ensure you stay on top of your cost from the very start.
Group and allocate costs using tag inheritance
Azure tags are a great way to supplement the Azure hierarchy to identify the ownership of your resources, which helps in monitoring and optimizing your costs. To ensure that all your cost records are tagged, you can also enable tag inheritance in Cost management.
Explore and analyze costs with cost analysis
After you have your Azure services running, it is recommended to regularly check costs to track your Azure spending. You can use cost analysis to understand where costs originated from for your Azure and Marketplace usage and purchases.
Visit the Cost Management + Billing page in the Azure portal.
Select Cost analysis from the menu on the left side of the screen to access reports that allow you to view your current cost broken down by various pivots such as tags, service, location, and subscription. After you add a service or make a purchase, it is recommended to wait 24 hours for the data to be displayed. By default, Cost analysis shows the cost for the scope that you are in. For example, in the screenshot below, cost for Contoso billing account is displayed. Use the Scope pill to switch to a different scope in Cost analysis. For more information about scopes, see, Understand and work with scopes
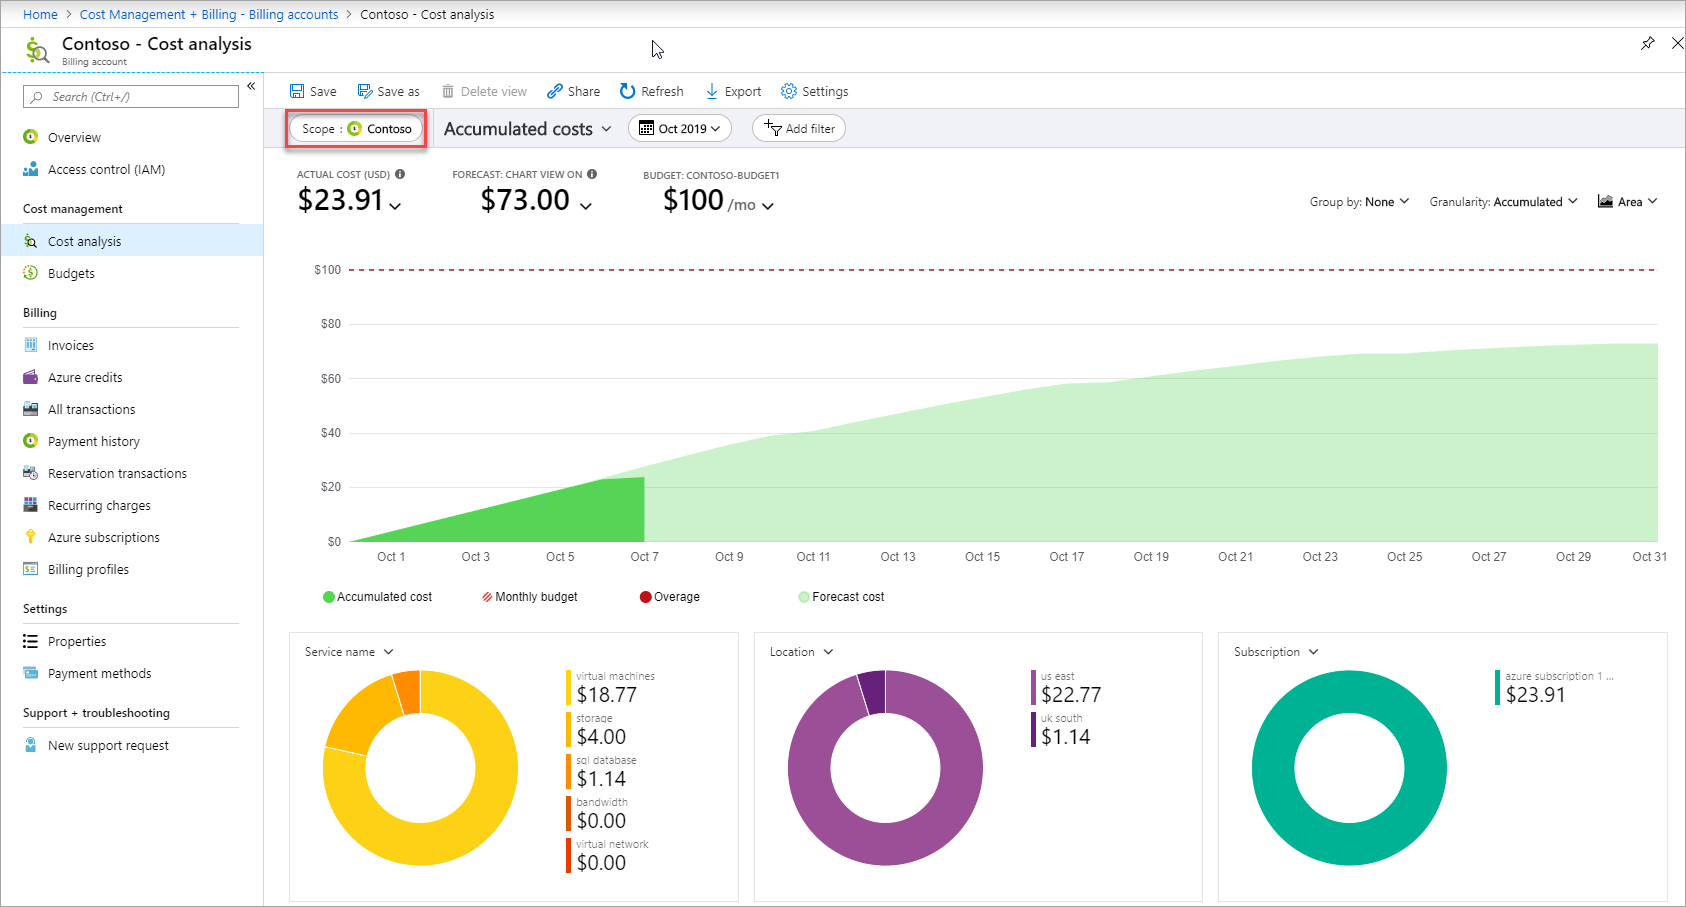
You can group your costs by various dimensions, such as service family, tags, subscription and resource group. Select Group by to view your charges by any of the available properties.
You can filter the charges by various properties, such as tags, resource type, and time span. Select Add filter to add the filter for a property and select the values to filter. Select Download to export the view to a comma-separated values (.csv) file.
For example, in the screenshot below, charges are filtered to virtual machines only.

Optimize and reduce costs
If you're unfamiliar with the principles of cost management, read How to optimize your cloud investment with Cost Management.
In the Azure portal, you can also optimize and reduce Azure costs with auto shutdown for VMs and Advisor recommendations.
Consider cost-cutting features like auto shutdown for VMs
Depending on your scenario, you can configure auto-shutdown for your VMs in the Azure portal. For more information, see Auto shutdown for VMs using Azure Resource Manager.
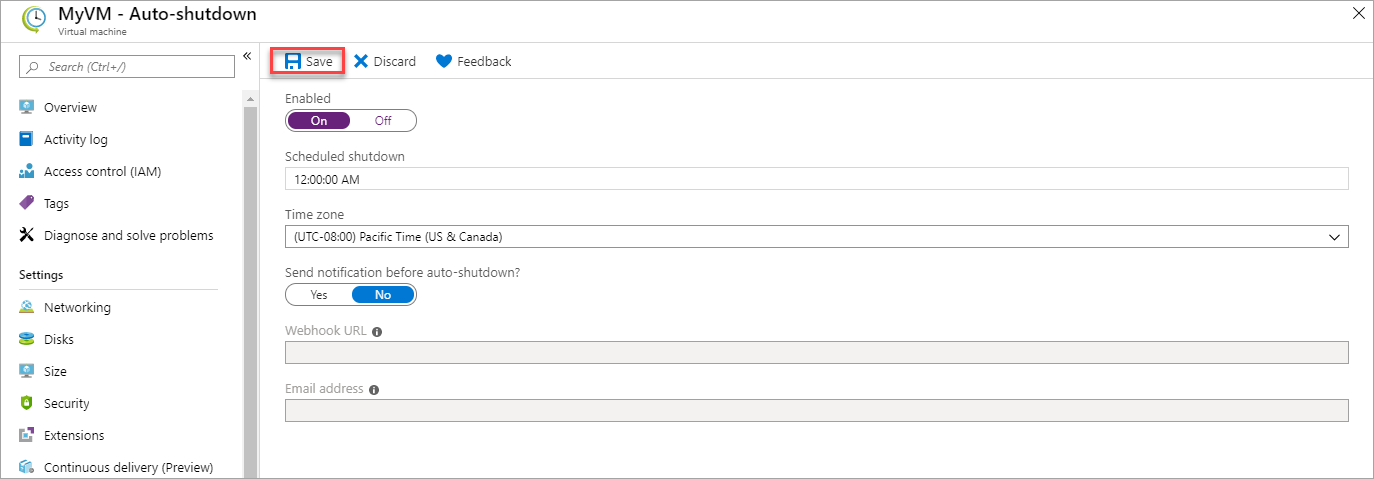
Auto-shutdown isn't the same as shutting down within the VM using power options. Auto-shutdown stops and deallocates your VMs to prevent additional usage charges. For more information, see pricing FAQ for Linux VMs and Windows VMs about VM states.
For more cost-cutting features for your development and test environments, see Azure DevTest Labs.
Turn on and review Azure Advisor recommendations
Azure Advisor helps you reduce costs by identifying resources with low usage. Search for Advisor in the Azure portal:

Select Cost from the left-hand side. You'll see actionable recommendations in the Cost tab:
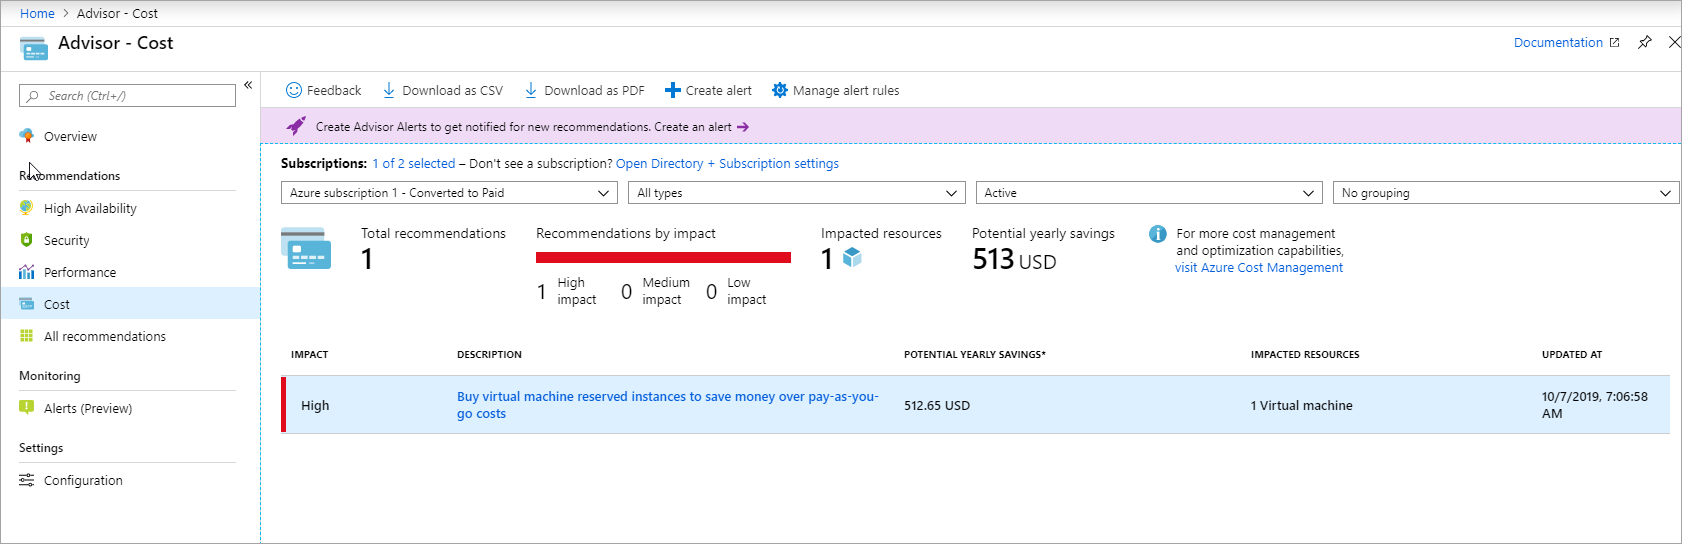
The mentioned prices are for example purposes only. They are not intended to imply actual costs.
Review the Optimize costs from recommendations tutorial for a guided tutorial about cost-saving Advisor recommendations.
Prevent unwanted charges
To prevent unwanted charges on a subscription, you can go to the Resources menu for the subscription and select the resources that you want to delete. If you don't want to have any charges for the subscription, select all the subscription resources and then Delete them. The subscription essentially becomes an empty container with no charges.

If you have a support plan, you might continue to be charged for it. To delete a support plan, navigate to Cost Management + Billing and select Recurring charges. Select the support plan and turn off autorenewal.

Integrate with billing and Cost Management APIs
Use the Azure billing and Cost Management automation APIs to programmatically retrieve billing and cost data. Use the RateCard API and the Usage API together to get your billed usage.
Additional resources and special cases
CSP and Sponsorship customers
Contact your account manager or Azure partner to get started.
| Offer | Resources |
|---|---|
| Cloud Solution Provider (CSP) | Talk to your provider |
| Azure Sponsorship | Sponsorship portal |
If you're managing IT for a large organization, we recommend reading Azure enterprise scaffold and the enterprise IT white paper (.pdf download, English only).
Enterprise Agreement cost views in the Azure portal
Enterprise cost views are currently in Public Preview. Items to note:
- Subscription costs are based on usage and don't include prepaid amounts, overages, included quantities, adjustments, and taxes. Actual charges are computed at the Enrollment level.
- If you aren't seeing costs, it might be for one of the following reasons:
- You don't have permissions at the subscription level. To see enterprise cost views, you must be a Billing Reader, Reader, Contributor, or Owner at the subscription level.
- You're an Account Owner and your Enrollment Administrator has disabled the "AO view charges" setting. Contact your Enrollment Administrator to get access to costs.
- You're a Department Administrator and your Enrollment Administrator has disabled the DA view charges setting. Contact your Enrollment Administrator to get access.
- You bought Azure through a channel partner, and the partner didn't release pricing information.
- Direct EA customers can update cost-related settings in the Azure portal. Navigate to the Policies menu to change settings.
- Spending limit, and invoice guidance don't apply to EA Subscriptions.
Check your subscription and access
To view costs, you need account or subscription level access to cost or billing information. The access varies by type of billing account. To learn more about billing accounts and check the type of your billing account, see View billing accounts in Azure portal.
If you have access to Azure through a Microsoft Online Service Program (MOSP) billing account, see Manage access to billing information for Azure.
If you have access to Azure through an Enterprise Agreement (EA) billing account, see Understand Azure Enterprise Agreement administrative roles in Azure.
If you have access to Azure through a Microsoft Customer Agreement (MCA) billing account, see Understand Microsoft Customer Agreement administrative roles in Azure.
Request a Service Level Agreement credit for a service incident
The Service Level Agreement (SLA) describes Microsoft's commitments for uptime and connectivity. A service incident is reported when Azure services experience an issue that impacts uptime or connectivity, often referred to as an outage. If we do not achieve and maintain the Service Levels for each service as described in the SLA, then you might be eligible for a credit towards a portion of your monthly service fees.
To request a credit:
Sign in to the Azure portal. If you have multiple accounts, make sure that you use the one that was affected by Azure downtime. Then, create a new support request.
Under Issue type, select Billing and then under Problem type, select Refund Request.
Add details to specify that you're asking for an SLA credit, mention the date/time/time-zone as well as the impacted services (VMs, Web Sites, etc.)
Finally, verify your contact details and select Create to submit your request.
For some services, there are prerequisites for the SLA to apply. For example, virtual machines must have two or more instances deployed in the same Availability Set.
For more information, see Service Level Agreements and the SLA summary for Azure services documentation.
Related content
- Learn about using spending limits to prevent overspending.
- Start analyzing your Azure costs.