Create custom VM images for your Azure Stack Edge Pro GPU device
APPLIES TO:  Azure Stack Edge Pro - GPU
 Azure Stack Edge Pro 2
 Azure Stack Edge Pro R
 Azure Stack Edge Mini R
To deploy VMs on your Azure Stack Edge Pro GPU device, you need to be able to create custom VM images that you can use to create VMs in Azure. This article describes the steps to create custom VM images in Azure for Windows and Linux VMs and download or copy those images to an Azure Storage account.
There's a required workflow for preparing a custom VM image. For the image source, you need to use a fixed VHD from any size that Azure supports. For VM size options, see Supported VM sizes.
Prerequisites
Complete the following prerequisite before you create your VM image:
- Download AzCopy. AzCopy gives you a fast way to copy an OS disk to an Azure Storage account.
Create a custom VM image
The steps for preparing a custom VM image vary for a Windows or Linux VM.
Do the following steps to create a Windows VM image:
Create a Windows virtual machine in Azure. For portal instructions, see Create a Windows virtual machine in the Azure portal. For PowerShell instructions, see Tutorial: Create and manage Windows VMs with Azure PowerShell.
The virtual machine can be a Generation 1 or Generation 2 VM. The OS disk that you use to create your VM image must be a fixed-size VHD of any size that Azure supports. For VM size options, see Supported VM sizes.
You can use any Windows Gen1 or Gen2 VM with a fixed-size VHD in Azure Marketplace. For a of list Azure Marketplace images that could work, see Commonly used Azure Marketplace images for Azure Stack Edge.
Generalize the virtual machine. To generalize the VM, connect to the virtual machine, open a command prompt, and run the following
sysprepcommand:c:\windows\system32\sysprep\sysprep.exe /oobe /generalize /shutdown /mode:vmImportant
After the command is complete, the VM will shut down. Do not restart the VM. Restarting the VM will corrupt the disk you just prepared.
Download OS disk to storage account
To use your custom VM image to deploy VMs on your device, you must download the OS disk to an Azure Storage account. We recommend that you use the same storage account that you used for your device.
To download the OS disk for the VM to an Azure storage account, do the following steps:
Stop the VM in the portal. You need to do this to deallocate the OS disk even if your Windows VM was shut down after you ran
sysprepto generalize it.Generate a download URL for the OS disk, and make a note of the URL. By default, the URL expires after 3600 seconds (1 hour). You can increase that time if needed.
Download the VHD to your Azure Storage account using one of these methods:
Method 1: For a faster transfer, use AzCopy to copy the VHD to your Azure Storage account. For instructions, see Use AzCopy to copy VM image to storage account, below.
Method 2: For a simple, one-click method, you can select Download the VHD file when you generate a download URL (in step 3b) to download the disk from the portal. When you use this method, the disk copy can take quite a long time, and you'll need to upload the VHD to your Azure storage account to be able to create VMs using the portal.
You can now use this VHD to create and deploy VMs on your Azure Stack Edge Pro GPU device.
Copy VHD to storage account using AzCopy
The following procedures describe how to use AzCopy to copy a custom VM image to an Azure Storage account so you can use the image to deploy VMs on your Azure Stack Edge Pro GPU device. We recommend that you store your custom VM images in any existing storage account that you're using which is in the same region/subscription as Azure Stack Edge.
Create target URI for a container
AzCopy requires a target URI that tells where to copy the new image to in your storage account. Before you run AzCopy, you'll generate a shared-access signature (SAS) URL for the blob container you want to copy the file to. To create the target URI, you'll add the filename to the SAS URL.
To create the target URI for your prepared VHD, do the following steps:
Generate a SAS URL for a container in an Azure Storage account, do the following steps:
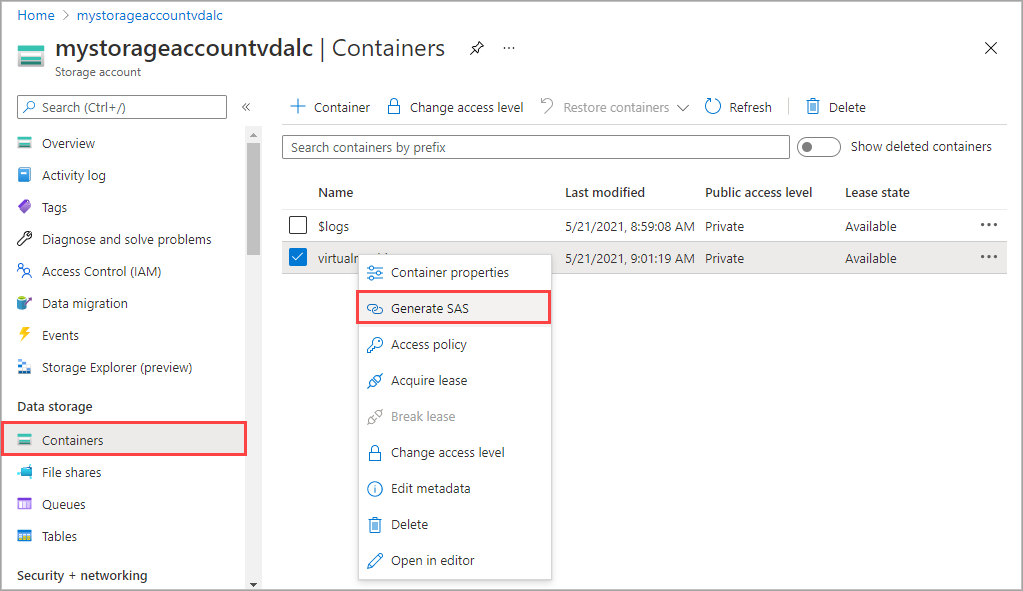
In the Azure portal, open the storage account, and select Containers. Select and then right-click the blob container you want to use, and select Generate SAS.

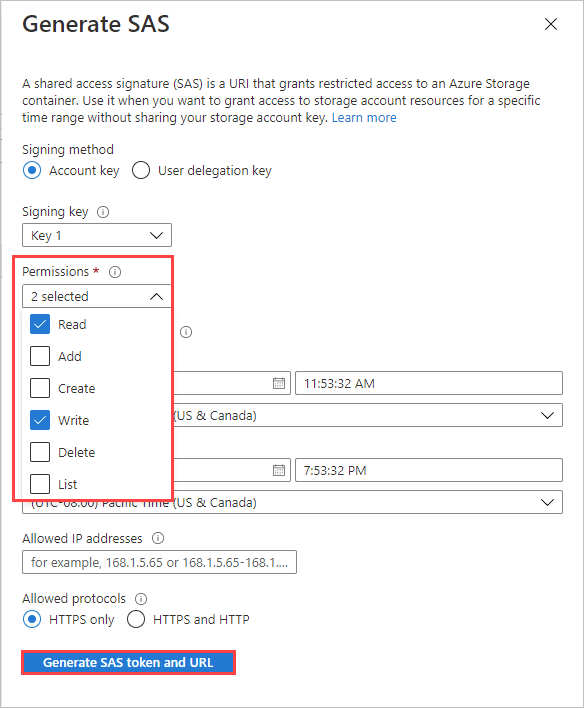
On the Generate SAS screen, select Read and Write in Permissions.

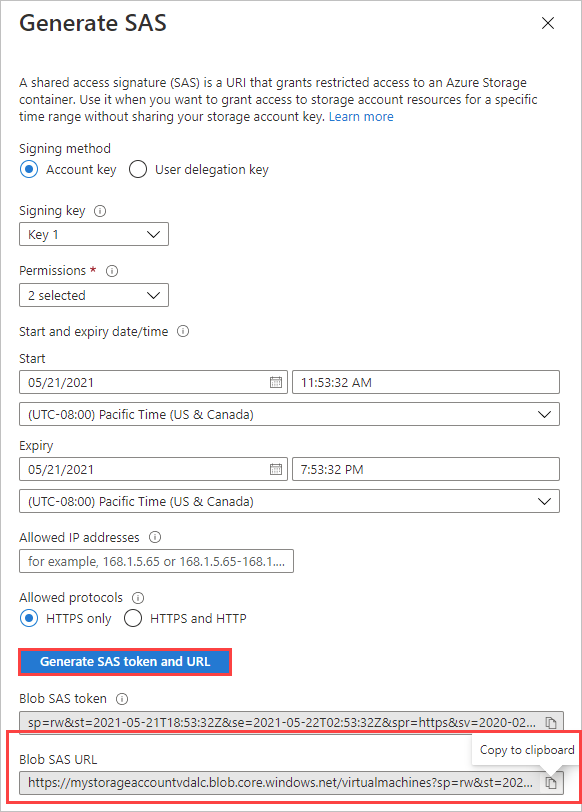
Select Generate SAS token and URL, and then select Copy to copy the Blob SAS URL.

To create the target URI for the
azcopycommand, add the desired filename to the SAS URL.The Blob SAS URL has the following format.

Insert the filename, in the format
/<filename>.vhdbefore the question mark that begins the query string. The filename extension must be VHD.For example, the following Blob SAS URL will copy the osdisk.vhd file to the virtualmachines blob container in mystorageaccount.

Copy VHD to blob container
To copy your VHD to a blob container using AzCopy, do the following steps:
Download AZCopy if you haven't done that already.
In PowerShell, navigate to the directory where you stored azcopy.exe, and run the following command:
.\azcopy copy <source URI> <target URI> --recursivewhere:
<source URI>is the download URL that you generated earlier.<target URI>tells which blob container to copy the new image to in your Azure Storage account. For instructions, see Use AzCopy to copy VM image to storage account.
For example, the following URI will copy a file named windowsosdisk.vhd to the virtual machines blob container in the mystorageaccount storage account:
.\azcopy copy "https://md-h1rvdq3wwtdp.z24.blob.storage.azure.net/gxs3kpbgjhkr/abcd?sv=2018-03-28&sr=b&si=f86003fc-a231-43b0-baf2-61dd51e3a05a&sig=o5Rj%2BNZSook%2FVNMcuCcwEwsr0i7sy%2F7gIDzak6JhlKg%3D" "https://mystorageaccount.blob.core.windows.net/virtualmachines/osdisk.vhd?sp=rw&st=2021-05-21T16:52:24Z&se=2021-05-22T00:52:24Z&spr=https&sv=2020-02-10&sr=c&sig=PV3Q3zpaQ%2FOLidbQJDKlW9nK%2BJ7PkzYv2Eczxko5k%2Bg%3D" --recursive
Sample output
For the example AzCopy command above, the following output indicates a successful copy was completed.
PS C:\azcopy\azcopy_windows_amd64_10.10.0> .\azcopy copy "https://md-h1rvdq3wwtdp.z24.blob.storage.azure.net/gxs3kpbgjhkr/abcd?sv=2018-03-28&sr=b&si=f86003fc-a231-43b0-baf2-61dd51e3a05a&sig=o5Rj%2BNZSook%2FVNMcuCcwEwsr0i7sy%2F7gIDzak6JhlKg%3D" "https://mystorageaccount.blob.core.windows.net/virtualmachines/osdisk.vhd?sp=rw&st=2021-05-21T16:52:24Z&se=2021-05-22T00:52:24Z&spr=https&sv=2020-02-10&sr=c&sig=PV3Q3zpaQ%2FOLidbQJDKlW9nK%2BJ7PkzYv2Eczxko5k%2Bg%3D" --recursive
INFO: Scanning...
INFO: Failed to create one or more destination container(s). Your transfers may still succeed if the container already exists.
INFO: Any empty folders will not be processed, because source and/or destination doesn't have full folder support

Job 783f2177-8317-3e4b-7d2f-697a8f1ab63c has started
Log file is located at: C:\Users\aseuser\.azcopy\783f2177-8317-3e4b-7d2f-697a8f1ab63c.log

INFO: Destination could not accommodate the tier P10. Going ahead with the default tier. In case of service to service transfer, consider setting the flag --s2s-preserve-access-tier=false.
100.0 %, 0 Done, 0 Failed, 1 Pending, 0 Skipped, 1 Total,

Job 783f2177-8317-3e4b-7d2f-697a8f1ab63c summary
Elapsed Time (Minutes): 1.4671
Number of File Transfers: 1
Number of Folder Property Transfers: 0
Total Number of Transfers: 1
Number of Transfers Completed: 1
Number of Transfers Failed: 0
Number of Transfers Skipped: 0
TotalBytesTransferred: 136367309312
Final Job Status: Completed

PS C:\azcopy\azcopy_windows_amd64_10.10.0>
Next steps
Feedback
Coming soon: Throughout 2024 we will be phasing out GitHub Issues as the feedback mechanism for content and replacing it with a new feedback system. For more information see: https://aka.ms/ContentUserFeedback.
Submit and view feedback for