Note
Access to this page requires authorization. You can try signing in or changing directories.
Access to this page requires authorization. You can try changing directories.
APPLIES TO:  Azure Stack Edge Pro - GPUAzure Stack Edge Pro 2Azure Stack Edge Pro RAzure Stack Edge Mini R
You can create and manage virtual machines (VMs) on an Azure Stack Edge device using APIs. These APIs are standard Azure Resource Manager APIs called using the local Azure Stack Edge endpoint. The Azure Resource Manager APIs provide a consistent management layer that in this case enables you to create, update, and delete VMs in a local subscription that exists on the device. You can connect to the Azure Resource Manager running on Azure Stack Edge via Azure PowerShell cmdlets.
This tutorial describes how to create and manage a VM on your Azure Stack Edge Pro device using Python and the Azure API.
VM deployment workflow
The deployment workflow is illustrated in the following diagram.

The high-level summary of the deployment workflow is as follows:
- Connect to Azure Resource Manager
- Create a resource group
- Create a storage account
- Add blob URI to hosts file
- Install certificates
- Upload a VHD
- Create managed disks from the VHD
- Create a VM image from the image managed disk
- Create VM with previously created resources
- Create a VNet
- Create a VNIC using the VNet subnet ID
For a detailed explanation of the workflow diagram, see Deploy VMs on your Azure Stack Edge Pro device using Azure PowerShell. For information on how to connect to Azure Resource Manager, see Connect to Azure Resource Manager using Azure PowerShell.
Prerequisites
Before you begin creating and managing a VM on your Azure Stack Edge Pro device using Azure CLI and Python, you need to make sure you have completed the prerequisites listed in the following steps:
You completed the network settings on your Azure Stack Edge Pro device as described in Step 1: Configure Azure Stack Edge Pro device.
You enabled a network interface for compute. This network interface IP is used to create a virtual switch for the VM deployment. The following steps walk you through the process:
Go to Compute. Select the network interface that you will use to create a virtual switch.
Important
You can only configure one port for compute.
Enable compute on the network interface. Azure Stack Edge Pro creates and manages a virtual switch corresponding to that network interface.
You created and installed all the certificates on your Azure Stack Edge Pro device and in the trusted store of your client. Follow the procedure described in Step 2: Create and install certificates.
You created a Base-64 encoded .cer certificate (PEM format) for your Azure Stack Edge Pro device. That certificate is already uploaded as signing chain on the device and installed in the trusted root store on your client. This certificate is also required in pem format for Python to work on this client.
Convert this certificate to
pemformat by using the certutil command. You must run this command in the directory that contains your certificate.certutil.exe <SourceCertificateName.cer> <DestinationCertificateName.pem>The following shows sample command usage:
PS C:\Certificates> certutil.exe -encode aze-root.cer aze-root.pem
Input Length = 2150
Output Length = 3014
CertUtil: -encode command completed successfully.
PS C:\Certificates>
You will also add this
pemto the Python store later.You assigned the device IP in your Network page in the local web UI of device. Add this IP to:
- The host file on the client, OR,
- The DNS server configuration
Important
We recommend that you modify the DNS server configuration for endpoint name resolution.
Start Notepad as an administrator (Administrator privileges is required to save the file), and then open the hosts file located at
C:\Windows\System32\Drivers\etc.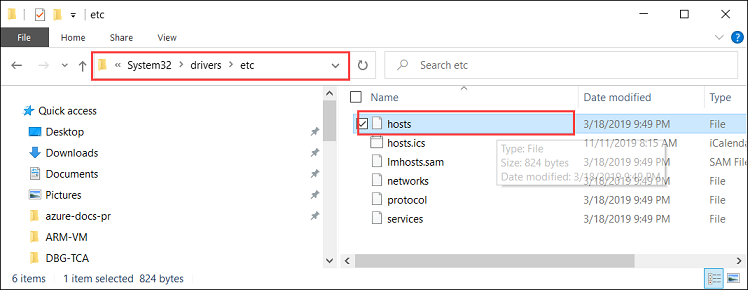
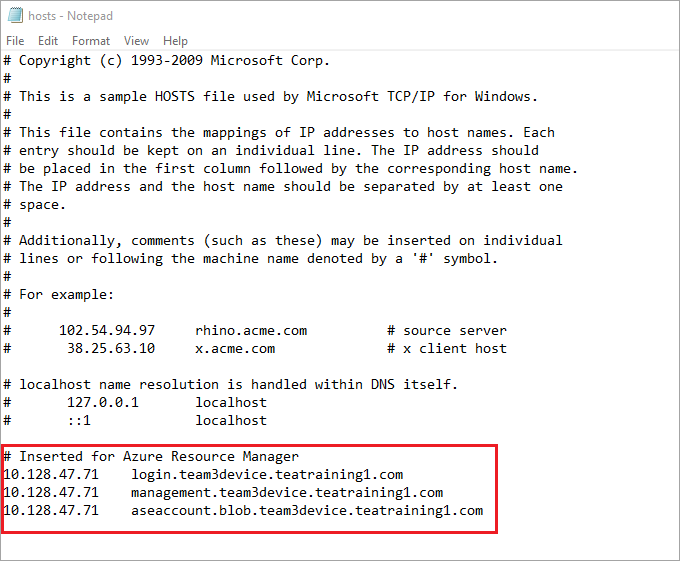
Add the following entries to your hosts file replacing with appropriate values for your device:
<Device IP> login.<appliance name>.<DNS domain>
<Device IP> management.<appliance name>.<DNS domain>
<Device IP> <storage name>.blob.<appliance name>.<DNS domain>
Use the following image for reference. Save the hosts file.
Download the Python script used in this procedure.
Prepare your environment for the Azure CLI:
Use the Bash environment in Azure Cloud Shell. For more information, see Get started with Azure Cloud Shell.

If you prefer to run CLI reference commands locally, install the Azure CLI. If you're running on Windows or macOS, consider running Azure CLI in a Docker container. For more information, see How to run the Azure CLI in a Docker container.
If you're using a local installation, sign in to the Azure CLI by using the az login command. To finish the authentication process, follow the steps displayed in your terminal. For other sign-in options, see Authenticate to Azure using Azure CLI.
When you're prompted, install the Azure CLI extension on first use. For more information about extensions, see Use and manage extensions with the Azure CLI.
Run az version to find the version and dependent libraries that are installed. To upgrade to the latest version, run az upgrade.
Step 1: Set up Azure CLI/Python on the client
Verify profile and install Azure CLI
Install Azure CLI on your client. In this example, Azure CLI 2.0.80 was installed. To verify the version of Azure CLI, run the az --version command.
The following is sample output from the above command:
PS C:\windows\system32> az --version
azure-cli                         2.0.80

command-modules-nspkg              2.0.3
core                              2.0.80
nspkg                              3.0.4
telemetry                          1.0.4
Extensions:
azure-cli-iot-ext                  0.7.1

Python location 'C:\Program Files (x86)\Microsoft SDKs\Azure\CLI2\python.exe'
Extensions directory 'C:\.azure\cliextensions'

Python (Windows) 3.6.6 (v3.6.6:4cf1f54eb7, Jun 27 2018, 02:47:15) [MSC v.1900 32 bit (Intel)]

Legal docs and information: aka.ms/AzureCliLegal

Your CLI is up-to-date.

Please let us know how we are doing: https://aka.ms/clihats
PS C:\windows\system32>
If you do not have Azure CLI, download and Install Azure CLI on Windows. You can run Azure CLI using Windows command prompt or through Windows PowerShell.
Make a note of the CLI's Python location. You need the Python location to determine the location of the trusted root certificate store for Azure CLI.
To run the sample script used in this article, you will need the following Python library versions:
azure-common==1.1.23
azure-mgmt-resource==2.1.0
azure-mgmt-network==2.7.0
azure-mgmt-compute==5.0.0
azure-mgmt-storage==1.5.0
azure-storage-blob==1.2.0rc1
haikunator
msrestazure==0.6.2
To install the versions, run the following command:
.\python.exe -m pip install haikunatorThe following sample output shows the installation of Haikunator:
PS C:\Program Files (x86)\Microsoft SDKs\Azure\CLI2> .\python.exe -m pip install haikunator

Collecting haikunator
  Downloading https://files.pythonhosted.org/packages/43/fa/130968f1a1bb1461c287b9ff35c630460801783243acda2cbf3a4c5964a5/haikunator-2.1.0-py2.py3-none-any.whl

Installing collected packages: haikunator
Successfully installed haikunator-2.1.0
You are using pip version 10.0.1, however version 20.0.1 is available.
You should consider upgrading using the 'python -m pip install --upgrade pip' command.

PS C:\Program Files (x86)\Microsoft SDKs\Azure\CLI2>
The following sample output shows the installation of pip for
msrestazure:PS C:\Program Files (x86)\Microsoft SDKs\Azure\CLI2> .\python.exe -m pip install msrestazure==0.6.2 Requirement already satisfied: msrestazure==0.6.2 in c:\program files (x86)\microsoft sdks\azure\cli2\lib\site-packages (0.6.2) Requirement already satisfied: msrest<2.0.0,>=0.6.0 in c:\program files (x86)\microsoft sdks\azure\cli2\lib\site-packages (from msrestazure==0.6.2) (0.6.10) === CUT =========================== CUT ================================== Requirement already satisfied: cffi!=1.11.3,>=1.8 in c:\program files (x86)\microsoft sdks\azure\cli2\lib\site-packages (from cryptography>=1.1.0->adal<2.0.0,>=0.6.0->msrestazure==0.6.2) (1.13.2) Requirement already satisfied: pycparser in c:\program files (x86)\microsoft sdks\azure\cli2\lib\site-packages (from cffi!=1.11.3,>=1.8->cryptography>=1.1.0->adal<2.0.0,>=0.6.0->msrestazure==0.6.2) (2.18) You are using pip version 10.0.1, however version 20.0.1 is available. You should consider upgrading using the 'python -m pip install --upgrade pip' command. PS C:\Program Files (x86)\Microsoft SDKs\Azure\CLI2>
Trust the Azure Stack Edge Pro CA root certificate
Find the certificate location on your machine. The location may vary depending on where you installed
az cli. Run Windows PowerShell as administrator. Switch to the path whereaz cliinstalled Python:C:\Program Files (x86)\Microsoft SDKs\Azure\CLI2\python.exe.To get the certificate location, type the following command:
.\python -c "import certifi; print(certifi.where())"The cmdlet returns the certificate location, as seen below:
PS C:\Program Files (x86)\Microsoft SDKs\Azure\CLI2> .\python -c "import certifi; print(certifi.where())"
C:\Program Files (x86)\Microsoft SDKs\Azure\CLI2\lib\site-packages\certifi\cacert.pem
PS C:\Program Files (x86)\Microsoft SDKs\Azure\CLI2>
Make a note of this location as you will use it later -
C:\Program Files (x86)\Microsoft SDKs\Azure\CLI2\lib\site-packages\certifi\cacert.pemTrust the Azure Stack Edge Pro CA root certificate by appending it to the existing Python certificate. You will provide the path to where you saved the PEM certificate earlier.
$pemFile = "<Path to the pem format certificate>"An example path would be "C:\VM-scripts\rootteam3device.pem"
Then type the following series of commands into Windows PowerShell:
$root = New-Object System.Security.Cryptography.X509Certificates.X509Certificate2
    $root.Import($pemFile)

Write-Host "Extracting required information from the cert file"
$md5Hash    = (Get-FileHash -Path $pemFile -Algorithm MD5).Hash.ToLower()
$sha1Hash   = (Get-FileHash -Path $pemFile -Algorithm SHA1).Hash.ToLower()
$sha256Hash = (Get-FileHash -Path $pemFile -Algorithm SHA256).Hash.ToLower()

$issuerEntry  = [string]::Format("# Issuer: {0}", $root.Issuer)
$subjectEntry = [string]::Format("# Subject: {0}", $root.Subject)
$labelEntry   = [string]::Format("# Label: {0}", $root.Subject.Split('=')[-1])
$serialEntry  = [string]::Format("# Serial: {0}", $root.GetSerialNumberString().ToLower())
$md5Entry = [string]::Format("# MD5 Fingerprint: {0}", $md5Hash)
$sha1Entry= [string]::Format("# SHA1 Fingerprint: {0}", $sha1Hash)
$sha256Entry  = [string]::Format("# SHA256 Fingerprint: {0}", $sha256Hash)
$certText = (Get-Content -Path $pemFile -Raw).ToString().Replace("`r`n","`n")

$rootCertEntry = "`n" + $issuerEntry + "`n" + $subjectEntry + "`n" + $labelEntry + "`n" + `
$serialEntry + "`n" + $md5Entry + "`n" + $sha1Entry + "`n" + $sha256Entry + "`n" + $certText

Write-Host "Adding the certificate content to Python Cert store"
Add-Content "${env:ProgramFiles(x86)}\Microsoft SDKs\Azure\CLI2\Lib\site-packages\certifi\cacert.pem" $rootCertEntry

Write-Host "Python Cert store was updated to allow the Azure Stack Edge Pro CA root certificate"
Connect to Azure Stack Edge Pro
Register your Azure Stack Edge Pro environment by running the az cloud register command.
In some scenarios, direct outbound internet connectivity is routed through a proxy or firewall, which enforces SSL interception. In these cases, the
az cloud registercommand can fail with an error such as "Unable to get endpoints from the cloud." To work around this error, set the following environment variables in Windows PowerShell:$ENV:AZURE_CLI_DISABLE_CONNECTION_VERIFICATION = 1 $ENV:ADAL_PYTHON_SSL_NO_VERIFY = 1Set environment variables for the script for Azure Resource Manager endpoint, location where the resources are created and the path to where the source VHD is located. The location for the resources is fixed across all the Azure Stack Edge Pro devices and is set to
dbelocal. You also need to specify the address prefixes and private IP address. All the following environment variables are values based on your values except forAZURE_RESOURCE_LOCATION, which should be hardcoded to"dbelocal".$ENV:ARM_ENDPOINT = "https://management.team3device.teatraining1.com" $ENV:AZURE_RESOURCE_LOCATION = "dbelocal" $ENV:VHD_FILE_PATH = "C:\Downloads\Ubuntu1604\Ubuntu13.vhd" $ENV:ADDRESS_PREFIXES = "5.5.0.0/16" $ENV:PRIVATE_IP_ADDRESS = "5.5.174.126"Register your environment. Use the following parameters when running az cloud register:
Value Description Example Environment name The name of the environment you are trying to connect to Provide a name, for example, aze-environResource Manager endpoint This URL is https://Management.<appliancename><dnsdomain>.
To get this URL, go to Devices page in the local web UI of your device.For example, https://management.team3device.teatraining1.com.az cloud register -n <environmentname> --endpoint-resource-manager "https://management.<appliance name>.<DNS domain>"The following shows sample usage of the above command:
PS C:\Program Files (x86)\Microsoft SDKs\Azure\CLI2> az cloud register -n az-new-env --endpoint-resource-manager "https://management.team3device.teatraining1.com"Set the active environment by using the following command:
az cloud set -n <EnvironmentName>The following shows sample usage of the above command:
PS C:\Program Files (x86)\Microsoft SDKs\Azure\CLI2> az cloud set -n az-new-env
Switched active cloud to 'az-new-env'.
Use 'az login' to log in to this cloud.
Use 'az account set' to set the active subscription.
PS C:\Program Files (x86)\Microsoft SDKs\Azure\CLI2>
Sign in to your Azure Stack Edge Pro environment by using the az login command. You can sign in to the Azure Stack Edge Pro environment either as a user or as a service principal.
Follow these steps to sign in as a user:
You can either specify the username and password directly within the
az logincommand, or authenticate by using a browser. You must do the latter if your account has multifactor authentication enabled.The following shows sample usage of
az login:PS C:\Certificates> az login -u EdgeARMuserAfter using the login command, you are prompted for a password. Provide the Azure Resource Manager password.
The following shows sample output for a successful sign-in after supplying the password:
PS C:\Program Files (x86)\Microsoft SDKs\Azure\CLI2> az login -u EdgeARMuser
Password:
[
     {
         "cloudName": "az-new-env",
         "id": "A4257FDE-B946-4E01-ADE7-674760B8D1A3",
         "isDefault": true,
         "name": "Default Provider Subscription",
         "state": "Enabled",
         "tenantId": "aaaabbbb-0000-cccc-1111-dddd2222eeee",
         "user": {
             "name": "EdgeArmUser@localhost",
             "type": "user"
         }
     }
]
PS C:\Program Files (x86)\Microsoft SDKs\Azure\CLI2>
Make a note of the
idandtenantIdvalues as these values correspond to your Azure Resource Manager Subscription ID and Azure Resource Manager Tenant ID respectively and will be used in the later step.The following environment variables need to be set to work as service principal:
$ENV:ARM_TENANT_ID = "aaaabbbb-0000-cccc-1111-dddd2222eeee"
$ENV:ARM_CLIENT_ID = "cbd868c5-7207-431f-8d16-1cb144b50971"
$ENV:ARM_CLIENT_SECRET - "<Your Azure Resource Manager password>"
$ENV:ARM_SUBSCRIPTION_ID = "<Your subscription ID>"
Your Azure Resource Manager Client ID is hard-coded. Your Azure Resource Manager Tenant ID and Azure Resource Manager Subscription ID are both present in the output of the
az logincommand you ran earlier. The Azure Resource Manager Client secret is the Azure Resource Manager password that you set.For more information, see Azure Resource Manager password.
Change the profile to version 2019-03-01-hybrid. To change the profile version, run the following command:
az cloud update --profile 2019-03-01-hybridThe following shows sample usage of
az cloud update:PS C:\Program Files (x86)\Microsoft SDKs\Azure\CLI2> az cloud update --profile 2019-03-01-hybrid PS C:\Program Files (x86)\Microsoft SDKs\Azure\CLI2>
Step 2: Create a VM
A Python script is provided to you to create a VM. Depending on whether you are signed in as user or set as service principal, the script takes the input accordingly and creates a VM.
- Run the Python script from the same directory where Python is installed.
.\python.exe example_dbe_arguments_name_https.py cli
When the script runs, uploading the VHD takes 20-30 minutes. To view the progress of the upload operation, you can use Azure Storage Explorer or AzCopy.
Here is a sample output of a successful run of the script. The script creates all the resources within a resource group, uses those resources to create a VM, and finally deletes the resource group including all the resources it created.
PS C:\Program Files (x86)\Microsoft SDKs\Azure\CLI2> .\python.exe example_dbe_arguments_name_https.py cli

Create Resource Group
Create a storage account
Uploading to Azure Stack Storage as blob:
        ubuntu13.vhd

Listing blobs...
        ubuntu13.vhd

VM image resource id:
            /subscriptions/.../resourceGroups/azure-sample-group-virtual-machines118/providers/Microsoft.Compute/images/UbuntuImage

Create Vnet
Create Subnet
Create NIC
Creating Linux Virtual Machine
Tag Virtual Machine
Create (empty) managed Data Disk
Get Virtual Machine by Name
Attach Data Disk
Detach Data Disk
Deallocating the VM (to prepare for a disk resize)
Update OS disk size
Start VM
Restart VM
Stop VM

List VMs in subscription
        VM: VmName118

List VMs in resource group
        VM: VmName118

Delete VM
All example operations completed successfully!

Delete Resource Group
Deleted: azure-sample-group-virtual-machines118
PS C:\Program Files (x86)\Microsoft SDKs\Azure\CLI2>