Note
Access to this page requires authorization. You can try signing in or changing directories.
Access to this page requires authorization. You can try changing directories.
Azure Databricks compute workloads in the compute plane store temporary data on Azure managed disks. By default, data stored on managed disks is encrypted at rest using server-side encryption with Microsoft-managed keys. This article describes how to configure a customer-managed key from Azure Key Vault vaults for your Azure Databricks workspace to use for managed disk encryption. For instructions on using a key from Azure Key Vault HSM, see Configure HSM customer-managed keys for Azure managed disks.
Important
- Customer-managed keys for managed disk storage apply to data disks, but do not apply to operating system (OS) disks.
- Customer-managed keys for managed disk storage do not apply to serverless compute resources such as serverless SQL warehouses and Model Serving. The disks used for serverless compute resources are short-lived and tied to the lifecycle of the serverless workload. When compute resources are stopped or scaled down, the VMs and their storage are destroyed.
Requirements
Your Azure Databricks workspace must be on the Premium plan.
Your Azure Key Vault and Azure Databricks workspace must be in the same region and in the same Microsoft Entra ID tenant. They can be in different subscriptions.
If you want to enable auto-rotation, only software keys and and HSM RSA of sizes 2048-bit, 3072-bit, and 4096-bit are supported.
This feature is unsupported for workspaces with FedRAMP compliance. Contact your Azure Databricks account team for more information.
To use the Azure CLI for these tasks, install the Azure CLI tool and install the Databricks extension:
az extension add --name databricksTo use Powershell for these tasks, install Azure PowerShell and install the Databricks Powershell module. You must also log in:
Connect-AzAccountTo log in to your Azure account as a user, see PowerShell login with an Azure Databricks user account. To log in to your Azure account as a service principal, see PowerShell login with a Microsoft Entra ID service principal.
Step 1: Create a Key Vault
You can create a Key Vault in many ways including Azure portal, Azure CLI, Powershell, and optionally using ARM templates. The following sections provide procedures for using Azure CLI and Powershell. For other approaches, refer to the Microsoft documentation.
Use Azure CLI
Create a Key Vault:
az keyvault create --name <keyVaultName> --resource-group <resourceGroupName> --location <location> --sku <sku> --enable-purge-protectionGet the vault URI:
az keyvault show --name <key-vault-name>Copy the
vaultUrivalue from the response.
Use Powershell
Create a new vault:
$keyVault = New-AzKeyVault -Name <key-vault-name> -ResourceGroupName <resource-group-name> -Location <location> -Sku <sku> -EnablePurgeProtection
Get an existing Key Vault:
$keyVault = Get-AzKeyVault -VaultName <key-vault-name>
Step 2: Prepare a key
You can create a key or retrieve an existing key stored in Azure Key Vault using Azure portal, Azure CLI, Powershell, and optionally using ARM templates. This section provides procedures for Azure CLI and Powershell. For other ways, see the Azure keys documentation.
Use Azure CLI
You can either create a key or retrieve an existing key.
Create a key:
Run the following command:
az keyvault key create \
--name <key-name> \
--vault-name <key-vault-name> \
--protection software
Make note of the following values from the output:
- Key vault name: The name of your Key Vault
- Key name: The name of your key
- Key version: The version of your key.
- Key vault resource group: The resource group of your Key Vault
Get key info:
az keyvault key show --vault-name <keyVaultName> --name <keyName>Copy the value of the
kidfield, which is your key ID.The full key ID usually has the form
https://<key-vault-name>.vault.azure.net/keys/<key-name>/<key-version>. Azure Key Vault keys that are in a non-public cloud have a different form.
Retrieve an existing key:
Run the following command:
az keyvault key show --name <key-name> --vault-name <key-vault-name>Make note of the following details for your existing key:
- Key vault name: The name of your Key Vault.
- Key name: The name of your key.
- Key version: The version of your key.
- Key vault resource group: The resource group of your Key Vault.
Get key info:
az keyvault key show --vault-name <keyVaultName> --name <keyName>Copy the value of the
kidfield, which is your key ID.The full key ID usually has the form
https://<key-vault-name>.vault.azure.net/keys/<key-name>/<key-version>. Azure Key Vault keys that are in a non-public cloud have a different form.Confirm that your existing key is enabled before proceeding by running
az keyvault key show --name <key name>again. The output displays"enabled": true.
Use Powershell
You can either create a key or retrieve an existing key:
Create a key:
$key = Add-AzKeyVaultKey \
-VaultName $keyVault.VaultName \
-Name <key-name> \
-Destination 'Software'
Retrieve an existing key:
$key = Get-AzKeyVaultKey \
-VaultName $keyVault.VaultName \
-Name <key-name>
Step 3: Stop all compute resources
Terminate all compute resources (clusters, pools, and SQL warehouses) in your workspace.
Step 4: Create or update a workspace
To create or update a workspace with a customer-managed key for managed disks, choose one of the following deployment strategies:
- Use the Azure portal (no template)
- Use the Azure CLI (no template)
- Use Powershell (no template)
- Use an ARM template (Azure portal or CLI)
Use the Azure portal (no template)
This section describes how to use the Azure portal to create or update a workspace with customer-managed keys for managed disks without using a template.
Start to create or update a workspace:
Create a new workspace with a key:
- Go to the Azure Portal homepage and click Create a resource in the top-left corner of the page.
- Within the search bar, type
Azure Databricksand click Azure Databricks. - Select Create from within the Azure Databricks widget.
- Enter values in the form fields on the tabs Basics and Networking.
- In the Encryption tab, select the Use your own key checkbox in the Managed Disks section.
Initially add a key to an existing workspace:
- Go to the Azure portal's home page for Azure Databricks.
- Navigate to your existing Azure Databricks workspace.
- Open the Encryption tab from the left-side panel.
- Under the Customer-managed keys section, enable Managed Disks.
Set the encryption fields.
- In the Key Identifier field, paste the Key Identifier of your Azure Key Vault key.
- In the Subscription dropdown, enter the subscription name of your Azure Key Vault key.
- To enable auto-rotation of your key, enable Enable Auto Rotation of Key.
Complete the remaining tabs and click Review + Create (for new workspace) or Save (for updating a workspace).
After your workspace deploys, navigate to your new Azure Databricks workspace.
From the Overview tab of your Azure Databricks workspace, click Managed Resource Group.
In the Overview tab of the managed resource group, look for the object of type Disk Encryption Set that was created in this resource group. Copy the name of the Disk Encryption Set.
In Azure portal, go to the Azure Key Vault that was used to configure the key that you are using for this feature.
In the sidebar, click Access control (IAM).
Click + Add > Add role assignment.
On the Role tab, select
Key Vault Crypto Service Encryption User.On the Members tab, click + Select members.
Search for and select the name of the Disk Encryption Set within the managed resource group of your Azure Databricks workspace.
Click Review + assign > Review + assign.
Note
If your key vault is using access policies instead of RBAC, follow these instructions:
- Open the Access policies tab from the left-side panel. Once the tab is open, click Create at the top of the page.
- In the Permissions tab under the Key permissions section, enable Get, Unwrap Key, and Wrap key.
- Click Next.
- On the Principal tab, enter the name of the Disk Encryption Set within the managed resource group of your Azure Databricks workspace in the search bar. Select the result and click Next.
- Click the Review + create tab and click Create.
Use the Azure CLI (no template)
For both new and updated workspaces, add these parameters to your command:
disk-key-name: Name of the keydisk-key-vault: Name of the vaultdisk-key-version: Key version. Use the specific key version and notlatest.disk-key-auto-rotation: Enable auto-rotation of the key (trueorfalse). This is an optional field. The default isfalse.
In the following commands, use the vault URI value from the response in the previous step in place of <key-vault-uri>. Additionally, the key name and key version values can be found within the kid value in the response from the previous step.
Create or update a workspace:
Example creating a workspace using these managed disk parameters:
az databricks workspace create --name <workspace-name> \
--resource-group <resource-group-name> \
--location <location> \
--sku premium --disk-key-name <key-name> \
--disk-key-vault <key-vault-uri> \
--disk-key-version <key-version> \
--disk-key-auto-rotation <true-or-false>
Example updating a workspace using these managed disk parameters:
az databricks workspace update \
--name <workspace-name> \
--resource-group <resource-group-name> \
--disk-key-name <key-name> \
--disk-key-vault <key-vault-uri> \
--disk-key-version <key-version> \
--disk-key-auto-rotation <true-or-false>
In the output of either of these commands, there is a
managedDiskIdentityobject. Save the value of theprincipalIdproperty within this object. That is used in a later step as the principal ID.Grant the Key Vault Crypto Service Encryption User role to the Azure Databricks managed disk identity on your key vault:
az keyvault role assignment create \
                        --role "Key Vault Crypto Service Encryption User"  \
                       --assignee <workspace-managed-disk-identity-principal-id>
Note
If your key vault is using access policies instead of RBAC, use the following command:
az keyvault set-policy \
--name <key-vault-name> \
--object-id <principal-id> \
--key-permissions get wrapKey unwrapKey
Use Powershell (no template)
For both new and updated workspaces, add these parameters to your command:
location: Workspace locationManagedDiskKeyVaultPropertiesKeyName: Key nameManagedDiskKeyVaultPropertiesKeyVaultUri: Key Vault URIManagedDiskKeyVaultPropertiesKeyVersion: Key version. Use the specific key version and notlatest.ManagedDiskRotationToLatestKeyVersionEnabled: Enable auto-rotation of the key (trueorfalse). This is an optional field. The default is false.
Create or update a workspace:
Example creating a workspace using managed disk parameters:
$workspace = New-AzDatabricksWorkspace -Name <workspace-name> \
-ResourceGroupName <resource-group-name> \
-location $keyVault.Location \
-Sku premium \
-ManagedDiskKeyVaultPropertiesKeyName $key.Name \
-ManagedDiskKeyVaultPropertiesKeyVaultUri $keyVault.VaultUri \
-ManagedDiskKeyVaultPropertiesKeyVersion $key.Version -ManagedDiskRotationToLatestKeyVersionEnabled
Example updating a workspace using managed disk parameters:
$workspace = Update-AzDatabricksworkspace -Name <workspace-name> \
-ResourceGroupName <resource-group-name> \
-ManagedDiskKeyVaultPropertiesKeyName $key.Name \
-ManagedDiskKeyVaultPropertiesKeyVaultUri $keyVault.VaultUri \
-ManagedDiskKeyVaultPropertiesKeyVersion $key.Version -ManagedDiskRotationToLatestKeyVersionEnabled
Grant the Key Vault Crypto Service Encryption User role to the Azure Databricks managed disk identity on your key vault:
New-AzKeyVaultRoleAssignment -RoleDefinitionName "Key Vault Crypto Service Encryption User" -ObjectId $workspace.ManagedDiskIdentityPrincipalId
Note
If your key vault is using access policies instead of RBAC, use the following command:
Set-AzKeyVaultAccessPolicy -VaultName $keyVault.VaultName \
-ObjectId $workspace.ManagedDiskIdentityPrincipalId \
-PermissionsToKeys wrapkey,unwrapkey,get
Use an ARM template (Azure portal or CLI)
You can explore Azure quickstart templates in the Azure documentation. For a list of ARM template deployment options, see the ARM template documentation.
When you create a workspace, a disk encryption set resource is also created within the managed resource group of your workspace. It has a system-assigned managed identity that is used to access your Key Vault. Before Azure Databricks compute can use this key to encrypt your data, you must retrieve the principal ID of the disk encryption set, then grant the identity the GET, WRAP, and UNWRAP key permissions to your Key Vault.
Databricks recommends that you create or update the workspace and grant Key Vault permissions in the same template deployment. You must create or update the workspace before you grant Key Vault permissions, with one exception. If you update an existing managed disk customer-managed key workspace to use a new key in a new Key Vault, you must grant the existing disk encryption set permission to access the new Key Vault, and then update the workspace with the new key configuration.
The example template in this section does both of the following:
- Creates or updates a workspace to add managed disk customer-managed key settings
- Grants the disk encryption set access to your Key Vault
You can use the following example ARM template, which does two things:
- Create or update a workspace with a managed disk customer-managed key.
- Create a key access policy.
If you already use an ARM template, you can merge the parameters, resources, and outputs from the example template into your existing template.
{
  "$schema": "https://schema.management.azure.com/schemas/2019-04-01/deploymentTemplate.json#",
  "contentVersion": "1.0.0.0",
  "parameters": {
    "workspaceName": {
      "type": "string",
      "metadata": {
        "description": "The name of the Azure Databricks workspace to create"
      }
    },
    "pricingTier": {
      "type": "string",
      "defaultValue": "premium",
      "allowedValues": ["premium"],
      "metadata": {
        "description": "The pricing tier of workspace"
      }
    },
    "apiVersion": {
      "type": "string",
      "defaultValue": "2023-02-01",
      "allowedValues": ["2023-02-01", "2022-04-01-preview"],
      "metadata": {
        "description": "The API version to use to create the workspace resources"
      }
    },
    "keyVaultName": {
      "type": "string",
      "metadata": {
        "description": "The Key Vault name used for CMK"
      }
    },
    "keyName": {
      "type": "string",
      "metadata": {
        "description": "The key name used for CMK"
      }
    },
    "keyVersion": {
      "type": "string",
      "metadata": {
        "description": "The key version used for CMK. Use the specific key version and not `latest`."
      }
    },
    "keyVaultResourceGroupName": {
      "type": "string",
      "metadata": {
        "description": "The resource group name of the Key Vault used for CMK"
      }
    },
    "enableAutoRotation": {
      "type": "bool",
      "defaultValue": false,
      "allowedValues": [true, false],
      "metadata": {
        "description": "Whether managed disk picks up new key versions automatically"
      }
    }
  },
  "variables": {
    "managedResourceGroupName": "[concat('databricks-rg-', parameters('workspaceName'), '-', uniqueString(parameters('workspaceName'), resourceGroup().id))]"
  },
  "resources": [
    {
      "type": "Microsoft.Databricks/workspaces",
      "name": "[parameters('workspaceName')]",
      "location": "[resourceGroup().location]",
      "apiVersion": "[parameters('apiVersion')]",
      "sku": {
        "name": "[parameters('pricingTier')]"
      },
      "properties": {
        "managedResourceGroupId": "[concat(subscription().id, '/resourceGroups/', variables('managedResourceGroupName'))]",
        "encryption": {
          "entities": {
            "managedDisk": {
              "keySource": "Microsoft.Keyvault",
              "keyVaultProperties": {
                "keyVaultUri": "[concat('https://', parameters('keyVaultName'), environment().suffixes.keyvaultDns)]",
                "keyName": "[parameters('keyName')]",
                "keyVersion": "[parameters('keyVersion')]"
              },
              "rotationToLatestKeyVersionEnabled": "[parameters('enableAutoRotation')]"
            }
          }
        }
      }
    },
    {
      "type": "Microsoft.Resources/deployments",
      "apiVersion": "2020-06-01",
      "name": "addAccessPolicy",
      "resourceGroup": "[parameters('keyVaultResourceGroupName')]",
      "dependsOn": ["[resourceId('Microsoft.Databricks/workspaces', parameters('workspaceName'))]"],
      "properties": {
        "mode": "Incremental",
        "template": {
          "$schema": "https://schema.management.azure.com/schemas/2019-04-01/deploymentTemplate.json#",
          "contentVersion": "0.9.0.0",
          "resources": [
            {
              "type": "Microsoft.KeyVault/vaults/accessPolicies",
              "apiVersion": "2019-09-01",
              "name": "[concat(parameters('keyVaultName'), '/add')]",
              "properties": {
                "accessPolicies": [
                  {
                    "objectId": "[reference(resourceId('Microsoft.Databricks/workspaces', parameters('workspaceName')), '2023-02-01').managedDiskIdentity.principalId]",
                    "tenantId": "[reference(resourceId('Microsoft.Databricks/workspaces', parameters('workspaceName')), '2023-02-01').managedDiskIdentity.tenantId]",
                    "permissions": {
                      "keys": ["get", "wrapKey", "unwrapKey"]
                    }
                  }
                ]
              }
            }
          ]
        }
      }
    }
  ],
  "outputs": {
    "workspace": {
      "type": "object",
      "value": "[reference(resourceId('Microsoft.Databricks/workspaces', parameters('workspaceName')))]"
    }
  }
}
Use the template with any tooling you want, including Azure portal, CLI, or other tooling. Details are included for the following template deployment strategies:
Apply a ARM template using the Azure portal
To create or update a workspace using an ARM template in the Azure portal, do the following:
Sign in to the Azure portal.
Click Create a resource, and then click Template deployment (deploy using custom templates).
On the Custom deployment page, click Build your own template in the editor.
Paste the contents of the example template in the editor.
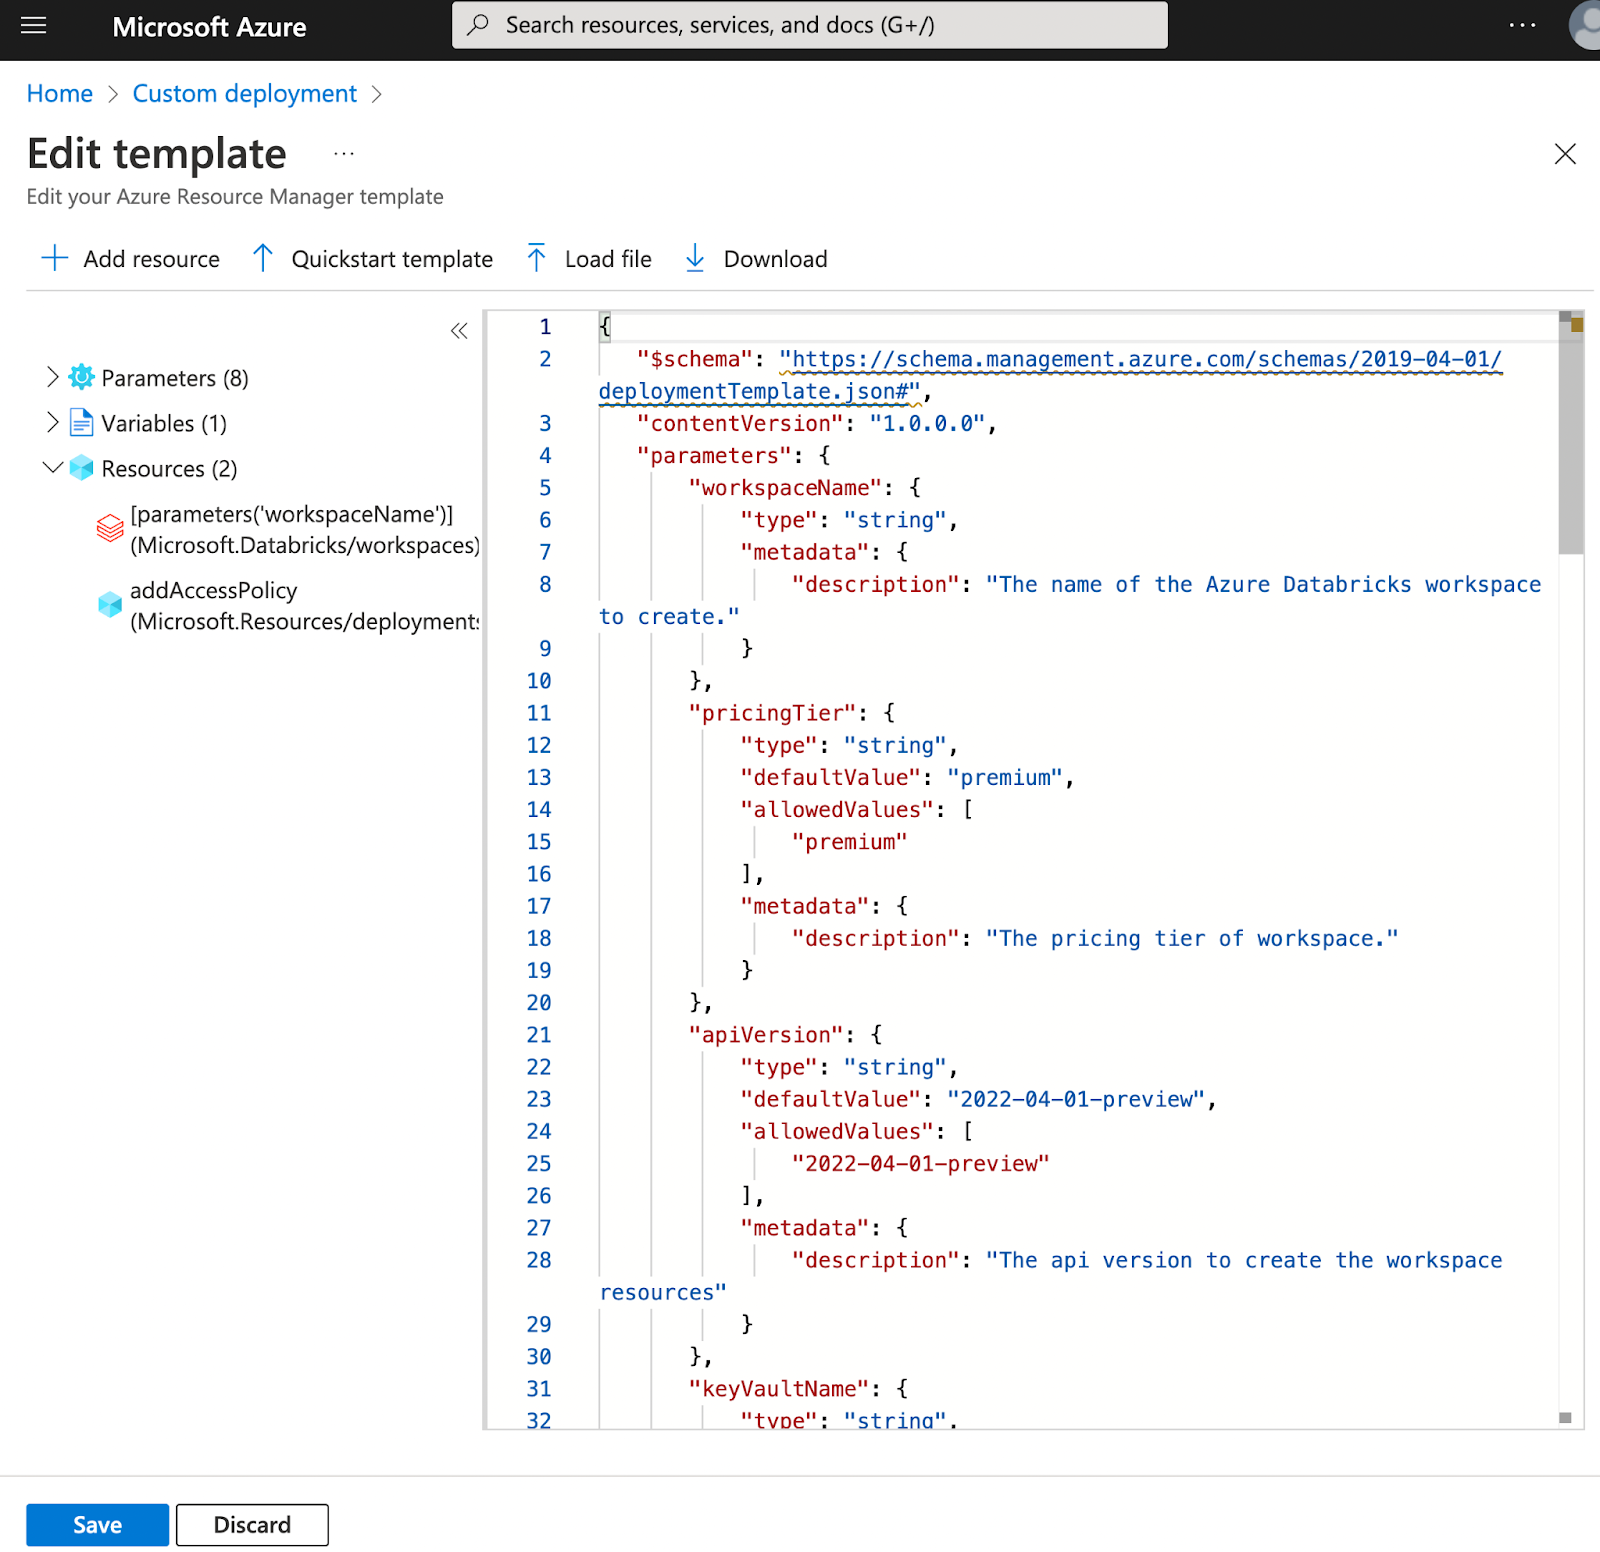
Click Save.
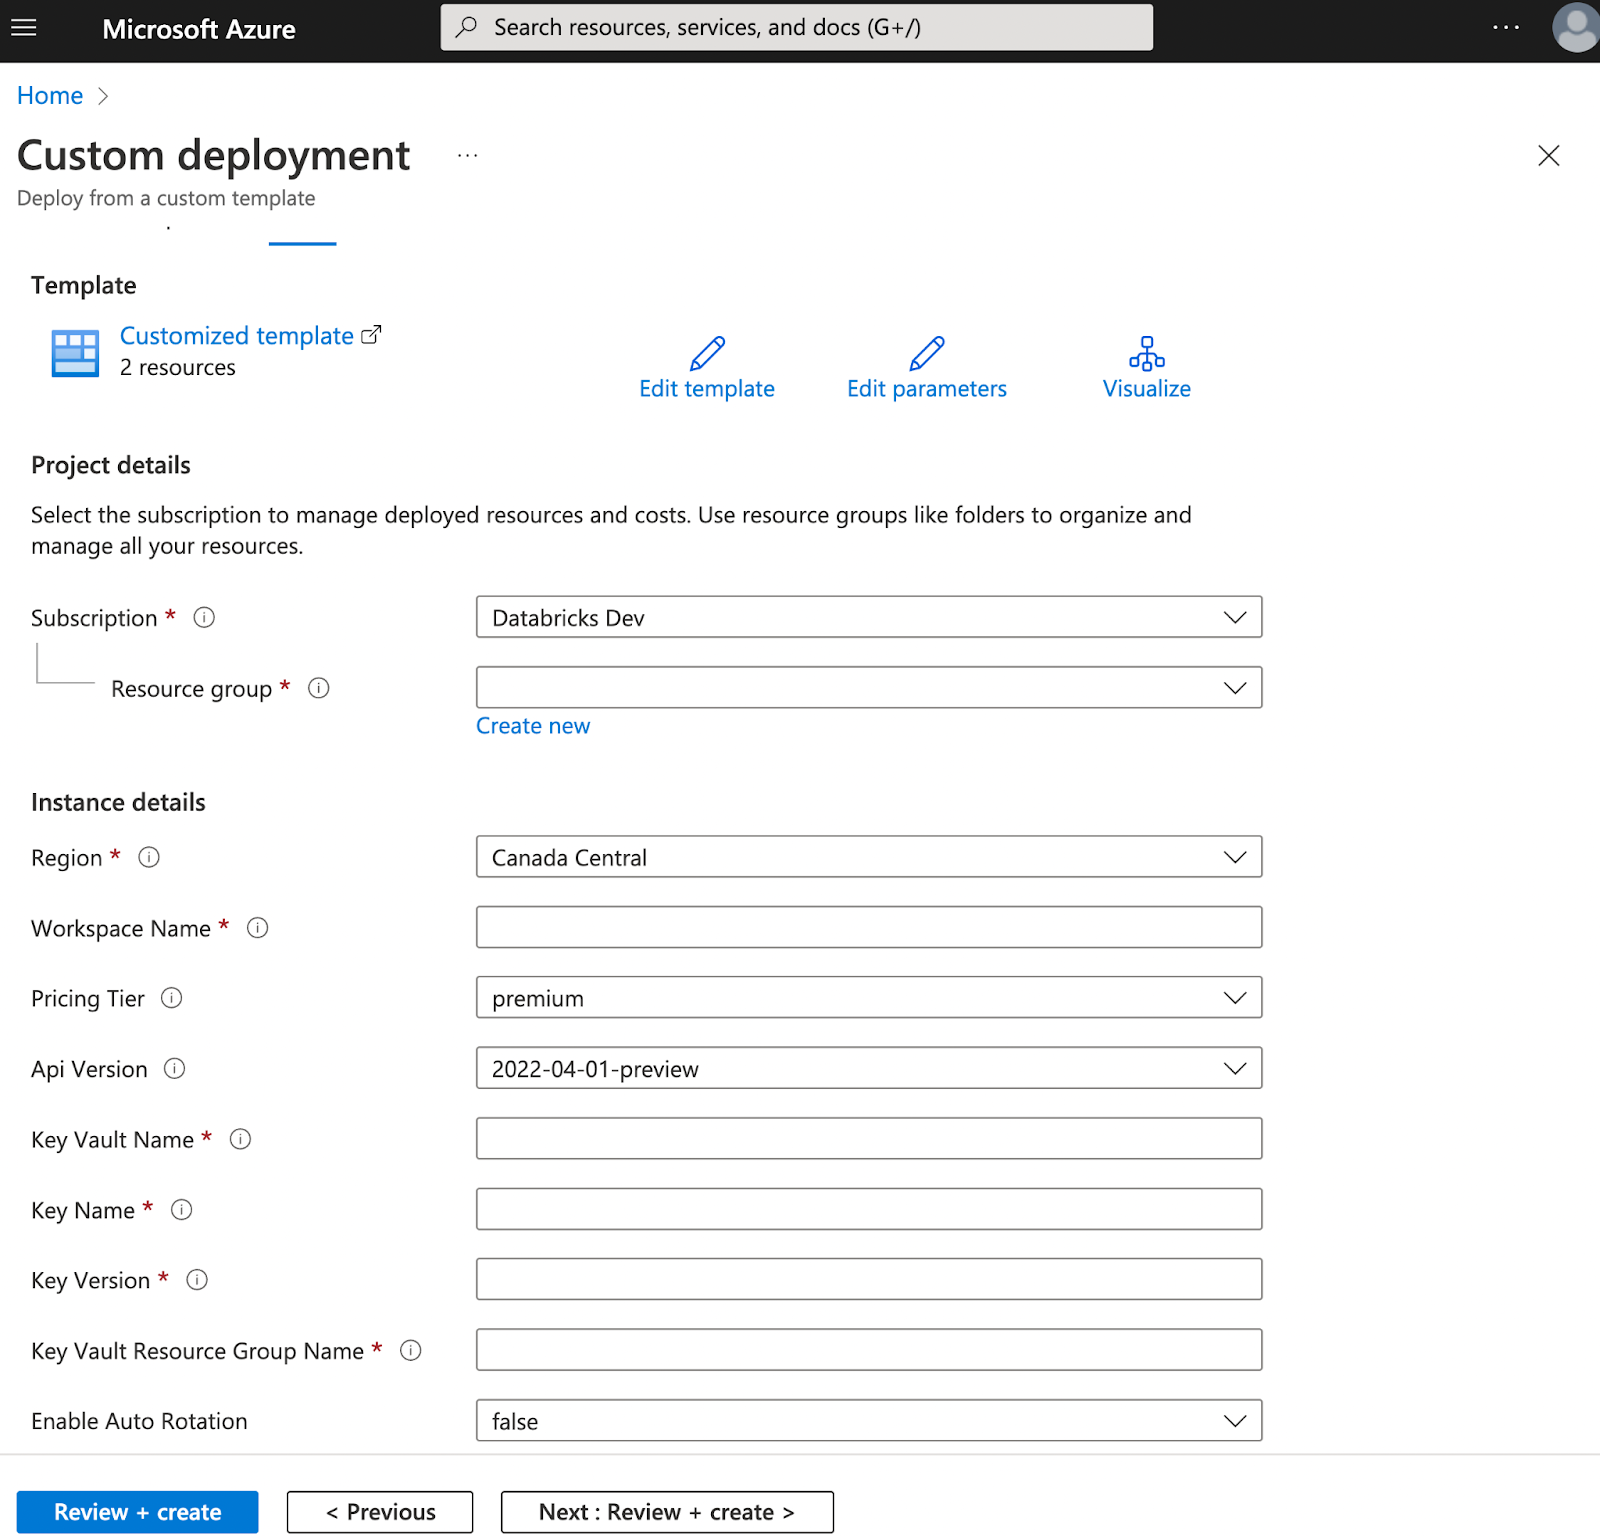
Enter your parameters values.
To update an existing workspace, use the same parameters that you used to create the workspace. To add a customer-managed key for the first time, add the key-related parameters under under
resources.properties.encryption.entities.managedDiskas shown in the above template. To rotate the key, change some or all of the key-related parameters.Important
If you update a workspace, the resource group name and the workspace name in the template must be identical to the resource group name and the workspace name of your existing workspace.
Click Review + Create.
Resolve any validation issues, and then click Create.
Important
If you rotate a key, do not delete the old key until after the workspace update is complete.
Apply an ARM template using the Azure CLI
This section describes how to create or update a workspace with your key using an ARM template with the Azure CLI.
Check whether your template includes the section for
resources.properties.encryption.entities.managedDiskand its related parameterskeyvaultName,keyName,keyVersion, andkeyVaultResourceGroupName. If they are not there, see earlier in this section for an example template and merge in that section and the parameters into your template.Run the
az deployment group createcommand. If the resource group name and the workspace name are identical to the resource group name and workspace name for an existing workspace, this command updates the existing workspace instead of creating a new workspace. If you are updating an existing deployment, be sure to use the same resource group and workspace name as was previously used.az deployment group create --resource-group <existing-resource-group-name> \ --template-file <file-name>.json \ --parameters workspaceName=<workspace-name> \ keyvaultName=<key-vault-name> \ keyName=<key-name> keyVersion=<key-version> \ keyVaultResourceGroupName=<key-vault-resource-group>Important
If you rotate a key, you can only delete the old key after the workspace update is complete.
Step 5: Confirm that your compute resources use your key (optional)
To confirm that the managed disk customer-managed key feature is enabled for the workspace:
Retrieve your Azure Databricks workspace details by doing one of the following:
Azure Portal
- In the Azure portal, click Workspaces, then click the name of your workspace.
- On the workspace page, click JSON view.
- Click an API version equal to or higher than
2022-04-01-previewAPI version.
Azure CLI
Run the following command:
az databricks workspace show --resource-group <resource group name> --name <workspace name>The managed disk encryption parameters are under
properties. For example:"properties": { "encryption": { "entities": { "managedDisk": { "keySource": "Microsoft.Keyvault", "keyVaultProperties": { "keyVaultUri": "<key-vault-uri>", "keyName": "<key-name>", "keyVersion": "<key-version>" }, "rotationToLatestKeyVersionEnabled": "<rotation-enabled>" } } }Powershell
Get-AzDatabricksWorkspace -Name <workspace-name> -ResourceGroupName <resource-group-name> |
  Select-Object -Property ManagedDiskKeySource,
   ManagedDiskKeyVaultPropertiesKeyVaultUri,
   ManagedServicesKeyVaultPropertiesKeyName,
   ManagedServicesKeyVaultPropertiesKeyVersion,
   ManagedDiskRotationToLatestKeyVersionEnabled
Review the values for the properties that are returned in the output:
ManagedDiskKeySource                           : Microsoft.Keyvault
ManagedDiskKeyVaultPropertiesKeyVaultUri       : <key-vault-uri>
ManagedServicesKeyVaultPropertiesKeyName       : <key-name>
ManagedServicesKeyVaultPropertiesKeyVersion    : <key-version>
ManagedDiskRotationToLatestKeyVersionEnabled   : <rotation-enabled>
Create any compute resource for your workspace to use for testing:
If a compute resource fails to start successfully, it typically is because you need to grant the disk encryption set appropriate permissions to access your Key Vault.
In the Azure portal, click Workspaces, then click the name of your workspace.
On the workspace page, click the name of the managed resource group that your workspace is in.
On the resource group page, under Resources, click the name of a virtual machine.
On the left side of the virtual machine page, under Settings, click Disks.
On the disks page, under Data disks, confirm that the Encryption field for your disk has the value
SSE with CMK.
Step 6: Start previously-terminated compute resources
- Ensure that the workspace update is complete. If the key was the only change to the template, this typically completes in less than five minutes, otherwise it could take more time.
- Manually start any compute resources that you terminated earlier.
If any compute resources fail to start successfully, it typically is because you need to grant the disk encryption set permission to access your Key Vault.
Rotate the key at a later time
There are two types of key rotations on an existing workspace that already has a key:
- Auto-rotation: If
rotationToLatestKeyVersionEnabledistruefor your workspace, the disk encryption set detects the key version change and points to the latest key version. - Manual rotation: You can update an existing managed disk customer-managed key workspace with a new key. Follow the instructions above as if you were initially adding a key to existing workspace.
Troubleshooting
Cluster fails with KeyVaultAccessForbidden
The issue is a cluster fails to start with the following error:
Cloud Provider Launch Failure: KeyVaultAccessForbidden
Grant the disk encryption set that is created in your workspace's managed resource group permission to access your Key Vault. Permissions needed: GET, WRAPKEY, UNWRAPKEY.
Re-read the subsection of Step 4: Create or update a workspace for your deployment type and pay special attention to the Key Vault access policy update with specific permissions.
Key parameters are missing
The issue is managed disk customer-managed key parameters are missing.
Confirm that your ARM template uses the correct API version for the Microsoft.Databricks/workspaces resource. The managed disk customer-managed key feature is only available with the API version equal to or higher than 2022-04-01-preview. If you use other API versions, the workspace is created or updated, but managed disk parameters are ignored.
Workspace update fails with ApplicationUpdateFail
The issue is a workspace update or patch operation fails for a managed disk enabled workspace with the following error:
Failed to update application: `<workspace name>`, because patch resource group failure. (Code: ApplicationUpdateFail)
Grant the disk encryption set access to your Key Vault, then perform workspace update operations like adding tags.
Access policy missing
The issue is the following error:
ERROR CODE: BadRequest MESSAGE: Invalid value found at accessPolicies[14].ObjectId: <objectId>
The access policy with the above object ID is invalid in your Key Vault. You have to remove it in order to add new access policies to your Key Vault.
Lost keys are unrecoverable
Lost keys are not recoverable. If you lose or revoke your key and can't recover it, Azure Databricks compute resources no longer work. Other functions of the workspace aren't impacted.
Resources
- Azure managed disks in the Azure documentation
- Server-side encryption of Azure Disk Storage in the Azure documentation