Note
Access to this page requires authorization. You can try signing in or changing directories.
Access to this page requires authorization. You can try changing directories.
In this article, you create a new environment from an existing Azure Developer CLI (azd) compatible template by using azd. You learn how to configure Azure Deployment Environments (ADE) and azd to work together to provision application infrastructure and deploy application code to the new infrastructure.
To learn the key concepts of how azd and ADE work together, see Use Azure Developer CLI with Azure Deployment Environments.
Prerequisites
- Create and configure a dev center with a project, environment types, and catalog. Use the following article as guidance:
Attach Microsoft quick start catalog
Microsoft provides a quick start catalog that contains a set of azd compatible templates that you can use to create environments. You can attach the quick start catalog to your dev center at creation or add it later. The quick start catalog contains a set of templates that you can use to create environments.
Examine an azd compatible template
You can use an existing azd compatible template to create a new environment, or you can add an azure.yaml file to your repository. In this section, you examine an existing azd compatible template.
azd provisioning for environments relies on curated templates from the catalog. Templates in the catalog might assign tags to provisioned Azure resources for you to associate your app services with in the azure.yaml file, or specify the resources explicitly. In this example, resources are specified explicitly.
For more information on tagging resources, see Tagging resources for Azure Deployment Environments.
In the Azure portal, navigate to your dev center.
In the left menu under Environment configuration, select Catalogs, and then copy the quick start catalog Clone URL.
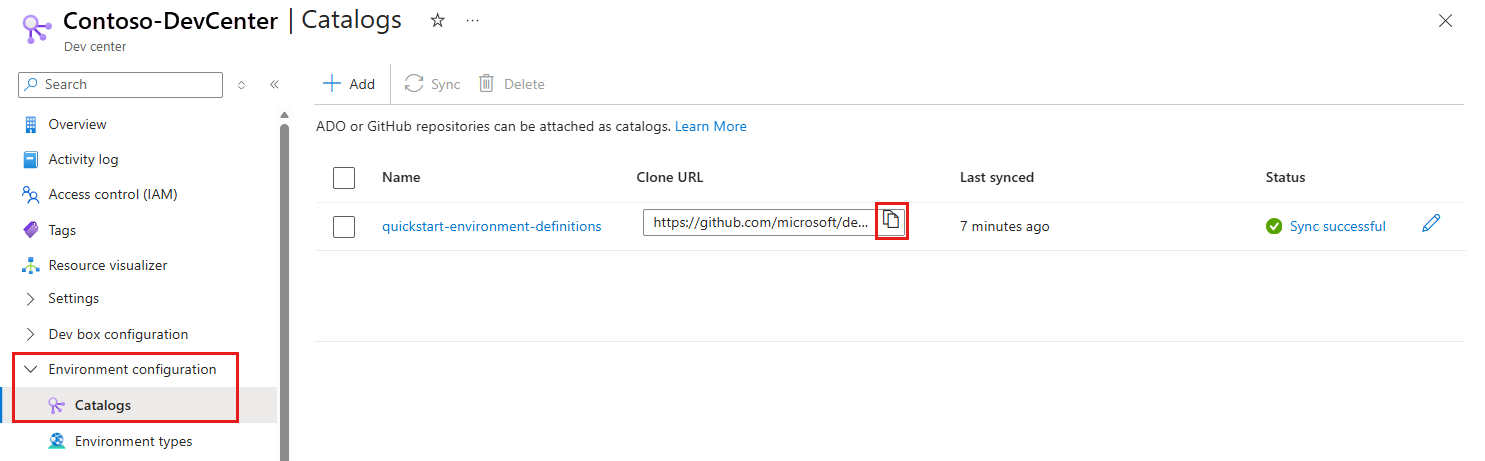
To view the quick start catalog in GitHub, paste the Clone URL into the address bar and press Enter. Or, you can use the following URL: Microsoft quick start catalog.
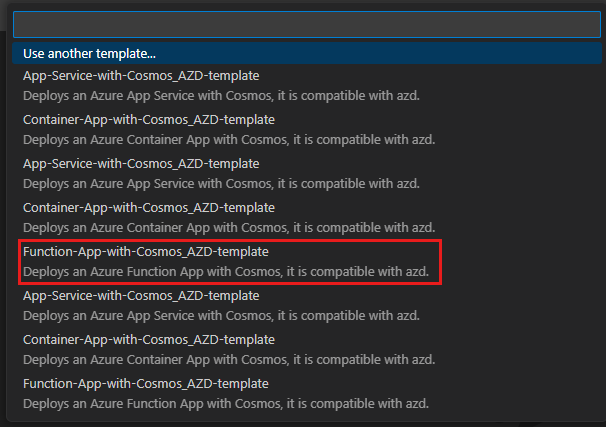
In the GitHub repository, navigate to the Environment-Definitions/ARMTemplates/Function-App-with-Cosmos_AZD-template folder.
Open the environment.yaml file. At the end of the file, you see the allowed repositories that contain sample application source code.

Copy the https://github.com/azure-samples/todo-python-mongo-swa-func repository URL, and then navigate to the repository in GitHub.
In the root of the repository, open the azure.yaml file.
In the azure.yaml file, in the services section, you see the web and API services that are defined in the template.


Note
Not all azd compatible catalogs use the linked templates structure shown in the example. You can use a single catalog for all your environments by including the azure.yaml file. Using multiple catalogs and code repositories allows you more flexibility in configuring secure access for platform engineers and developers.
If you're working with your own catalog & environment definition, you can create an azure.yaml file in the root of your repository. Use the azure.yaml file to define the services that you want to deploy to the environment.
Create an environment from an existing template
Use an existing azd compatible template to create a new environment.
Prepare to work with azd
When you work with azd for the first time, there are some one-time setup tasks you need to complete. These tasks include installing the Azure Developer CLI, signing in to your Azure account, and enabling azd support for Azure Deployment Environments.
Install the Azure Developer CLI extension
When you install azd, the azd tools are installed within an azd scope rather than globally, and are removed if azd is uninstalled. You can install azd in Visual Studio Code, from the command line, or in Visual Studio.
To enable Azure Developer CLI features in Visual Studio Code, install the Azure Developer CLI extension. Select the Extensions icon in the Activity bar, search for Azure Developer CLI, and then select Install.

Sign in with Azure Developer CLI
Access your Azure resources by logging in. When you initiate a log in, a browser window opens and prompts you to log in to Azure. After you sign in, the terminal displays a message that you're signed in to Azure.
Sign in to azd using the command palette:

The output of commands issued from the command palette is displayed in an azd dev terminal like the following example:


Enable azd support for ADE
When platform.type is set to devcenter, all azd remote environment state and provisioning uses dev center components. azd uses one of the infrastructure templates defined in your dev center catalog for resource provisioning. In this configuration, the infra folder in your local templates isn't used.

Create a new environment
Now you're ready to create an environment to work in. You begin with an existing template. ADE defines the infrastructure for your application, and the azd template provides sample application code.
In Visual Studio Code, open an empty folder.
Open the command palette, enter Azure Developer CLI init, and then from the list, select Azure Developer CLI (azd): init.

In the list of templates, select Function-App-with-Cosmos_AZD-template.
In the
azdterminal, enter an environment name.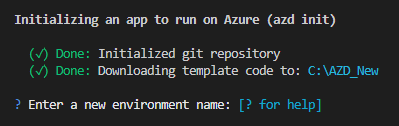
Select a project.

Select an environment definition.

azdcreates the project resources, including an azure.yaml file in the root of your project.


Configure your devcenter
You can define azd settings for your dev centers so that you don't need to specify them each time you update an environment. In this example, you define the names of the catalog, dev center, and project that you're using for your environment.
In Visual Studio Code, navigate to the azure.yaml file in the root of your project.
In the azure.yaml file, add the following settings:
platform:
    type: devcenter
    config:
        catalog: MS-cat
        name: Contoso-DevCenter
        project: Contoso-Dev-project

To learn more about the settings you can configure, see Configure dev center settings.
Provision your environment
You can use azd to provision and deploy resources to your deployment environments using commands like azd up or azd provision.
To learn more about provisioning your environment, see Work with Azure Deployment Environments.