Note
Access to this page requires authorization. You can try signing in or changing directories.
Access to this page requires authorization. You can try changing directories.
This tutorial shows you a simple and effective way to implement high availability and disaster recovery (HA/DR) for Java using WebSphere Liberty/Open Liberty on Azure Kubernetes Service (AKS). The solution illustrates how to achieve a low Recovery Time Objective (RTO) and Recovery Point Objective (RPO) using a simple database-driven Jakarta EE application running on WebSphere Liberty/Open Liberty.
HA/DR is a complex topic, with many possible solutions. The best solution depends on your unique requirements. For other ways to implement HA/DR, see the resources at the end of this article.
In this tutorial, you learn how to:
- Use Azure optimized best practices to achieve high availability and disaster recovery.
- Set up a Microsoft Azure SQL Database failover group in paired regions.
- Set up the primary WebSphere Liberty/Open Liberty cluster on AKS.
- Set up disaster recovery for the cluster using Azure Backup.
- Set up the secondary AKS cluster.
- Set up an Azure Traffic Manager.
- Test failover from primary to secondary.
The following diagram illustrates the architecture you build:

Azure Traffic Manager checks the health of your regions and routes the traffic accordingly to the application tier. Both the primary region and the secondary region have a full deployment of the Liberty cluster. However, only the primary region is actively servicing network requests from the users. The secondary region is passive, and is activated to receive traffic only when the primary region experiences a service disruption. Azure Traffic Manager uses the health check feature of the Azure Application Gateway to implement this conditional routing. The primary cluster is running and the secondary cluster is shut down. The geo-failover RTO of the application tier depends on the time for starting virtual machines (VMs) and running the secondary cluster. The RPO depends on the Azure SQL Database because the data is persisted and replicated in the Azure SQL Database failover group.
The database tier consists of an Azure SQL Database failover group with a primary server and a secondary server. The read/write listener endpoint always points to the primary server and is connected to a WebSphere Liberty/Open Liberty cluster in each region. A geo-failover switches all secondary databases in the group to the primary role. For the geo-failover RPO and RTO of Azure SQL Database, see Overview of business continuity with Azure SQL Database.
This tutorial was written with the Azure Backup and Azure SQL Database services because the tutorial relies on the HA features of these services. Other database choices are possible, but you must consider the HA features of whatever database you choose.
Prerequisites
- An Azure subscription. If you don't have an Azure subscription, create a free account before you begin.
- Make sure you're assigned either the
Ownerrole or theContributorandUser Access Administratorroles in the subscription. You can verify the assignment by following the steps in List Azure role assignments using the Azure portal. - Prepare a local machine with Windows, Linux, or macOS installed.
- Install the Azure CLI 2.62.0 or above to run Azure CLI commands.
- Sign in with Azure CLI by using the az login command. To finish the authentication process, follow the steps displayed in your terminal. For other sign-in options, see Sign into Azure with Azure CLI.
- When you're prompted, install the Azure CLI extension on first use. For more information about extensions, see Use and manage extensions with the Azure CLI.
- Run az version to find the version and dependent libraries that are installed. To upgrade to the latest version, run az upgrade.
- Install and set up Git.
- Install a Java SE implementation, version 17 or later - for example, the Microsoft build of OpenJDK.
- Install Maven, version 3.9.3 or later.
Set up an Azure SQL Database failover group in paired regions
In this section, you create an Azure SQL Database failover group in paired regions for use with your WebSphere Liberty/Open Liberty clusters and app. In a later section, you configure WebSphere Liberty/Open Liberty to store its session data to this database. This practice references Creating a table for session persistence.
First, create the primary Azure SQL Database by following the Azure portal steps in Quickstart: Create a single database - Azure SQL Database. Follow the steps up to, but not including, the "Clean up resources" section. Use the following directions as you go through the article, then return to this article after you create and configure the Azure SQL Database.
When you reach the section Create a single database, use the following steps:
- In step 4 for creating new resource group, save aside the Resource group name value - for example,
myResourceGroup. - In step 5 for database name, save aside the Database name value - for example,
mySampleDatabase. - In step 6 for creating the server, use the following steps:
- Fill in a unique server name - for example,
sqlserverprimary-mjg032524. - For Location, select (US) East US.
- For Authentication method, select Use SQL authentication.
- Save aside the Server admin login value - for example,
azureuser. - Save aside the Password value.
- Fill in a unique server name - for example,
- In step 8, for Workload environment, select Development. Look at the description and consider other options for your workload.
- In step 11, for Backup storage redundancy, select Locally-redundant backup storage. Consider other options for your backups. For more information, see the Backup storage redundancy section of Automated backups in Azure SQL Database.
- In step 14, in the Firewall rules configuration, for Allow Azure services and resources to access this server, select Yes.
Then, create an Azure SQL Database failover group by following the Azure portal steps in Configure a failover group for Azure SQL Database. You just need the following sections: Create failover group and Test planned failover. Use the following steps as you go through the article, then return to this article after you create and configure the Azure SQL Database failover group:
When you reach the section Create failover group, use the following steps:
- In step 5 for creating the failover group, enter and save aside the unique failover group name - for example,
failovergroup-mjg032524. - In step 5 for configuring the server, select the option to create a new secondary server and then use the following steps:
- Enter a unique server name - for example,
sqlserversecondary-mjg032524. - Enter the same server admin and password as your primary server.
- For Location, select (US) West US.
- Make sure Allow Azure services to access server is selected.
- Enter a unique server name - for example,
- In step 5 for configuring the Databases within the group, select the database you created in the primary server - for example,
mySampleDatabase.
- In step 5 for creating the failover group, enter and save aside the unique failover group name - for example,
After you complete all the steps in the section Test planned failover, keep the failover group page open and use it for the failover test of the WebSphere Liberty/Open Liberty clusters later.
Note
This article guides you to create an Azure SQL Database single database with SQL authentication for simplicity because the HA/DR setup this article focuses on is already very complex. A more secure practice is to use Microsoft Entra authentication for Azure SQL for authenticating the database server connection. For information on how to configure the database connection with Microsoft Entra authentication, see Deploy a Java application with Open Liberty or WebSphere Liberty on an Azure Kubernetes Service (AKS) cluster.
Set up the primary WebSphere Liberty/Open Liberty cluster on AKS
In this section, you create the primary WebSphere Liberty/Open Liberty cluster on AKS using the IBM WebSphere Liberty and Open Liberty on Azure Kubernetes Service offer. The secondary cluster is restored from the primary cluster during the failover using Azure Backup later.
Deploy the primary WebSphere Liberty/Open Liberty cluster
Use the following steps to deploy the primary cluster:
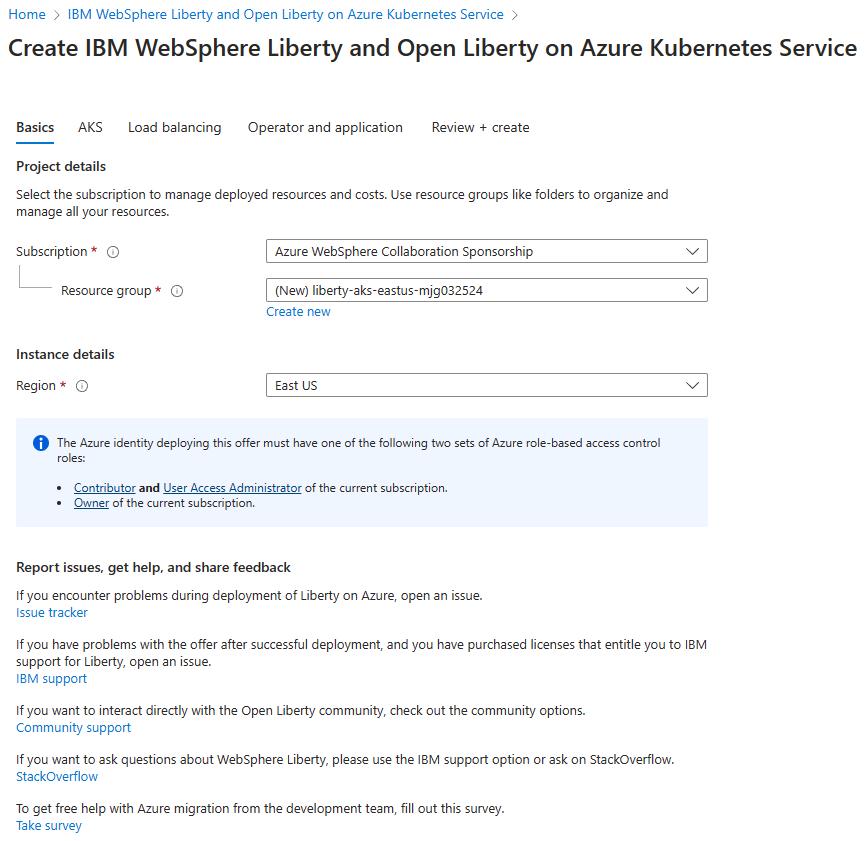
Open the IBM WebSphere Liberty and Open Liberty on Azure Kubernetes Service offer in your browser and select Create. You should see the Basics pane of the offer.
Use the following steps to fill out the Basics pane:
- Ensure that the value shown for Subscription is the same one that has the roles listed in the prerequisites section.
- You must deploy the offer in an empty resource group. In the Resource group field, select Create new and fill in a unique value for the resource group - for example,
liberty-aks-eastus-mjg032524. - Under Instance details, for Region, select East US.
- Select Next to go to the AKS pane.
Wait for a while. You should see all fields prepopulated with the defaults in the AKS pane. Select Next to go to the Load balancing pane.

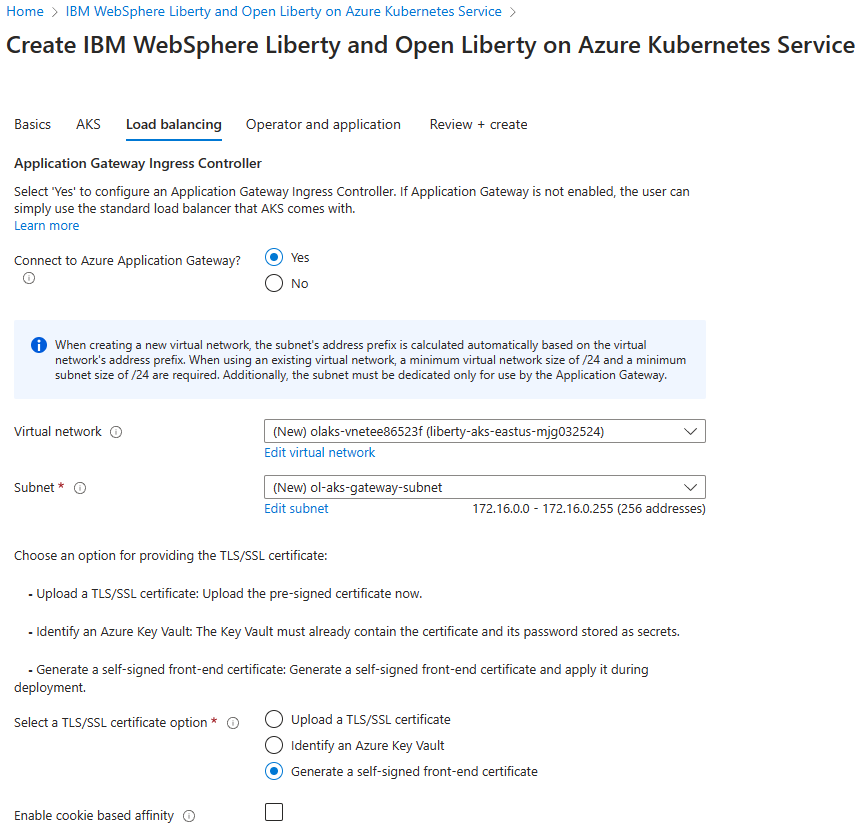
Use the following steps to fill out the Load balancing pane:
- For Connect to Azure Application Gateway?, select Yes.
- Leave the defaults for other fields.
- Select Next to go to the Operator and application pane.
Use the following steps to fill out the Operator and application pane:
Leave the defaults for all fields.
Note
This tutorial deploys Open Liberty Operator using the defaults. Optionally you can deploy WebSphere Liberty Operator by selecting Yes for IBM supported?.
Select Review + create.
Wait until Running final validation... successfully completes, then select Create.


After a while, you should see the Deployment page where Deployment is in progress is displayed.
Note
If you see any problems during Running final validation..., fix them and try again.
Depending on network conditions and other activity in your selected region, the deployment can take up to about 30 minutes to complete. After that, you should see the text Your deployment is complete displayed on the deployment page.
Verify the deployment of the cluster
You deployed an AKS cluster, an Azure Container Registry (ACR) instance, and an Azure Application Gateway in the primary region. The AKS cluster is the target computing platform where your app is deployed and running. The ACR instance stores the application image that AKS pulls during the app deployment. The Azure Application Gateway acts as load balancer for the application deployed to the AKS cluster.
Use the following steps to verify these key components before you move to the next step:
Return to the Deployment page, then select Outputs.
Copy the value of the property cmdToConnectToCluster. Open a terminal, paste the copied command, and press Enter to execute. You should see a message similar to the following example included in the output:
Merged "cluster3984d1-admin" as current context in <your-user>\.kube\configSave aside the command so you can use it to connect to the cluster later.
Run
kubectl get pod --all-namespacesin the terminal to list all pods running on the AKS cluster. You should see output similar to the following example:NAMESPACE NAME READY STATUS RESTARTS AGE cert-manager cert-manager-66bc9756fd-255pk 1/1 Running 0 8m55s cert-manager cert-manager-cainjector-669c9fb694-k4q88 1/1 Running 0 8m55s cert-manager cert-manager-webhook-84967d556d-vj4lp 1/1 Running 0 8m55s kube-system azure-ip-masq-agent-dgzkt 1/1 Running 0 29m kube-system cloud-node-manager-6x7bp 1/1 Running 0 29m kube-system coredns-789789675-6b7dh 1/1 Running 0 28m kube-system coredns-789789675-n68wt 1/1 Running 0 29m kube-system coredns-autoscaler-649b947bbd-zhdbn 1/1 Running 0 29m kube-system csi-azuredisk-node-h9p7m 3/3 Running 0 29m kube-system csi-azurefile-node-jnllw 3/3 Running 0 29m kube-system ingress-appgw-deployment-69944d8fb9-v9btr 1/1 Running 5 (12m ago) 17m kube-system konnectivity-agent-94878f88c-hfqng 1/1 Running 0 29m kube-system konnectivity-agent-94878f88c-ln2vp 1/1 Running 0 29m kube-system kube-proxy-28lkg 1/1 Running 0 29m kube-system metrics-server-5fffcb8954-549xl 2/2 Running 0 28m kube-system metrics-server-5fffcb8954-fn56g 2/2 Running 0 28m open-liberty olo-controller-manager-7954d76cf8-qhmxw 1/1 Running 0 8m40sRun
kubectl get secretin the terminal to list all secrets installed on the AKS cluster. You should see one secret in the output, as shown in the following example:NAME TYPE DATA AGE secret3984d1 kubernetes.io/tls 2 24mThis secret is a TLS secret that includes certificate and key data for TLS traffic. Copy and save aside the name of the secret - for example,
secret3984d1, you use it in the app deployment later.Switch back to Outputs page. Copy the value of the property cmdToLoginInRegistry. Paste the copied command in the terminal and press Enter to execute. You should see Login Succeeded in the output. Keep the terminal open and use it for further configuration of the WebSphere Liberty/Open Liberty cluster later.
Use the following steps to get the name and DNS name of the public IP address of the Azure Application Gateway. You use them for app deployment and the Azure Traffic Manager setup later.
- In the Azure portal, in the search box, enter Resource groups and select Resource groups from the search results.
- Select the name of resource group for your primary region - for example, liberty-aks-eastus-mjg032524.
- Find the Public IP address resource prefixed with gwip, then copy and save aside its name.
- Select the Public IP address resource, then copy and save aside the DNS name value - for example, olgw3984d1.eastus.cloudapp.azure.com.
Enable geo-replications for the ACR instance
The ACR instance is designed to store application images for both primary and secondary clusters. Use the following steps to enable geo-replications for the ACR instance:
In the Azure portal, in the search box, enter Resource groups and select Resource groups from the search results.
Select the name of resource group for your primary region - for example, liberty-aks-eastus-mjg032524.
Find the Container registry resource prefixed with acr, then select it to open it.
Select Properties. For Pricing plan, select Premium, then select Save. Wait until completion.
Select Geo-replications, then select Add. For Location, select West US, then select Create. Wait until completion.
Wait for a while, select Refresh. Repeat the operation until you see two locations are listed and Status is Ready.

Use the following steps to get the ACR sign-in credentials. You use them for app deployment later.
Select Access keys.
Copy and save aside the values for Registry name and Login server.
Note
This article uses the
az acr buildcommand to build and push the Docker image to the Container Registry, without usingusernameandpasswordof the Container Registry. It's still possible to use username and password withdocker loginanddocker push. Using username and password is less secure than passwordless authentication.
Deploy a sample app
Use the following steps to deploy and run a sample CRUD Java/Jakarta EE application on WebSphere Liberty/Open Liberty cluster for disaster recovery failover test later:
Download the sample by using the following commands:
git clone https://github.com/Azure-Samples/open-liberty-on-aks.git
cd open-liberty-on-aks
export BASE_DIR=$PWD
git checkout 20240325
The application configures a data source jdbc/JavaEECafeDB that connects to the Azure SQL Database you deployed previously. The data source is used for storing HTTP session data, which enables failover and load balancing across a cluster of WebSphere Liberty/Open Liberty servers. The sample app also configures a persistence schema to persist application data
coffeein the same datasource. Notice that the context root of the sample is configured as/in the server.xml file.Use the following commands to define environment variables with the values that you saved aside previously:
export DB_SERVER_NAME=<failover-group-name>.database.windows.net
export DB_NAME=mySampleDatabase
export DB_USER=azureuser@<failover-group-name>
export DB_PASSWORD='<SQL-Server-admin-login-password>'
export REGISTRY_NAME=<ACR-registry-name>
export LOGIN_SERVER=<ACR-login-server>
export INGRESS_TLS_SECRET=<TLS-secret-name>
Use the
az acr buildcommand to build and push the Docker image to the Container Registry, as shown in the following example:cd $BASE_DIR/java-app mvn clean install cd $BASE_DIR/java-app/target # If you deployed WebSphere Liberty Operator previously, use "Dockerfile-wlp" instead of "Dockerfile" az acr build \ --registry ${REGISTRY_NAME} \ --image javaee-cafe:v1 \ --file Dockerfile \ .Use the following commands to deploy the sample app to the AKS cluster:
cd $BASE_DIR/java-app/target
kubectl apply -f db-secret.yaml

# If you deployed WebSphere Liberty Operator previously, use "webspherelibertyapplication-agic.yaml" instead of "openlibertyapplication-agic.yaml"
kubectl apply -f openlibertyapplication-agic.yaml
Run the following command to get the sample app you deployed:
# If you deployed WebSphere Liberty Operator previously, use "WebSphereLibertyApplication" instead of "OpenLibertyApplication"
kubectl get OpenLibertyApplication
You should see one READY application in the output:
NAME                       IMAGE                                 EXPOSED   RECONCILED   RESOURCESREADY   READY   AGE
javaee-cafe-cluster-agic   acr3984d1.azurecr.io/javaee-cafe:v1             True         True             True    45s
Run the following command to get status of the pods created during the deployment:
kubectl get podsThe following example indicates that all the pods are running. If you don't see similar output, wait for a while and repeat the operation.
NAME                                        READY   STATUS    RESTARTS   AGE
javaee-cafe-cluster-agic-6bbb8d6f5c-2xjc4   1/1     Running   0          1m
javaee-cafe-cluster-agic-6bbb8d6f5c-4f449   1/1     Running   0          1m
javaee-cafe-cluster-agic-6bbb8d6f5c-m2wg6   1/1     Running   0          1m
Use the following steps to verify that the app is running as expected:
In a new browser tab, open the DNS name of the public IP address of the Azure Application Gateway that you saved aside previously. Use the
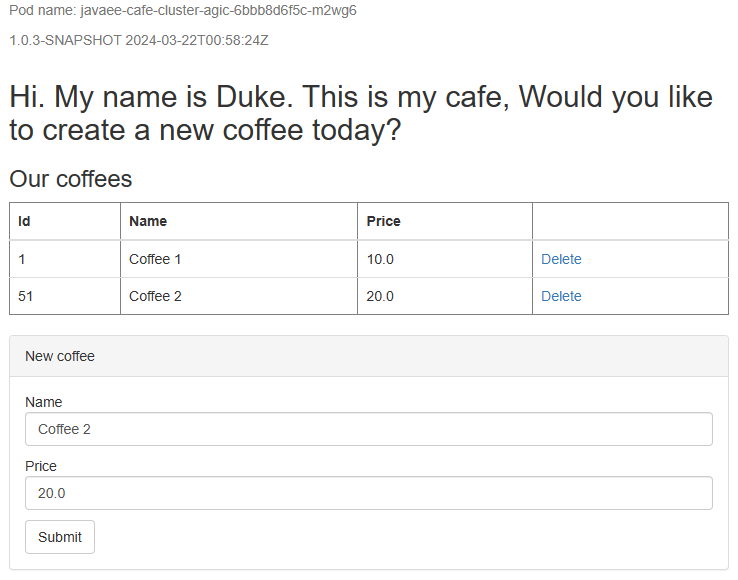
httpsprotocol - for example,https://olgw3984d1.eastus.cloudapp.azure.com. You should see the welcome page of sample app.Create a new coffee with name and price - for example, Coffee 1 with price 10 - which is persisted into both the application data table and the session table of the database. The UI that you see should be similar to the following screenshot:
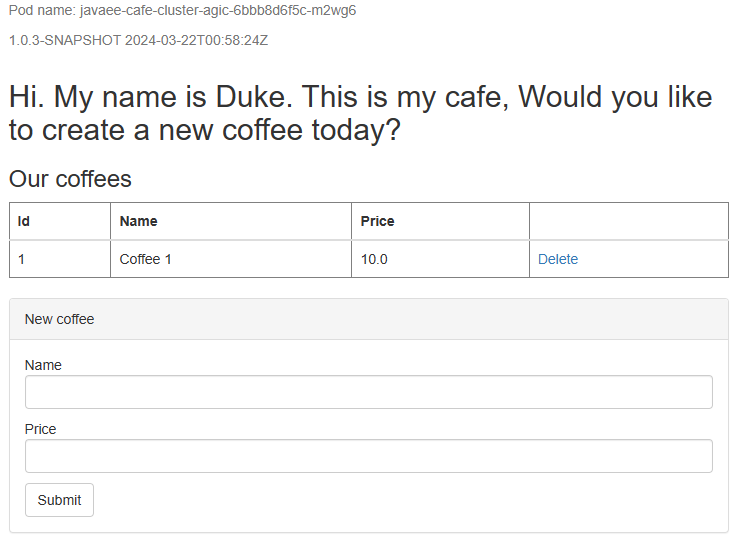
If your UI doesn't look similar, troubleshoot and resolve the problem before you continue.

Set up disaster recovery for the cluster using Azure Backup
In this section, you set up disaster recovery for the AKS cluster in the primary region using Azure Backup.
Create a storage account
AKS backup uses a blob container to hold the AKS cluster resources. You create another blob container as a staging location for use during cross region restoring.
Use the following steps to create a storage account and two containers. Some of these steps direct you to other guides.
- Sign in to the Azure portal.
- Create a storage account by following the steps in Create a storage account. You don't need to do all the steps in the article. Fill out the fields as shown on the Basics pane, using the following steps:
- For Resource group, select the existing resource group where the primary cluster is deployed - for example,
liberty-aks-eastus-mjg032524. - For Storage account name, enter a unique name - for example,
storageeastusmjg032524. - For Region, select East US.
- Select Review + create to accept the default options.
- Proceed to validate and create the account, then return to this article.
- For Resource group, select the existing resource group where the primary cluster is deployed - for example,
- Create a storage container for the AKS Backup Extension by following the steps in Create a storage container. This guide uses
aks-backup-extas the container name. - Create another storage container as a staging location for use during restoring. This guide uses
stagingas the container name.
Enable the AKS Backup Extension
Before you continue, use the following steps to install the AKS Backup Extension to the cluster in primary region:
Enable the CSI drivers and snapshots for your cluster. For the following
az aks updatecommand, update the value of Bash variableRG_NAMEto your resource group name - for example,liberty-aks-eastus-mjg032524- and run in your local Bash terminal.export RG_NAME=<your-aks-cluster-resource-group> export AKS_NAME=$(az aks list \ --resource-group ${RG_NAME} \ --query "[0].name" \ --output tsv | tr -d '\r') az aks update \ --resource-group ${RG_NAME} \ --name ${AKS_NAME} \ --enable-disk-driver \ --enable-file-driver \ --enable-blob-driver \ --enable-snapshot-controller --yesIt takes about 5 minutes to enable the drivers. Make sure the commands complete without error before you continue.
Open the resource group that has AKS deployed - for example,
liberty-aks-eastus-mjg032524. Select the AKS cluster from resources list.Under Settings of the AKS landing page, select Back up, then select Install Extension.
In the Install AKS Backup extension page, select Next. Select the storage account
storageeastusmjg032524and the blob containeraks-backup-extcreated in the same resource group. Select Next, then select Create. It takes about five minutes to complete this step.
Back up the AKS cluster
Use the following steps to back up the AKS cluster:
In the Azure portal, in the search box, search for Backup vaults. You see it listed under Services. Select it.
Follow the steps in Back up Azure Kubernetes Service by using Azure Backup to enable AKS Backup for the primary cluster. Execute the steps up to, but not including, the Use hooks during AKS backup section, and use the rest of the steps in this section to make adjustments as you go.
When you reach the Create a Backup vault section, use the following steps:
For step 1, for Resource group, select the existing resource group where the primary cluster is deployed - for example,
liberty-aks-eastus-mjg032524.For Backup vault name, enter a unique value - for example,
aks-backup-vault-eastus-mjg032524.For Region, select East US.
For Backup Storage Redundancy, select Globally-Redundant.
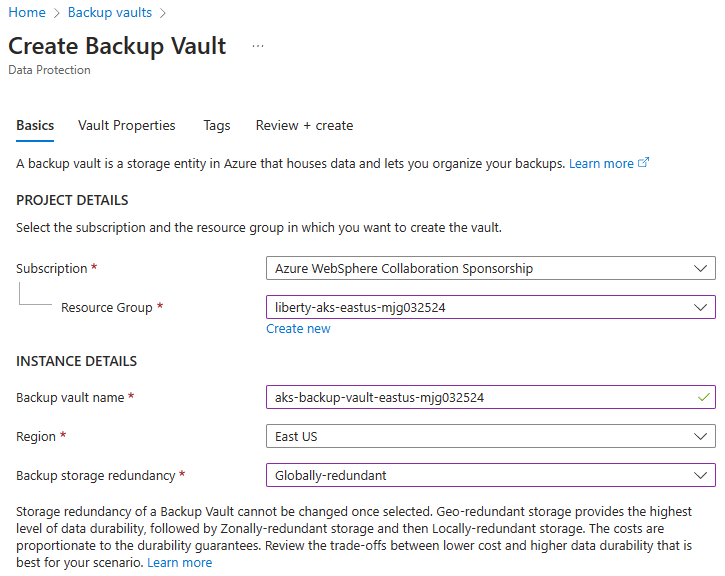
For step 2, for Cross Region Restore, select Enable.
When you reach the Create a backup policy section, use the following steps:
For step 3, enter a name for the backup policy - for example,
aksbackuppolicy.Select the Backup vault you created in the same resource group - for example,
aks-backup-vault-eastus-mjg032524.For step 4, add a retention rule where Vault-standard is selected.
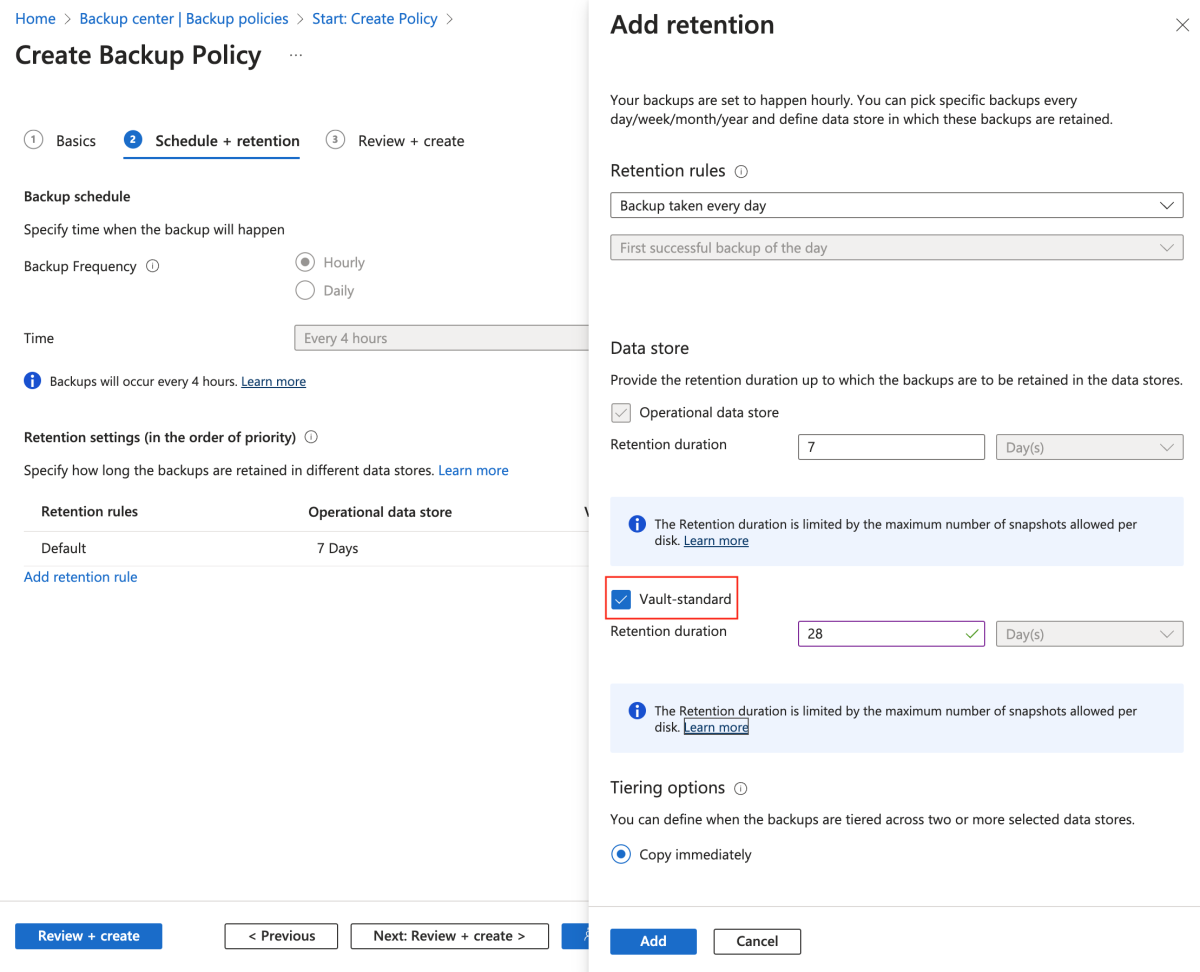
Select Add.
In the Configure backups section, use the following steps:
Skip step 1-5, which are for AKS Extension installation. Start from step 6 for the AKS cluster in the primary region.
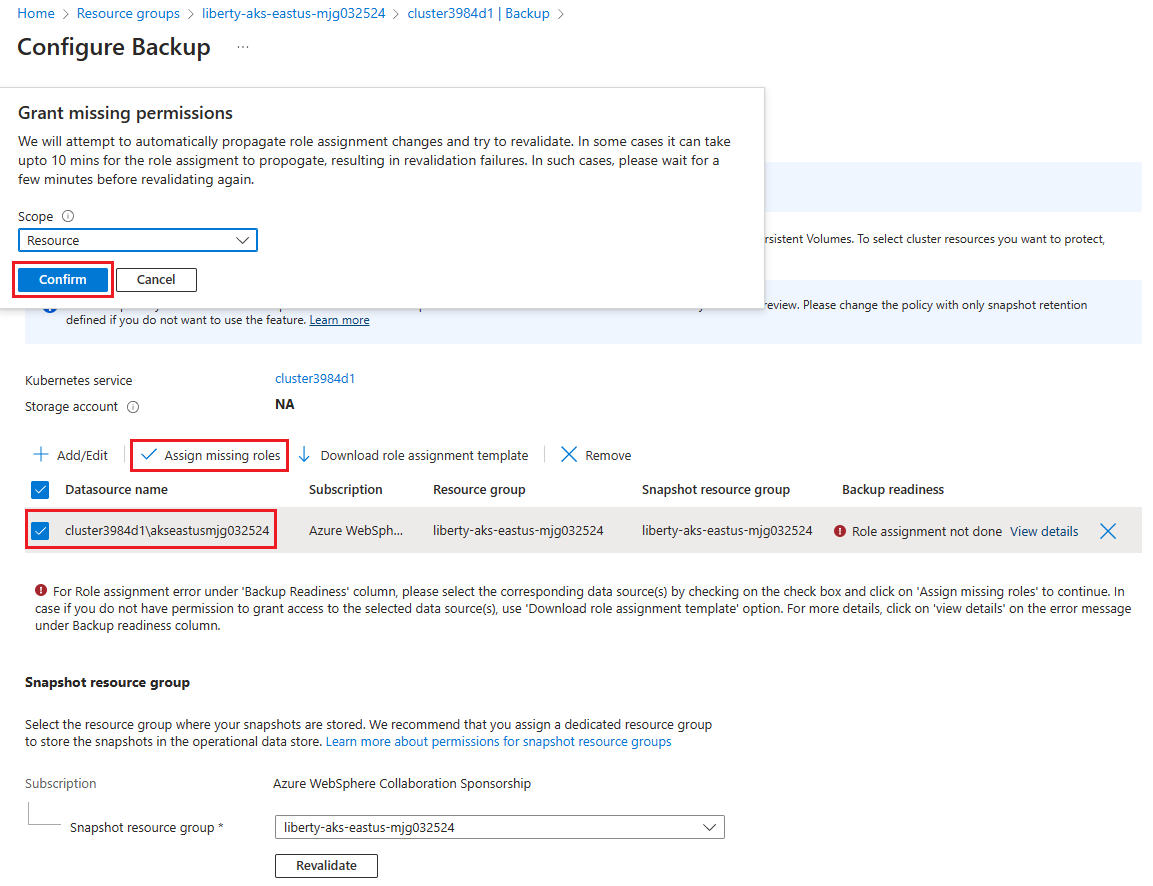
For step 7, for Vault, select the backup vault you created in the same resource group - for example,
aks-backup-vault-eastus-mjg032524. When you run into permission errors, select Grant Permissions to move on. After the permission deployment completes, if the error still shows, select Revalidate to refresh the role assignments.
For step 10, find Select Resources to Backup. For Backup Instance name, fill in a unique name - for example,
akseastusmjg032524. For Other options, select all the options. Make sure Include Secrets is selected.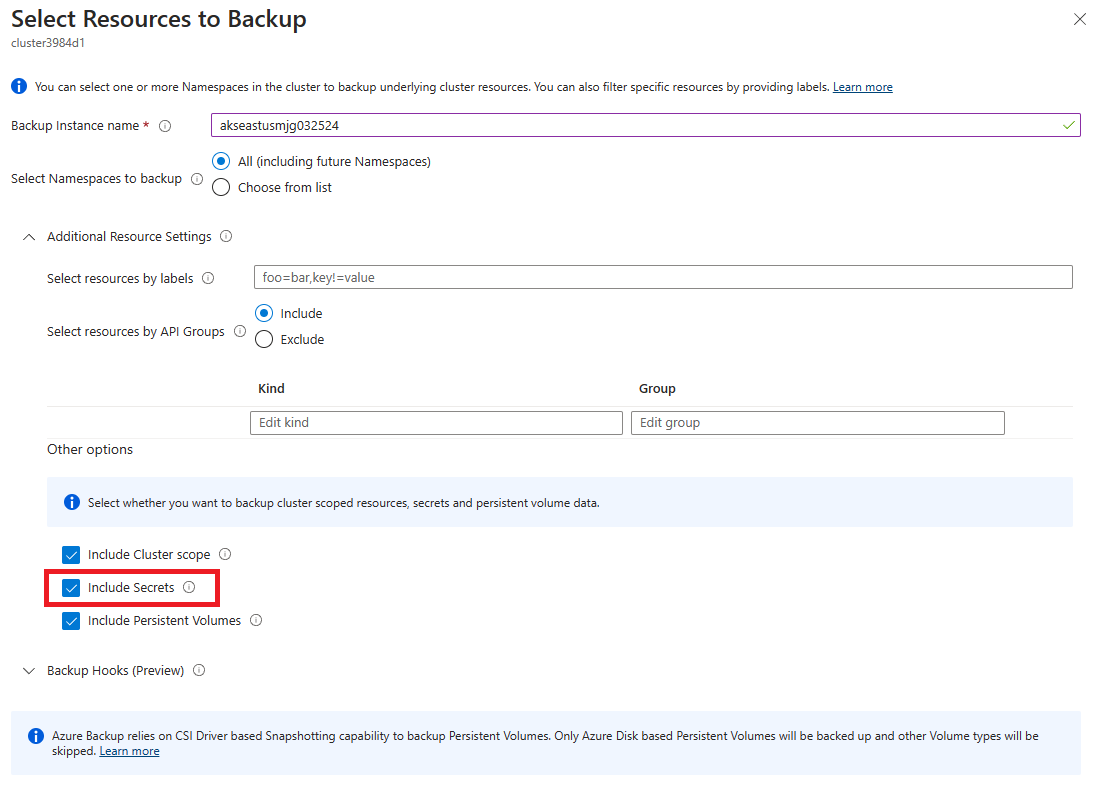
For step 11, you run into Role assignment error. Follow step 12-14 to mitigate the error.
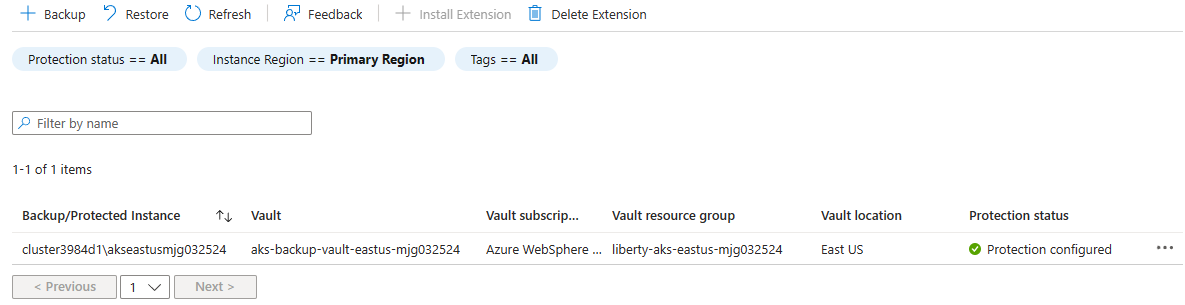
After you select Configure backup in step 15, you return to the Backup page. Wait for a while and then select Refresh. Repeat the operation until you see that the backup instance is listed and its Protection status is Protection configured.


Wait for a Vault-standard backup to happen
In AKS, the Vault-standard Tier is the only tier that supports Geo-redundancy and Cross Region Restore. As stated in Which backup storage tier does AKS backup support?, "Only one scheduled recovery point per day is moved to Vault Tier." You must wait for a Vault-standard backup to happen. A good lower bound is to wait at most 24 hours after completing the previous step before you restore.
Use the following steps to verify that a Vault-standard backup is available:
In Backup page of the primary AKS cluster, select the backup instance.
Wait for a while and select Refresh. Repeat the operation until you see that at least one Operational and Vault-standard restore point is listed in the RESTORE POINTS section.


Set up the secondary AKS cluster
While waiting for a Vault-standard backup for the primary AKS cluster to happen, set up your secondary AKS cluster for restoring later.
Use the same steps in the section Deploy the primary WebSphere Liberty/Open Liberty cluster to set up the secondary AKS cluster in the secondary region, except for the following differences:
In the Basics pane, use the following steps:
- In the Resource group field, select Create new and fill in a different unique value for the resource group - for example,
liberty-aks-westus-mjg032524. - Under Instance details, for Region, select West US.
- In the Resource group field, select Create new and fill in a different unique value for the resource group - for example,
In the AKS pane, use the following steps:
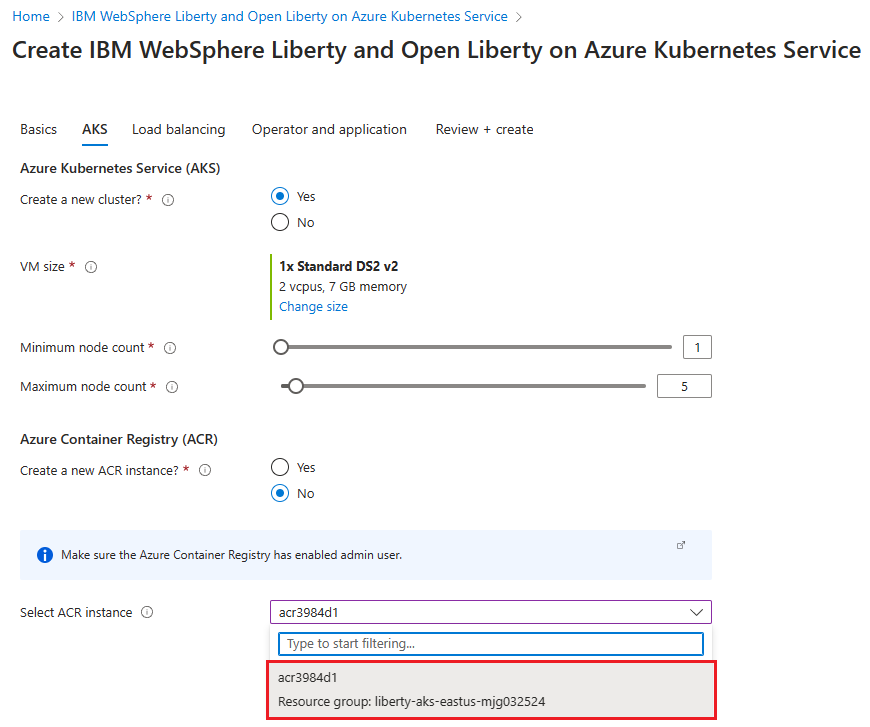
Under Azure Container Registry (ACR), for Select ACR instance, select No.
Select the existing ACR instance in the primary region that enabled with geo-replications.

Use the same steps in the section Verify the deployment of the cluster to verify the deployment in the secondary region, except for the following differences:
- You don't need to copy and save aside the name of the TLS secret. The TLS secret is restored from the backup of the primary AKS cluster.
- Use the resource group of the secondary cluster - for example,
liberty-aks-westus-mjg032524- when you look up the the name and DNS name of the public IP address of the Azure Application Gateway deployed in the secondary region.
Use the same steps in the section Create a storage account to create a storage account in secondary region, except for the following differences:
- For Resource group field, select the existing resource group where the secondary cluster is deployed - for example,
liberty-aks-westus-mjg032524. - For Storage account name, enter a unique name - for example,
storagewestusmjg032524. - For Region, select West US.
Use the same steps in the section Enable the AKS Backup Extension to install the AKS Backup Extension for the cluster in the secondary region, except for the following differences:
- In step 1 for enabling the CSI drivers and snapshots for your secondary cluster, update the value of Bash variable
RG_NAMEto the resource group in the secondary region - for example,liberty-aks-westus-mjg032524. - In step 2, select the AKS cluster from the resource group in the secondary region - for example,
liberty-aks-westus-mjg032524. - In step 4 for installing the AKS Backup Extension for your secondary cluster, select the storage account you created in the same resource group of the secondary region - for example,
storagewestusmjg032524.
To save costs, stop the AKS cluster in the secondary region by following the steps in Stop and start an Azure Kubernetes Service (AKS) cluster. You need to start it before you restore the cluster later.
Set up an Azure Traffic Manager
Vault-standard backup was mentioned in section Wait for a Vault-standard backup to happen. After you see that a Vault-standard backup is available, you can create an Azure Traffic Manager for distributing traffic to your public facing applications across the global Azure regions. The primary endpoint points to the public IP address of the Azure Application Gateway in the primary region. The secondary endpoint points to the public IP address of the Azure Application Gateway in the secondary region.
Create an Azure Traffic Manager profile by following the steps in Quickstart: Create a Traffic Manager profile using the Azure portal. You just need the following sections: Create a Traffic Manager profile and Add Traffic Manager endpoints. Use the following steps as you go through these sections, then return to this article after you create and configure the Azure Traffic Manager:
When you reach the section Create a Traffic Manager profile, in step 2, for Create Traffic Manager profile, use the following steps:
- For Name, enter a unique Traffic Manager profile name - for example,
tmprofile-mjg032524. - For Routing method, select Priority.
- For Resource group, enter and save aside the new resource group name - for example,
myResourceGroupTM1.
- For Name, enter a unique Traffic Manager profile name - for example,
When you reach the section Add Traffic Manager endpoints, use the following steps:
- After you open the Traffic Manager profile in step 2, in the Configuration page, use the following steps:
- For DNS time to live (TTL), enter 10.
- Under Endpoint monitor settings, for Protocol, select https, and for Port, enter 443.
- Under Fast endpoint failover settings, use the following values:
- For Probing internal, select 10.
- For Tolerated number of failures, enter 3.
- For Probe timeout, enter 5.
- Select Save. Wait until it completes.
- In step 4 for adding the primary endpoint myPrimaryEndpoint, use the following steps:
- For Target resource type, select Public IP address.
- Select the Choose public IP address dropdown and enter the name of the public IP address of the Azure Application Gateway in the East US region that you saved aside previously. You should see one entry matched. Select it for Public IP address.
- In step 6 for adding a failover/secondary endpoint
myFailoverEndpoint, use the following steps:- For Target resource type, select Public IP address.
- Select the Choose public IP address dropdown and enter the name of the public IP address of the Azure Application Gateway in the West US region that you saved aside previously. You should see one entry matched. Select it for Public IP address.
- Wait for a while. Select Refresh until the Monitor status for endpoint
myPrimaryEndpointis Online and Monitor status for endpointmyFailoverEndpointis Degraded.
- After you open the Traffic Manager profile in step 2, in the Configuration page, use the following steps:
Next, use the following steps to verify that the sample app deployed to the primary cluster is accessible from the Traffic Manager profile:
Select Overview of the Traffic Manager profile you created.
Check and copy down the DNS name of the Traffic Manager profile, replacing the protocol
httpwithhttps. For example,https://tmprofile-mjg032524.trafficmanager.net.Open the URL in a new browser tab. You should see that the coffee you created previously is listed in the page.
Create another coffee with a different name and price - for example, Coffee 2 with price 20 - which is persisted into both the application data table and the session table of the database. The UI that you see should be similar to the following screenshot:

If your UI doesn't look similar, troubleshoot and resolve the problem before you continue. Keep the console open and use it for the failover test later.
You've completed the Traffic Manager profile setup. Keep the page open and you use it for monitoring the endpoint status change in a failover event later.
Test failover from primary to secondary
In this section, to test failover, you manually failover your Azure SQL Database server and restore the backup of your AKS cluster, and then fail back using the Azure portal.
Failover to the secondary site
To simulate an outage of the primary region, stop the primary AKS cluster by following the steps in Stop and start an Azure Kubernetes Service (AKS) cluster.
Next, start the secondary AKS cluster so it can be restored from the backup of the primary cluster.
Note
If you have WebSphere Liberty/Open Liberty applications running on the restore target cluster, to avoid conflicts, use the following steps to clean up WebSphere Liberty/Open Liberty applications:
Connect to the target cluster by running the command for
cmdToConnectToClusterthat you saved aside previously.For Open Liberty applications, run the following command:
kubectl delete OpenLibertyApplication --all --all-namespacesFor WebSphere Liberty applications, run the following command:
kubectl delete WebSphereLibertyApplication --all --all-namespaces
Then, switch to the browser tab of your Traffic Manager profile, and verify that the Monitor status for both endpoints myPrimaryEndpoint and myFailoverEndpoint is Degraded.
Now, use the following steps to failover the Azure SQL Database from the primary server to the secondary server:
- Switch to the browser tab of your Azure SQL Database failover group - for example,
failovergroup-mjg032524. - Select Failover, then select Yes.
- Wait until it completes.
Next, use the following steps to restore the backup of the primary AKS cluster to the secondary AKS cluster:
In the Azure portal, in the search box, enter Backup center and select Backup center from the search results.
Under Manage, select Backup instances. Filter on the datasource type Kubernetes Services. Find the backup instance you created in the previous section - for example, <aks-cluster-name>\akseastusmjg032524.
Select the backup instance.
Select Restore.
On the Restore page, the default pane is Restore point. Select Previous to change to the Basics pane. For Restore Region, select Secondary Region, then select Next: Restore point.

In the Restore point pane, the latest Operational and Vault-standard restore point is selected. Keep the defaults and select Next: Restore parameters.

On the Restore parameters pane, use the following steps:
For Select Target cluster, select the secondary AKS cluster that you created in the West US region. You run into a permission issue as shown in the following screenshot. Select Grant Permission to mitigate the errors.
For Backup Staging Location, select the Storage Account that you created in the West US region. You run into a permission issue as shown in the following screenshot. Select Assign missing roles to mitigate the errors.

If the errors still happen after the role assignments finish, select Revalidate to refresh the permissions.
When granting missing permissions, if asked to specify a Scope, accept the default value.
Select Validate. You should see the message,
Validation completed successfully. Otherwise, troubleshoot and resolve the problem before you continue.
Select Next: Review + restore. Then select Restore. It takes about 10 minutes to restore the cluster.
You can monitor the restore process from Backup center > Monitoring + reporting > Backup jobs, as shown in the following screenshot:

Wait for a while, then select Refresh. Repeat the operation until you see that Status becomes Completed.


Then, use the following steps to verify that the restore works as expected:
Switch to the terminal where you connected to the secondary AKS cluster.
Run the following command to get the sample app restored from the backup:
kubectl get OpenLibertyApplicationYou should see one READY application in the output:
NAME                       IMAGE                                 EXPOSED   RECONCILED   RESOURCESREADY   READY   AGE
javaee-cafe-cluster-agic   acr3984d1.azurecr.io/javaee-cafe:v1             True         True             True    3m
Run the following command to get status of the pods created during the deployment:
kubectl get podsYou should see three Running pods in the output:
NAME                                        READY   STATUS    RESTARTS   AGE
javaee-cafe-cluster-agic-7bb57dd945-6ljll   1/1     Running   0          3m
javaee-cafe-cluster-agic-7bb57dd945-h2xdf   1/1     Running   0          3m
javaee-cafe-cluster-agic-7bb57dd945-k744w   1/1     Running   0          3m
Switch to the browser tab of your Traffic Manager profile, then refresh the page until you see that Monitor status for endpoint
myFailoverEndpointis Online and Monitor status for endpointmyPrimaryEndpointis Degraded.Switch to the browser tab with the DNS name of the Traffic Manager profile - for example,
https://tmprofile-mjg032524.trafficmanager.net. Refresh the page and you should see the same data persisted in the application data table and the session table displayed. The UI that you see should be similar to the following screenshot:
If you don't observe this behavior, it might be because the Traffic Manager is taking time to update DNS to point to the failover site. The problem could also be that your browser cached the DNS name resolution result that points to the failed site. Wait for a while and refresh the page again.
Note
The app configures session timeout as 1 hour. Depending on how much time it took to failover, you might not see session data displayed in the New coffee section of the sample app UI if it expired more than one hour previously.

Re-protect the failover site
Now that the secondary region is the failover site and is active, you should re-protect it with Azure Backup.
First, use the same steps in the section Back up the AKS cluster to back up the secondary AKS cluster, except for the following differences:
- For Create a Backup vault, use the following steps:
- For Resource group, select the existing resource group deployed in the secondary region - for example,
liberty-aks-westus-mjg032524. - For Backup vault name, enter a unique value - for example,
aks-backup-vault-westus-mjg032524. - For Region, select West US.
- For Resource group, select the existing resource group deployed in the secondary region - for example,
- For Create a backup policy, use the following steps:
- Select the Backup vault you created in the secondary region - for example,
aks-backup-vault-westus-mjg032524.
- Select the Backup vault you created in the secondary region - for example,
- For Configure backups, use the following steps:
- Select the Backup vault you created in the secondary region - for example,
aks-backup-vault-westus-mjg032524. - For Backup Instance name, fill in a unique name - for example,
akswestusmjg032524.
- Select the Backup vault you created in the secondary region - for example,
Then, use the same steps in the section Wait for a Vault-standard backup to happen to wait until a Vault-standard backup of the secondary AKS cluster is available, except select the backup instance from the Backup page of the secondary AKS cluster.
Fail back to the primary site
Use the same steps in the Failover to the secondary site section to fail back to the primary site including database server and the AKS cluster, except for the following differences:
When you prepare for the failback, use the following steps:
- Stop the secondary AKS cluster to simulate an outage of the secondary region.
- Start the primary AKS cluster.
- Connect to the primary AKS cluster and clean up WebSphere Liberty/Open Liberty applications.
When you restore the backup of the secondary AKS cluster to the primary AKS cluster, use the following steps:
- Select the backup instance in the secondary region - for example,
<aks-cluster-name>\akswestusmjg032524. - In the Restore parameters pane, use the following steps:
- For Select Target cluster, select the primary AKS cluster that you created in the East US region.
- For Backup Staging Location, select the Storage Account that you created in the East US region.
- Select the backup instance in the secondary region - for example,
When you verify that the restore works as expected, use the following steps:
- Switch to the terminal where you connected to the primary AKS cluster, and check that the app is restored successfully.
- Switch to the browser tab of your Traffic Manager profile, then refresh the page until you see that Monitor status for endpoint
myPrimaryEndpointis Online and Monitor status for endpointmyFailoverEndpointis Degraded.
Clean up resources
If you're not going to continue to use the WebSphere Liberty/Open Liberty clusters and other components, use the following steps to delete the resource groups to clean up the resources used in this tutorial:
- In the Azure portal, in the search box, enter the resource group name of Azure SQL Database servers - for example,
myResourceGroup- and select the matched resource group from the search results. - Select Delete resource group.
- In Enter resource group name to confirm deletion, enter the resource group name.
- Select Delete.
- Repeat steps 1-4 for the resource group of the Traffic Manager - for example,
myResourceGroupTM1. - In the Azure portal, in the search box, enter Backup vaults and select Backup vaults from the search results. You should see two Backup vaults listed - for example, aks-backup-vault-eastus-mjg032524 and aks-backup-vault-westus-mjg032524. For each of them, use the following steps:
- Select to open the Backup vault.
- Select Manage > Properties > Soft delete > Update. Next to Enable soft Delete, unselect the checkbox, and then select Update.
- Select Manage > Backup instances. Filter on the datasource type Kubernetes Services. Select the instance you created and then delete it.
- Wait until the two Backup instances are deleted.
- Repeat steps 1-4 for the resource group of the primary cluster - for example,
liberty-aks-eastus-mjg032524. - Repeat steps 1-4 for the resource group of the secondary cluster - for example,
liberty-aks-westus-mjg032524.
Next steps
In this tutorial, you set up a WebSphere Liberty/Open Liberty HA/DR solution consisting of an active-passive application infrastructure tier with an active-passive database tier, and in which both tiers span two geographically different sites. At the first site, both the application infrastructure tier and the database tier are active. At the second site, the secondary domain is restored with Azure Backup, and the secondary database is on standby.
Continue to explore the following references for more options to build HA/DR solutions and run WebSphere on Azure: