Note
Access to this page requires authorization. You can try signing in or changing directories.
Access to this page requires authorization. You can try changing directories.
This article shows you how to create a Java app with sign-in capability by using Spring Initializr with the Spring Boot Starter for Microsoft Entra ID.
In this tutorial, you learn how to:
- Create a Java application using the Spring Initializr
- Configure Azure Active Directory B2C
- Secure the application with Spring Boot classes and annotations
- Build and test your Java application
Microsoft Entra ID is Microsoft's cloud-scale enterprise identity solution. Azure Active Directory B2C compliments the feature set of Microsoft Entra ID, allowing you to manage customer, consumer, and citizen access to your business-to-consumer (B2C) applications.
Prerequisites
- An Azure subscription. If you don't already have one, create a free account before you begin.
- A supported Java Development Kit (JDK). For more information about the JDKs available for use when developing on Azure, see Java support on Azure and Azure Stack.
- Apache Maven, version 3.0 or higher.
Important
Spring Boot version 2.5 or higher is required to complete the steps in this article.
Create an app using Spring Initializr
Browse to https://start.spring.io/.
Fill out the values according to this guidance. The labels and layout may differ from the image shown here.
- Under Project, select Maven Project.
- Under Language, select Java.
- Under Spring Boot, select 2.7.11.
- Under Group, Artifact and Name enter the same value, using a short descriptive string. The UI may automatically fill in some of these fields as you type.
- In the Dependencies pane, select Add Dependencies. Use the UI to add dependencies on Spring Web and Spring Security.
Note
Spring Security 5.5.1, 5.4.7, 5.3.10 and 5.2.11 have been released to address the following CVE report CVE-2021-22119: Denial-of-Service attack with
spring-security-oauth2-client. If you're using the older version, please upgrade it.Select Generate Project, then download the project to a path on your local computer. Move the downloaded file to a directory named after your project and unzip the file. The file layout should look something like the following, with the value you entered for Group in place of
yourProject.. ├── HELP.md ├── mvnw ├── mvnw.cmd ├── pom.xml └── src ├── main │ ├── java │ │ └── yourProject │ │ └── yourProject │ │ └── YourProjectApplication.java │ └── resources │ ├── application.properties │ ├── static │ └── templates └── test └── java └── yourProject └── yourProject └── YourProjectApplicationTests.java
Create and initialize a Microsoft Entra instance
Create the Active Directory instance
Log into https://portal.azure.com.
Select Create a resource. Search for Azure Active Directory B2C.
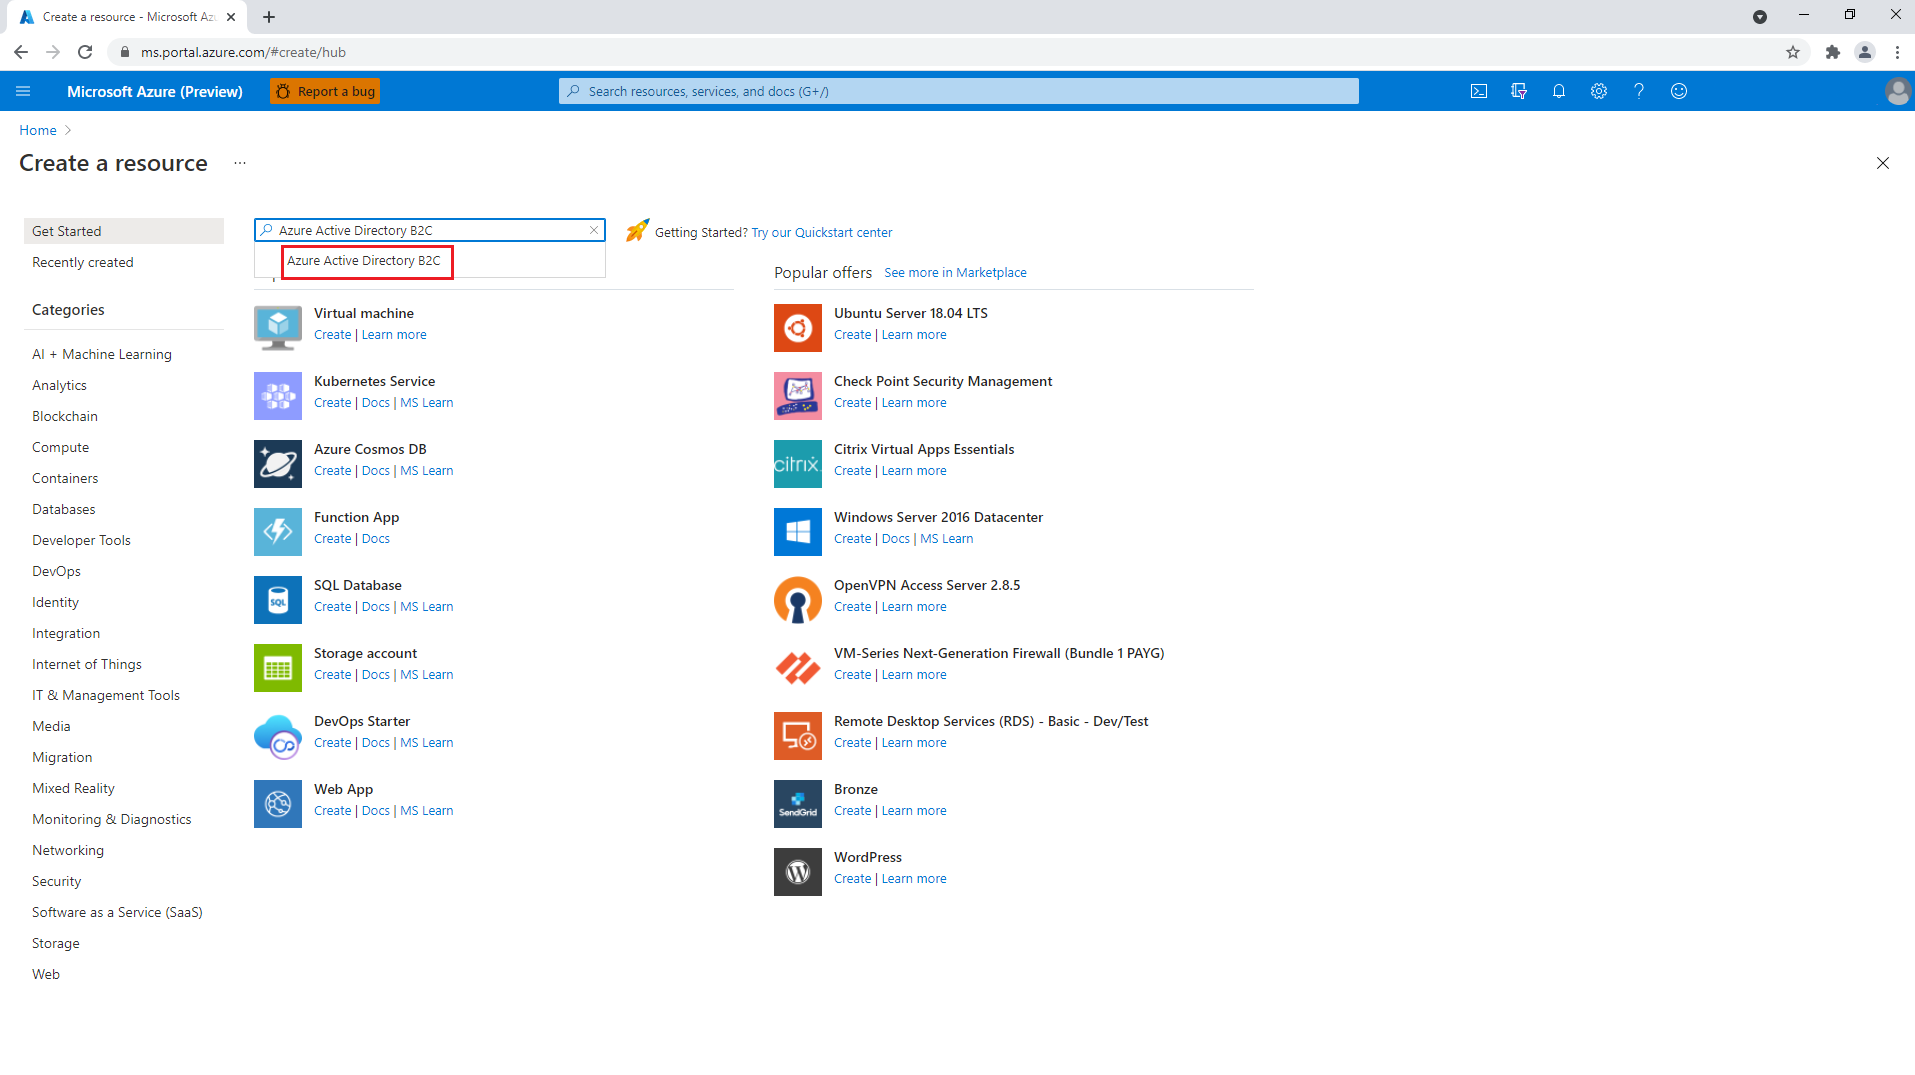
Select Create.

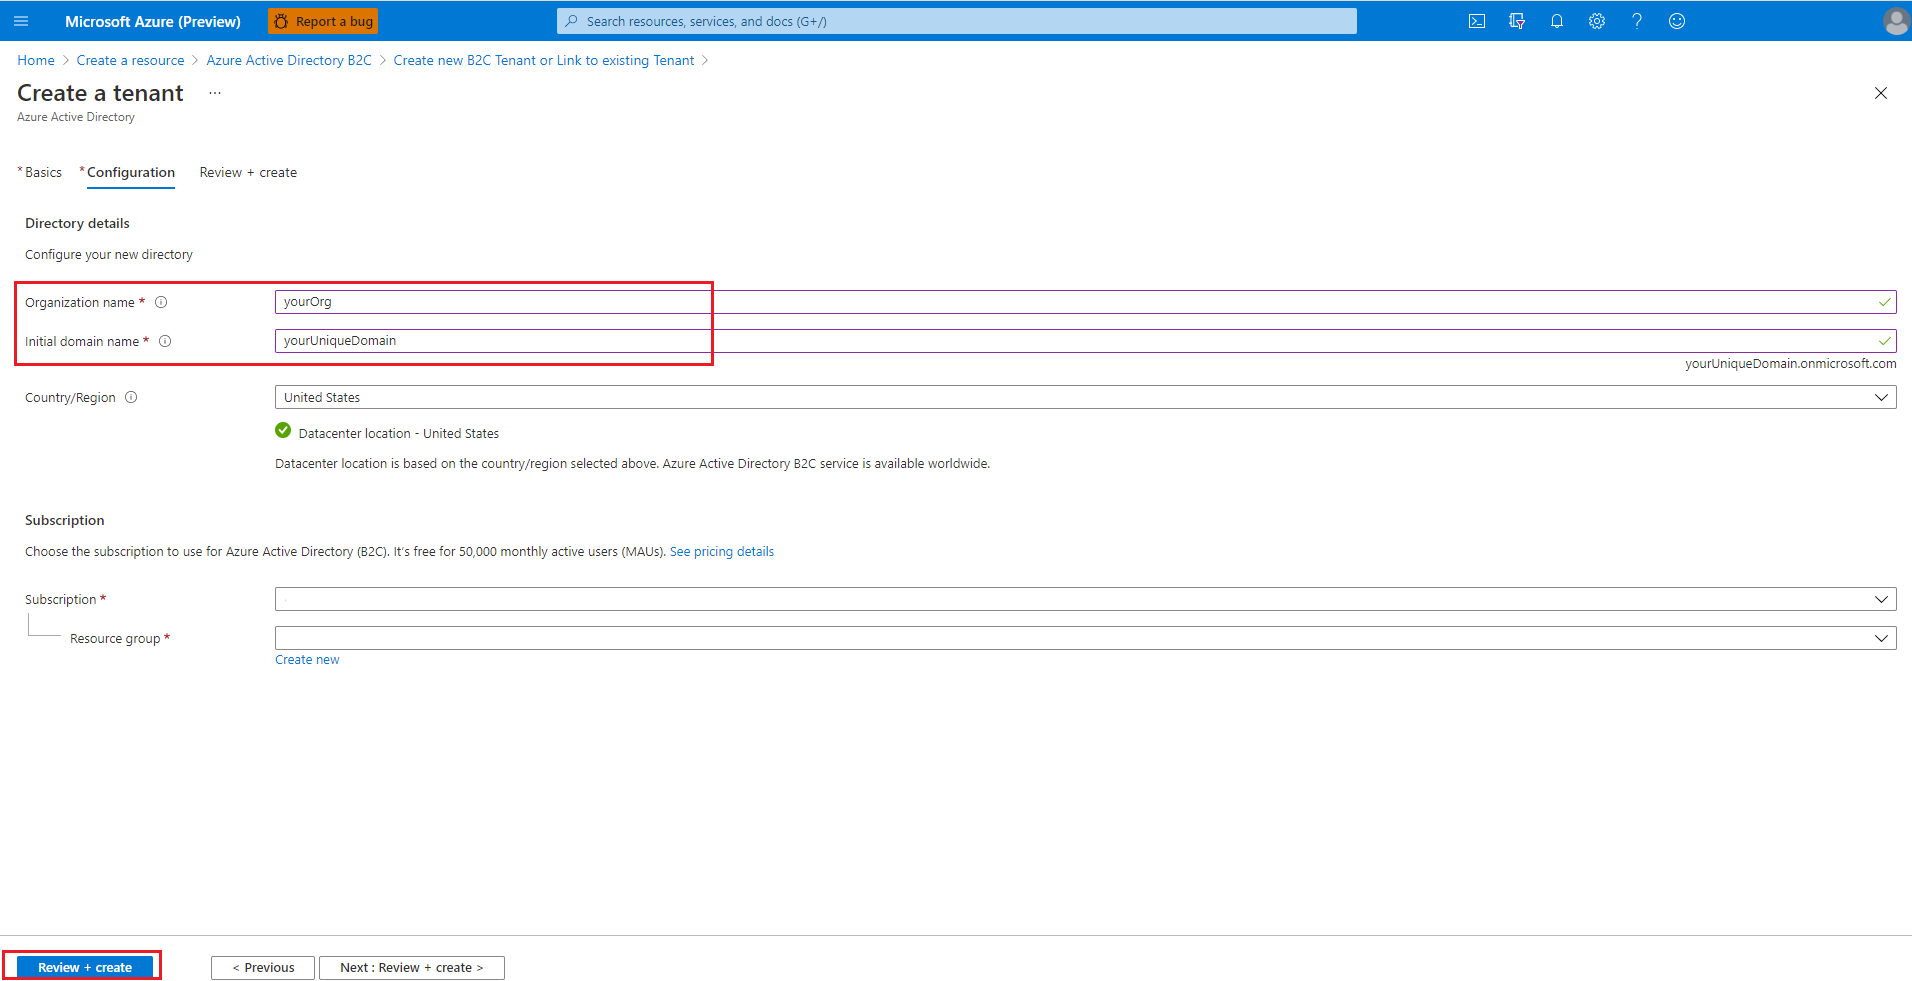
Select Create a new Azure AD B2C Tenant.

For Organization name and Initial domain name, provide appropriate values, then select Create.
When the Active Directory creation is complete, select your account in the upper right corner, select Switch directory, then select the directory created. You'll be redirected to the new tenant home page. Then search for
b2cand select Azure AD B2C.
Add an application registration for your Spring Boot app
In the Manage pane, select App registrations, and then select New registration.
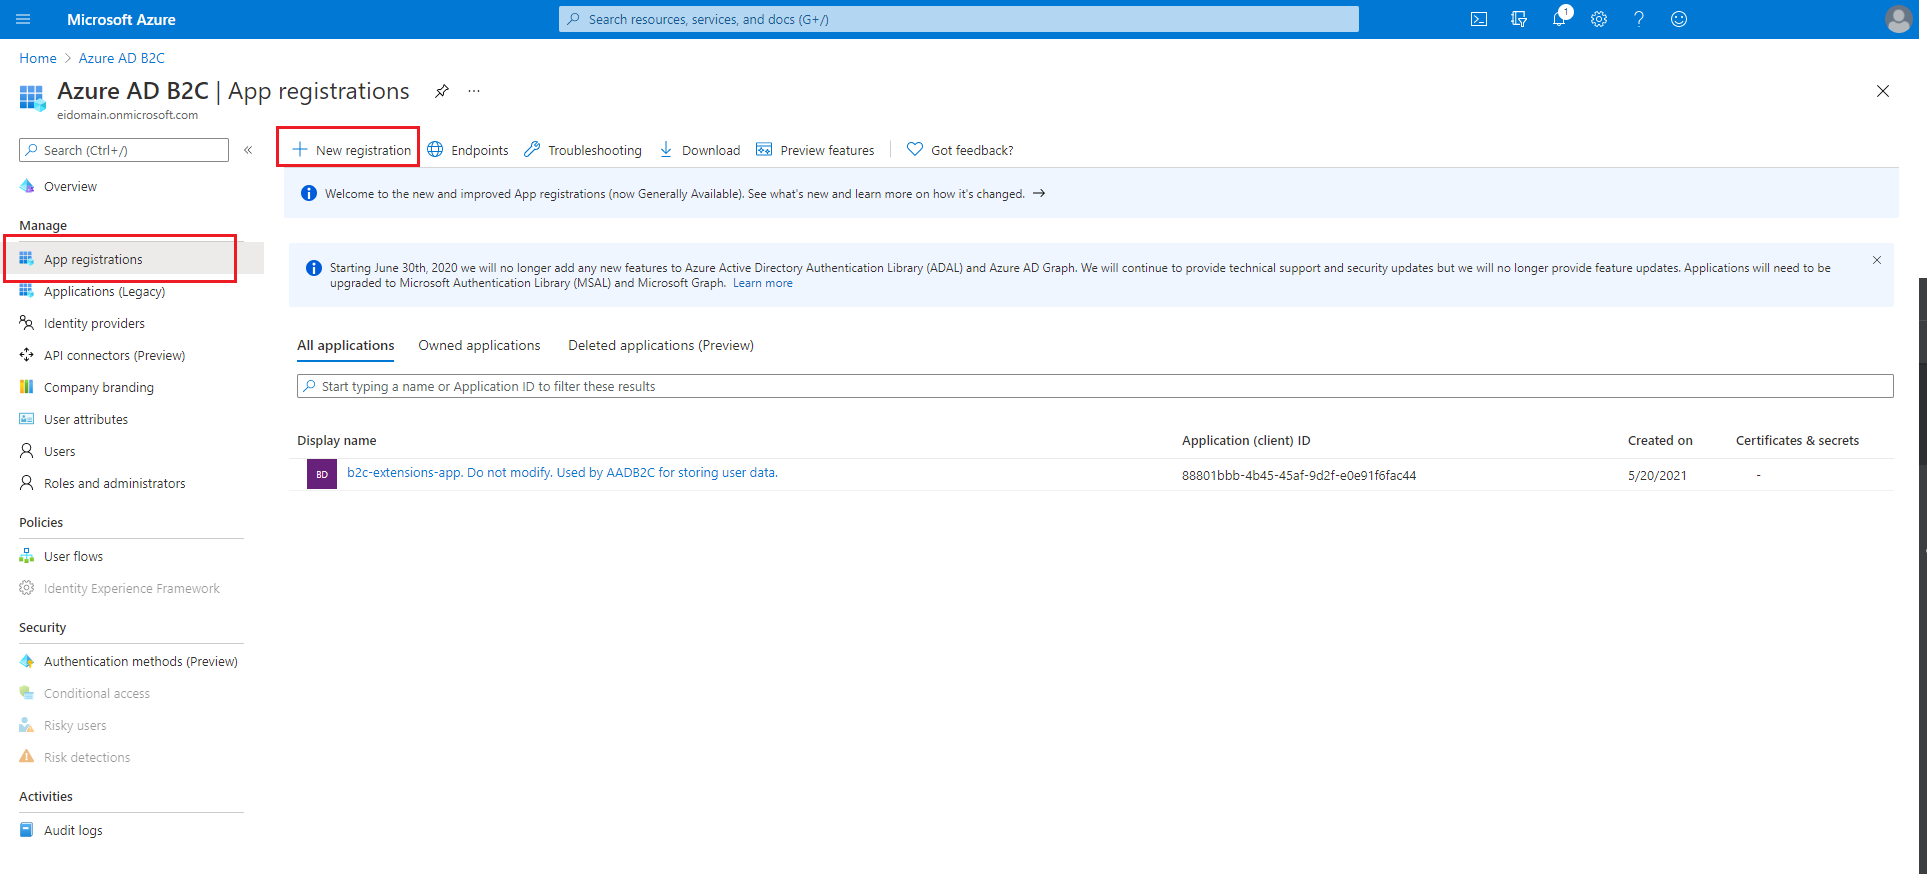
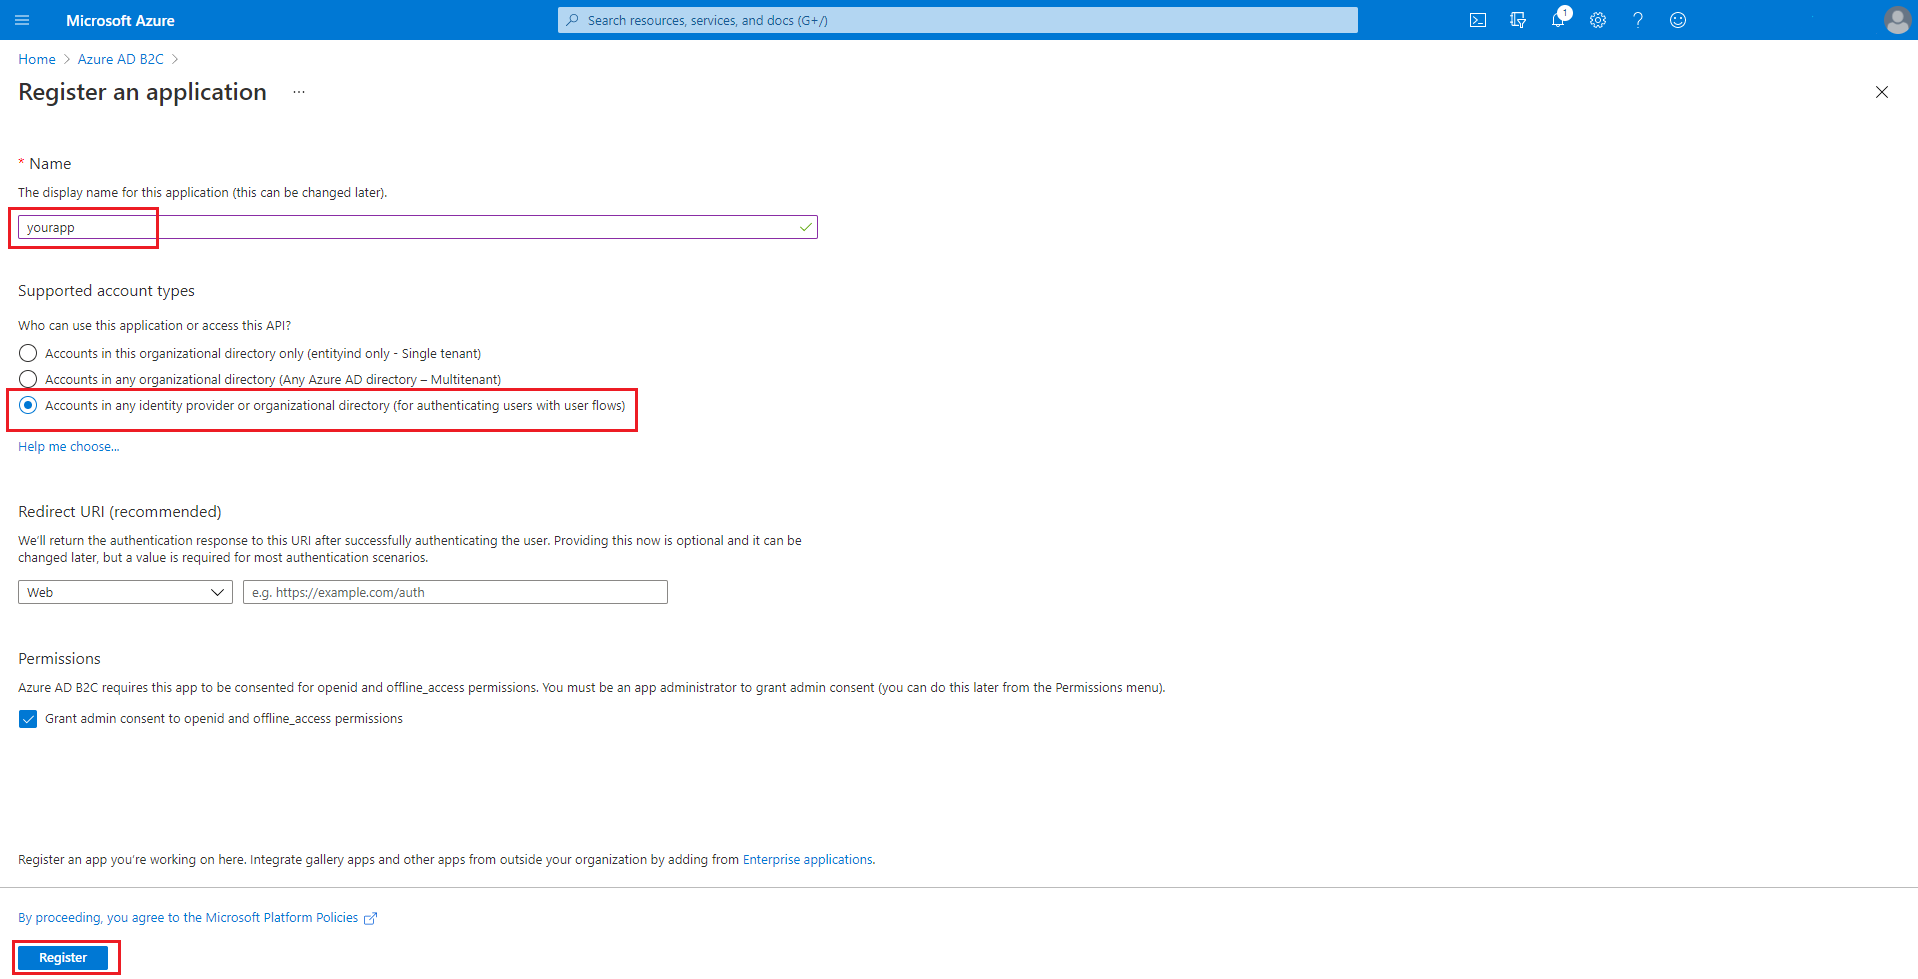
In the Name field, enter your app's name, then select Register.
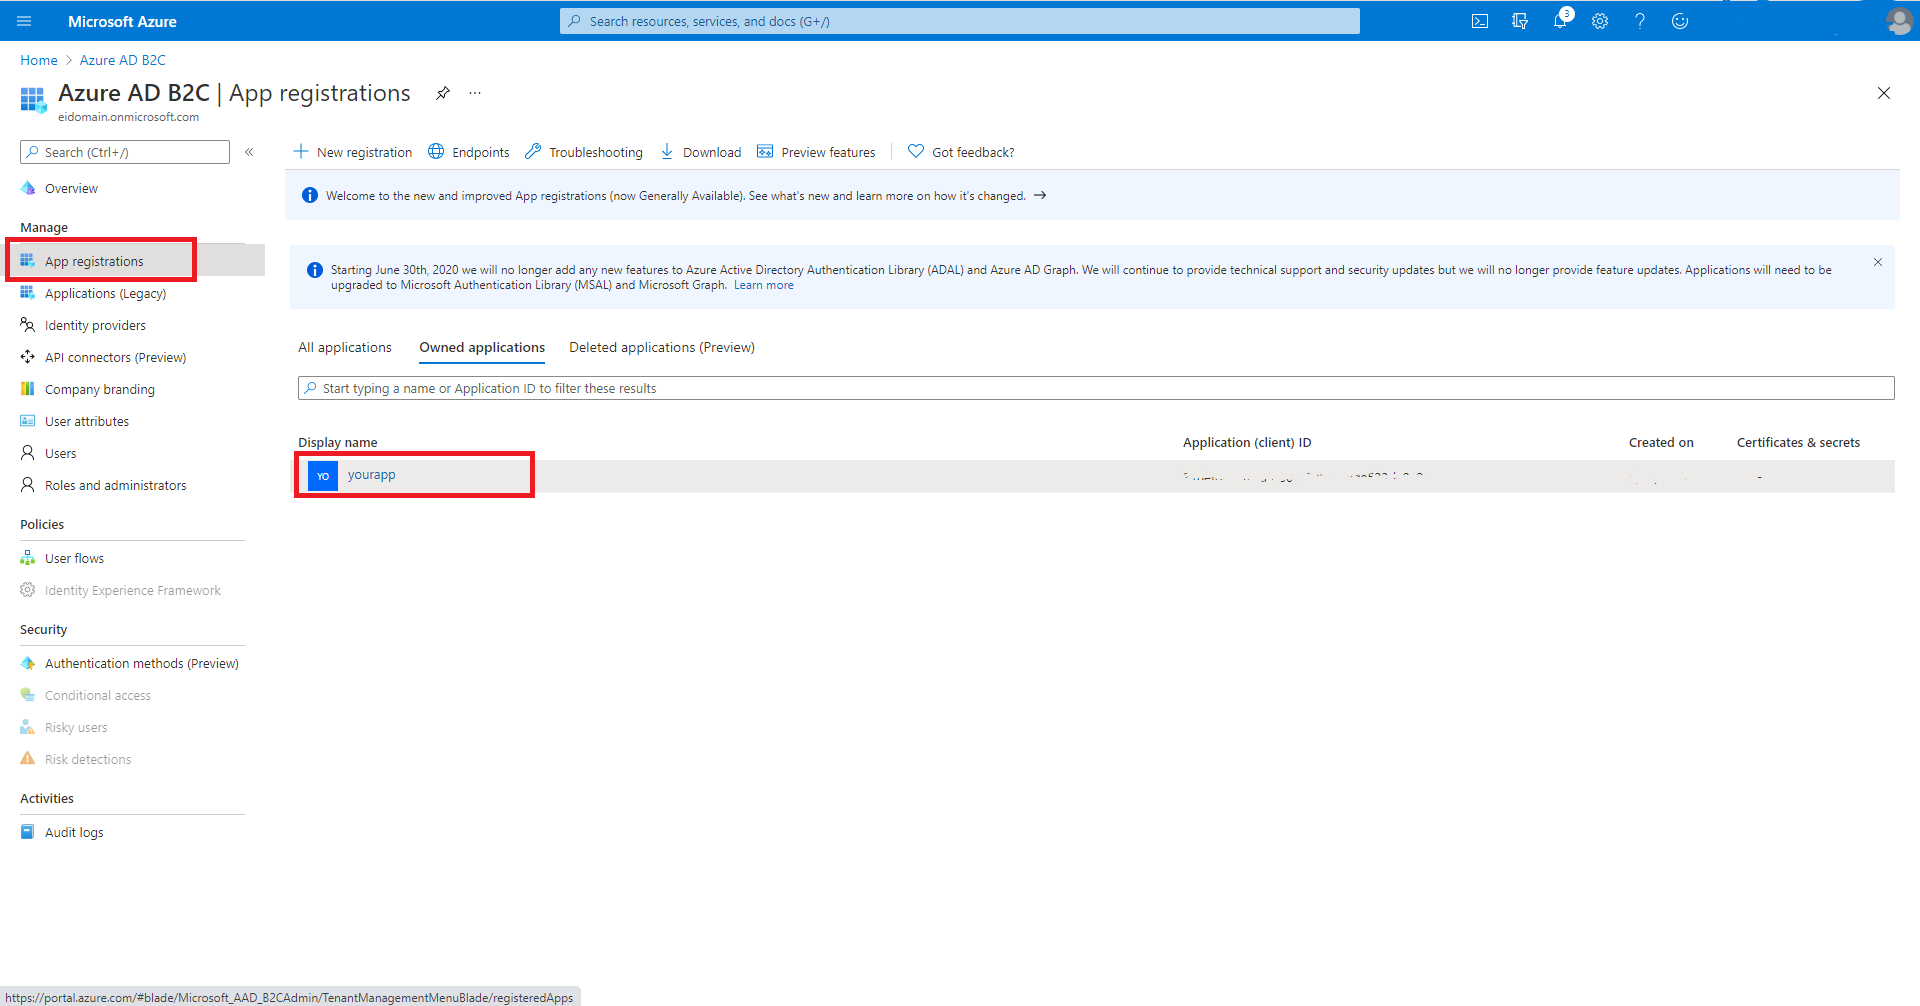
Back on the Manage pane, select App registrations, then select the application name you created.
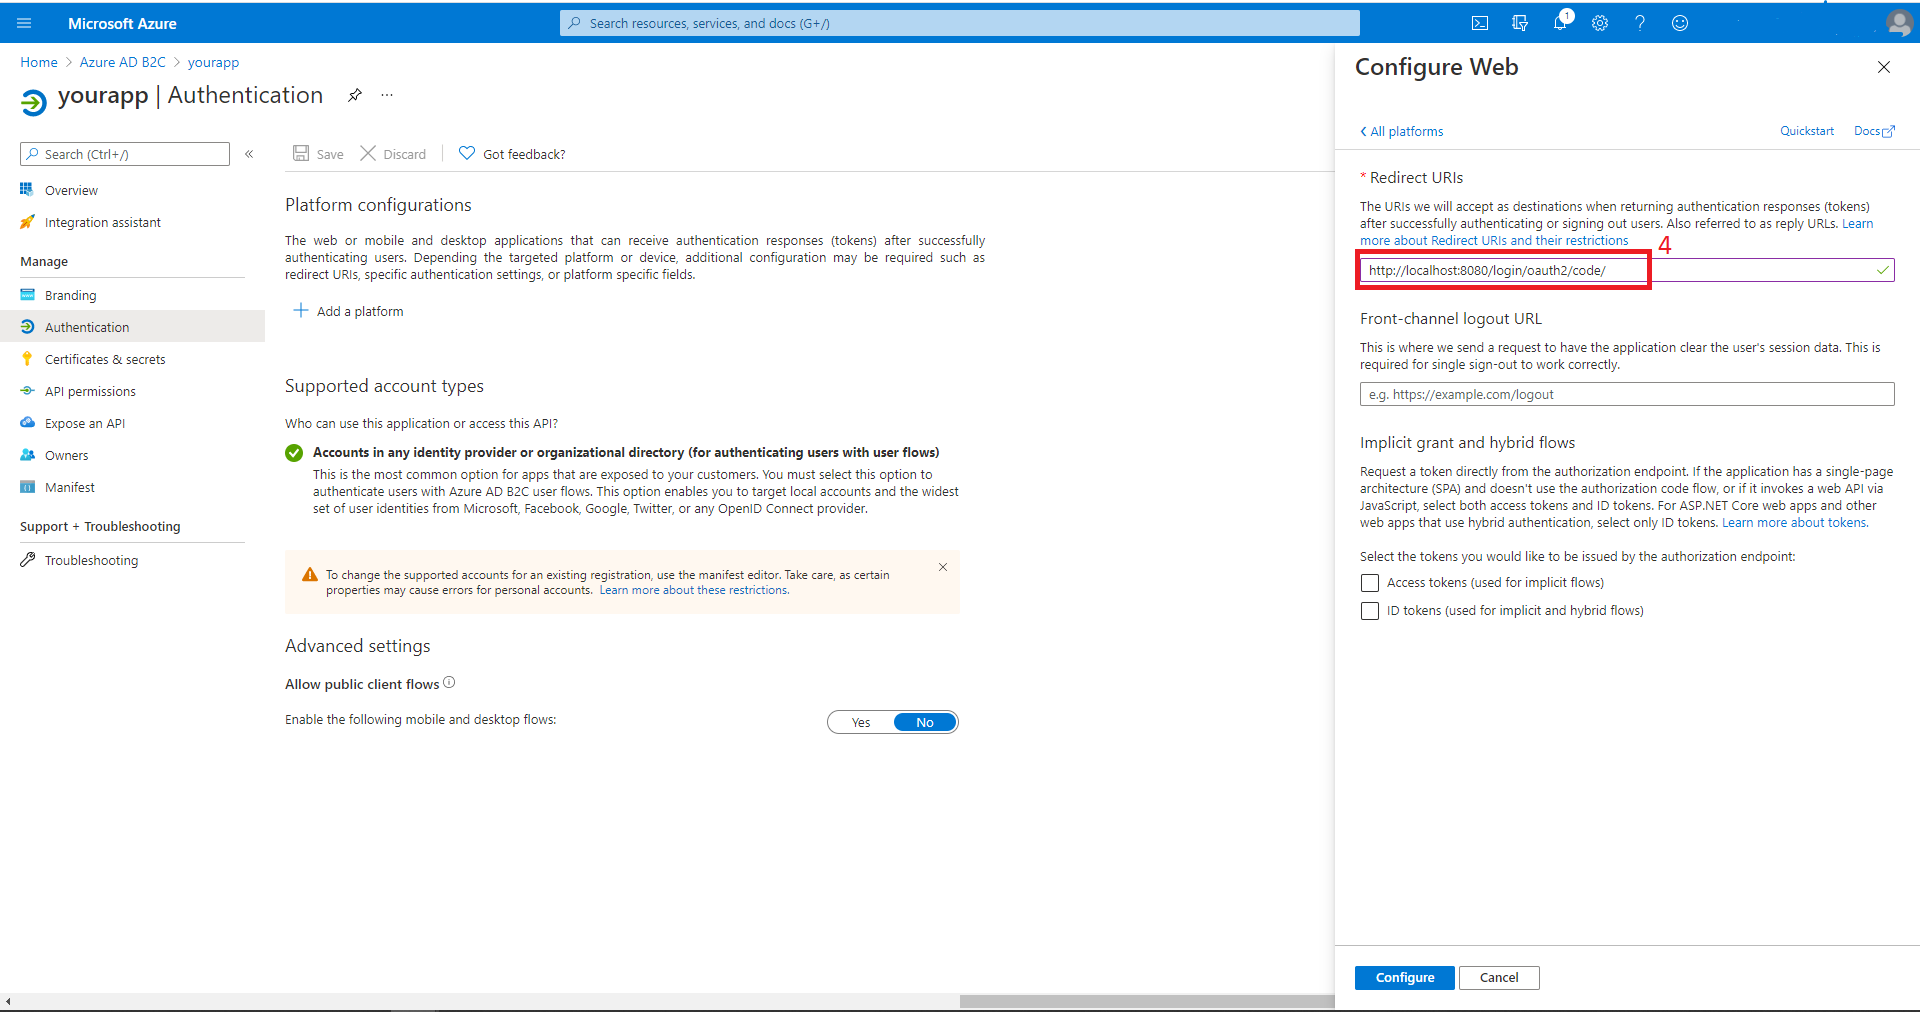
Select Authentication, then Add a platform then Web. Set the Redirect URIs to
http://localhost:8080/login/oauth2/code/, then select Configure.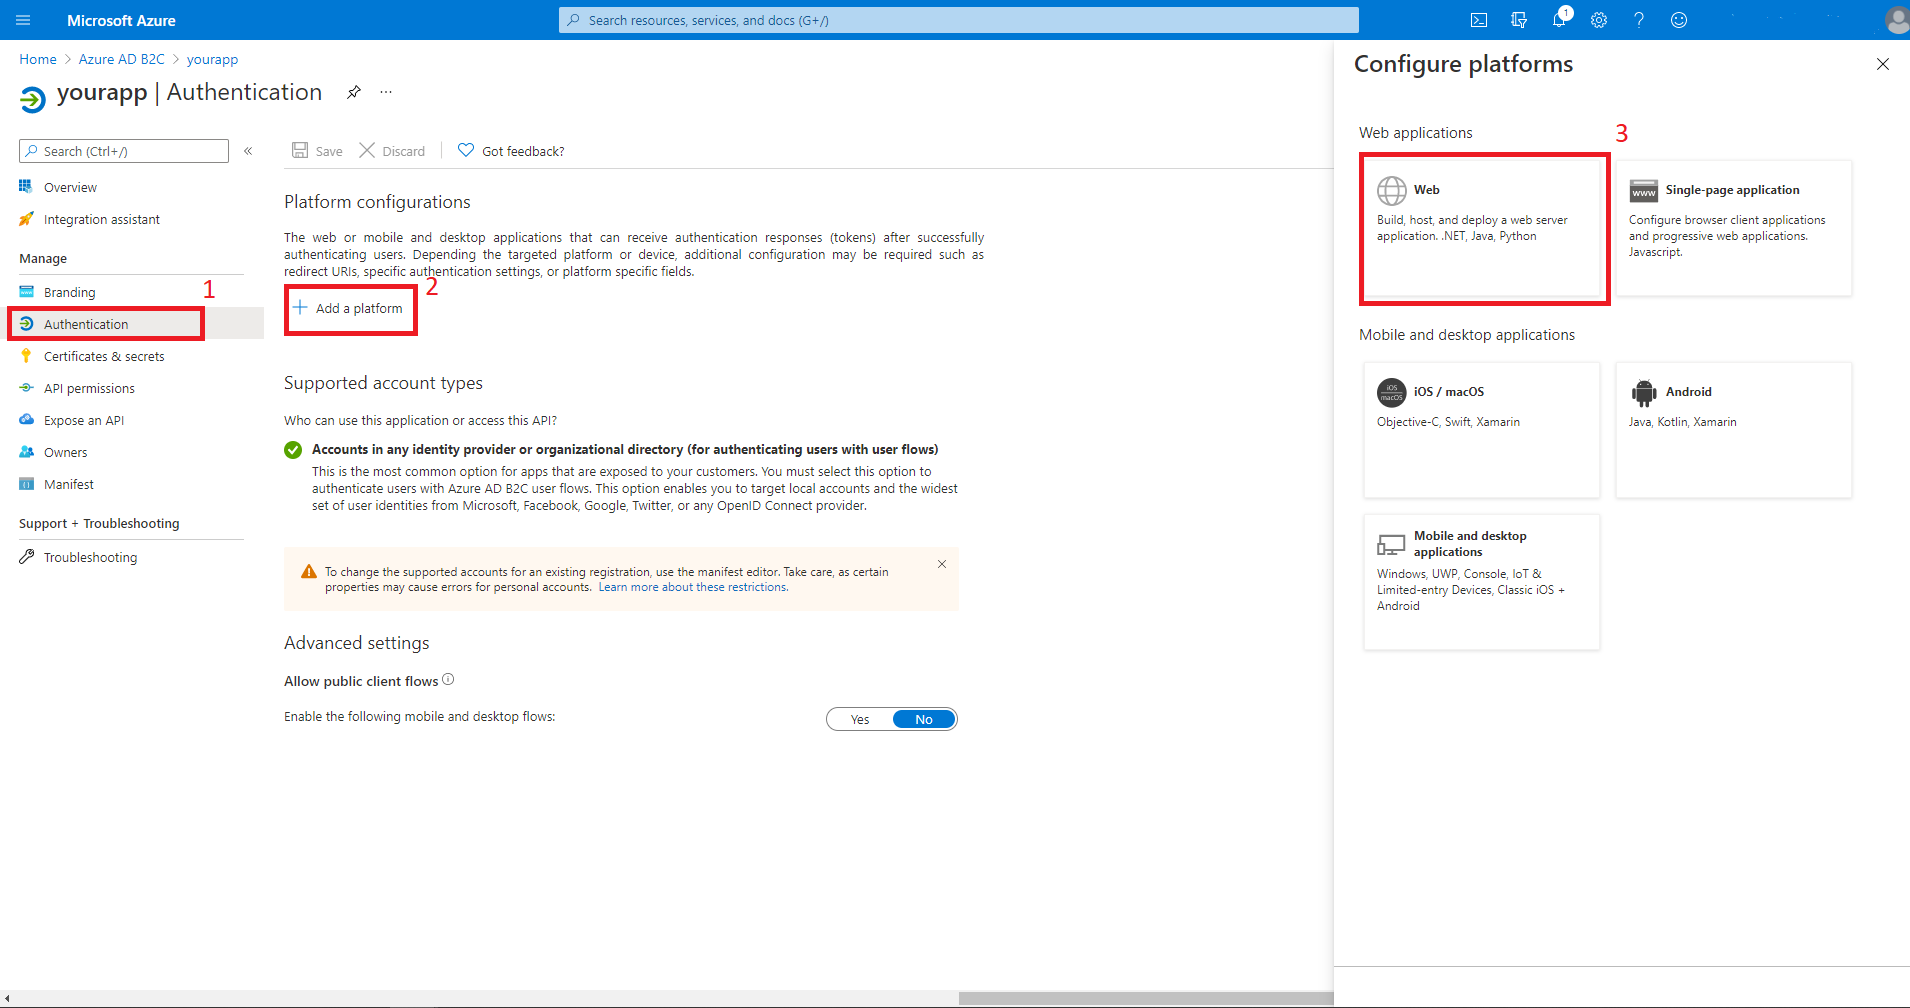
Add app secrets for your app
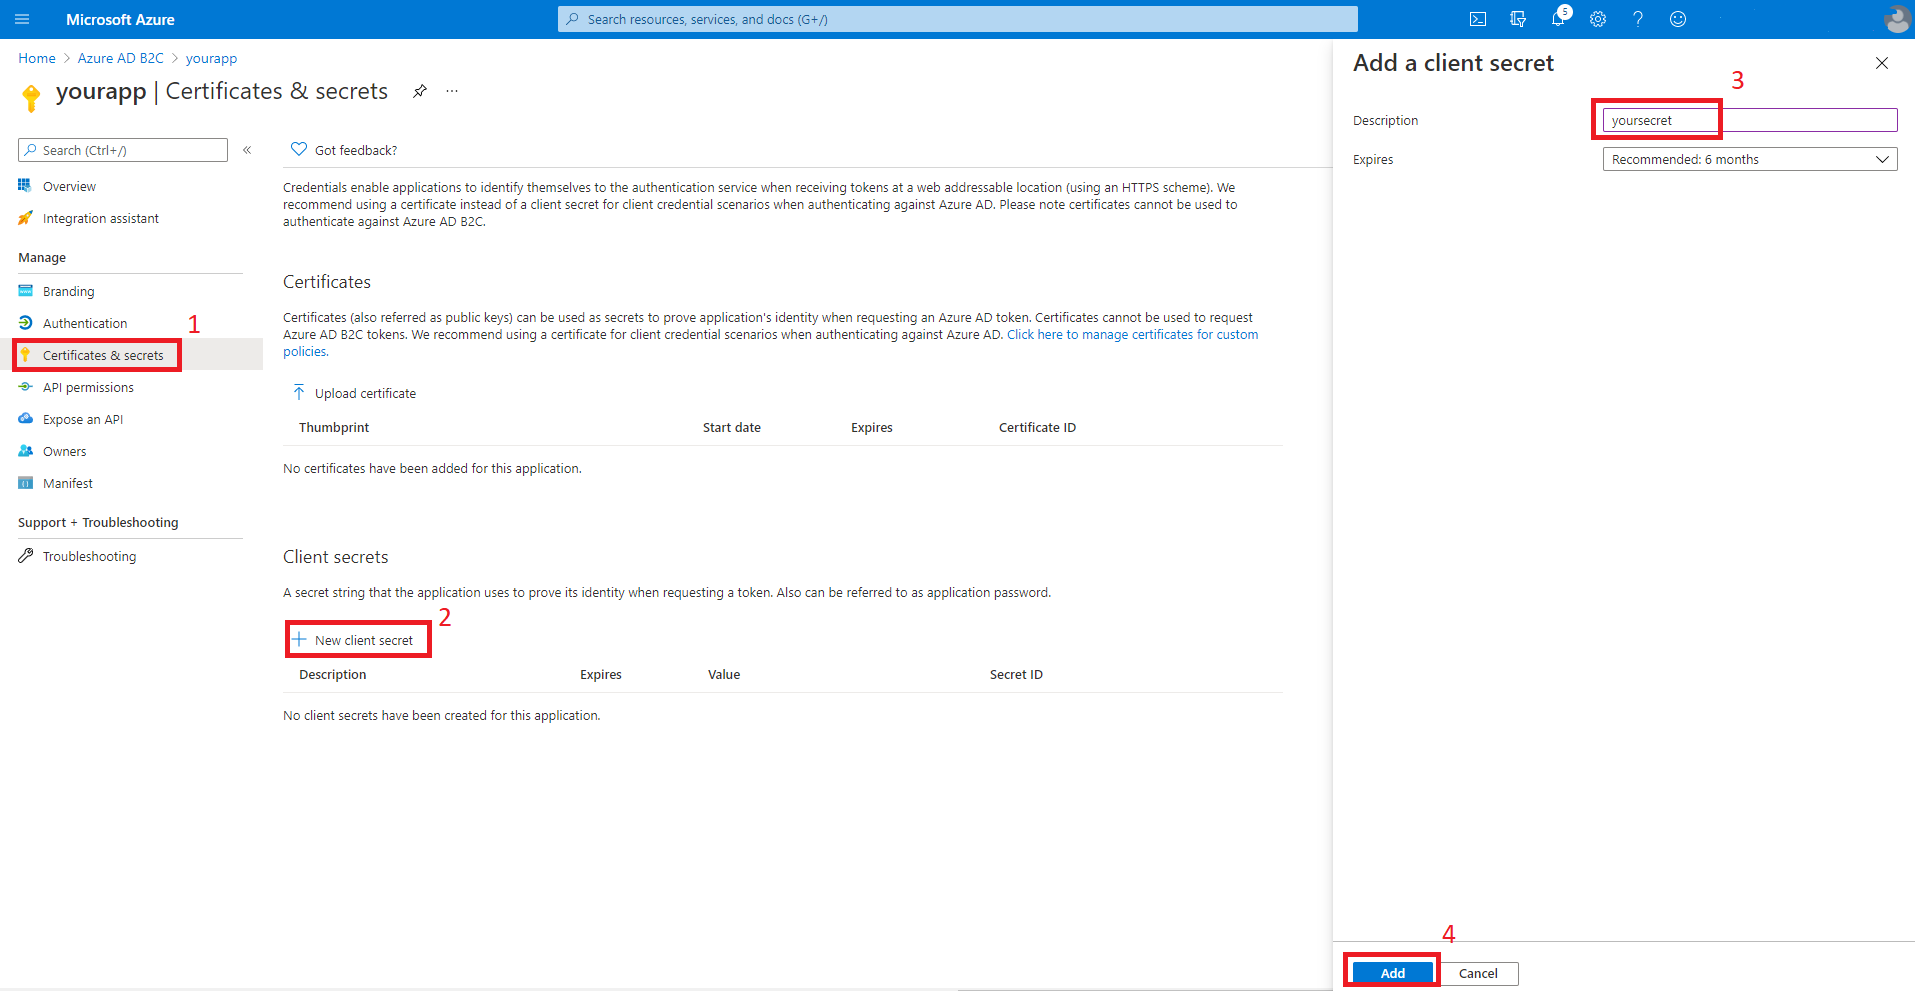
Select Certificates & secrets, then New client secrets. Input your secret description and then select Add. After you create the secret, select the copy icon next to the secret value to copy the value for use later in this article.

Note
If you leave the Certificates & secrets section and come back, you'll not be able to see the secret value. In that case, you must create another secret and copy it for future use.
Occasionally, the generated secret value may contain characters that are problematic for inclusion in the application.yml file, such as backslash or backtick. In that case, discard that secret and generate another one.
Add user flow
Navigate to your tenant main page. In the Policies section of the left pane, select User flows, then select New user flow.
You'll now leave this tutorial, execute another tutorial, and come back to this tutorial when you're done. Here are some things to keep in mind when you go to the other tutorial.
- Start with the step that requests you to select New User flow.
- When this tutorial refers to
webapp1, use the value you entered for Group instead. - When you're selecting claims to return from the flows, ensure Display Name is selected. Without this claim, the app being built in this tutorial won't work.
- When you're asked to run the user flows, the redirect URL you specified previously isn't yet active. You can still run the flows, but the redirection won't complete successfully. This is expected.
- When you reach "Next steps", return to this tutorial.
Follow all the steps in Tutorial: Create user flows in Azure Active Directory B2C to create user flows for "sign-up and sign in", "profile editing" and "password reset".
Azure AD B2C supports local accounts as well as social identity providers. For an example of creating a GitHub identity provider, see Set up sign-up and sign-in with a GitHub account using Azure Active Directory B2C.
Configure and compile your app
Now that you've created the Azure AD B2C instance and some user flows, you'll connect your Spring app to the Azure AD B2C instance.
From the command line, cd to the directory where you unzipped the .zip file you downloaded from Spring Initializr.
Navigate to the parent folder for your project, and open the pom.xml Maven project file in a text editor.
Add the dependencies for Spring OAuth2 security to the pom.xml:
<dependency>
    <groupId>com.azure.spring</groupId>
    <artifactId>spring-cloud-azure-starter-active-directory-b2c</artifactId>
    <version>See Below</version>
</dependency>
<dependency>
    <groupId>org.springframework.boot</groupId>
    <artifactId>spring-boot-starter-thymeleaf</artifactId>
    <version>See Below</version>
</dependency>
<dependency>
    <groupId>org.thymeleaf.extras</groupId>
    <artifactId>thymeleaf-extras-springsecurity5</artifactId>
    <version>See Below</version>
</dependency>
For the
spring-cloud-azure-starter-active-directory-b2c, use the latest version available. You may be able to use mvnrepository.com to look this up.For the
spring-boot-starter-thymeleaf, use the version corresponding to the version of Spring Boot you selected above, for example2.3.4.RELEASE.For
thymeleaf-extras-springsecurity5, use the latest version available. You may be able to use mvnrepository.com to look this up. As of this writing, the latest version is3.0.4.RELEASE.Save and close the pom.xml file.
- Verify that your dependencies are correct by running
mvn -DskipTests clean install. If you don't seeBUILD SUCCESS, troubleshoot and resolve the problem before continuing.
- Verify that your dependencies are correct by running
Navigate to the src/main/resources folder in your project and create an application.yml file in a text editor.
Specify the settings for your app registration using the values you created earlier; for example:
spring:
  cloud:
    azure:
      active-directory:
        b2c:
          enabled: true
          base-uri: https://<your-tenant-initial-domain-name>.b2clogin.com/<your-tenant-initial-domain-name>.onmicrosoft.com/
          credential:
            client-id: <your-application-ID>
            client-secret: '<secret-value>'
          login-flow: sign-up-or-sign-in
          logout-success-url: <your-logout-success-URL>
          user-flows:
            sign-up-or-sign-in: <your-sign-up-or-sign-in-user-flow-name>
            profile-edit: <your-profile-edit-user-flow-name>
            password-reset: <your-password-reset-user-flow-name>
          user-name-attribute-name: <your-user-name-attribute-name>
Notice that the
client-secretvalue is enclosed in single quotes. This is necessary because the value of<secret-value>will almost certainly contain some characters that require being inside single quotes when present in YAML.Note
As of this writing, the full list of Active Directory B2C Spring Integration values that are available for use in application.yml is the following:
spring:
  cloud:
    azure:
      active-directory:
        b2c:
          enabled: true
          base-uri:
          credential:
            client-id:
            client-secret:
          login-flow:
          logout-success-url:
          user-flows:
            sign-up-or-sign-in:
            profile-edit: # optional
            password-reset: # optional
          user-name-attribute-name:
The application.yml file is available in
spring-cloud-azure-starter-active-directory-b2csample:aad-b2c-web-applicationon GitHub.Save and close the application.yml file.
Create a folder named controller in src/main/java/<yourGroupId>/<yourGroupId>, replacing
<yourGroupId>with the value you entered for Group.Create a new Java file named WebController.java in the controller folder and open it in a text editor.
Enter the following code, changing
yourGroupIdappropriately, then save and close the file:package yourGroupId.yourGroupId.controller; import org.springframework.security.oauth2.client.authentication.OAuth2AuthenticationToken; import org.springframework.security.oauth2.core.user.OAuth2User; import org.springframework.stereotype.Controller; import org.springframework.ui.Model; import org.springframework.web.bind.annotation.GetMapping; @Controller public class WebController { private void initializeModel(Model model, OAuth2AuthenticationToken token) { if (token != null) { final OAuth2User user = token.getPrincipal(); model.addAttribute("grant_type", user.getAuthorities()); model.addAllAttributes(user.getAttributes()); } } @GetMapping(value = "/") public String index(Model model, OAuth2AuthenticationToken token) { initializeModel(model, token); return "home"; } @GetMapping(value = "/greeting") public String greeting(Model model, OAuth2AuthenticationToken token) { initializeModel(model, token); return "greeting"; } @GetMapping(value = "/home") public String home(Model model, OAuth2AuthenticationToken token) { initializeModel(model, token); return "home"; } }Because every method in the controller calls
initializeModel(), and that method callsmodel.addAllAttributes(user.getAttributes());, any HTML page in src/main/resources/templates is able to access any of those attributes, such as${name},${grant_type}, or${auth_time}. The values returned fromuser.getAttributes()are in fact the claims of theid_tokenfor the authentication. The complete list of available claims is listed in Microsoft identity platform ID tokens.Create a folder named security in src/main/java/<yourGroupId>/<yourGroupId>, replacing
yourGroupIdwith the value you entered for Group.Create a new Java file named WebSecurityConfiguration.java in the security folder and open it in a text editor.
Enter the following code, changing
yourGroupIdappropriately, then save and close the file:package yourGroupId.yourGroupId.security; import com.azure.spring.cloud.autoconfigure.aadb2c.AadB2cOidcLoginConfigurer; import org.springframework.security.config.annotation.web.builders.HttpSecurity; import org.springframework.security.config.annotation.web.configuration.EnableWebSecurity; import org.springframework.security.config.annotation.web.configuration.WebSecurityConfigurerAdapter; @EnableWebSecurity public class WebSecurityConfiguration extends WebSecurityConfigurerAdapter { private final AadB2cOidcLoginConfigurer configurer; public WebSecurityConfiguration(AadB2cOidcLoginConfigurer configurer) { this.configurer = configurer; } @Override protected void configure(HttpSecurity http) throws Exception { http .authorizeRequests() .anyRequest() .authenticated() .and() .apply(configurer) ; } }Copy the home.html file from
spring-cloud-azure-starter-active-directory-b2csample:aad-b2c-web-applicationto src/main/resources/templates, and replace the${your-profile-edit-user-flow}and${your-password-reset-user-flow}with the names of the user flows that you created earlier.
Build and test your app
Open a command prompt and change directory to the folder where your app's pom.xml file is located.
Build your Spring Boot application with Maven and run it; for example:
Note
It's extremely important that the time according to the system clock under which the local spring boot app runs is accurate. There is very little tolerance of clock skew when using OAuth 2.0. Even three minutes of inaccuracy may cause the signin to fail with an error similar to
[invalid_id_token] An error occurred while attempting to decode the Jwt: Jwt used before 2020-05-19T18:52:10Z. As of this writing, time.gov has an indicator of how far off your clock is from the actual time. The app was successfully run with a skew of +0.019 seconds.mvn -DskipTests clean package mvn -DskipTests spring-boot:runAfter your application is built and started by Maven, open
http://localhost:8080/in a web browser; you should be redirected to login page.
Select the link with text relating to signing in. You should be redirected Azure AD B2C to start the authentication process.
After you've logged in successfully, you should see the sample
home pagefrom the browser,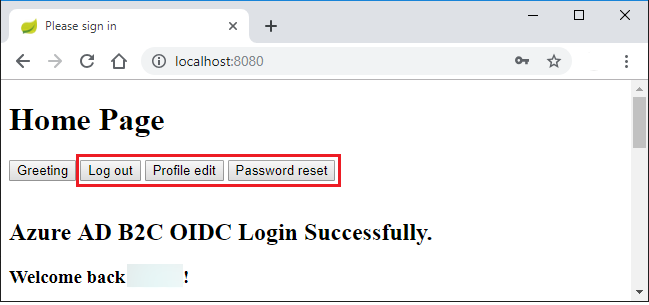
Troubleshooting
The following sections describe how to resolve some problems you might encounter.
Missing attribute name in attributes
While running the sample, you might get an exception with the message Missing attribute 'name' in attributes. The log for this exception will look similar to the following output:
java.lang.IllegalArgumentException: Missing attribute 'name' in attributes
at org.springframework.security.oauth2.core.user.DefaultOAuth2User.<init>(DefaultOAuth2User.java:67) ~[spring-security-oauth2-core-5.3.6.RELEASE.jar:5.3.6.RELEASE]
at org.springframework.security.oauth2.core.oidc.user.DefaultOidcUser.<init>(DefaultOidcUser.java:89) ~[spring-security-oauth2-core-5.3.6.RELEASE.jar:5.3.6.RELEASE]
at org.springframework.security.oauth2.client.oidc.userinfo.OidcUserService.loadUser(OidcUserService.java:144) ~[spring-security-oauth2-client-5.3.6.RELEASE.jar:5.3.6.RELEASE]
at org.springframework.security.oauth2.client.oidc.userinfo.OidcUserService.loadUser(OidcUserService.java:63) ~[spring-security-oauth2-client-5.3.6.RELEASE.jar:5.3.6.RELEASE]
If you get this error, double-check the user workflow you created in Tutorial: Create user flows in Azure Active Directory B2C. When creating the user workflow, for User attributes and claims, be sure to choose attributes and claims for Display Name. Also, be sure to properly configure user-name-attribute-name in the application.yml file.
Sign in with loops to B2C endpoint
This issue is most likely due to polluted cookies for localhost. Clean up cookies for localhost and try it again.
Summary
In this tutorial, you created a new Java web application using the Azure Active Directory B2C starter, configured a new Azure AD B2C tenant, and registered a new application in it, and then configured your application to use the Spring annotations and classes to protect the web app.
Clean up resources
When no longer needed, use the Azure portal to delete the resources created in this article to avoid unexpected charges.
Next steps
To learn more about Spring and Azure, continue to the Spring on Azure documentation center.