Build a Xamarin.Forms app with Azure Mobile Apps
This tutorial shows you how to add a cloud-based backend service to a cross-platform mobile app by using Xamarin.Forms and an Azure mobile app backend. You'll create both a new mobile app backend and a simple Todo list app that stores app data in Azure.
You must complete this tutorial before other Xamarin Forms tutorials using the Mobile Apps feature in Azure App Service.
Prerequisites
You can complete this tutorial on Mac or Windows. To complete this tutorial, you need:
- Visual Studio 2022 with the following workloads.
- ASP.NET and web development
- Azure development
- Mobile development with .NET
- An Azure account.
- The Azure CLI.
- Sign in with
az loginand select an appropriate subscription before starting.
- Sign in with
- (Optional) The Azure Developer CLI.
- An Android Virtual Device, with the following settings:
- Phone: Any phone image - we use the Pixel 5 for testing.
- System Image: Android 11 (API 30 with Google APIs)
If compiling the iOS edition of the app, you must have an available Mac:
- Install XCode
- Open Xcode after installing so that it can add any extra required components.
- Once open, select XCode Preferences... > Components, and install an iOS simulator.
- If completing the tutorial on Windows, follow the guide to Pair to Mac.
Download the sample app
Open the azure-mobile-apps repository in your browser.
Open the Code drop-down, then select Download ZIP.

Once the download is complete, open your Downloads folder and locate the
azure-mobile-apps-main.zipfile.Right-click the downloaded file, and select Extract All....
If you prefer, you can use PowerShell to expand the archive:
C:\Temp> Expand-Archive azure-mobile-apps-main.zip
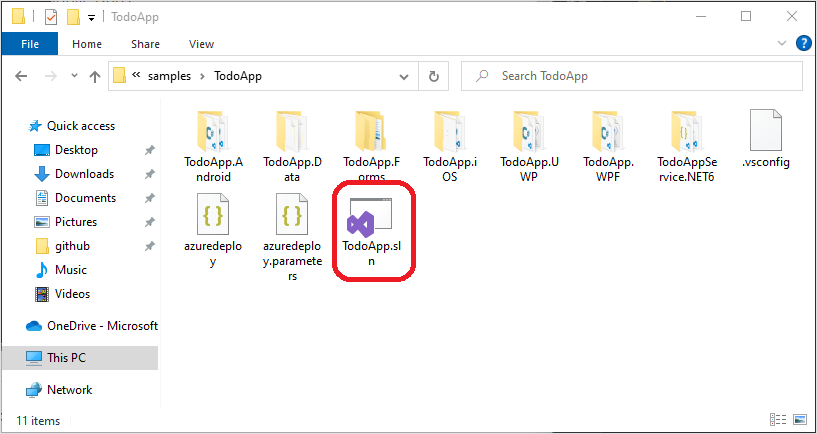
The samples are located in the samples folder within the extracted files. The sample for the quick start is named TodoApp. You can open the sample in Visual Studio by double-clicking the TodoApp.sln file.
Deploy the backend to Azure
Note
If you have already deployed the backend from another quick start, you can use the same backend and skip this step.
To deploy the backend service, we will:
- Provision an Azure App Service and Azure SQL Database to Azure.
- Use Visual Studio to deploy the service code to the newly created Azure App Service.
Use the Azure Developer CLI to complete all steps
The TodoApp sample is configured to support the Azure Developer CLI. To complete all steps (provisioning and deploying):
- Install the Azure Developer CLI.
- Open a terminal and change directory to the folder containing the
TodoApp.slnfile. This directory also containsazure.yaml. - Run
azd up.
If you aren't already signed-in to Azure, the browser launches to ask you to sign-in. You're then be prompted for a subscription
and Azure region to use. The Azure Developer CLI then provisions the necessary resources and deploys the service code to the Azure
region and subscription of your choice. Finally, the Azure Developer CLI writes an appropriate Constants.cs file for you.
You can run the azd env get-values command to see the SQL authentication information should you wish to access the database directly.
If you have completed the steps with the Azure Developer CLI, proceed to the next step. If you don't wish to use the Azure Developer CLI, proceed with the manual steps.
Create resources on Azure.
Open a terminal and change directory to the folder containing the
TodoApp.slnfile. This directory also containsazuredeploy.json.Ensure you've signed in and selected a subscription using the Azure CLI.
Create a new resource group:
az group create -l westus -g quickstartThis command creates the
quickstartresource group in the West US region. You can select any region that you wish, providing you can create resources there. Ensure you use the same name and region wherever they're mentioned in this tutorial.Create the resources using a group deployment:
az deployment group create -g quickstart --template-file azuredeploy.json --parameters sqlPassword=MyPassword1234Pick a strong password for your SQL Administrator password. You need it later on when accessing the database.
Once the deployment is complete, get the output variables as these hold important information you need later on:
az deployment group show -g quickstart -n azuredeploy --query properties.outputsAn example output is:
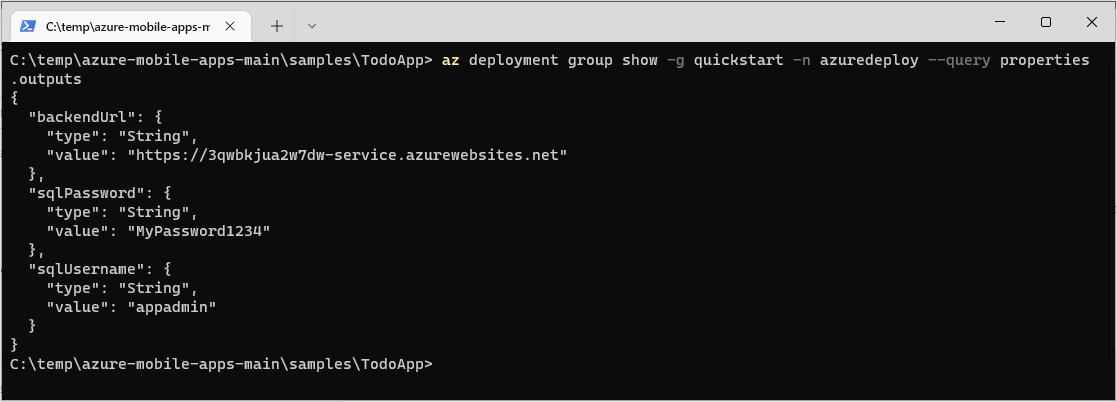
Make a note of each of the values in the outputs for later use.
Publish the service code
Open the TodoApp.sln in Visual Studio.
In the right-hand pane, select the Solutions Explorer.
Right-click the
TodoAppService.NET6project, then select Set as Startup Project.On the top menu, select Build > Publish TodoAppService.NET6.
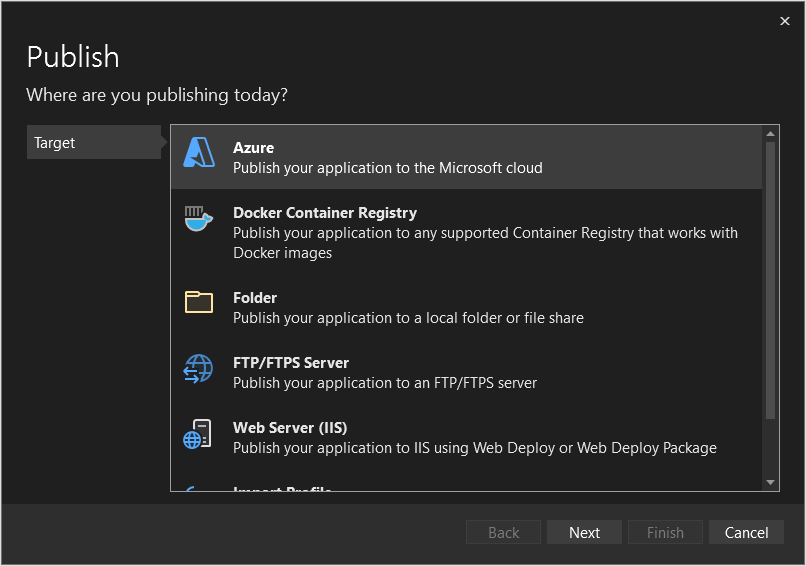
In the Publish window, select Target: Azure, then press Next.
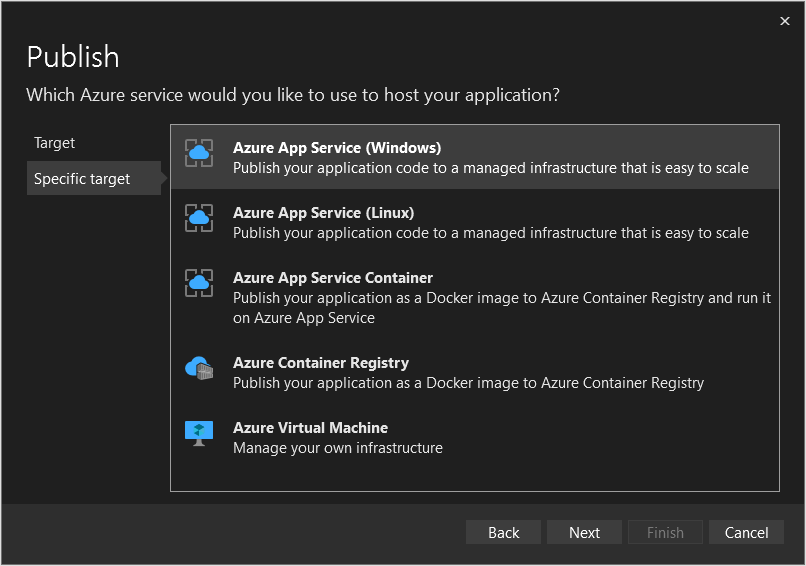
Select Specific target: Azure App Service (Windows), then press Next.
If necessary, sign in and select an appropriate Subscription name.
Ensure View is set to Resource group.
Expand the
quickstartresource group, then select the App Service that was created earlier.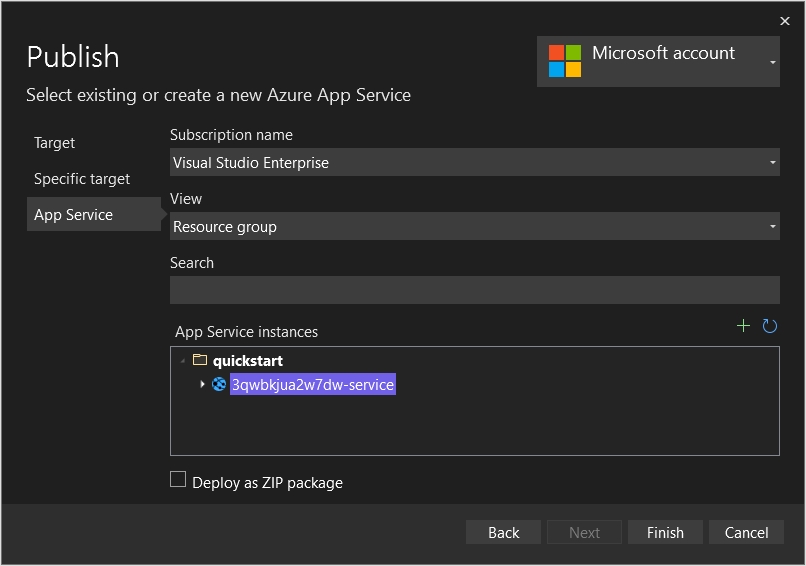
Select Finish.
Once the publish profile creation process has completed, select Close.
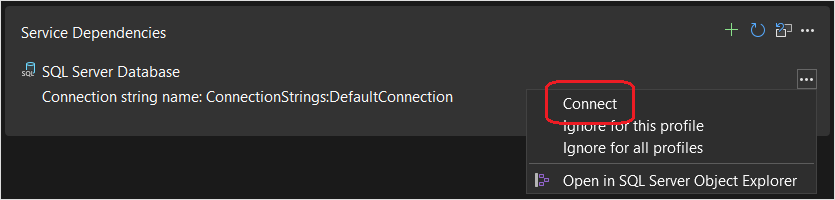
Locate the Service Dependencies and select the triple-dots next to the SQL Server Database, then select Connect.
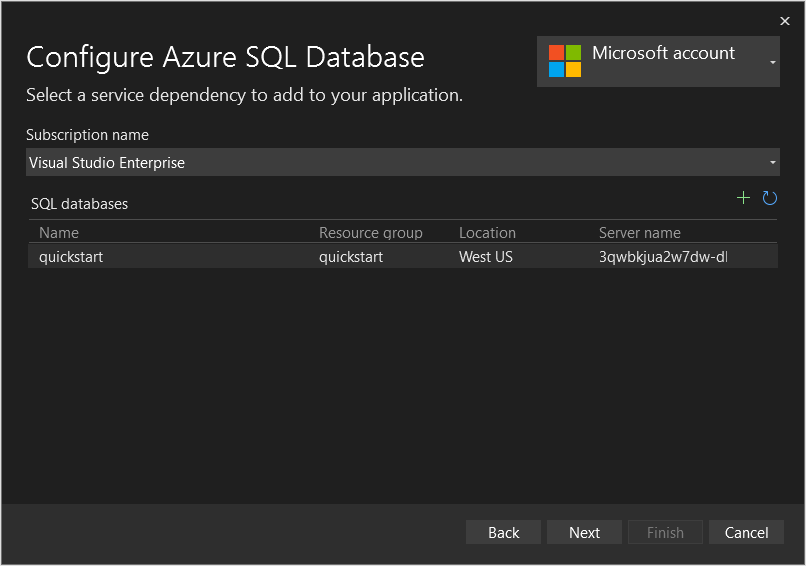
Select Azure SQL Database, then select Next.
Select the quickstart database, then select Next.
Fill in the form using the SQL username and password that were in the outputs of the deployment, then select Next.
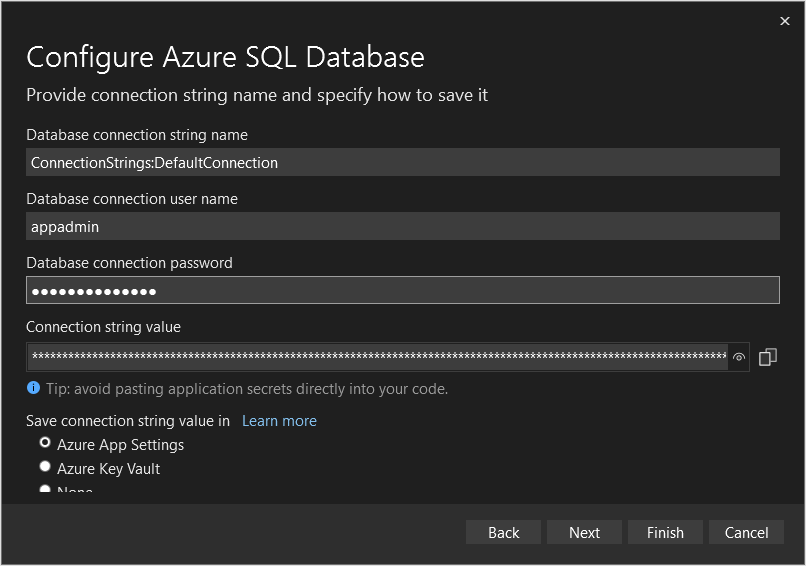
Select Finish.
Select Close when complete.
Select Publish to publish your app to the Azure App Service you created earlier.

Once the backend service is published, a browser is opened. Add
/tables/todoitem?ZUMO-API-VERSION=3.0.0to the URL:
Configure the sample app
Your client application needs to know the base URL of your backend so that it can communicate with it.
If you used
azd upto provision and deploy the service, theConstants.csfile was created for you and you can skip this step.
Expand the
TodoApp.Dataproject.Right-click on the
TodoApp.Dataproject, then select Add > Class....Enter
Constants.csas the name, then select Add.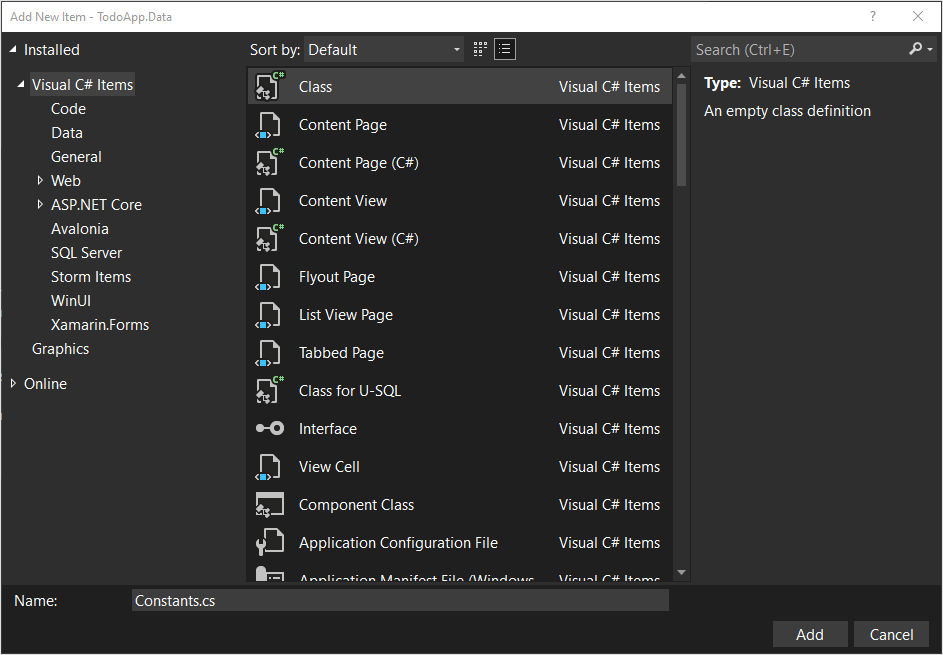
Open the
Constants.cs.examplefile and copy the contents (Ctrl-A, followed by Ctrl-C).Switch to
Constants.cs, highlight all text (Ctrl-A), then paste the contents from the example file (Ctrl-V).Replace the
https://APPSERVICENAME.azurewebsites.netwith the backend URL of your service.namespace TodoApp.Data { public static class Constants { /// <summary> /// The base URI for the Datasync service. /// </summary> public static string ServiceUri = "https://demo-datasync-quickstart.azurewebsites.net"; } }You can obtain the backend URL of your service from the Publish tab. Ensure you use a https URL.
Save the file. (Ctrl-S).
Build and run the Android app
In the solutions explorer, expand the
xamarin-formsfolder.Right-click the
TodoApp.Forms.Androidproject and select Set as Startup Project.In the top bar, select Any CPU configuration and the TodoApp.Forms.Android target:

If you see Android Emulator instead, you haven't created an Android emulator. For more information, see Android emulator setup. To create a new Android emulator:
- Select Tools > Android > Android Device Manager.
- Select + New.
- Select the following options on the left-hand side:
- Name:
quickstart - Base Device: Pixel 5
- Processor: x86_64
- OS: Android 11.0 - API 30
- Google APIs: Checked
- Name:
- Select Create.
- If necessary, accept the license agreement. The image will then be downloaded.
- Once the Start button appears, press Start.
- If you're prompted about Hyper-V hardware acceleration, read the documentation to enable hardware acceleration before continuing. The emulator will be slow without enabling hardware acceleration.
Tip
Start your Android emulator before continuing. You can do this by opening the Android Device Manager and pressing Start next to your chosen emulator.
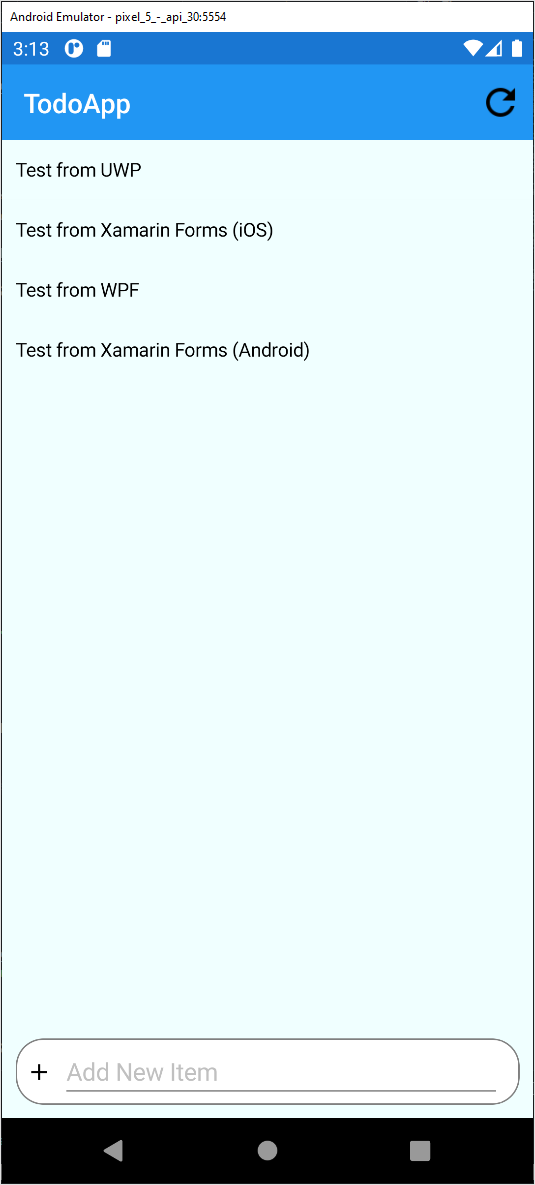
Press F5 to build and run the project.
Once the app has started, you'll see an empty list and a text box to add items in the emulator. You can:
- Enter some text in the box, then press Enter to insert a new item.
- Select an item to set or clear the completed flag.
- Press the refresh icon to reload data from the service.
Build and run the iOS app
Note
You MUST follow the guide to Pair to Mac. You'll receive errors when compiling or running iOS applications without a paired Mac.
In the solutions explorer, expand the
xamarin-formsfolder.Right-click the
TodoApp.Forms.iOSproject and select Set as Startup Project.In the top bar, select iPhone Simulator configuration and the TodoApp.Forms.iOS target:

Select the iPhone Simulator
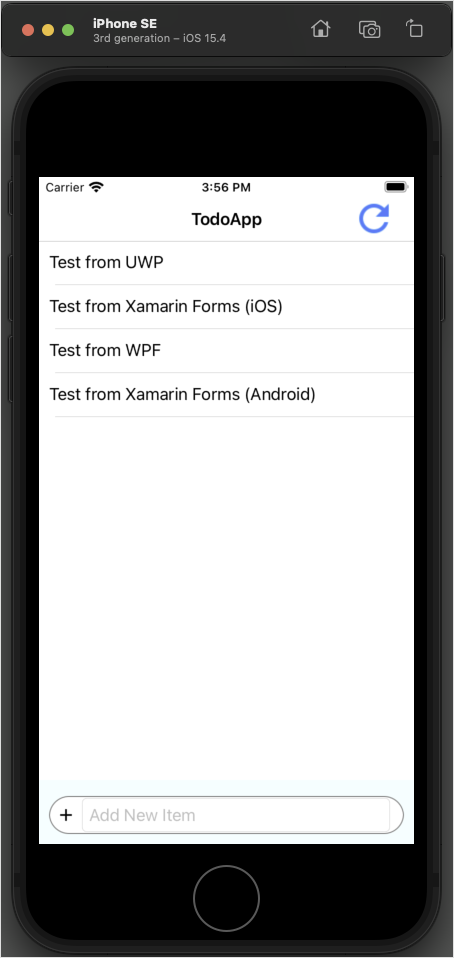
Press F5 to build and run the project.
Once the app has started, you'll see an empty list and a text box to add items in the emulator. You can:
- Enter some text in the box, then press Enter to insert a new item.
- Select an item to set or clear the completed flag.
- Press the refresh icon to reload data from the service.
Troubleshooting
The remote simulator that ships with Visual Studio 2022 is incompatible with XCode 13.3. You'll receive the following error message:

To work around this issue:
- Disable the remote simulator (Tools / Options / iOS Settings / uncheck Remote Simulator to Windows). When unchecked, the simulator will run on the Mac instead of on Windows. You can then interact with the simulator directly on your Mac while using the debugger, etc. on Windows.
- Disable the remote simulator as above, so that the simulator runs on the Mac. Then use a remote desktop app to connect to the Mac desktop from Windows. Remote desktop options include Devolutions Remote Desktop Manager (fast and there’s a free version available), and VNC clients (slower and free).
- Use a physical device to test instead of the simulator. You can obtain a free provisioning profile to complete the authentication tutorial.
Next steps
Continue the tutorial by adding authentication to the app.
Feedback
Coming soon: Throughout 2024 we will be phasing out GitHub Issues as the feedback mechanism for content and replacing it with a new feedback system. For more information see: https://aka.ms/ContentUserFeedback.
Submit and view feedback for