Add authentication to your Xamarin.Forms app
In this tutorial, you add Microsoft authentication to your app using Microsoft Entra ID. Before completing this tutorial, ensure you've created the project and deployed the backend.
Note
Since the iOS app requires keychain access, you will need to set up an iOS provisioning profile. A provisioning profile requires either a real iOS device or a paid Apple Developer Account (if using the simulator). You can skip this tutorial and move on to adding offline access to your app if you cannot use authentication due to this restriction.
Tip
Although we use Microsoft Entra ID for authentication, you can use any authentication library you wish with Azure Mobile Apps.
Add authentication to your backend service
Your backend service is a standard ASP.NET 6 service. Any tutorial that shows you how to enable authentication for an ASP.NET 6 service works with Azure Mobile Apps.
To enable Microsoft Entra authentication for your backend service, you need to:
- Register an application with Microsoft Entra ID.
- Add authentication checking to the ASP.NET 6 backend project.
Register the application
First, register the web API in your Microsoft Entra tenant and add a scope by following these steps:
Sign in to the Azure portal.
If you have access to multiple tenants, use the Directories + subscriptions filter in the top menu to switch to the tenant in which you want to register the application.
Search for and select Microsoft Entra ID.
Under Manage, select App registrations > New registration.
- Name: enter a name for your application; for example, TodoApp Quickstart. Users of your app will see this name. You can change it later.
- Supported account types: Accounts in any organizational directory (Any Microsoft Entra directory - Multitenant) and personal Microsoft accounts (e.g. Skype, Xbox)
Select Register.
Under Manage, select Expose an API > Add a scope.
For Application ID URI, accept the default by selecting Save and continue.
Enter the following details:
- Scope name:
access_as_user - Who can consent?: Admins and users
- Admin consent display name:
Access TodoApp - Admin consent description:
Allows the app to access TodoApp as the signed-in user. - User consent display name:
Access TodoApp - User consent description:
Allow the app to access TodoApp on your behalf. - State: Enabled
- Scope name:
Select Add scope to complete the scope addition.
Note the value of the scope, similar to
api://<client-id>/access_as_user(referred to as the Web API Scope). You need the scope when configuring the client.Select Overview.
Note the Application (client) ID in the Essentials section (referred to as the Web API Application ID). You need this value to configure the backend service.
Open Visual Studio and select the TodoAppService.NET6 project.
Right-click on the
TodoAppService.NET6project, then select Manage NuGet Packages....In the new tab, select Browse, then enter Microsoft.Identity.Web in the search box.
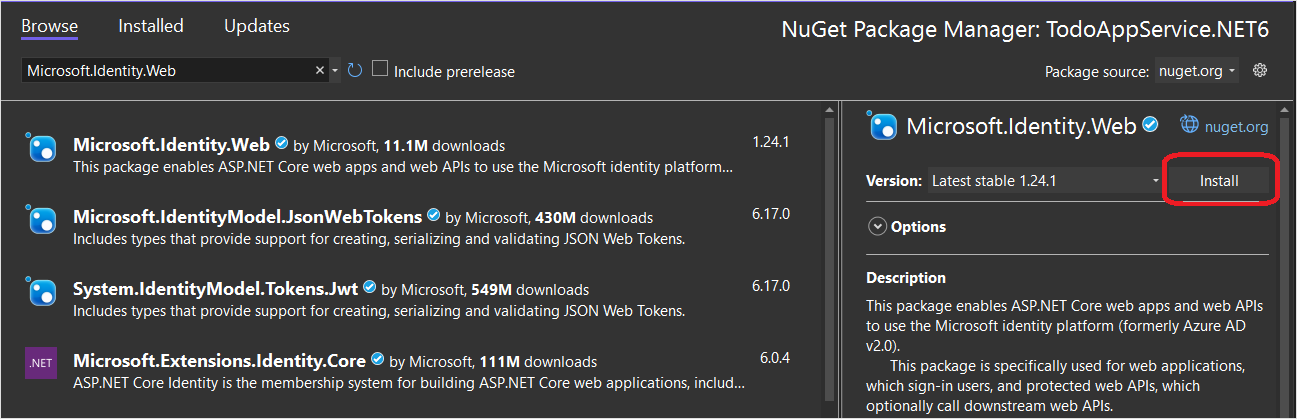
Select the
Microsoft.Identity.Webpackage, then press Install.Follow the prompts to complete the installation of the package.
Open
Program.cs. Add the following to the list ofusingstatements:
using Microsoft.AspNetCore.Authentication.JwtBearer;
using Microsoft.Identity.Web;
- Add the following code directly above the call to
builder.Services.AddDbContext():
builder.Services.AddAuthentication(JwtBearerDefaults.AuthenticationScheme)
  .AddMicrosoftIdentityWebApi(builder.Configuration);
builder.Services.AddAuthorization();
- Add the following code directly above the call to
app.MapControllers():
app.UseAuthentication();
app.UseAuthorization();
Your Program.cs should now look like this:
using Microsoft.AspNetCore.Datasync;
using Microsoft.EntityFrameworkCore;
using Microsoft.AspNetCore.Authentication.JwtBearer;
using Microsoft.Identity.Web;
using TodoAppService.NET6.Db;

var builder = WebApplication.CreateBuilder(args);
var connectionString = builder.Configuration.GetConnectionString("DefaultConnection");

if (connectionString == null)
{
  throw new ApplicationException("DefaultConnection is not set");
}

builder.Services.AddAuthentication(JwtBearerDefaults.AuthenticationScheme)
  .AddMicrosoftIdentityWebApi(builder.Configuration);
builder.Services.AddAuthorization();
builder.Services.AddDbContext<AppDbContext>(options => options.UseSqlServer(connectionString));
builder.Services.AddDatasyncControllers();

var app = builder.Build();

// Initialize the database
using (var scope = app.Services.CreateScope())
{
  var context = scope.ServiceProvider.GetRequiredService<AppDbContext>();
  await context.InitializeDatabaseAsync().ConfigureAwait(false);
}

// Configure and run the web service.
app.UseAuthentication();
app.UseAuthorization();
app.MapControllers();
app.Run();
- Edit the
Controllers\TodoItemController.cs. Add an[Authorize]attribute to the class. Your class should look like this:
using Microsoft.AspNetCore.Authorization;
using Microsoft.AspNetCore.Datasync;
using Microsoft.AspNetCore.Datasync.EFCore;
using Microsoft.AspNetCore.Mvc;
using TodoAppService.NET6.Db;

namespace TodoAppService.NET6.Controllers
{
  [Authorize]
  [Route("tables/todoitem")]
  public class TodoItemController : TableController<TodoItem>
  {
    public TodoItemController(AppDbContext context)
      : base(new EntityTableRepository<TodoItem>(context))
    {
    }
  }
}
- Edit the
appsettings.json. Add the following block:
  "AzureAd": {
    "Instance": "https://login.microsoftonline.com",
    "ClientId": "<client-id>",
    "TenantId": "common"
  },
Replace the <client-id> with the Web API Application ID that you recorded earlier. Once complete, it should look like this:
{
  "AzureAd": {
    "Instance": "https://login.microsoftonline.com",
    "ClientId": "<client-id>",
    "TenantId": "common"
  },
  "ConnectionStrings": {
    "DefaultConnection": "Server=(localdb)\\mssqllocaldb;Database=TodoApp;Trusted_Connection=True"
  },
  "Logging": {
    "LogLevel": {
      "Default": "Information",
      "Microsoft.AspNetCore": "Warning"
    }
  },
  "AllowedHosts": "*"
}
Publish your service to Azure again:
- Right-click on the
TodoAppService.NET6project, then select Publish.... - Select the Publish button in the top-right corner of the tab.
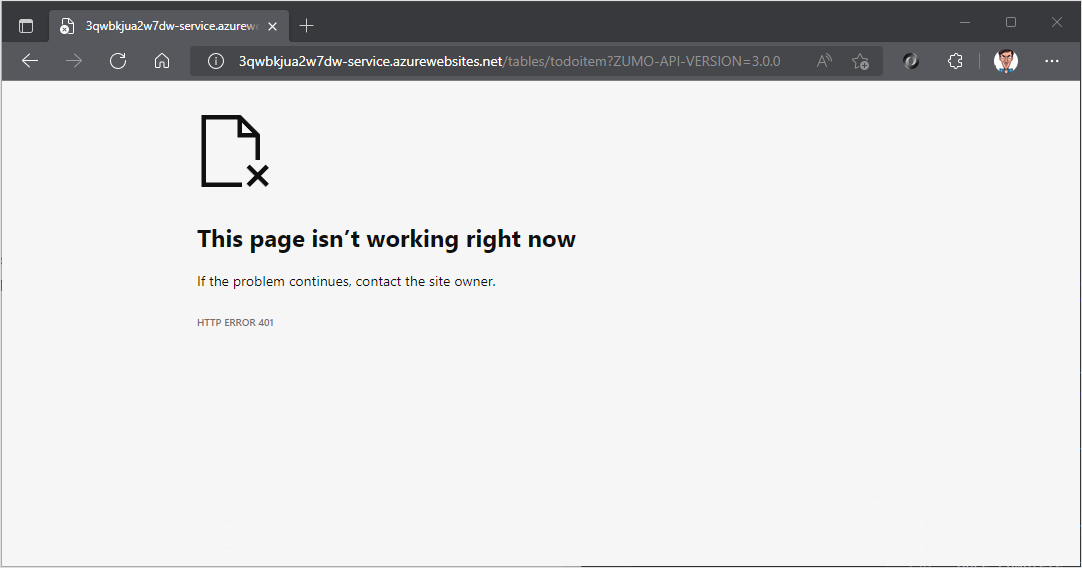
Open a browser to https://yoursite.azurewebsites.net/tables/todoitem?ZUMO-API-VERSION=3.0.0. Note that the service now returns a 401 response, which indicates that authentication is required.
Register your app with the identity service
The Microsoft Data sync Framework has built-in support for any authentication provider that uses a Json Web Token (JWT) within a header of the HTTP transaction. This application uses the Microsoft Authentication Library (MSAL) to request such a token and authorize the signed in user to the backend service.
Configure a native client application
You can register native clients to allow authentication to Web APIs hosted in your app using a client library such as the Microsoft Identity Library (MSAL).
In the Azure portal, select Microsoft Entra ID > App registrations > New registration.
In the Register an application page:
- enter a Name for your app registration. You may want to use the name
native-quickstartto distinguish this one from the one used by your backend service. - Select Accounts in any organizational directory (Any Microsoft Entra directory - Multitenant) and personal Microsoft accounts (e.g. Skype, Xbox).
- In Redirect URI:
- Select Public client (mobile & desktop)
- Enter the URL
quickstart://auth
- enter a Name for your app registration. You may want to use the name
Select Register.
Select API permissions > Add a permission > My APIs.
Select the app registration you created earlier for your backend service. If you don't see the app registration, make sure that you added the access_as_user scope.
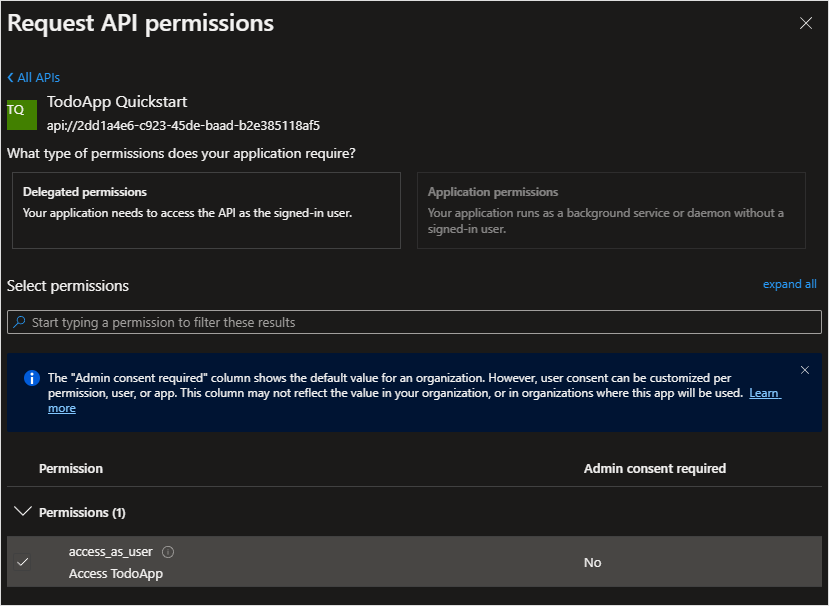
Under Select permissions, select access_as_user, and then select Add permissions.
Select Authentication > Mobile and desktop applications.
Check the box next to
https://login.microsoftonline.com/common/oauth2/nativeclient.Check the box next to
msal{client-id}://auth(replacing{client-id}with your application ID).Select Add URI, then add
http://localhostin the field for extra URIs.Select Save at the bottom of the page.
Select Overview. Make a note of the Application (client) ID (referred to as the Native Client Application ID) as you need it to configure the mobile app.
We have defined three redirect URLs:
http://localhostis used by WPF applications.https://login.microsoftonline.com/common/oauth2/nativeclientis used by UWP applications.msal{client-id}://authis used by mobile (Android and iOS) applications.
Add the Microsoft Identity Client to your app
Open the TodoApp.sln solution in Visual Studio and set the TodoApp.Forms project as the startup project.
Add the Microsoft Identity Library (MSAL) to the platform project:
Right-click on the project, then select Manage NuGet Packages....
Select the Browse tab.
Enter
Microsoft.Identity.Clientin the search box, then press Enter.Select the
Microsoft.Identity.Clientresult, then click Install.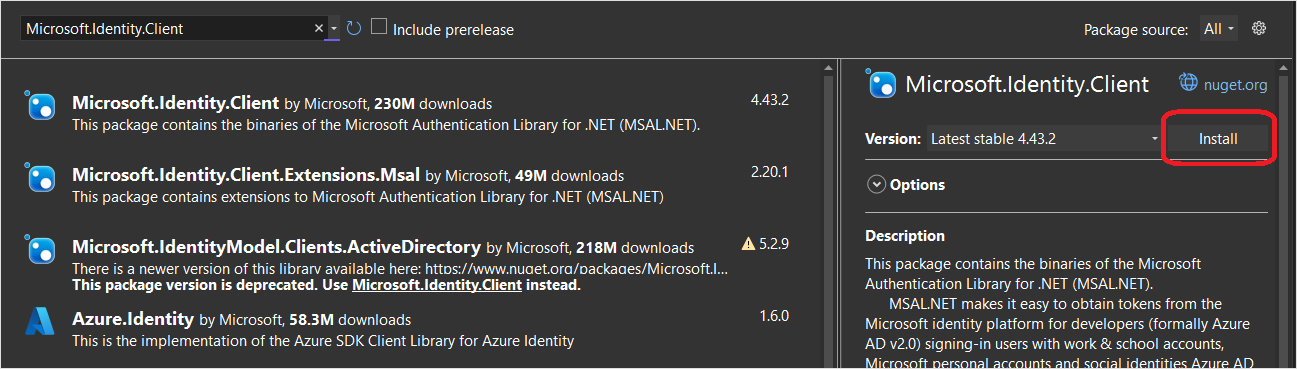
Accept the license agreement to continue the installation.
Add the native client ID and backend scope to the configuration.
Open the TodoApp.Data project and edit the Constants.cs file. Add constants for ApplicationId and Scopes:
  public static class Constants
  {
      /// <summary>
      /// The base URI for the Datasync service.
      /// </summary>
      public static string ServiceUri = "https://demo-datasync-quickstart.azurewebsites.net";

      /// <summary>
      /// The application (client) ID for the native app within Microsoft Entra ID
      /// </summary>
      public static string ApplicationId = "<client-id>";

      /// <summary>
      /// The list of scopes to request
      /// </summary>
      public static string[] Scopes = new[]
      {
          "<scope>"
      };
  }
Replace the <client-id> with the Native Client Application ID you received when registering the client application in Microsoft Entra ID, and the <scope> with the Web API Scope you copied when you used Expose an API while registering the service application.
Open the TodoApp.Forms project. Add a new file called IPlatform.cs with the following contents:
using Microsoft.Identity.Client;

namespace TodoApp.Forms
{
    public interface IPlatform
    {
        IPublicClientApplication GetIdentityClient(string applicationId);
    }
}
This interface is used later on to allow the shared project to ask the platform project for an identity client suitable for the platform.
Open App.xaml.cs. Add the following using statements:
using Microsoft.Datasync.Client;
using Microsoft.Identity.Client;
using System.Diagnostics;
using System.Linq;
using System.Threading.Tasks;
In the App class, add two new properties:
public IPublicClientApplication IdentityClient { get; set; }
public IPlatform PlatformService { get; }
Adjust the constructor to read:
public App(IPlatform platformService)
{
    InitializeComponent();

    PlatformService = platformService;
    TodoService = new RemoteTodoService(GetAuthenticationToken);
    MainPage = new NavigationPage(new MainPage(this, TodoService));
}
Add the GetAuthenticationToken method to the class:
public async Task<AuthenticationToken> GetAuthenticationToken()
{
    if (IdentityClient == null)
    {
        IdentityClient = PlatformService.GetIdentityClient(Constants.ApplicationId);
    }

    var accounts = await IdentityClient.GetAccountsAsync();
    AuthenticationResult result = null;
    bool tryInteractiveLogin = false;

    try
    {
        result = await IdentityClient
            .AcquireTokenSilent(Constants.Scopes, accounts.FirstOrDefault())
            .ExecuteAsync();
    }
    catch (MsalUiRequiredException)
    {
        tryInteractiveLogin = true;
    }
    catch (Exception ex)
    {
        Debug.WriteLine($"MSAL Silent Error: {ex.Message}");
    }

    if (tryInteractiveLogin)
    {
        try
        {
            result = await IdentityClient
                .AcquireTokenInteractive(Constants.Scopes)
                .ExecuteAsync()
                .ConfigureAwait(false);
        }
        catch (Exception ex)
        {
            Debug.WriteLine($"MSAL Interactive Error: {ex.Message}");
        }
    }

    return new AuthenticationToken
    {
        DisplayName = result?.Account?.Username ?? "",
        ExpiresOn = result?.ExpiresOn ?? DateTimeOffset.MinValue,
        Token = result?.AccessToken ?? "",
        UserId = result?.Account?.Username ?? ""
    };
}
The GetAuthenticationToken() method works with the Microsoft Identity Library (MSAL) to get an access token suitable for authorizing the signed-in user to the backend service. This function is then passed to the RemoteTodoService for creating the client. If the authentication is successful, the AuthenticationToken is produced with data necessary to authorize each request. If not, then an expired bad token is produced instead.
Configure the Android app for authentication
Open the TodoApp.Forms.Android project. Create a new class MsalActivity with the following code:
using Android.App;
using Android.Content;
using Microsoft.Identity.Client;

namespace TodoApp.Forms.Droid
{
    [Activity(Exported = true)]
    [IntentFilter(new[] { Intent.ActionView },
        Categories = new[] { Intent.CategoryBrowsable, Intent.CategoryDefault },
        DataHost = "auth",
        DataScheme = "msal{client-id}")]
    public class MsalActivity : BrowserTabActivity
    {
    }
}
Replace {client-id} with the application ID of the native client (which is the same as Constants.ApplicationId).
If your project targets Android version 11 (API version 30) or later, you must update your AndroidManifest.xml to meet the Android package visibility requirements. Open TodoApp.Forms.Android/Properties/AndroidManifest.xml and add the following queries/intent nodes to the manifest node:
<manifest>
  ...
  <queries>
    <intent>
      <action android:name="android.support.customtabs.action.CustomTabsService" />
    </intent>
  </queries>
</manifest>
Open MainActivity.cs. Add IPlatform to the definition of the MainActivity class:
public class MainActivity : global::Xamarin.Forms.Platform.Android.FormsAppCompatActivity, IPlatform
Change the LoadApplication() call in the OnCreate() method:
protected override void OnCreate(Bundle savedInstanceState)
{
    base.OnCreate(savedInstanceState);

    Xamarin.Essentials.Platform.Init(this, savedInstanceState);
    global::Xamarin.Forms.Forms.Init(this, savedInstanceState);
    LoadApplication(new App(this));
}
Add the following code to the bottom of the class:
protected override void OnActivityResult(int requestCode, [GeneratedEnum] Result resultCode, Intent data)
{
    base.OnActivityResult(requestCode, resultCode, data);
    // Return control to MSAL
    AuthenticationContinuationHelper.SetAuthenticationContinuationEventArgs(requestCode, resultCode, data);
}

public IPublicClientApplication GetIdentityClient(string applicationId)
{
    var identityClient = PublicClientApplicationBuilder.Create(applicationId)
        .WithAuthority(AzureCloudInstance.AzurePublic, "common")
        .WithRedirectUri($"msal{applicationId}://auth")
        .WithParentActivityOrWindow(() => this)
        .Build();
    return identityClient;
}
When the shared project requires authentication, it obtains an identity client from GetIdentityClient(), then switch to an internal activity that opens the system browser. Once authentication is complete, the system browser redirects to the defined redirect URL (msal{client-id}://auth). The MsalActivity traps the redirect URL, which then switches back to the main activity by calling OnActivityResult(). That then calls the MSAL authentication helper, which completes the transaction.
Configure the iOS app for authentication
Open the AppDelegate.cs file in the TodoApp.Forms.iOS project. Add IPlatform to the definition of the AppDelegate class:
public partial class AppDelegate : global::Xamarin.Forms.Platform.iOS.FormsApplicationDelegate, IPlatform
Change the FinishedLaunching() method to read:
public override bool FinishedLaunching(UIApplication app, NSDictionary options)
{
    global::Xamarin.Forms.Forms.Init();
    LoadApplication(new App(this));
    return base.FinishedLaunching(app, options);
}
Add the following code to the end of the class:
public override bool OpenUrl(UIApplication app, NSUrl url, NSDictionary options)
{
    bool result = AuthenticationContinuationHelper.SetAuthenticationContinuationEventArgs(url);
    return result || base.OpenUrl(app, url, options);
}

public IPublicClientApplication GetIdentityClient(string applicationId)
{
    var identityClient = PublicClientApplicationBuilder.Create(applicationId)
        .WithIosKeychainSecurityGroup("com.microsoft.adalcache")
        .WithRedirectUri($"msal{applicationId}://auth")
        .Build();
    return identityClient;
}
Add keychain access to the Entitlements.plist:
Open the
Entitlements.plistfile.Select Keychain.
Select Add New in the keychain groups.
Enter
com.microsoft.adalcacheas the value: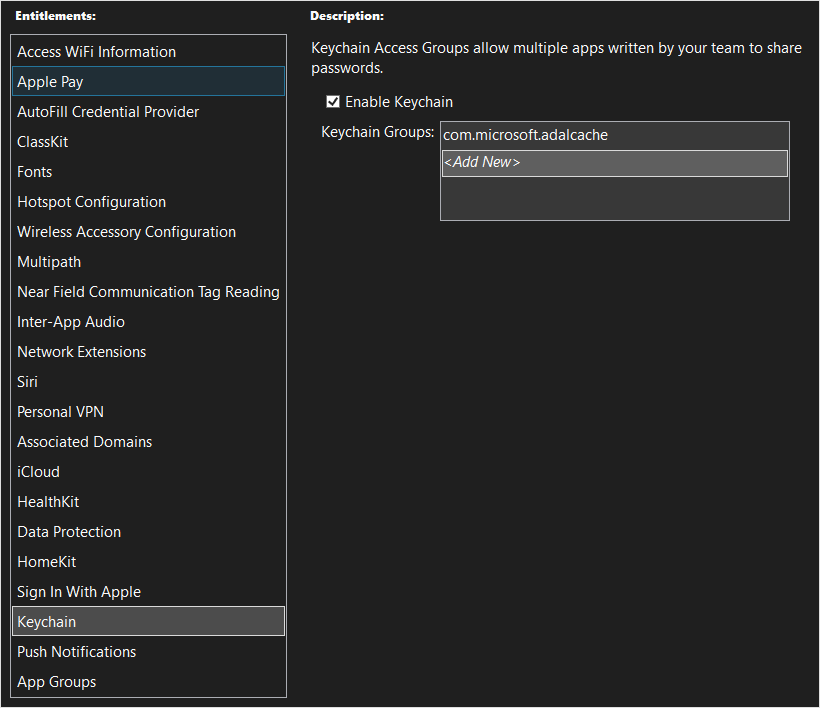
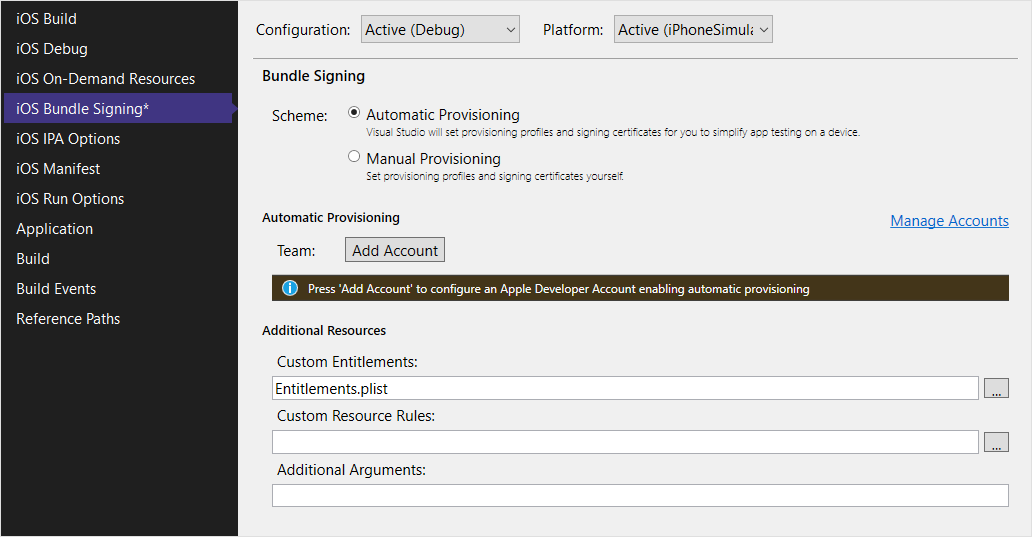
Add the custom entitlements to the project:
Right-click on the
TodoApp.Forms.iOSproject, then select Properties.Select iOS Bundle Signing.
Select the ... button next to the Custom Entitlements field.
Select
Entitlements, then select Open.Press Ctrl+S to save the project.
Test the Android app
Set TodoApp.Forms.Android as the startup project, then press F5 to build and run the app. When the app starts, you're prompted to sign in to the app. On the first run, you're asked to consent to the app. Once authentication is complete, the app runs as normal.
Test the iOS app
Note
Since the iOS app requires keychain access, you will need to set up a provisioning profile. A provisioning profile requires either a real device or a paid Apple Developer Account (if using the simulator). For more information, see Device provisioning for iOS.
Set TodoApp.Forms.iOS as the startup project, then press F5 to build and run the app. When the app starts, you're prompted to sign in to the app. On the first run, you're asked to consent to the app. Once authentication is complete, the app runs as normal.
Next steps
Next, configure your application to operate offline by implementing an offline store.
Further reading
Feedback
Coming soon: Throughout 2024 we will be phasing out GitHub Issues as the feedback mechanism for content and replacing it with a new feedback system. For more information see: https://aka.ms/ContentUserFeedback.
Submit and view feedback for