Note
Access to this page requires authorization. You can try signing in or changing directories.
Access to this page requires authorization. You can try changing directories.
Azure DevOps Services | Azure DevOps Server 2022 | Azure DevOps Server 2020
With Azure Artifacts upstream sources, developers are able to consume packages from public registries such as nuget.org and npmjs.com. This article will walk you through the process of setting up your project and using the command line to effectively consume NuGet packages from the NuGet Gallery. In this article, you'll learn how to:
- Enable upstream sources for your feed
- Add NuGet Gallery as an upstream source
- Connect to your feed
- Install packages from nuget.org
Prerequisites
An Azure DevOps organization and a project. Create an organization or a project if you haven't already.
An Azure Artifacts feed.
Download NuGet.
Download and install Azure Artifacts Credential Provider.
Enable upstream sources on your feed
If you haven't created a feed yet, follow the steps below to create a new one and make sure you select the upstream sources checkbox to enable them. If you already have a feed, proceed to the next step to add the NuGet Gallery as an upstream source.
Sign in to your Azure DevOps organization and navigate to your project.
Select Artifacts, and then select Create Feed.
Provide a Name for your feed, choose the Visibility option that defines who can view your packages, check Include packages from common public sources if you want to include packages from sources like nuget.org or npmjs.com, and for Scope, decide whether the feed should be scoped to your project or the entire organization.
Select Create when you're done.

Sign in to your Azure DevOps server, and then go to your project.
Select Artifacts, and then select Create Feed.
Provide a Name for your feed, choose the Visibility option that defines who can view your packages, check Include packages from common public sources if you want to include packages from sources like nuget.org or npmjs.com, and for Scope, decide whether the feed should be scoped to your project or the entire organization.
Select Create when you're done.

Select Create when you're done.

Note
By default, the Build Service for the project (for example: projectName Build Service (orgName)) is assigned the Feed and Upstream Reader (Collaborator) role when a new feed is created.
Add NuGet Gallery upstream source
If you've checked the upstream sources checkbox when making your feed, NuGet Gallery should have been added automatically. If not, add it manually by following these steps:
Sign in to your Azure DevOps organization, and then navigate to your project.
Select Artifacts, and then select your feed.
Select the gear icon button
 to navigate to your Feed settings.
Select Upstream Sources, and then select Add Upstream to add a new upstream source.
Select Public source, and then select NuGet Gallery from the dropdown menu.
Select Add when you're done, and then select Save one more time at the top right corner to save your changes.
Sign in to your Azure DevOps server, and then navigate to your project.
Select Artifacts, and then select your feed.
Select the gear icon button
to navigate to your Feed settings.Select Upstream Sources, and then select Add Upstream.
Select Public source, and then select NuGet Gallery from the dropdown menu.
Select Save when you're done, and then select Save one more time at the top right corner to save your changes.
Sign in to your Azure DevOps server, and then navigate to your project.
Select Artifacts, and then select your feed.
Select the gear icon button
to navigate to your Feed settings.Select Upstream Sources, and then select Add upstream source.
Select Public source, and then select NuGet Gallery from the dropdown menu.
Select Add when you're done.
Connect to feed
Sign in to your Azure DevOps organization, and then navigate to your project.
Select Artifacts, and then select your feed.
Select Connect to feed, and then select NuGet.exe.
Add a nuget.config file in the same folder as your .csproj or .sln file. Paste the provided XML snippet into your file. If you use the examples below, make sure you replace the placeholders with the appropriate values for your scenario.
Organization-scoped feed:
<?xml version="1.0" encoding="utf-8"?>
<configuration>
  <packageSources>
    <clear />
    <add key="<SOURCE_NAME>" value="https://pkgs.dev.azure.com/<ORGANIZATION_NAME>/_packaging/<FEED_NAME>/nuget/v3/index.json" />
  </packageSources>
</configuration>
Project-scoped feed:
<?xml version="1.0" encoding="utf-8"?>
<configuration>
  <packageSources>
    <clear />
    <add key="<SOURCE_NAME>" value="https://pkgs.dev.azure.com/<ORGANIZATION_NAME>/<PROJECT_NAME>/_packaging/<FEED_NAME>/nuget/v3/index.json" />
  </packageSources>
</configuration>
Sign in to your Azure DevOps server, and then navigate to your project.
Select Artifacts, and then select your feed.
Select Connect to Feed, and then select NuGet.exe from the left navigation pane.
Follow the instructions in the Project setup section to connect to your feed.
Install packages from NuGet Gallery
With our project now configured to authenticate with our feed, we can now proceed to install packages from the NuGet Gallery upstream. In this example, we will install the Serilog diagnostic logging library:
Navigate to the NuGet Gallery at
https://www.nuget.org/.Search for the Serilog package, and then select it to navigate to the details page.
Select the Package Manager tab, and copy the command. In our example, the command is as follows:
NuGet\Install-Package Serilog -Version 3.1.2-dev-02097Open your project in Visual Studio, and then select Tools > NuGet Package Manager > Package Manager Console to open the console window.
Paste your command in the Package Manager Console window, and press Enter to install your package.
Note
To save packages from upstreams, you must have the Feed and Upstream Reader (Collaborator) role or higher. See Manage Permissions for more details.
View saved packages
- Sign in to your Azure DevOps organization, and then navigate to your project.
- Sign in to your Azure DevOps server, and then navigate to your project.
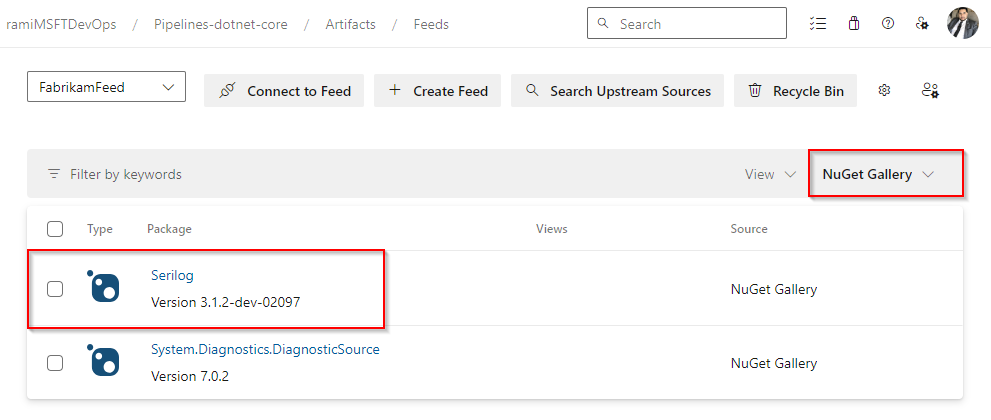
Select Artifacts, and then select your feed from the dropdown menu.
Select the NuGet Gallery source from the dropdown menu to filter for packages from this upstream.
The Serilog package, installed in the previous step, is now available in our feed. Azure Artifacts automatically saved a copy to our feed when we executed the install command.