
Events
Mar 17, 11 PM - Mar 21, 11 PM
Join the meetup series to build scalable AI solutions based on real-world use cases with fellow developers and experts.
Register nowThis browser is no longer supported.
Upgrade to Microsoft Edge to take advantage of the latest features, security updates, and technical support.
Azure DevOps Services | Azure DevOps Server 2022 - Azure DevOps Server 2019
Visual Studio 2022 | Visual Studio 2019 | Visual Studio 2017 | Visual Studio 2015
With work item templates, you can quickly create work items with prepopulated values for your team's commonly used fields. You can use work item templates to create work items or make bulk updates to several work items. You can add and manage work item templates from the web portal or from Visual Studio 2015 or earlier versions. For examples showing usage of work item templates, see Sample work item templates.
Work item templates are distinct from process templates. For more information, see About processes and process templates or these specific articles for default process templates: Basic, Agile, Scrum, or CMMI.
The availability of template task options depends on your client and platform version. You can add and manage work item templates from the web portal or from Visual Studio 2015 or earlier versions. For more information, see the prerequisites in this article.
As shown in the following table, a ✔️ indicates the task is available from the web portal or from Visual Studio 2015 or earlier versions. (Make sure to select the content version based on your platform version).
Task
Web portal
Visual Studio 2015
✔️
✔️
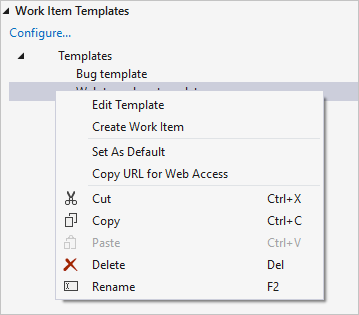
Manage work item templates
(Define, edit, delete, copy link, create copy, and rename)
✔️
✔️
✔️
✔️
✔️
✔️
✔️
✔️
✔️
✔️
✔️
✔️
Tip
The templates you define through the web portal are distinct from those you define through Visual Studio. Web portal templates can only be managed and applied to work items through the web portal. Similarly, Visual Studio templates can only be managed, viewed, and applied to work items in Visual Studio. But, you can use the URLs of both template types to add work items through the web portal.
Depending on the platform, version, and client you use, you might need to follow different steps to capture a work item.
Templates captured through the web portal get assigned a GUID.
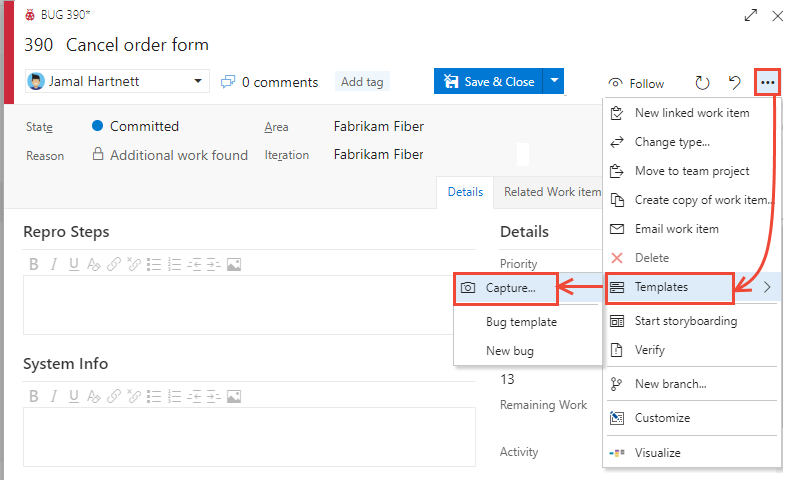
From the web portal, open a work item to use as the basis for a template.
Select the ![]() actions icon, and then choose Templates > Capture.
actions icon, and then choose Templates > Capture.
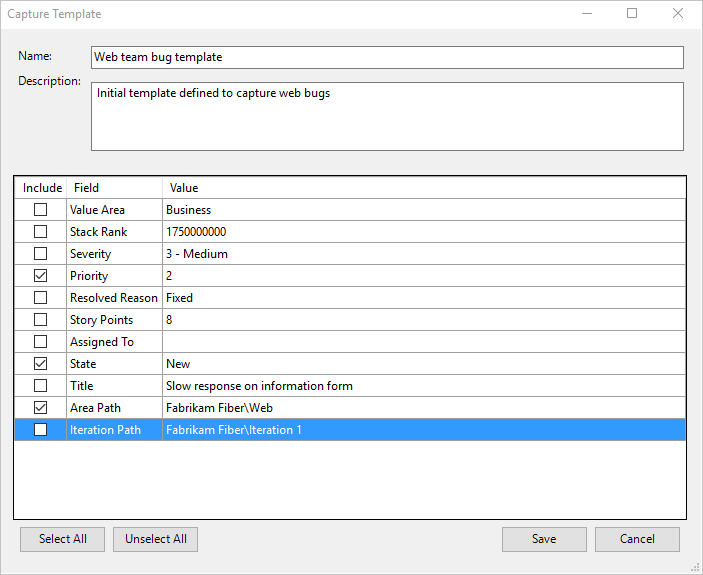
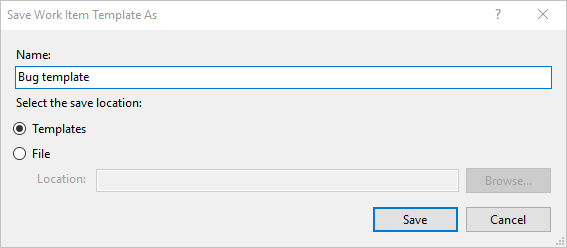
Name the template, select the team for which you want to save it under, and optionally define or clear fields. Save the template when finished.
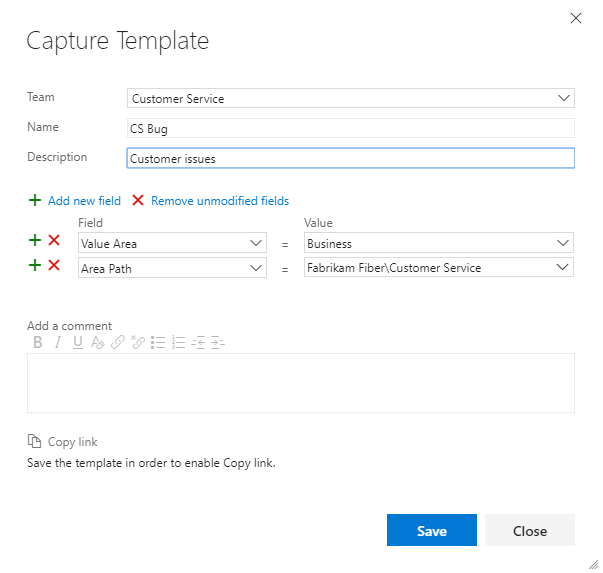
Save the template, and then select Copy link to capture the URL for the template.
You can paste the URL link into a browser to create a work item, or provide it to others for their use to add work items. For example, you can add it as a hyperlink to a project wiki, a dashboard via a Markdown widget, or other shared network resource.
Use the URL whenever you want to add a work item of the same type with predefined values.
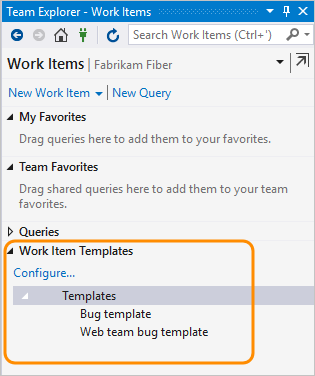
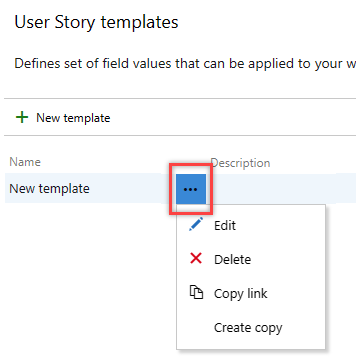
For each work item type, you can see and manage the templates that your team defined. You can perform various actions on the templates, such as adding, editing, copying, deleting, renaming, and getting the link.
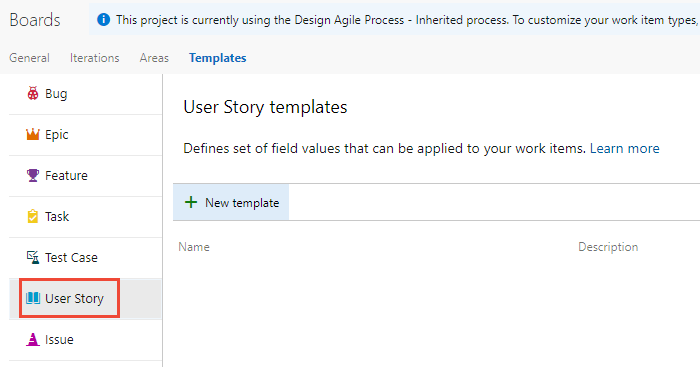
From the web portal, open Project settings.

Expand Boards and choose Team configuration. If you need to switch to a different team, use the team selector.
Select Templates.
Choose any work item type to view or add templates for that type.
For example, select User Story to view templates defined for capturing user stories.
From the work item type page, select the ![]() New template to create a template from scratch.
New template to create a template from scratch.
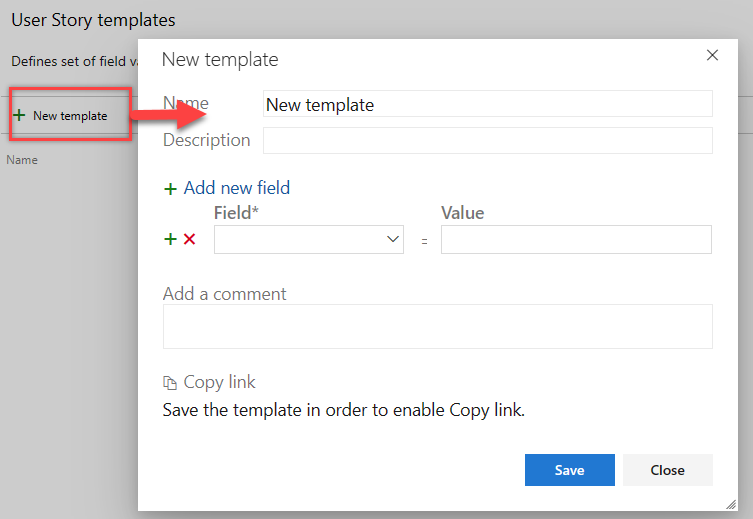
Name the template and optionally add and remove fields. Save the template when you're done.
To get the URL for the template, choose Copy link. You can use this URL to create work items based on the template.
From the work item type page, choose ![]() the actions icon for an existing template to access the menu options to Edit, Delete, Copy link, or Create copy.
the actions icon for an existing template to access the menu options to Edit, Delete, Copy link, or Create copy.
The main method used to add a work item using a template is to open the template link within a browser window. To get the template link, see the Edit, delete, copy link, create copy section.
You can apply a template to a single work item or do a bulk update of several work items.
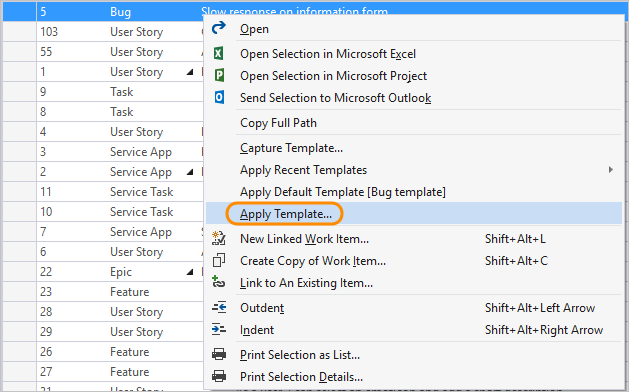
Open a new work item or an existing work item that you want to update using the fields defined within a template, choose the ![]() actions icon to open the menu, select Templates, and then select the name of a predefined template.
actions icon to open the menu, select Templates, and then select the name of a predefined template.

Only those templates defined for teams that you belong to appear.
Tip
Refresh your browser to discover the latest templates added. If you don't see any templates, there might not be any for that work item type.
Save the work item for the changes to be applied. The fields changed are noted in the History field.
To bulk update several work items, first select them from the backlog or a query results list, and then open the actions menu for one of them. All work items you select must be of the same work item type. For example, all user stories or all bugs.
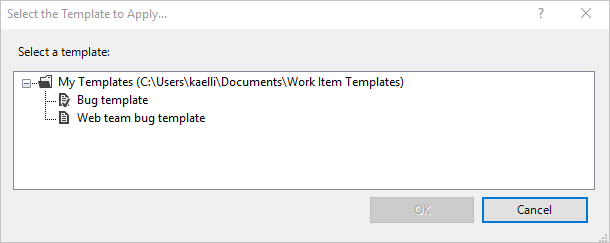
Choose the template to apply.

Field changes are automatically applied and work items saved. For more information about bulk updates, see Bulk modify work items.
You can add tags to a template and they're applied to the work item when you use the template. To add two or more tags, delimit them with a comma (,).
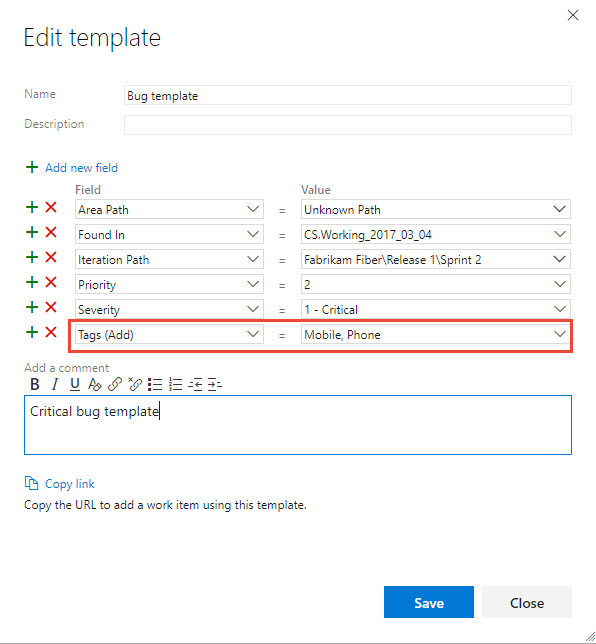
If you don't specify tags to remove, then all tags present in a work item remain defined. They remain defined even when you apply a work item template to an existing work item.
You can specify a work item template that specifies several field values using the following syntax. Use the URL whenever you want to add a work item of the same type with predefined values.
https://dev.azure.com/{OrganizationName}/{ProjectName}/_workItems/create/{WorkItemType}?
[FieldReferenceName 1]={FieldValue 1}&
[FieldReferenceName 2]={FieldValue 2}&
[FieldReferenceName 3]={FieldValue 3}&
. . .
http://{ServerName}:8080/tfs/DefaultCollection/{ProjectName}/_workItems/create/{WorkItemType}?
[FieldReferenceName 1]={FieldValue 1}&
[FieldReferenceName 2]={FieldValue 2}&
[FieldReferenceName 3]={FieldValue 3}&
. . .
For example, the following syntax specifies a work item task with title TaskTitle. It specifies values for the Assigned To, Description, Tags, Activity, and Iteration Path fields.
https://dev.azure.com/{OrganizationName}/{ProjectName}/_workItems/create/Task?
[System.Title]=TaskTitle&
[System.AssignedTo]=Jamal+Hartnett&
[System.Description]=<p>Always+include+Remaining+Work+and+links+to+any+related+bugs+or+user+stories.</p>&
[System.Tags]=Web;+Phone;+Service&
[Microsoft.VSTS.Common.Activity]=Development&
[System.IterationPath]=Fabrikam+Fiber%5CIteration+1
http://{ServerName}:8080/tfs/DefaultCollection/{ProjectName}/_workItems/create/Task?
[System.AssignedTo]=Jamal+Hartnett&
[System.Description]=<p>Always+include+Remaining+Work+and+links+to+any+related+bugs+or+user+stories.</p>&
[System.Tags]=Web;+Phone;+Service&
[Microsoft.VSTS.Common.Activity]=Development&
[System.IterationPath]=Fabrikam+Fiber%5CIteration+1
Tip
There's a 2000 character limit imposed by some browser clients.
You can save the URL as a text file or add the URL to a dashboard or web page as a hyperlink.
You can add links to a Markdown widget that appear on your team dashboard in the web portal. These links open a work item with the template defined fields predefined.
For example, the following widget contains links to three templates.
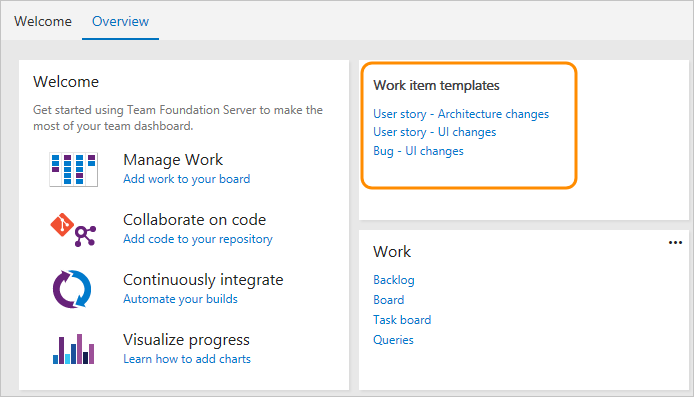
For more information, see Add Markdown to a dashboard, Markdown widgets.
Events
Mar 17, 11 PM - Mar 21, 11 PM
Join the meetup series to build scalable AI solutions based on real-world use cases with fellow developers and experts.
Register nowTraining
Learning path
Use advance techniques in canvas apps to perform custom updates and optimization - Training
Use advance techniques in canvas apps to perform custom updates and optimization