Note
Access to this page requires authorization. You can try signing in or changing directories.
Access to this page requires authorization. You can try changing directories.
Azure DevOps Services | Azure DevOps Server 2022 - Azure DevOps Server 2019
The Markdown widget is a versatile tool that allows you to support your team and stakeholders by adding valuable information directly to your dashboard. You can use it to display the following items:
- Team goals
- Links to team backlogs or boards
- Links to metrics
- Links to other items located in a network share, such as a OneNote, SharePoint site, or wiki pages
- Important dates or target deadlines
By using the Markdown widget, you can ensure that essential information is easily accessible and visible to your team and stakeholders.
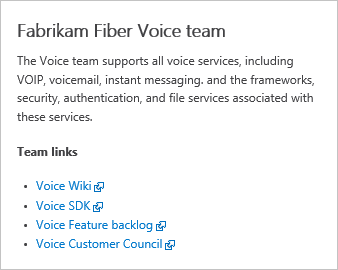
The following example shows team information and links:
Prerequisites
| Category | Requirements |
|---|---|
| Access levels | - Project member. - At least Basic access or specific dashboard permissions. |
| Permissions | To add, edit, or manage a team dashboard: A member of the team and a member of the Project Administrators group. |
| Category | Requirements |
|---|---|
| Access levels | - Project member. - At least Basic access or specific dashboard permissions. |
| Permissions | To add, edit, or manage a team dashboard: A member of the team and a member of the Project Administrators group. |
| Tools | For Analytics widgets to work with your dashboard: Analytics enabled. |
Note
Data displayed within a chart or widget is subject to the permissions granted to the signed-in user. For example, if a user doesn't have permissions to view work items under a specific area path, those items don't appear in query-based widgets on the dashboard. For more information, see FAQs on Azure DevOps dashboards, charts, and reports.
Supported Markdown syntax
The Markdown widget supports CommonMark standard features, such as:
- Headings
- Paragraphs and line breaks
- Blockquotes
- Horizontal rule
- Emphasis (bold, italics, strikethrough)
- Tables
- Lists, both ordered and unordered
- Links
- Images
- Character escaping
For more information, see Syntax guidance for basic Markdown usage.
For performance reasons, the Markdown widget doesn't add support for many extended features, many of which are supported in the wiki. Extended capabilities would impede widget load time. For example, the following extended Markdown features aren't supported in the Markdown widget:
- HTML syntax embedded
- Code highlighting (wiki/others support language-syntax aware color coding, CommonMark just renders code as plain preformatted text)
- Checklists
- Emoji characters
- Attachments
- Math formulas
Add the Markdown widget
Do the following steps to add the Markdown widget. To add a dashboard, see Add, rename, and delete dashboards.
Sign in to your project (
https://dev.azure.com/{Your_Organization/Your_Project}).Select Dashboards.
Select
 Edit. The widget catalog automatically opens.
Add or drag the Markdown widget onto the dashboard where you want it located.
Select Done Editing to exit dashboard editing. This action dismisses the widget catalog. You can then configure the Markdown widget as needed.
Select
 more actions >
  Configure.
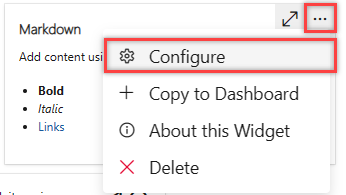
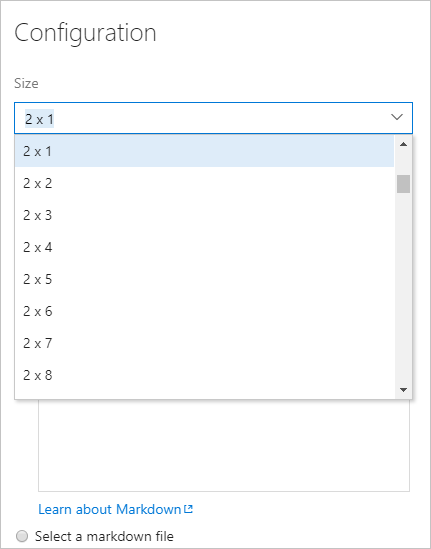
(Optional) Adjust the widget size as needed to fit the contents of the Markdown. The largest size is 10 tiles wide by 10 tiles tall. You can always adjust the size later.
Enter text and Markdown syntax into the configuration dialog. For supported syntax, see Syntax guidance for Markdown files, widgets, wikis, and pull request comments.
Note
- Links to documents on file shares using
file://aren't supported. This restriction is implemented for security purposes. - To link to a wiki page, use the following syntax:
/ProjectName/_wiki/wikis/WikiRepositoryName?pagePath=/FileName - To link to a repository file, page, or image within the project, choose Select a markdown file, choose your Repository, Branch, and Path from the dropdown menus.
- Links to documents on file shares using
Save your changes.