Configure GitHub Advanced Security for Azure DevOps
GitHub Advanced Security for Azure DevOps adds GitHub Advanced Security's suite of security features to Azure Repos.
GitHub Advanced Security for Azure includes:
- Secret Scanning push protection: check if code pushes include commits that expose secrets such as credentials
- Secret Scanning repo scanning: scan your repository and look for exposed secrets that were committed accidentally
- Dependency Scanning – search for known vulnerabilities in open source dependencies (direct and transitive)
- Code Scanning – use CodeQL static analysis engine to identify code-level application vulnerabilities such as SQL injection and authentication bypass
At this time, GitHub Advanced Security for Azure DevOps is only available for Azure DevOps Services and there are no plans to bring this product to Azure DevOps Server.
GitHub Advanced Security for Azure DevOps works with Azure Repos. If you want to use GitHub Advanced Security with GitHub repositories, see GitHub Advanced Security.
Prerequisites
You must have permissions allocated as a member of the Project Collection Administrators group. To add members to the Project Collection Administrators group or change a project collection-level permission see Change project collection-level permissions.
Extra prerequisites for self-hosted agents
If your organization uses self-hosted agents, there are more requirements:
- Add these URLs to your Allowlist to allow for the dependency scanning task to fetch vulnerability advisory data. Learn more about Allowed IP addresses and domain URLs.
| Domain URL | Description |
|---|---|
https://governance.dev.azure.com/{organization_name} |
For organizations using the dev.azure.com domain to access their DevOps instance |
https://dev.azure.com/{organization_name} |
For organizations using the dev.azure.com domain to access their DevOps instance |
https://advsec.dev.azure.com/{organization_name} |
For organizations using the dev.azure.com domain to access their DevOps instance |
https://{organization_name}.governance.visualstudio.com/ |
For organizations using the {organization_name}.visualstudio.com domain to access their DevOps instance |
https://{organization_name}.visualstudio.com |
For organizations using the {organization_name}.visualstudio.com domain to access their DevOps instance |
https://{organization_name}.advsec.visualstudio.com/ |
For organizations using the {organization_name}.visualstudio.com domain to access their DevOps instance |
Run a compatible version of the .NET runtime (currently .NET 6.0.x). If a compatible version isn't present on the agent, the dependency scanning build task downloads .NET.
Install the CodeQL bundle to the agent tool cache by utilizing the setup script for your architecture, available on GitHub. These scripts require the
$AGENT_TOOLSDIRECTORYenvironment variable to be set to the location of the agent tools directory on the agent, e.g.C:/agent/_work/_tool. Alternatively, you may manually implement the following steps:- Pick the latest CodeQL release bundle from GitHub.
- Download and unzip the bundle to the following directory inside the agent tool directory, typically located under
_work/_tool:./CodeQL/0.0.0-[codeql-release-bundle-tag]/x64/. Using the current release ofv2.16.0, the folder name would be titled./CodeQL/0.0.0-codeql-bundle-v2.16.0/x64/. Learn more about the agent tool directory. - Create an empty file titled
x64.completewithin the./CodeQL/0.0.0-[codeql-release-bundle-tag]folder. Using the previous example, the end file path to yourx64.completefile should be./CodeQL/0.0.0-codeql-bundle-v2.16.0/x64.complete.
Enable GitHub Advanced Security
You can enable Advanced Security at the organization, project, or repository level. To access each of the scanning tools and results, you need to first enable Advanced Security. Once you enable Advanced Security, any future pushes containing secrets to a repository with this policy enabled are blocked, and repository secret scanning happens in the background.
Repository-level onboarding
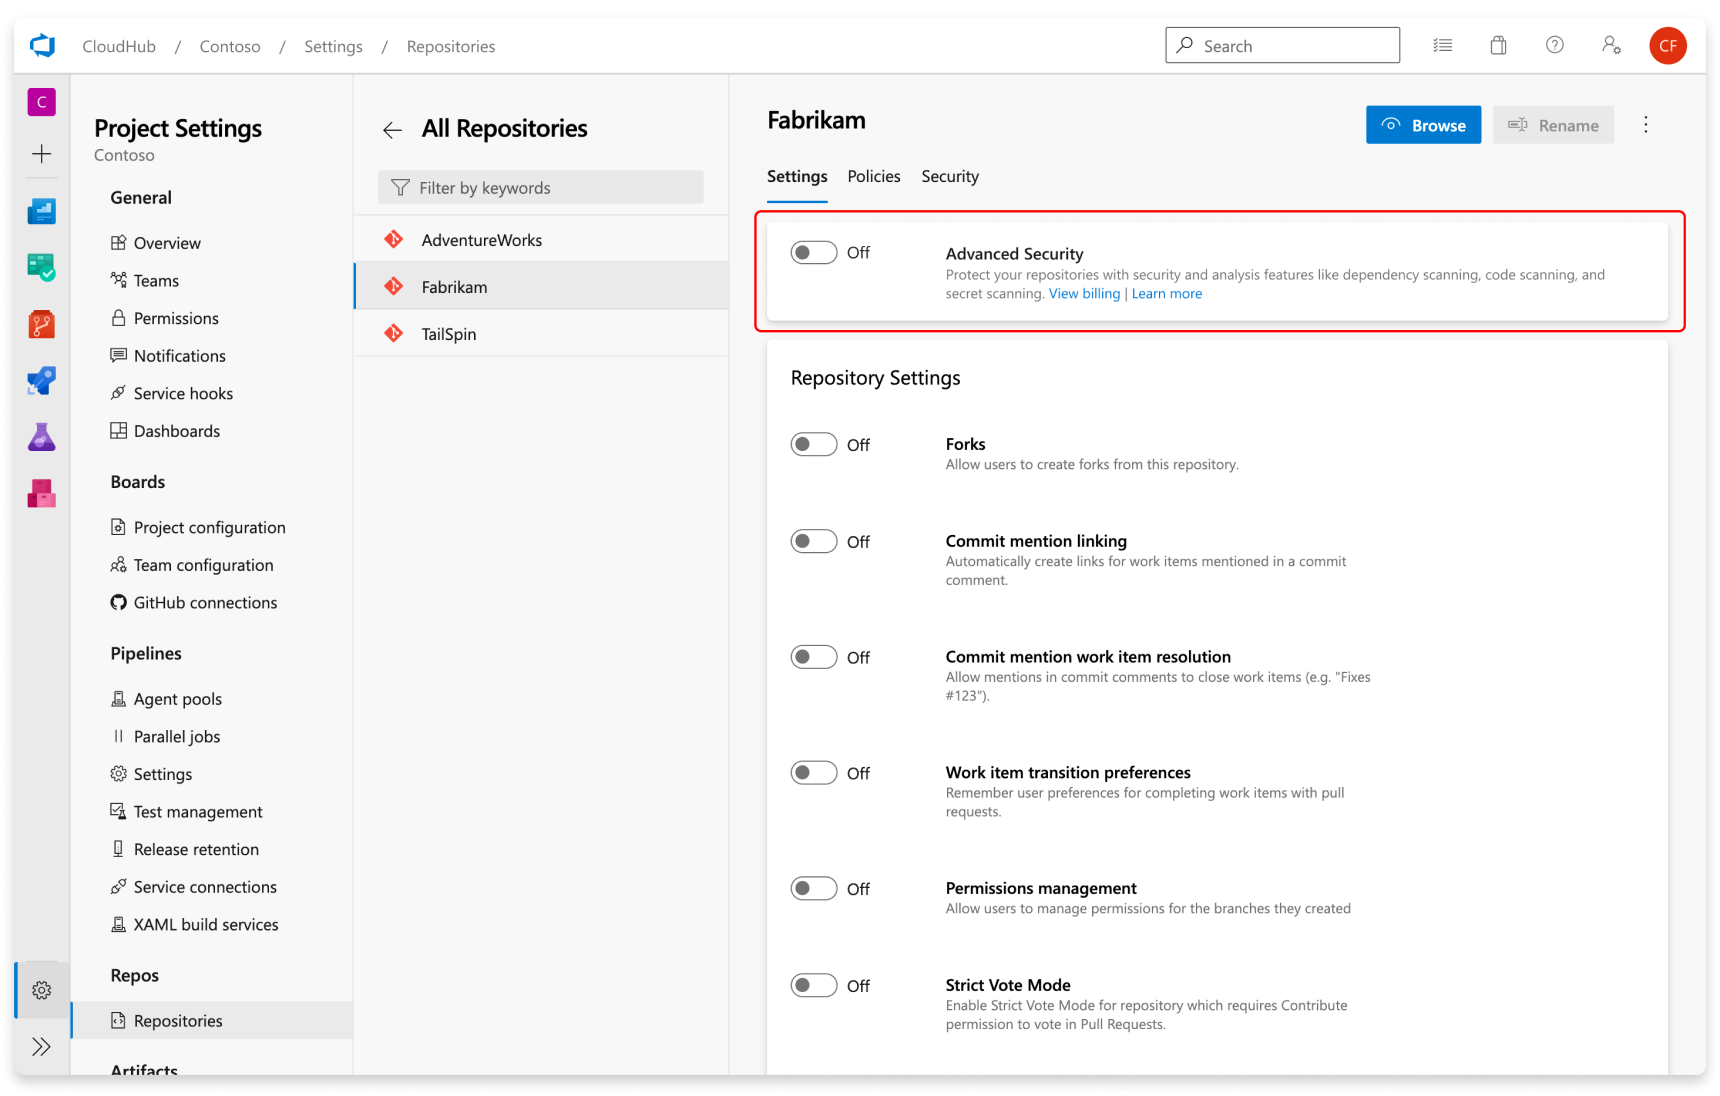
- Go to your Project settings for your Azure DevOps project.
- Select Repos > Repositories.
- Select the repository you want to enable Advanced Security for.
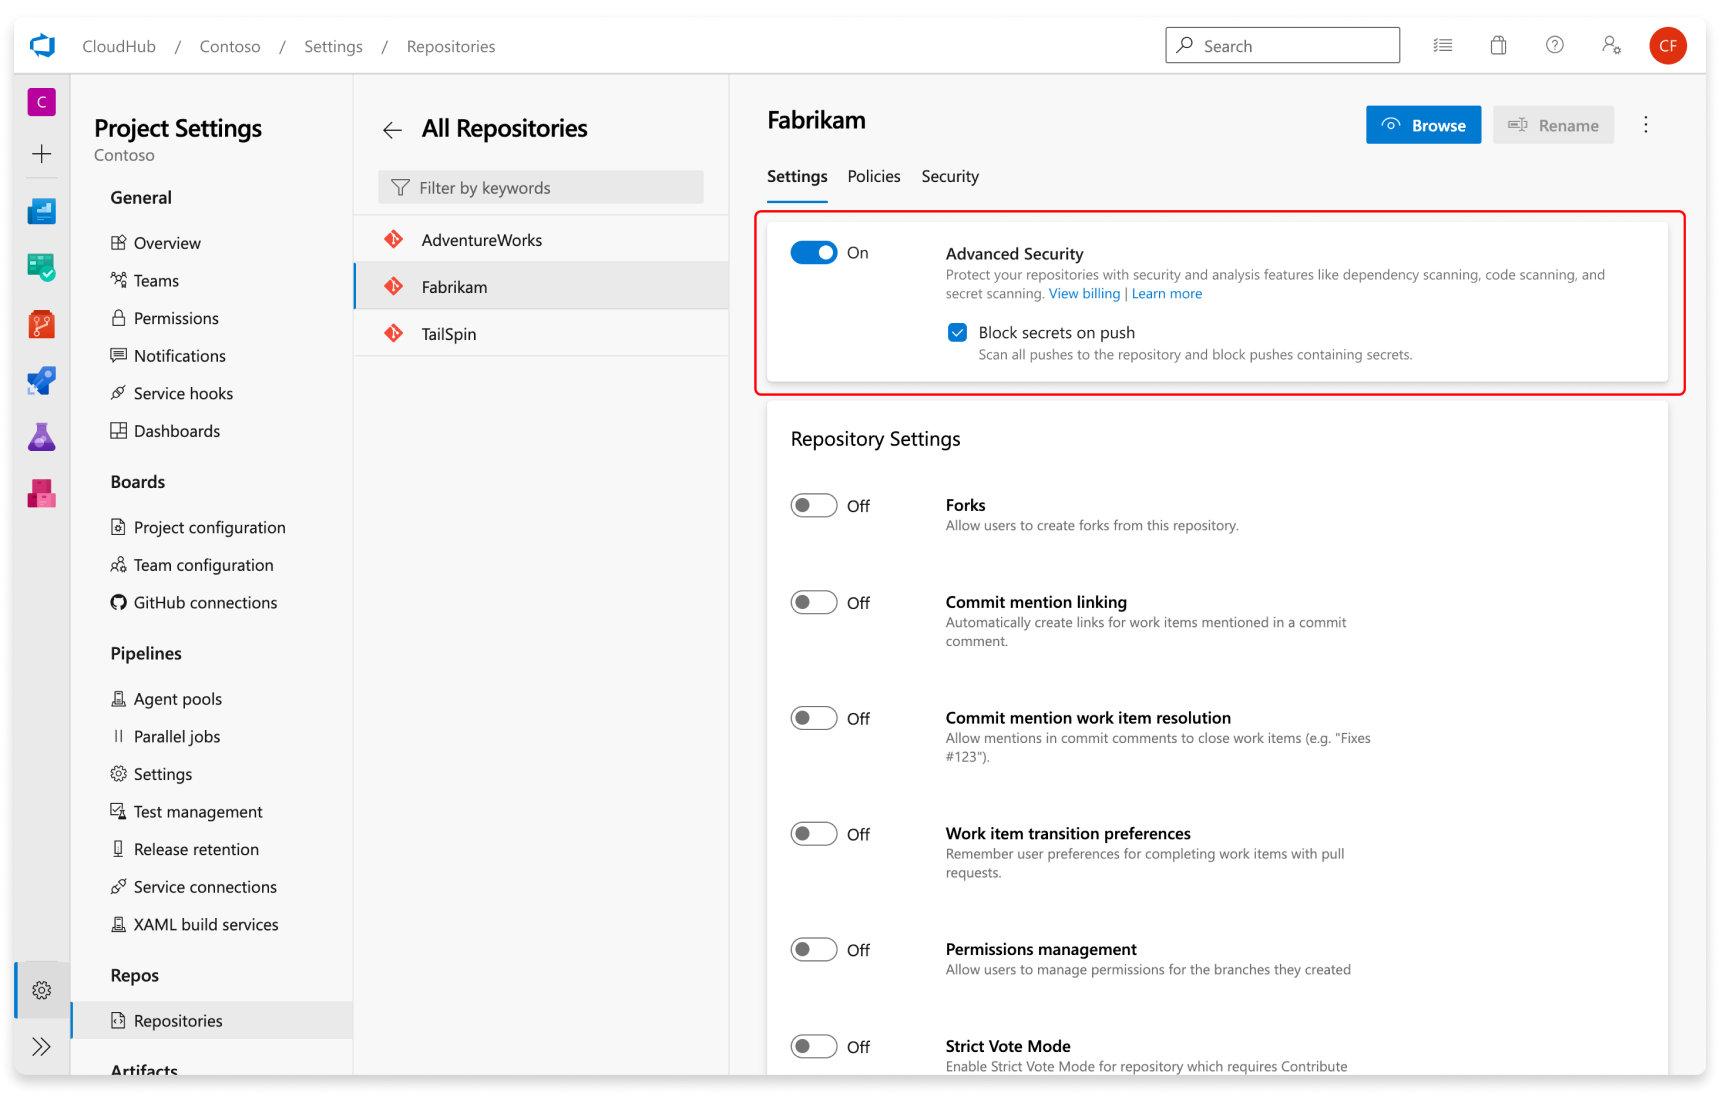
- Select Enable and Begin billing to activate Advanced Security. A shield icon now appears in the repository view for any repository with Advanced Security enabled.
Project-level onboarding
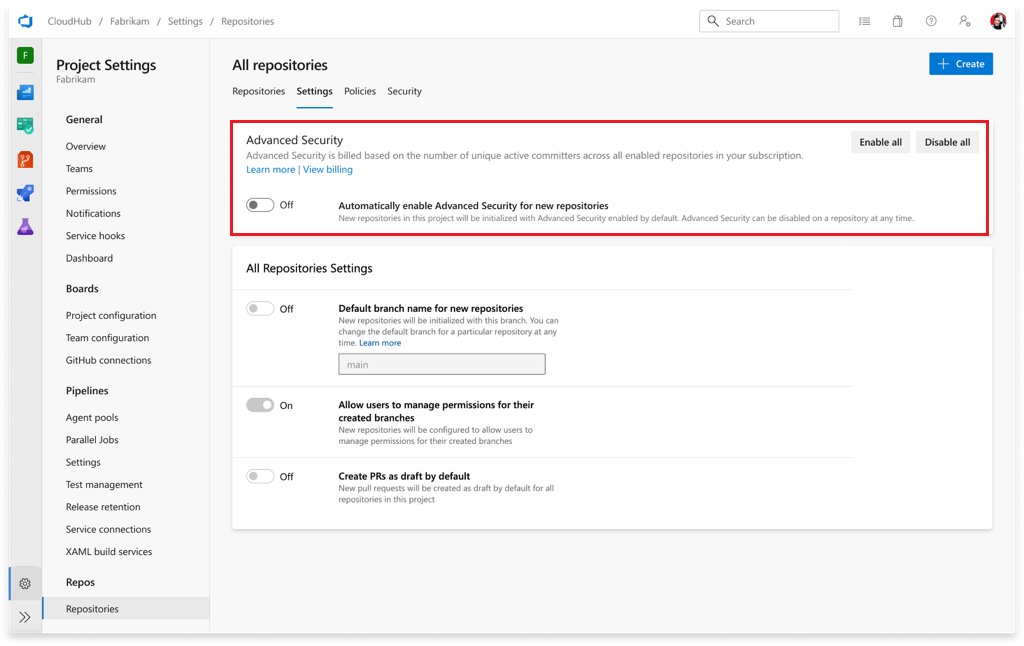
- Go to your Project settings for your Azure DevOps project.
- Select Repos.
- Select the Settings tab.
- Select Enable all and you'll see an estimate for the number of active committers for your project appear.
- Select Begin billing to activate Advanced Security for every existing repository in your project.
- Optionally, select Automatically enable Advanced Security for new repositories so that any newly created repositories have Advanced Security enabled upon creation.
Organization-level onboarding
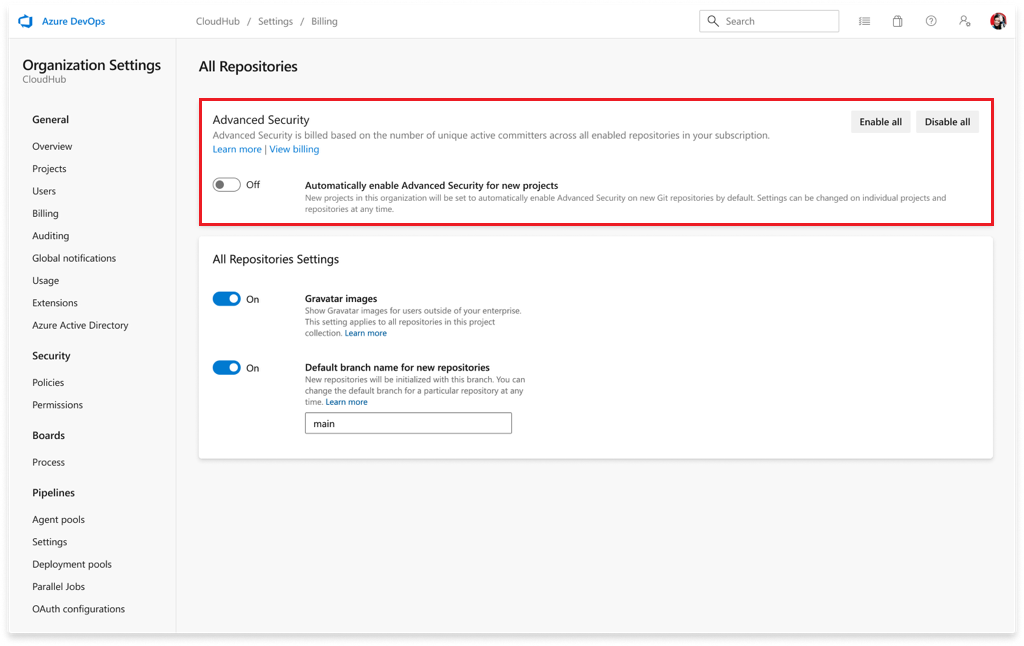
- Go to your Organization settings for your Azure DevOps organization.
- Select Repositories.
- Select Enable all and you'll see an estimate for the number of active committers for your organization appear.
- Select Begin billing to activate Advanced Security for every existing repository in each project in your organization.
- Optionally, select Automatically enable Advanced Security for new repositories so that any newly created projects have Advanced Security enabled upon creation.
Set up secret scanning
Secret scanning push protection and repository scanning are automatically enabled when you turn on Advanced Security. You can enable or disable secret push protection from the repository settings page.
As mentioned, secret scanning repository scanning is automatically kicked off upon enabling Advanced Security for a selected repository.
Set up dependency scanning
Dependency scanning is a pipeline-based scanning tool. Results are aggregated per repository. It's recommended that you add the dependency scanning task to all the pipelines you'd like to be scanned.
Tip
For the most accurate scanning results, be sure to add the dependency scanning task following the build steps of a pipeline that builds the code you wish to scan.
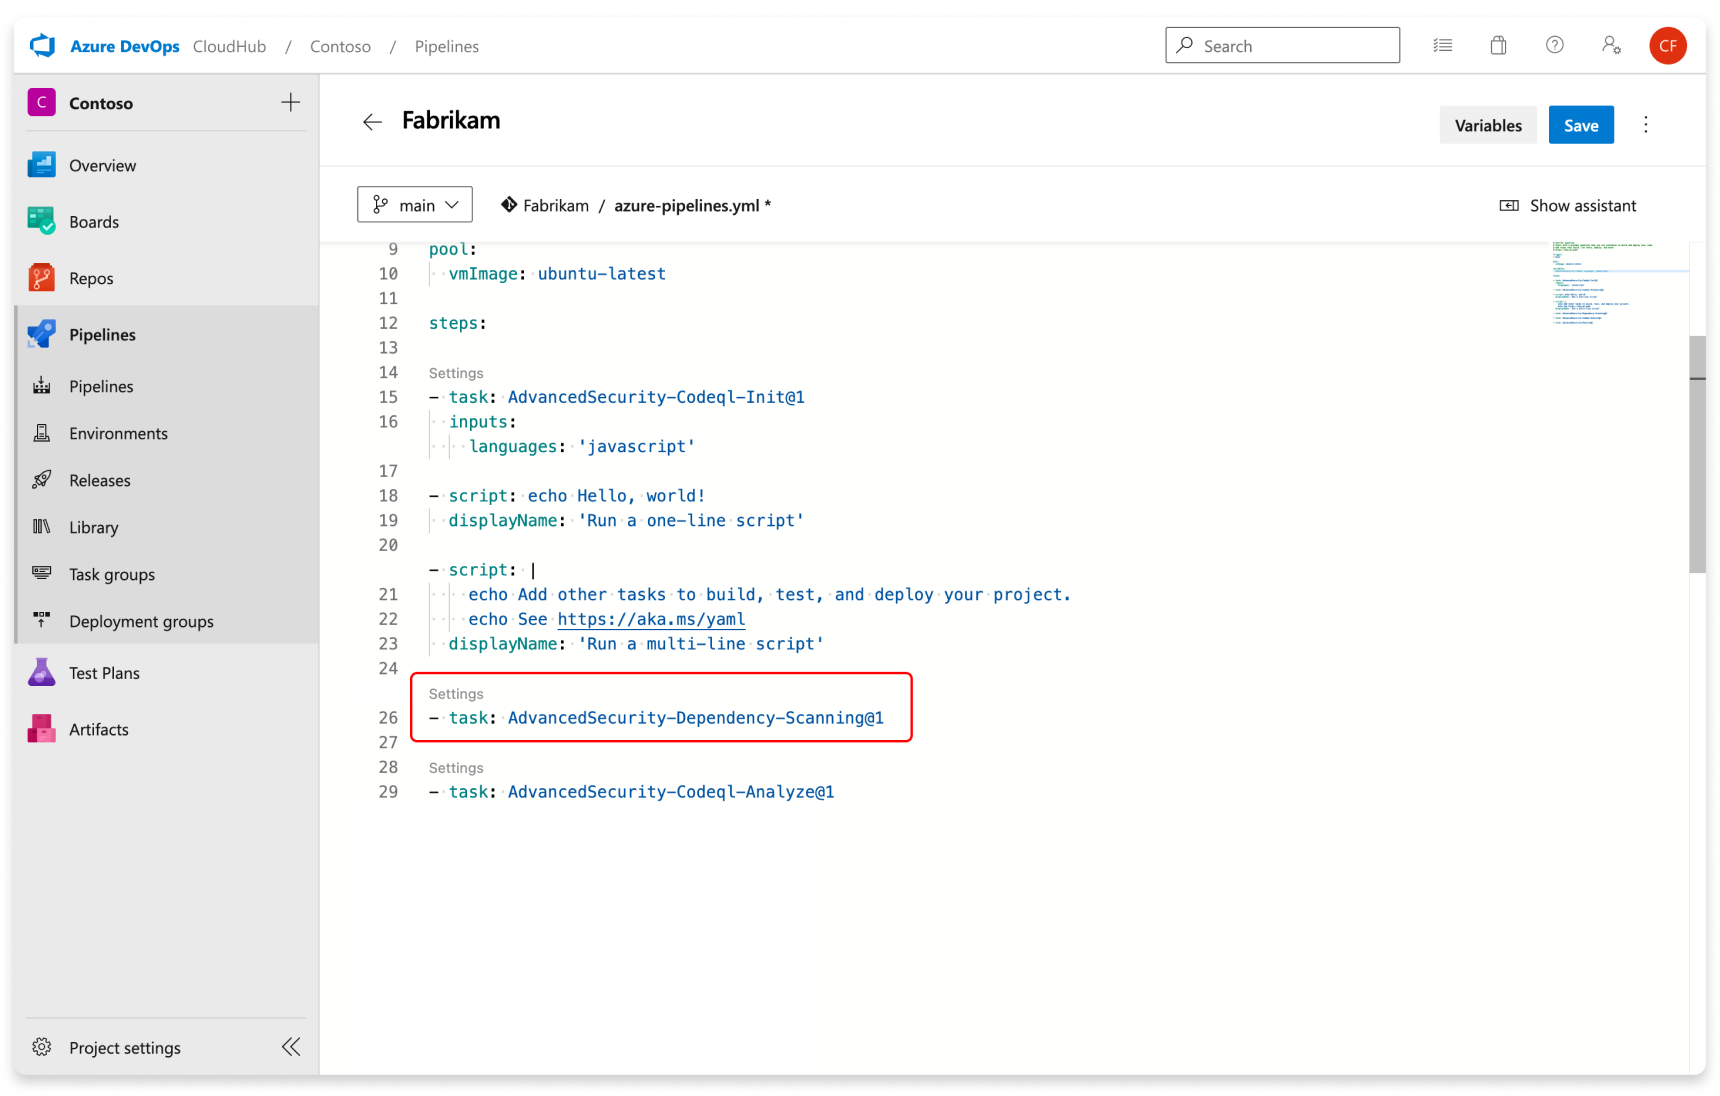
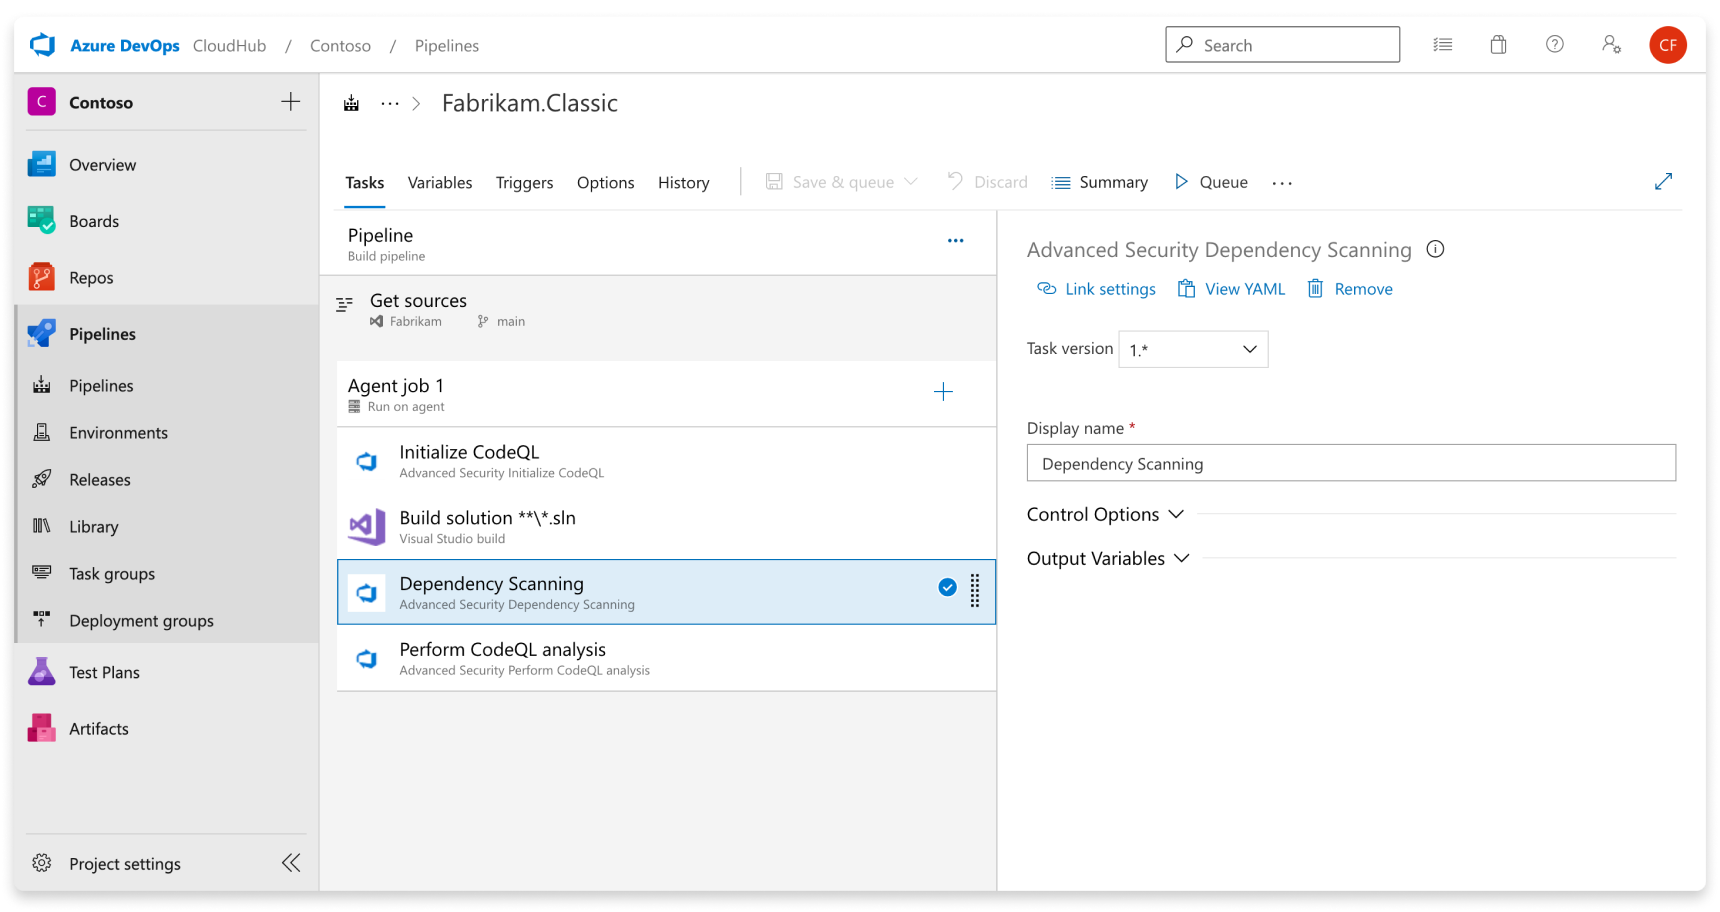
Add the task Advanced Security Dependency Scanning task (AdvancedSecurity-Dependency-Scanning@1) directly to your YAML pipeline file or select the Advanced Security Dependency Scanning task from the task assistant.
Set up code scanning
Code scanning is also a pipeline-based scanning tool where results are aggregated per repository.
Tip
It's recommended to add the code scanning task to a separate, cloned pipeline of your main production pipeline or create a new pipeline. This is because code scanning can be a more time-intensive build task.
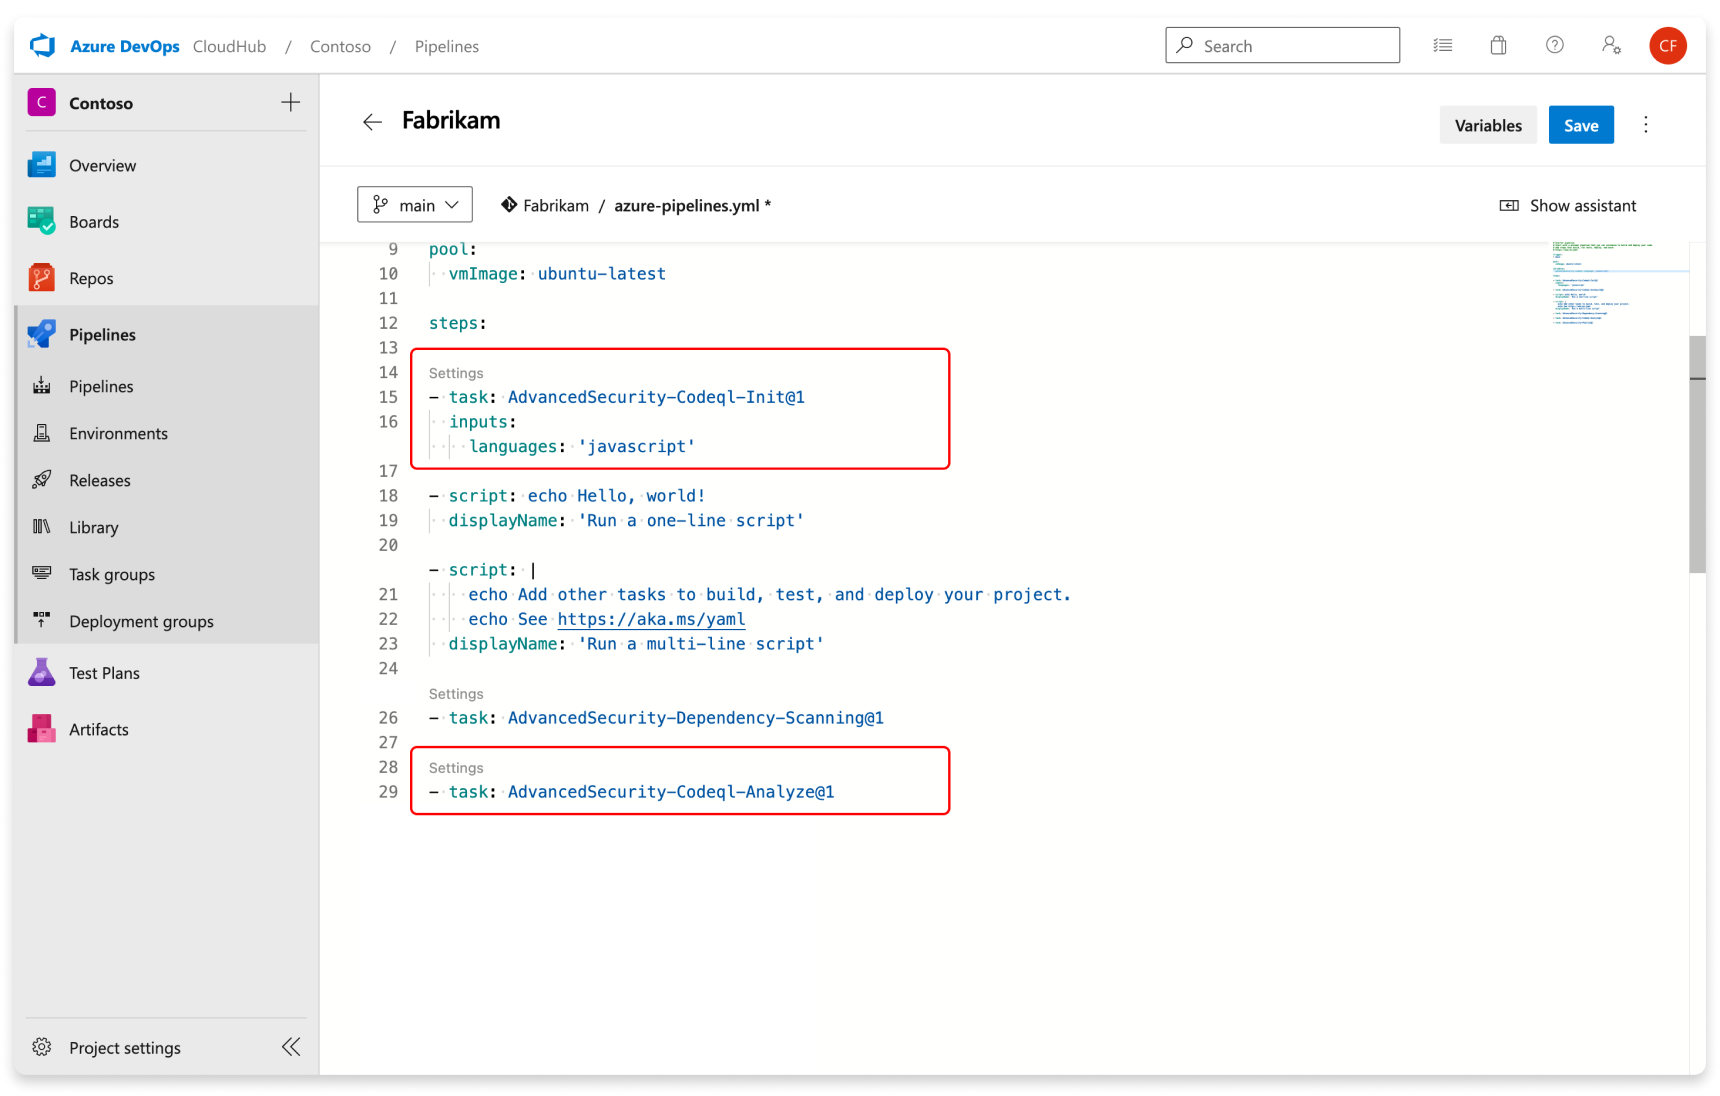
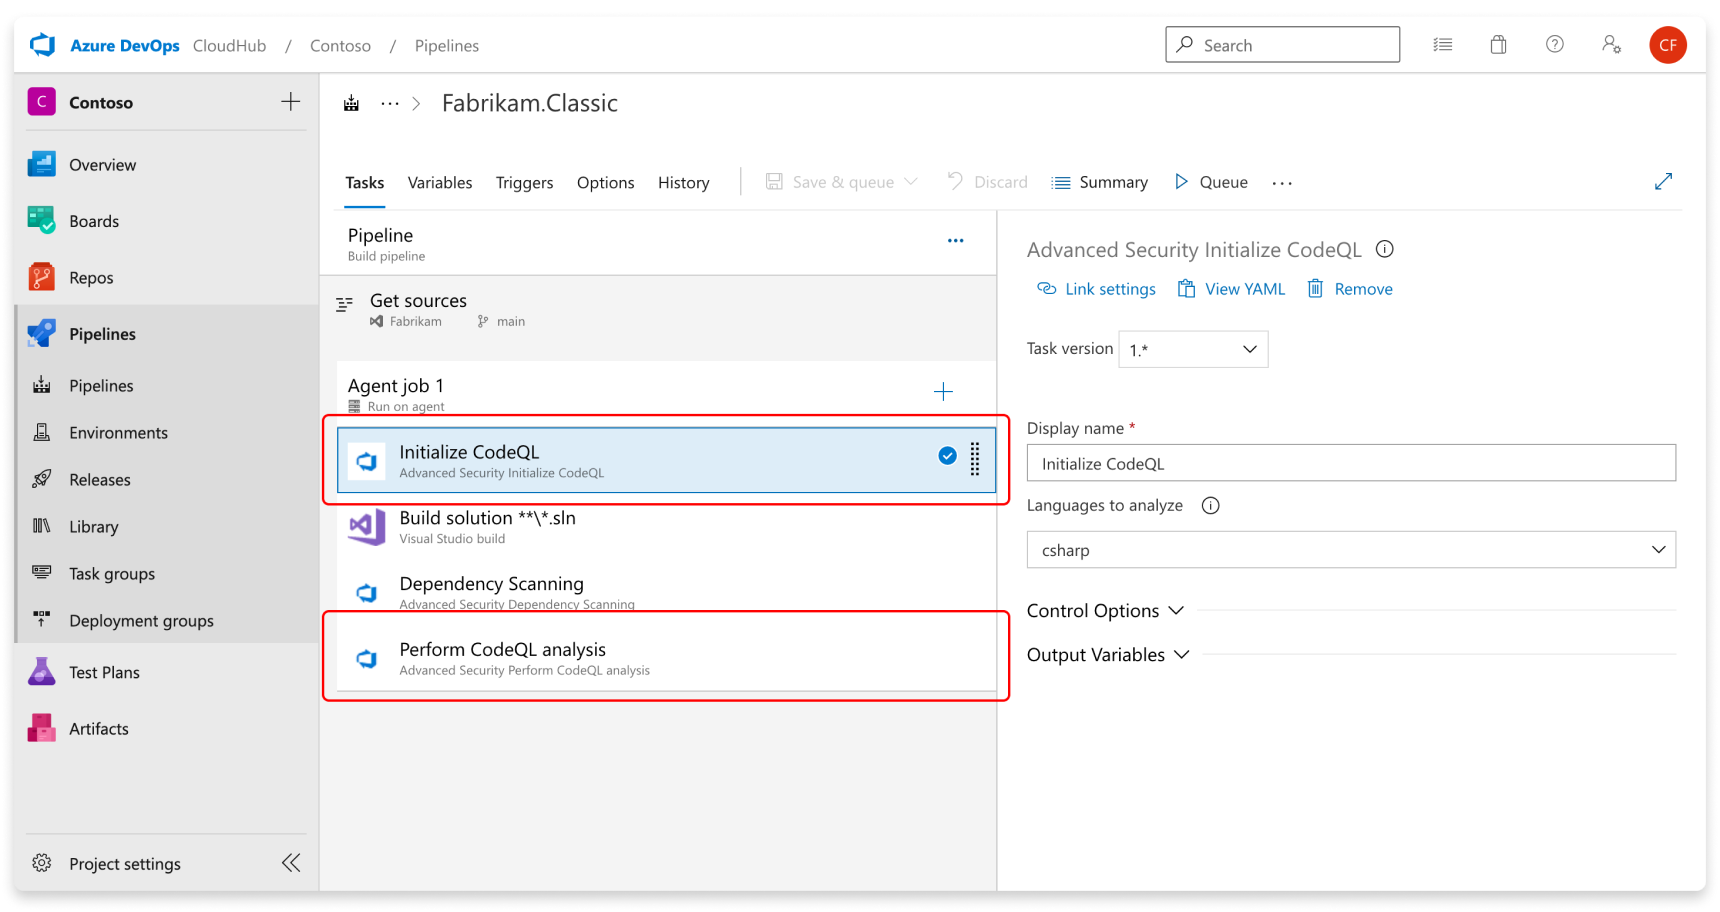
Add the tasks in the following order:
- Advanced Security Initialize CodeQL (AdvancedSecurity-Codeql-Init@1)
- Your custom build steps
- Advanced Security Perform CodeQL Analysis (AdvancedSecurity-Codeql-Analyze@1)
Additionally, you'll need to specify which language(s) you're analyzing in the Initialize CodeQL task. A comma separated list can be used to analyze multiple languages at once. The supported languages are csharp, cpp, go, java, javascript, python, ruby, swift.
Here is an example starter pipeline:
trigger:
  - main

pool:
  # Additional hosted image options are available: https://learn.microsoft.com/en-us/azure/devops/pipelines/agents/hosted#software
  vmImage: ubuntu-latest

steps:

  - task: AdvancedSecurity-Codeql-Init@1
    inputs:
      languages: "java"
      # Supported languages: csharp, cpp, go, java, javascript, python, ruby, swift
      # You can customize the initialize task: https://learn.microsoft.com/en-us/azure/devops/pipelines/tasks/reference/advanced-security-codeql-init-v1?view=azure-pipelines

#   Add your custom build steps here
# - Ensure that all code to be scanned is compiled (often using a `clean` command to ensure you are building from a clean state).
# - Disable the use of any build caching mechanisms as this can interfere with CodeQL's ability to capture all the necessary data during the build.
# - Disable the use of any distributed/multithreaded/incremental builds as CodeQL needs to monitor executions of the compiler to construct an accurate representation of the application.

# If you had a Maven app:
#   - task: Maven@4
#     inputs:
#       mavenPomFile: 'pom.xml'
#       goals: 'clean package'
#       publishJUnitResults: true
#       testResultsFiles: '**/TEST-*.xml'
#       javaHomeOption: 'JDKVersion'
#       jdkVersionOption: '1.17'
#       mavenVersionOption: 'Default'

# Or a general script:
#   - script: |
#       echo "Run, Build Application using script"
#       ./location_of_script_within_repo/buildscript.sh

  - task: AdvancedSecurity-Dependency-Scanning@1 # More details on this task: https://learn.microsoft.com/en-us/azure/devops/pipelines/tasks/reference/advanced-security-dependency-scanning-v1?view=azure-pipelines

  - task: AdvancedSecurity-Codeql-Analyze@1 # More details on this task: https://learn.microsoft.com/en-us/azure/devops/pipelines/tasks/reference/advanced-security-codeql-analyze-v1?view=azure-pipelines
Tip
CodeQL analysis for Kotlin/Swift are currently in beta. During the beta, analysis of these languages will be less comprehensive than CodeQL analysis of others.
Use java to analyze code written in Java, Kotlin or both.
Use javascript to analyze code written in JavaScript, TypeScript, or both.
If the language specified is cpp, java, csharp or swift either custom or AutoBuild build steps are required. For other languages, if AutoBuild is included the step completes successfully without performing any action.
If, for whatever reason, you need to disable Advanced Security, any alerts and state of alerts will be retained for the next time you re-enable Advanced Security for your repository.
Next steps
- Code scanning alerts for GitHub Advanced Security for Azure DevOps
- Dependency scanning alerts for GitHub Advanced Security for Azure DevOps
- Secret scanning alerts for GitHub Advanced Security for Azure DevOps
- Permissions for GitHub Advanced Security for Azure DevOps
- Billing for GitHub Advanced Security for Azure DevOps
Feedback
Coming soon: Throughout 2024 we will be phasing out GitHub Issues as the feedback mechanism for content and replacing it with a new feedback system. For more information see: https://aka.ms/ContentUserFeedback.
Submit and view feedback for
