Tutorial: Create an Azure Digital Twins graph using the Azure CLI
In this tutorial, you'll build a graph in Azure Digital Twins using models, twins, and relationships. The tool for this tutorial is the Azure Digital Twins command set for the Azure CLI.
You can use the CLI commands to perform essential Azure Digital Twins actions such as uploading models, creating and modifying twins, and creating relationships. You can also look at the reference documentation for az dt command set to see the full set of CLI commands.
In this tutorial, you will...
- Model an environment
- Create digital twins
- Add relationships to form a graph
- Query the graph to answer questions
Prerequisites
To complete the steps in this tutorial, you'll need to first complete the following prerequisites.
If you don't have an Azure subscription, create a free account before you begin.
Download the sample models
The tutorial uses two pre-written models that are part of the C# end-to-end sample project for Azure Digital Twins. The model files are located here:
To get the files on your machine, use the navigation links above and copy the file bodies into local files on your machine with the same names (Room.json and Floor.json).
Prepare your environment for the Azure CLI
Use the Bash environment in Azure Cloud Shell. For more information, see Quickstart for Bash in Azure Cloud Shell.

If you prefer to run CLI reference commands locally, install the Azure CLI. If you're running on Windows or macOS, consider running Azure CLI in a Docker container. For more information, see How to run the Azure CLI in a Docker container.
If you're using a local installation, sign in to the Azure CLI by using the az login command. To finish the authentication process, follow the steps displayed in your terminal. For other sign-in options, see Sign in with the Azure CLI.
When you're prompted, install the Azure CLI extension on first use. For more information about extensions, see Use extensions with the Azure CLI.
Run az version to find the version and dependent libraries that are installed. To upgrade to the latest version, run az upgrade.
Set up CLI session
To start working with Azure Digital Twins in the CLI, the first thing to do is log in and set the CLI context to your subscription for this session. Run these commands in your CLI window:
az login
az account set --subscription "<your-Azure-subscription-ID>"
Tip
You can also use your subscription name instead of the ID in the command above.
If this is the first time you've used this subscription with Azure Digital Twins, run this command to register with the Azure Digital Twins namespace. (If you're not sure, it's ok to run it again even if you've done it sometime in the past.)
az provider register --namespace 'Microsoft.DigitalTwins'
Next you'll add the Microsoft Azure IoT Extension for Azure CLI, to enable commands for interacting with Azure Digital Twins and other IoT services. Run this command to make sure you have the latest version of the extension:
az extension add --upgrade --name azure-iot
Now you are ready to work with Azure Digital Twins in the Azure CLI.
You can verify this by running az dt --help at any time to see a list of the top-level Azure Digital Twins commands that are available.
Prepare an Azure Digital Twins instance
To work with Azure Digital Twins in this article, you first need to set up an Azure Digital Twins instance and the required permissions for using it. If you already have an Azure Digital Twins instance set up from previous work, you can use that instance.
Otherwise, follow the instructions in Set up an instance and authentication. The instructions also contain steps to verify that you've completed each step successfully and are ready to move on to using your new instance.
After you set up your Azure Digital Twins instance, make a note of the following values that you'll need to connect to the instance later:
- The instance's host name
- The Azure subscription that you used to create the instance
Tip
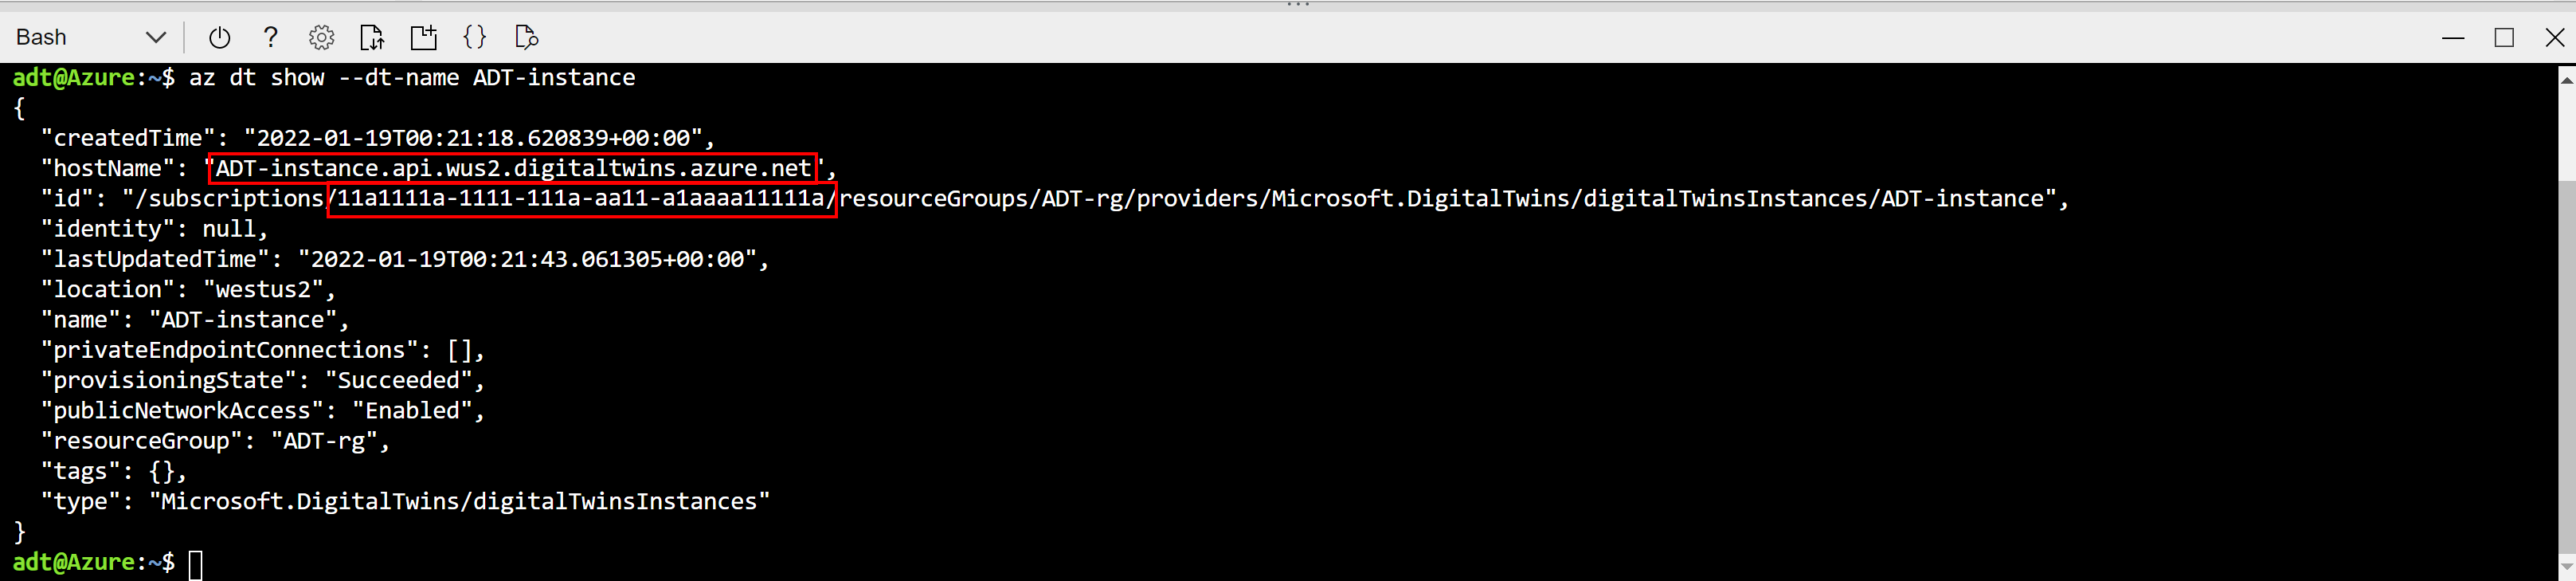
If you know the friendly name of your instance, you can use the following CLI command to get the host name and subscription values:
az dt show --dt-name <Azure-Digital-Twins-instance-name>
They'll appear in the output like this:
Model a physical environment with DTDL
Now that the CLI and Azure Digital Twins instance are set up, you can begin building a graph of a scenario.
The first step in creating an Azure Digital Twins solution is defining twin models for your environment.
Models are similar to classes in object-oriented programming languages; they provide user-defined templates for digital twins to follow and instantiate later. They're written in a JSON-like language called Digital Twins Definition Language (DTDL), and can define a twin's properties, relationships, and components.
Note
DTDL also allows for the definition of commands on digital twins. However, commands are not currently supported in the Azure Digital Twins service.
Navigate on your machine to the Room.json file that you created in the Prerequisites section. Open it in a code editor, and change it in the following ways:
Update the version number, to indicate that you are providing a more-updated version of this model. Do this by changing the 1 at the end of the
@idvalue to a 2. Any number greater than the current version number will also work.Edit a property. Change the name of the
Humidityproperty to HumidityLevel (or something different if you want. If you use something different than HumidityLevel, remember what you used and continue using that instead of HumidityLevel throughout the tutorial).Add a property. Underneath the
HumidityLevelproperty that ends on line 15, paste the following code to add aRoomNameproperty to the room:,{ "@type": "Property", "name": "RoomName", "schema": "string" }Add a relationship. Underneath the
RoomNameproperty that you just added, paste the following code to add the ability for this type of twin to formcontainsrelationships with other twins:,{ "@type": "Relationship", "name": "contains" }
When you are finished, the updated model should match this:
{
"@id": "dtmi:example:Room;2",
"@type": "Interface",
"displayName": "Room",
"contents": [
{
"@type": "Property",
"name": "Temperature",
"schema": "double"
},
{
"@type": "Property",
"name": "HumidityLevel",
"schema": "double"
}
,{
  "@type": "Property",
  "name": "RoomName",
  "schema": "string"
}
,{
  "@type": "Relationship",
  "name": "contains"
}
],
"@context": "dtmi:dtdl:context;3"
}
Make sure to save the file before moving on.
Upload models to Azure Digital Twins
After designing models, you need to upload them to your Azure Digital Twins instance. Doing so configures your Azure Digital Twins service instance with your own custom domain vocabulary. Once you've uploaded the models, you can create twin instances that use them.
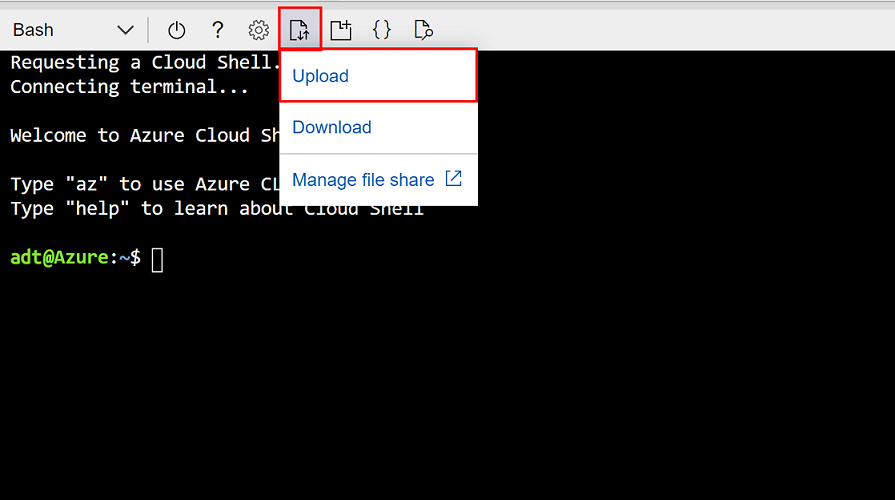
If you're using a local installation of the Azure CLI, you can skip this step. If you're using Cloud Shell, you'll need to upload your model files to Cloud Shell's storage so the files will be available when you run the Cloud Shell command that uses them. To do so, select the "Upload/Download files" icon and choose "Upload".
Navigate to the Room.json file on your machine and select "Open." Then, repeat this step for Floor.json.
Next, use the az dt model create command as shown below to upload your updated Room model to your Azure Digital Twins instance. The second command uploads another model, Floor, which you'll also use in the next section to create different types of twins. There's a placeholder for the instance's host name (you can also use the instance's friendly name with a slight decrease in performance), and a placeholder for a path to each model file. If you're using Cloud Shell, Room.json and Floor.json are in the main storage directory, so you can just use the file names directly in the command below where a path is required.
az dt model create --dt-name <Azure-Digital-Twins-instance-hostname-or-name> --models <path-to-Room.json>
az dt model create --dt-name <Azure-Digital-Twins-instance-hostname-or-name> --models <path-to-Floor.json>
The output from each command will show information about the successfully uploaded model.
Tip
You can also upload all models within a directory at the same time, by using the
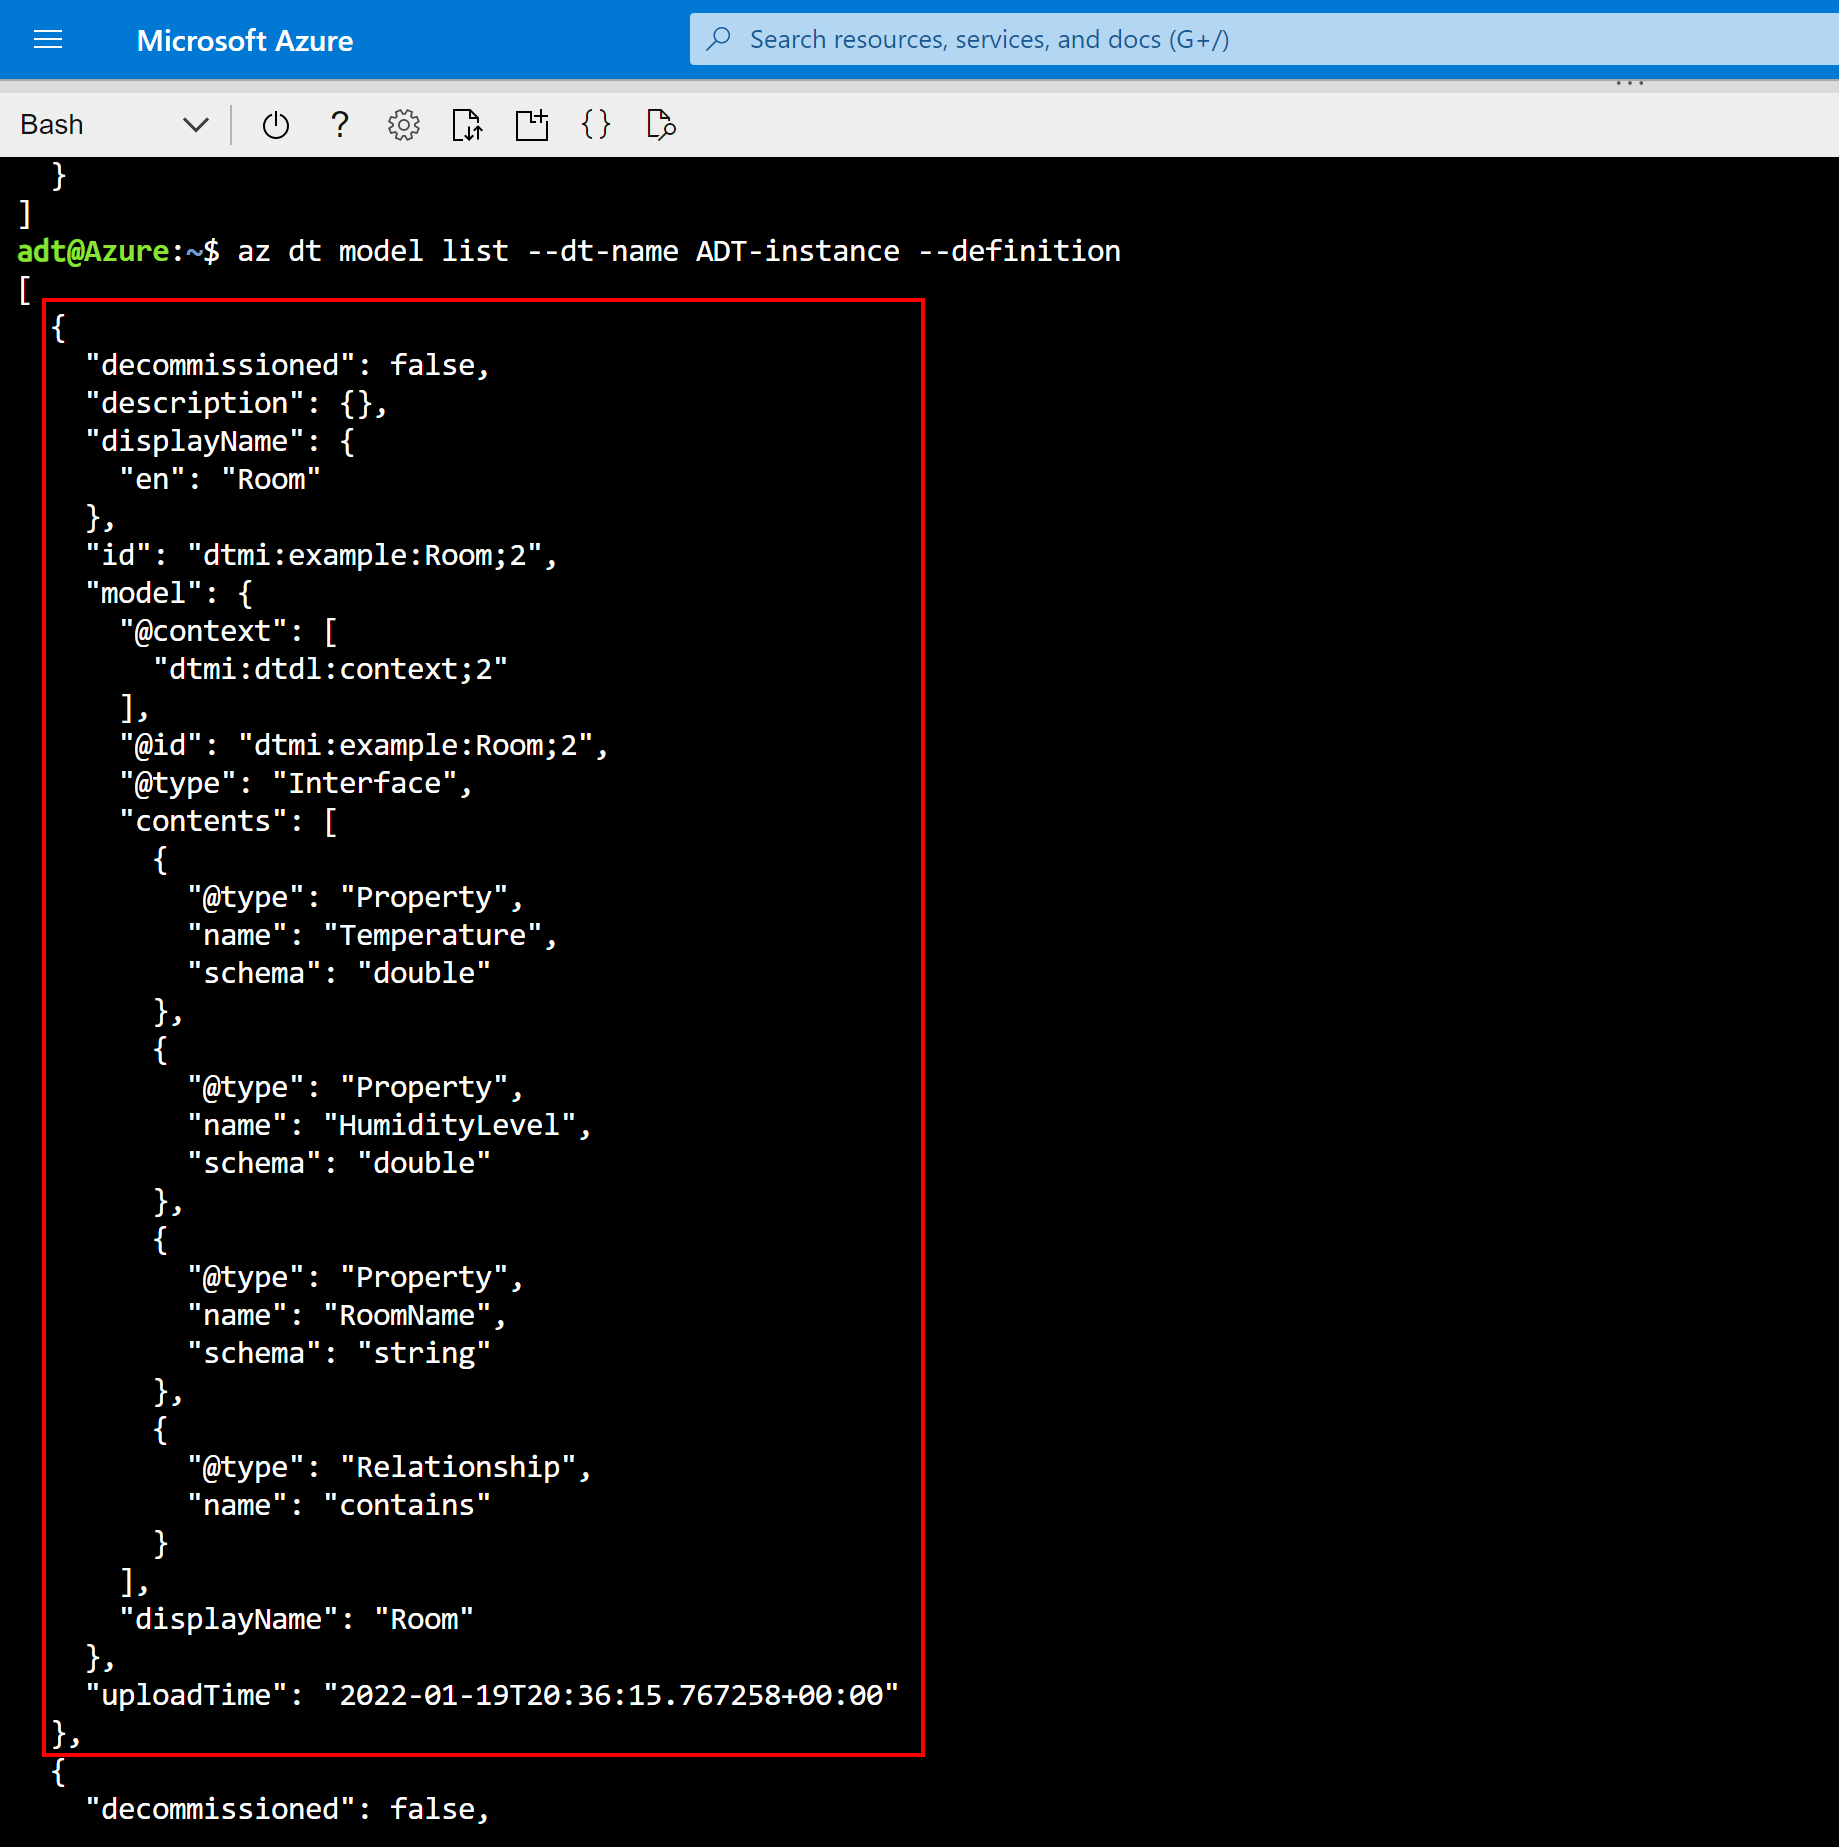
--from-directoryoption for the model create command. For more information, see Optional parameters for az dt model create.Verify the models were created with the az dt model list command as shown below. Doing so will print a list of all models that have been uploaded to the Azure Digital Twins instance with their full information. There's one placeholder for the instance's host name (you can also use the instance's friendly name with a slight decrease in performance).
az dt model list --dt-name <Azure-Digital-Twins-instance-hostname-or-name> --definitionLook for the edited Room model in the results:

Errors
The CLI also handles errors from the service.
Rerun the az dt model create command to try re-uploading one of the same models you uploaded, for a second time:
az dt model create --dt-name <Azure-Digital-Twins-instance-hostname-or-name> --models Room.json
As models cannot be overwritten, running this command on the same model will now return an error code of ModelIdAlreadyExists.
Create digital twins
Now that some models have been uploaded to your Azure Digital Twins instance, you can create digital twins based on the model definitions. Digital twins represent the entities within your business environment—things like sensors on a farm, rooms in a building, or lights in a car.
To create a digital twin, you use the az dt twin create command. You must reference the model that the twin is based on, and can optionally define initial values for any properties in the model. You don't have to pass any relationship information at this stage.
Run this code in the CLI to create several twins, based on the Room model you updated earlier and another model, Floor. Recall that Room has three properties, so you can provide arguments with the initial values for these properties. (Initializing property values is optional in general, but they're needed for this tutorial.) There's one placeholder for the instance's host name (you can also use the instance's friendly name with a slight decrease in performance).
az dt twin create --dt-name <Azure-Digital-Twins-instance-hostname-or-name> --dtmi "dtmi:example:Room;2" --twin-id room0 --properties '{"RoomName":"Room0", "Temperature":70, "HumidityLevel":30}'
az dt twin create --dt-name <Azure-Digital-Twins-instance-hostname-or-name> --dtmi "dtmi:example:Room;2" --twin-id room1 --properties '{"RoomName":"Room1", "Temperature":80, "HumidityLevel":60}'
az dt twin create --dt-name <Azure-Digital-Twins-instance-hostname-or-name> --dtmi "dtmi:example:Floor;1" --twin-id floor0
az dt twin create --dt-name <Azure-Digital-Twins-instance-hostname-or-name> --dtmi "dtmi:example:Floor;1" --twin-id floor1
Note
If you're using anything other than Cloud Shell in the Bash environment, you may need to escape certain characters in the inline JSON so that it's parsed correctly.
For more information, see Use special characters in different shells.
The output from each command will show information about the successfully created twin (including properties for the room twins that were initialized with them).
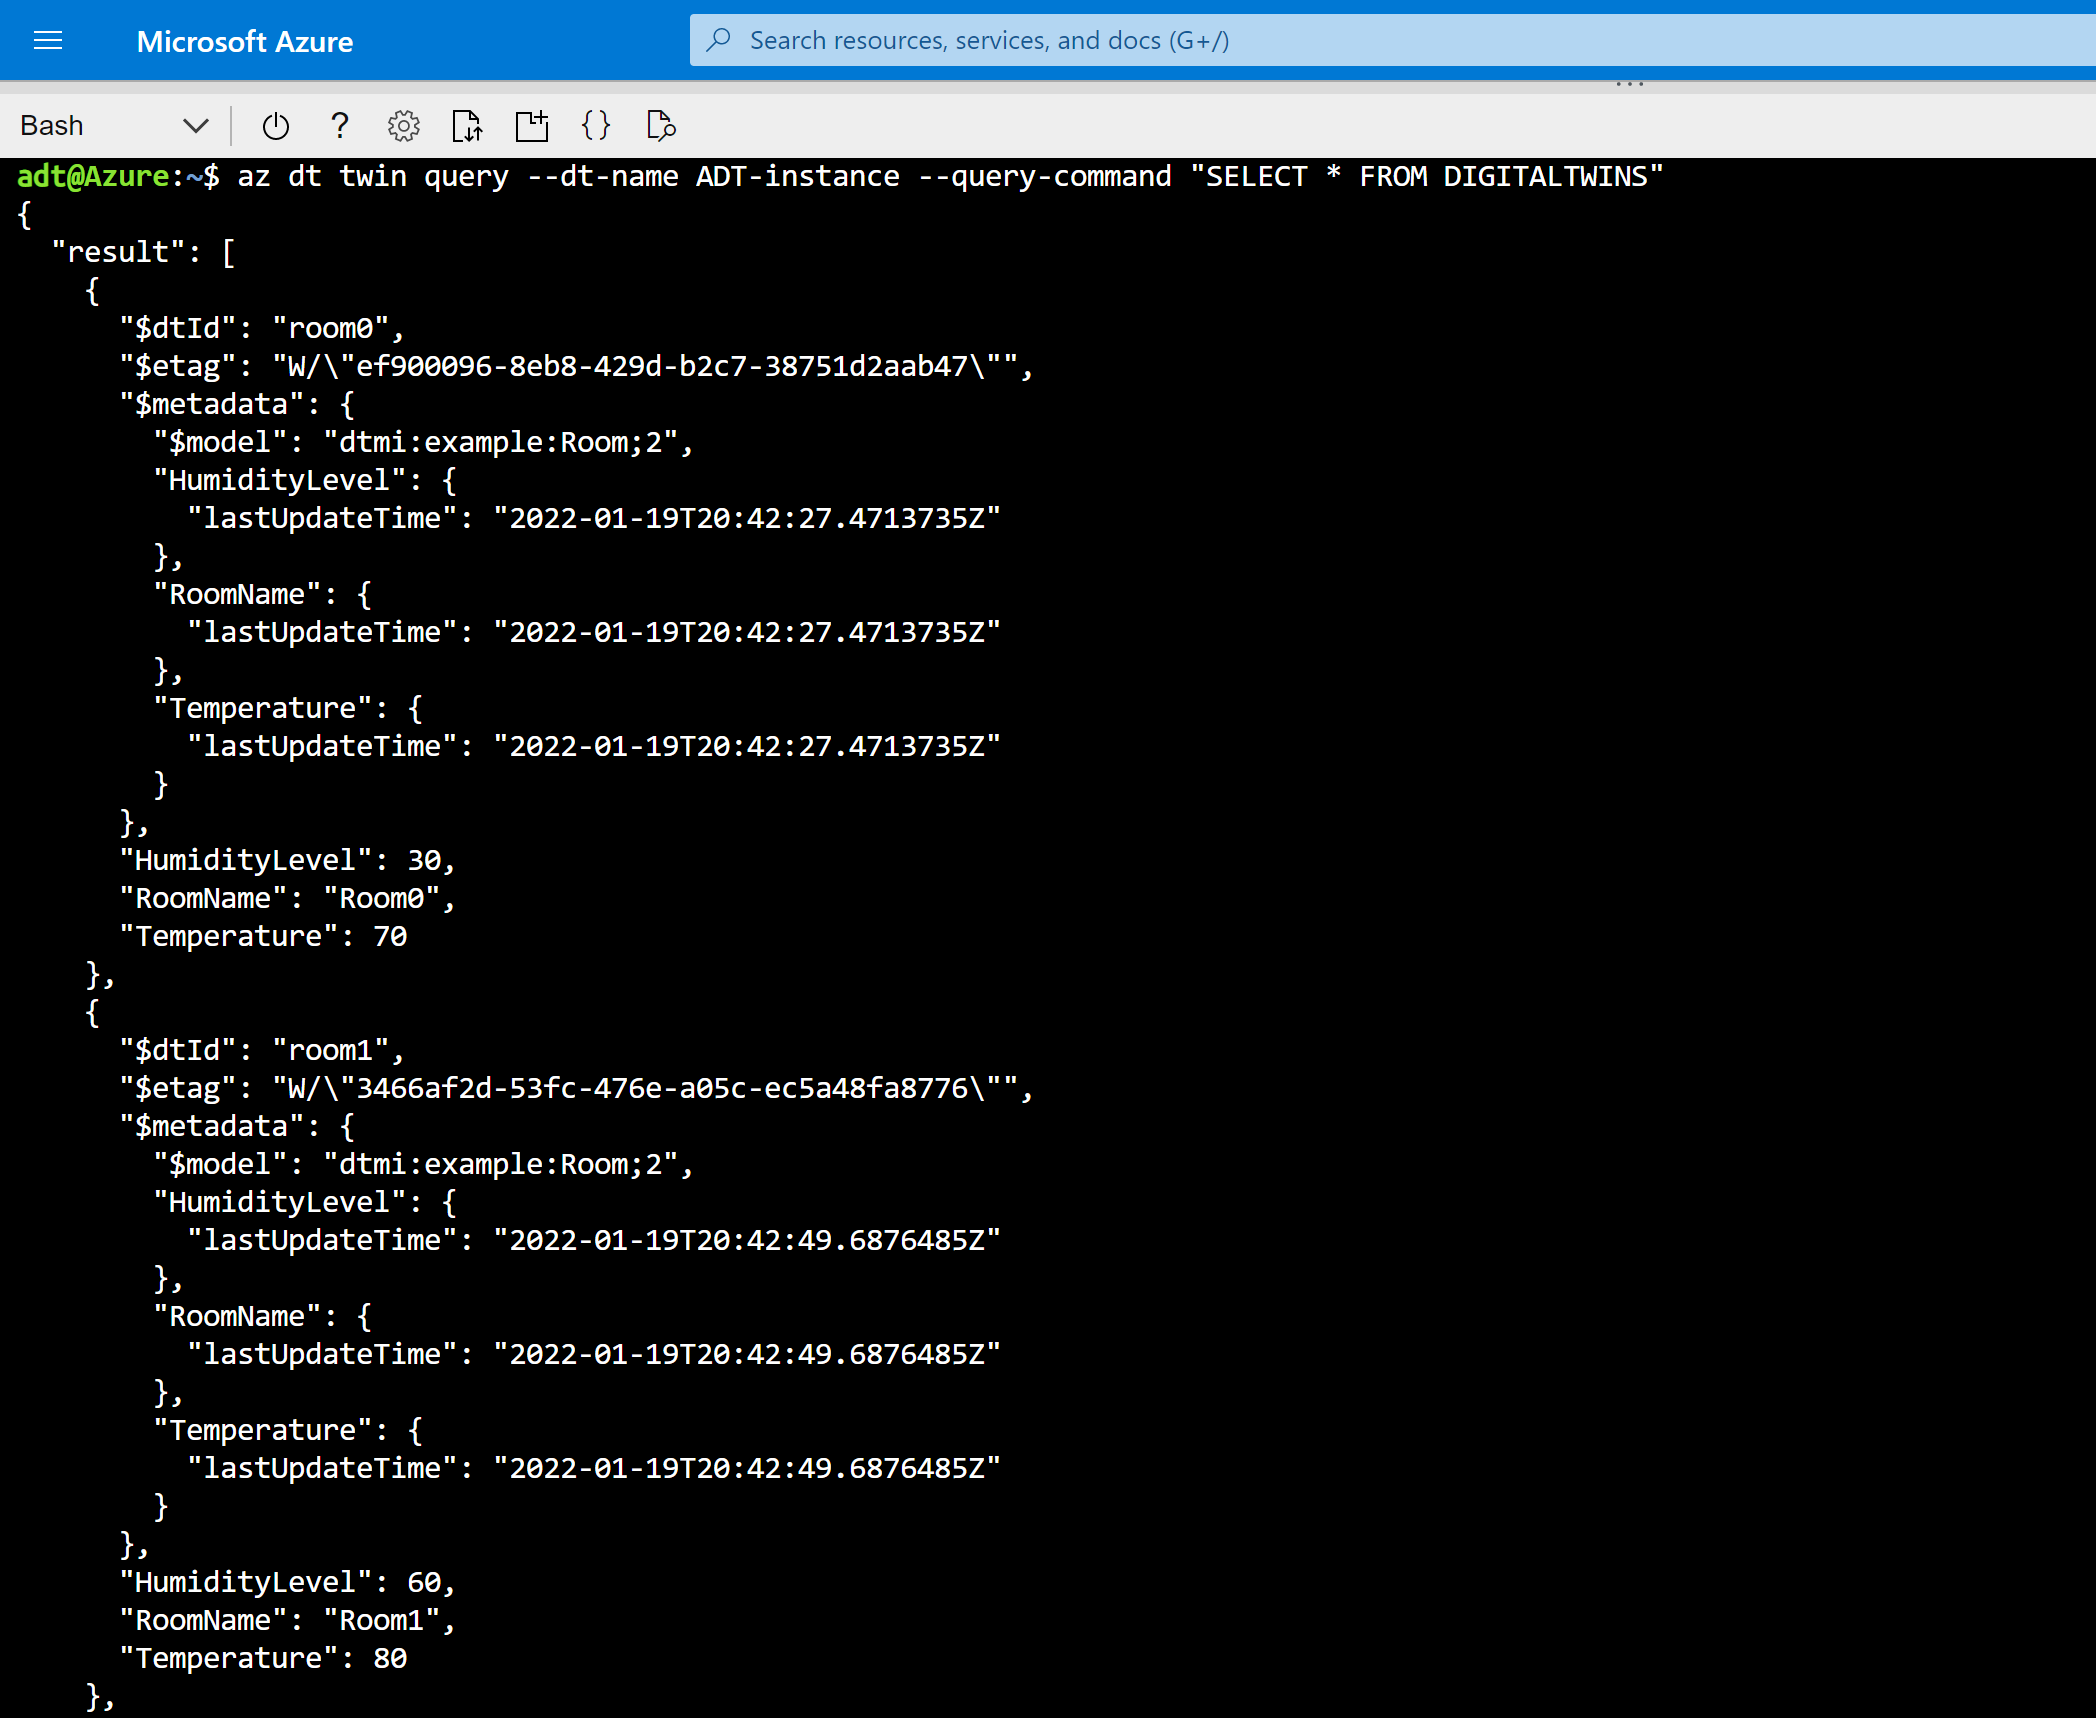
You can verify that the twins were created with the az dt twin query command as shown below. The query shown finds all the digital twins in your Azure Digital Twins instance. There's one placeholder for the instance's host name (you can also use the instance's friendly name with a slight decrease in performance).
az dt twin query --dt-name <Azure-Digital-Twins-instance-hostname-or-name> --query-command "SELECT * FROM DIGITALTWINS"Look for the room0, room1, floor0, and floor1 twins in the results. Here's an excerpt showing part of the result of this query.

Note
After making a change to the data in your graph, there may be a latency of up to 10 seconds before the changes will be reflected in queries.
The DigitalTwins API reflects changes immediately, so if you need an instant response, use an API request (DigitalTwins GetById) or an SDK call (GetDigitalTwin) to get twin data instead of a query.
Modify a digital twin
You can also modify the properties of a twin you've created.
Run the following az dt twin update command to change room0's RoomName from Room0 to PresidentialSuite. There's one placeholder for the instance's host name (you can also use the instance's friendly name with a slight decrease in performance).
az dt twin update --dt-name <Azure-Digital-Twins-instance-hostname-or-name> --twin-id room0 --json-patch '{"op":"add", "path":"/RoomName", "value": "PresidentialSuite"}'Note
It's recommended to use the CLI in the Bash environment for this tutorial. If you're using the PowerShell environment, you may need to escape the quotation mark characters in order for the
--json-patchJSON value to be parsed correctly.The output from this command will show the twin's current information, and you should see the new value for the
RoomNamein the result.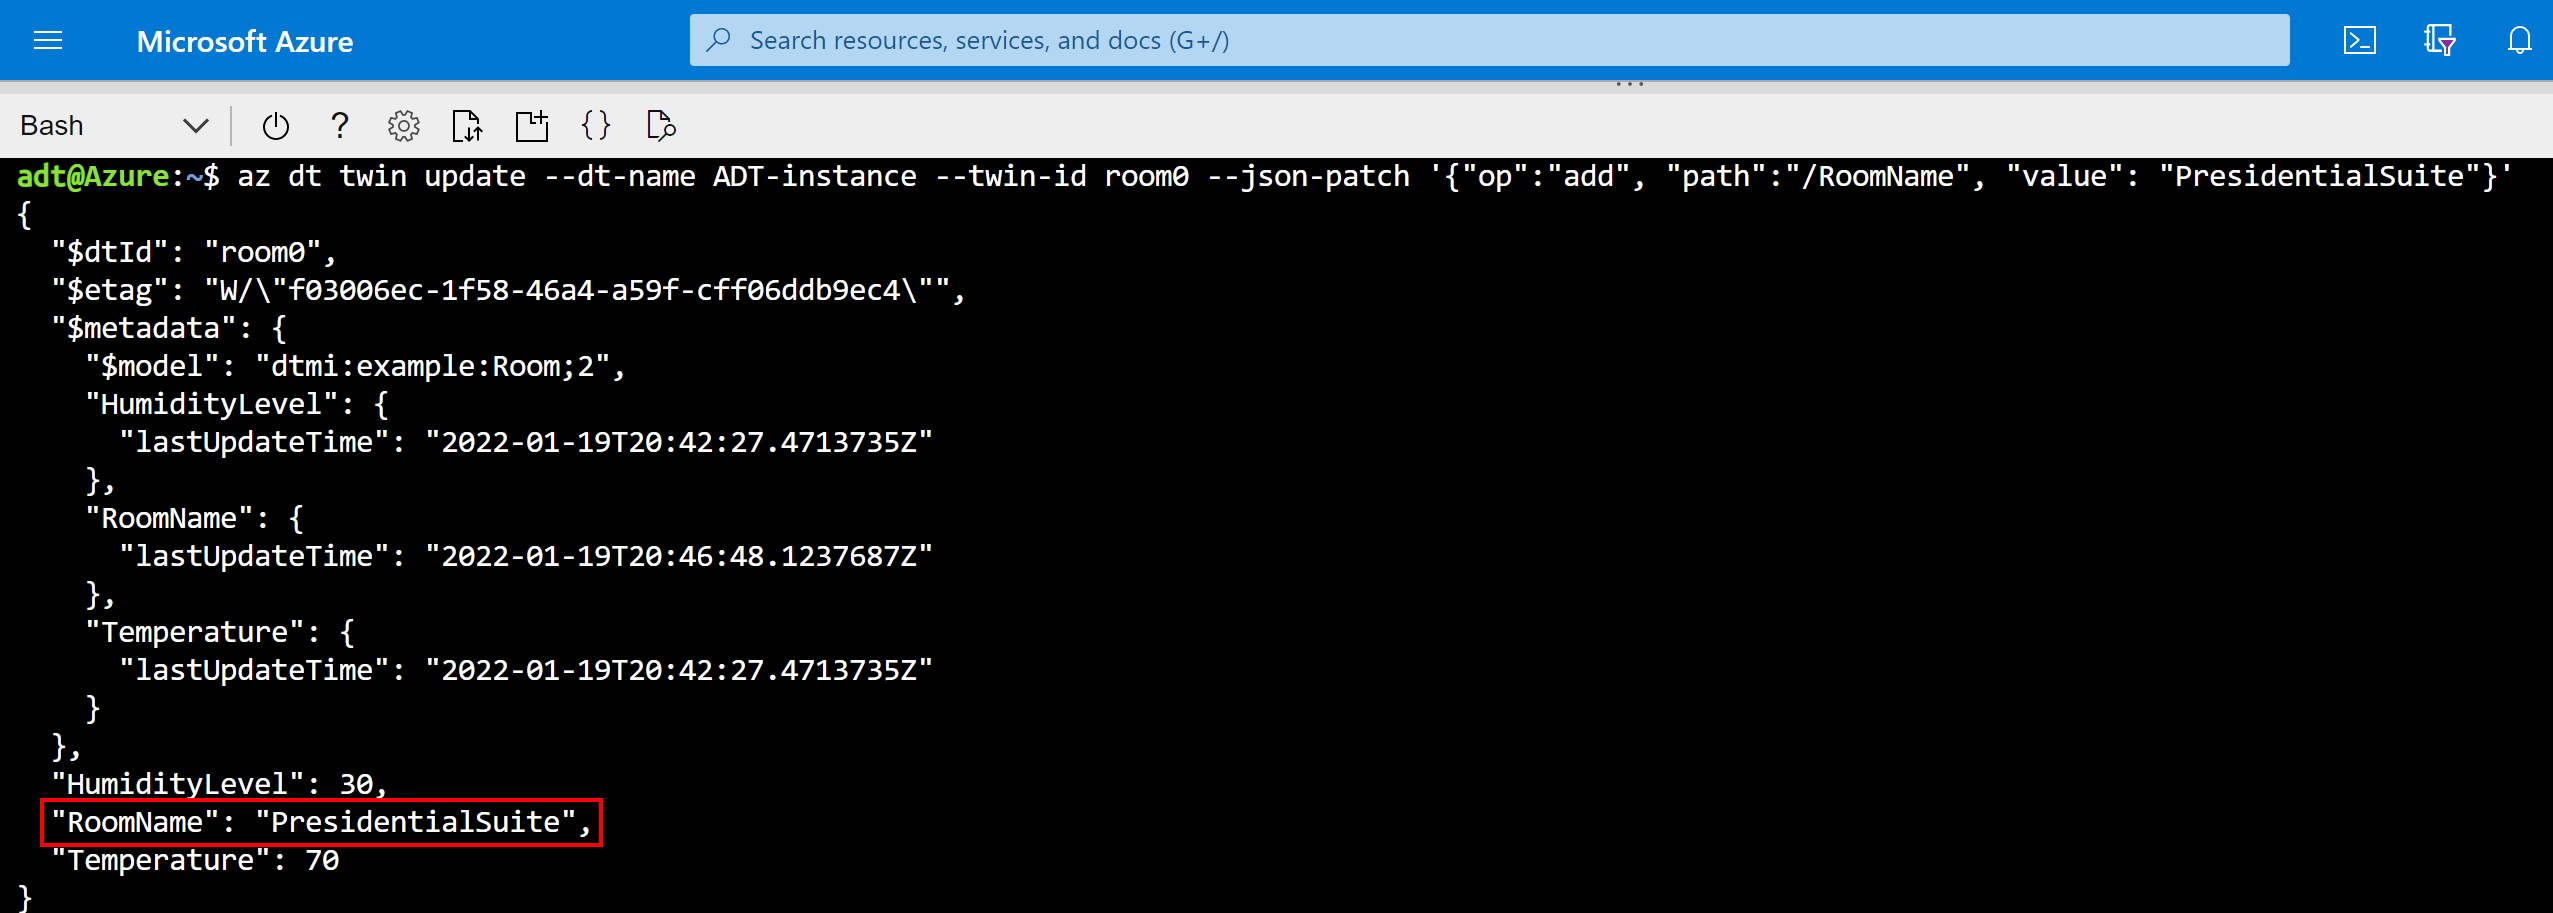
You can verify the update succeeded by running the az dt twin show command to see room0's information. There's one placeholder for the instance's host name (you can also use the instance's friendly name with a slight decrease in performance).
az dt twin show --dt-name <Azure-Digital-Twins-instance-hostname-or-name> --twin-id room0The output should reflect the updated name.

Create a graph by adding relationships
Next, you can create some relationships between these twins, to connect them into a twin graph. Twin graphs are used to represent an entire environment.
The types of relationships that you can create from one twin to another are defined within the models that you uploaded earlier. The model definition for Floor specifies that floors can have a type of relationship called contains. Since the model definition specifies this relationship, it's possible to create a contains-type relationship from each Floor twin to the corresponding room that it contains.
To add a relationship, use the az dt twin relationship create command. Specify the twin that the relationship is coming from, the type of relationship, and the twin that the relationship is connecting to. Lastly, give the relationship a unique ID. If a relationship was defined to have properties, you can initialize the relationship properties in this command as well.
Run the following code to add a
contains-type relationship from each of the Floor twins you created earlier to the corresponding Room twin. The relationships are named relationship0 and relationship1. There's one placeholder for the instance's host name (you can also use the instance's friendly name with a slight decrease in performance).az dt twin relationship create --dt-name <Azure-Digital-Twins-instance-hostname-or-name> --relationship-id relationship0 --relationship contains --twin-id floor0 --target room0 az dt twin relationship create --dt-name <Azure-Digital-Twins-instance-hostname-or-name> --relationship-id relationship1 --relationship contains --twin-id floor1 --target room1Tip
The
containsrelationship in the Floor model was also defined with two properties,ownershipUserandownershipDepartment, so you can also provide arguments with the initial values for these when you create the relationships. To create a relationship with these properties initialized, add the--propertiesoption to either of the above commands, like this:... --properties '{"ownershipUser":"MyUser", "ownershipDepartment":"MyDepartment"}'The output from each command will show information about the successfully created relationship.
You can verify the relationships with any of the following commands, which print the relationships in your Azure Digital Twins instance. Each command has one placeholder for the instance's host name (you can also use the instance's friendly name with a slight decrease in performance).
- To see all relationships coming off of each floor (viewing the relationships from one side):
az dt twin relationship list --dt-name <Azure-Digital-Twins-instance-hostname-or-name> --twin-id floor0 az dt twin relationship list --dt-name <Azure-Digital-Twins-instance-hostname-or-name> --twin-id floor1 - To see all relationships arriving at each room (viewing the relationship from the "other" side):
az dt twin relationship list --dt-name <Azure-Digital-Twins-instance-hostname-or-name> --twin-id room0 --incoming az dt twin relationship list --dt-name <Azure-Digital-Twins-instance-hostname-or-name> --twin-id room1 --incoming - To look for these relationships individually, by ID:
az dt twin relationship show --dt-name <Azure-Digital-Twins-instance-hostname-or-name> --twin-id floor0 --relationship-id relationship0
az dt twin relationship show --dt-name <Azure-Digital-Twins-instance-hostname-or-name> --twin-id floor1 --relationship-id relationship1
- To see all relationships coming off of each floor (viewing the relationships from one side):
The twins and relationships you have set up in this tutorial form the following conceptual graph:

Query the twin graph to answer environment questions
A main feature of Azure Digital Twins is the ability to query your twin graph easily and efficiently to answer questions about your environment. In the Azure CLI, querying is done with the az dt twin query command.
Note
After making a change to the data in your graph, there may be a latency of up to 10 seconds before the changes will be reflected in queries.
The DigitalTwins API reflects changes immediately, so if you need an instant response, use an API request (DigitalTwins GetById) or an SDK call (GetDigitalTwin) to get twin data instead of a query.
Run the following queries in the CLI to answer some questions about the sample environment. Each command has one placeholder for the instance's host name (you can also use the instance's friendly name with a slight decrease in performance).
What are all the entities from my environment represented in Azure Digital Twins? (query all)
az dt twin query --dt-name <Azure-Digital-Twins-instance-hostname-or-name> --query-command "SELECT * FROM DIGITALTWINS"This query allows you to take stock of your environment at a glance, and make sure everything is represented as you want it to be within Azure Digital Twins. The result of this query is an output containing each digital twin with its details. Here's an excerpt:
Tip
You may recognize that this is the same command you used in the Create digital twins section earlier to find all the Azure Digital Twins in the instance.
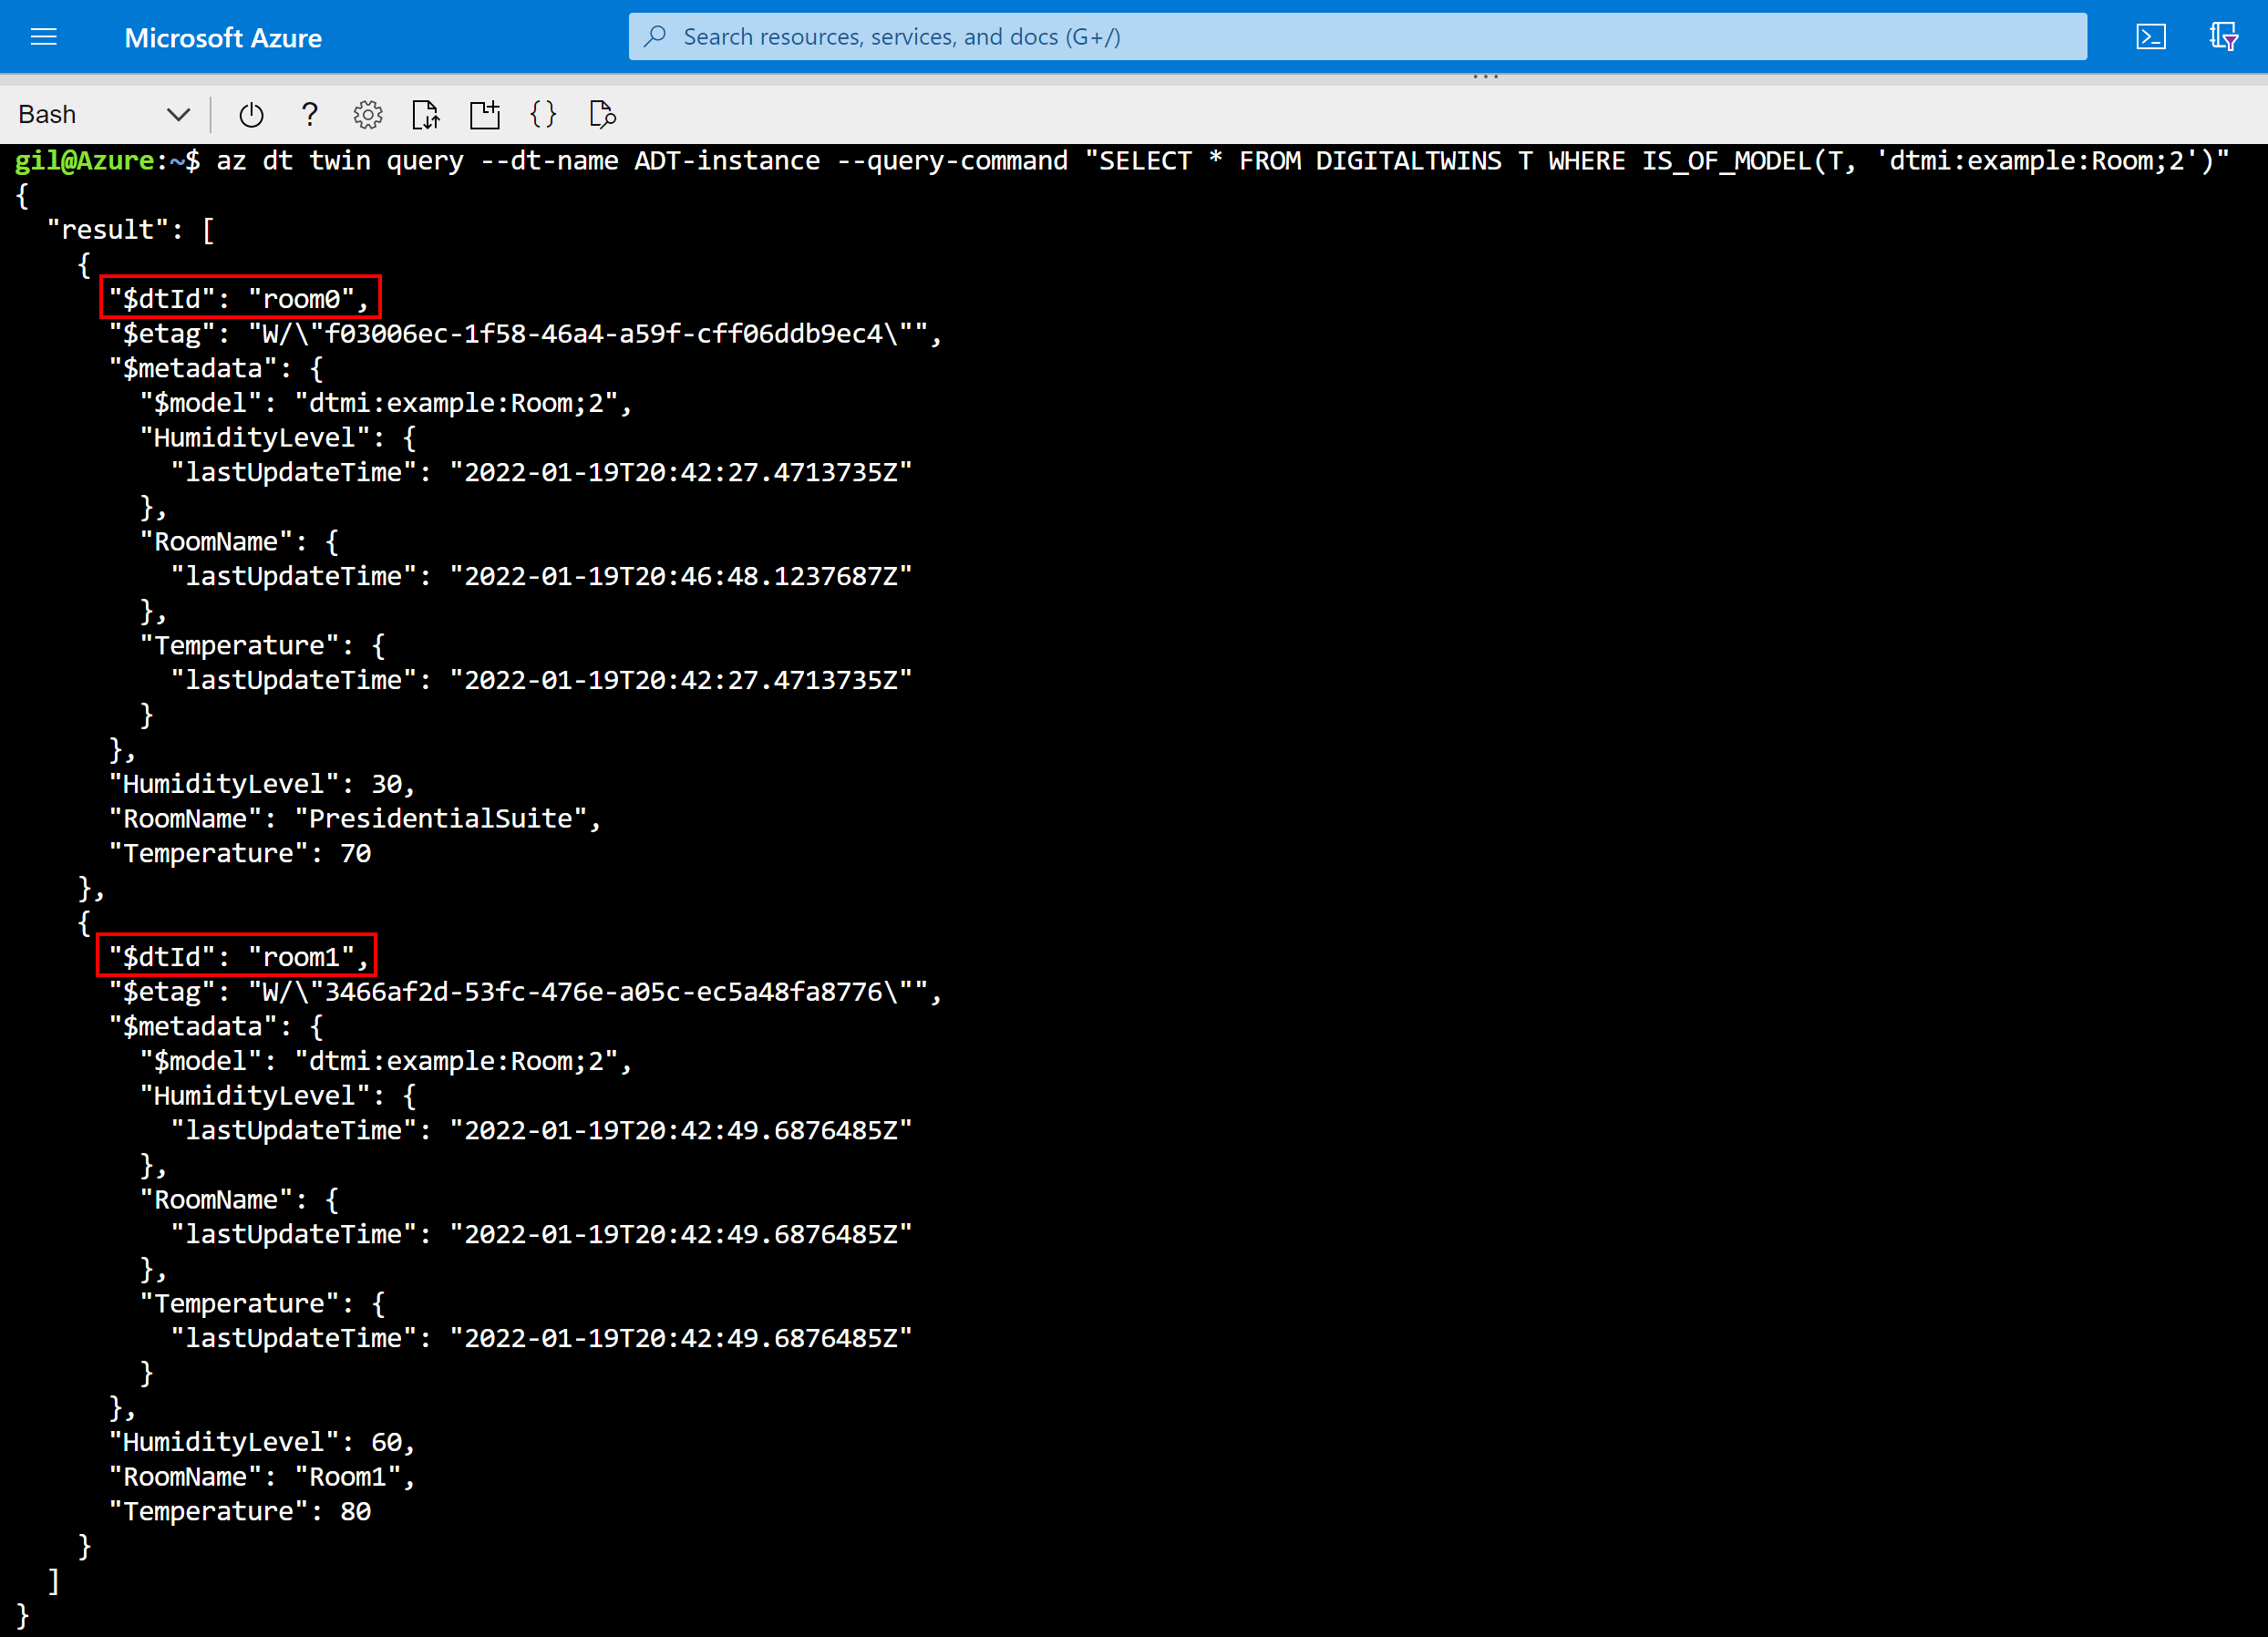
What are all the rooms in my environment? (query by model)
az dt twin query --dt-name <Azure-Digital-Twins-instance-hostname-or-name> --query-command "SELECT * FROM DIGITALTWINS T WHERE IS_OF_MODEL(T, 'dtmi:example:Room;2')"You can restrict your query to twins of a certain type, to get more specific information about what's represented. The result of this shows room0 and room1, but doesn't show floor0 or floor1 (since they're floors, not rooms).
What are all the rooms on floor0? (query by relationship)
az dt twin query --dt-name <Azure-Digital-Twins-instance-hostname-or-name> --query-command "SELECT room FROM DIGITALTWINS floor JOIN room RELATED floor.contains where floor.\$dtId = 'floor0'"You can query based on relationships in your graph, to get information about how twins are connected or to restrict your query to a certain area. This query also illustrates that a twin's ID (like floor0 in the query above) is queried using the metadata field
$dtId. Only room0 is on floor0, so it's the only room in the result for this query.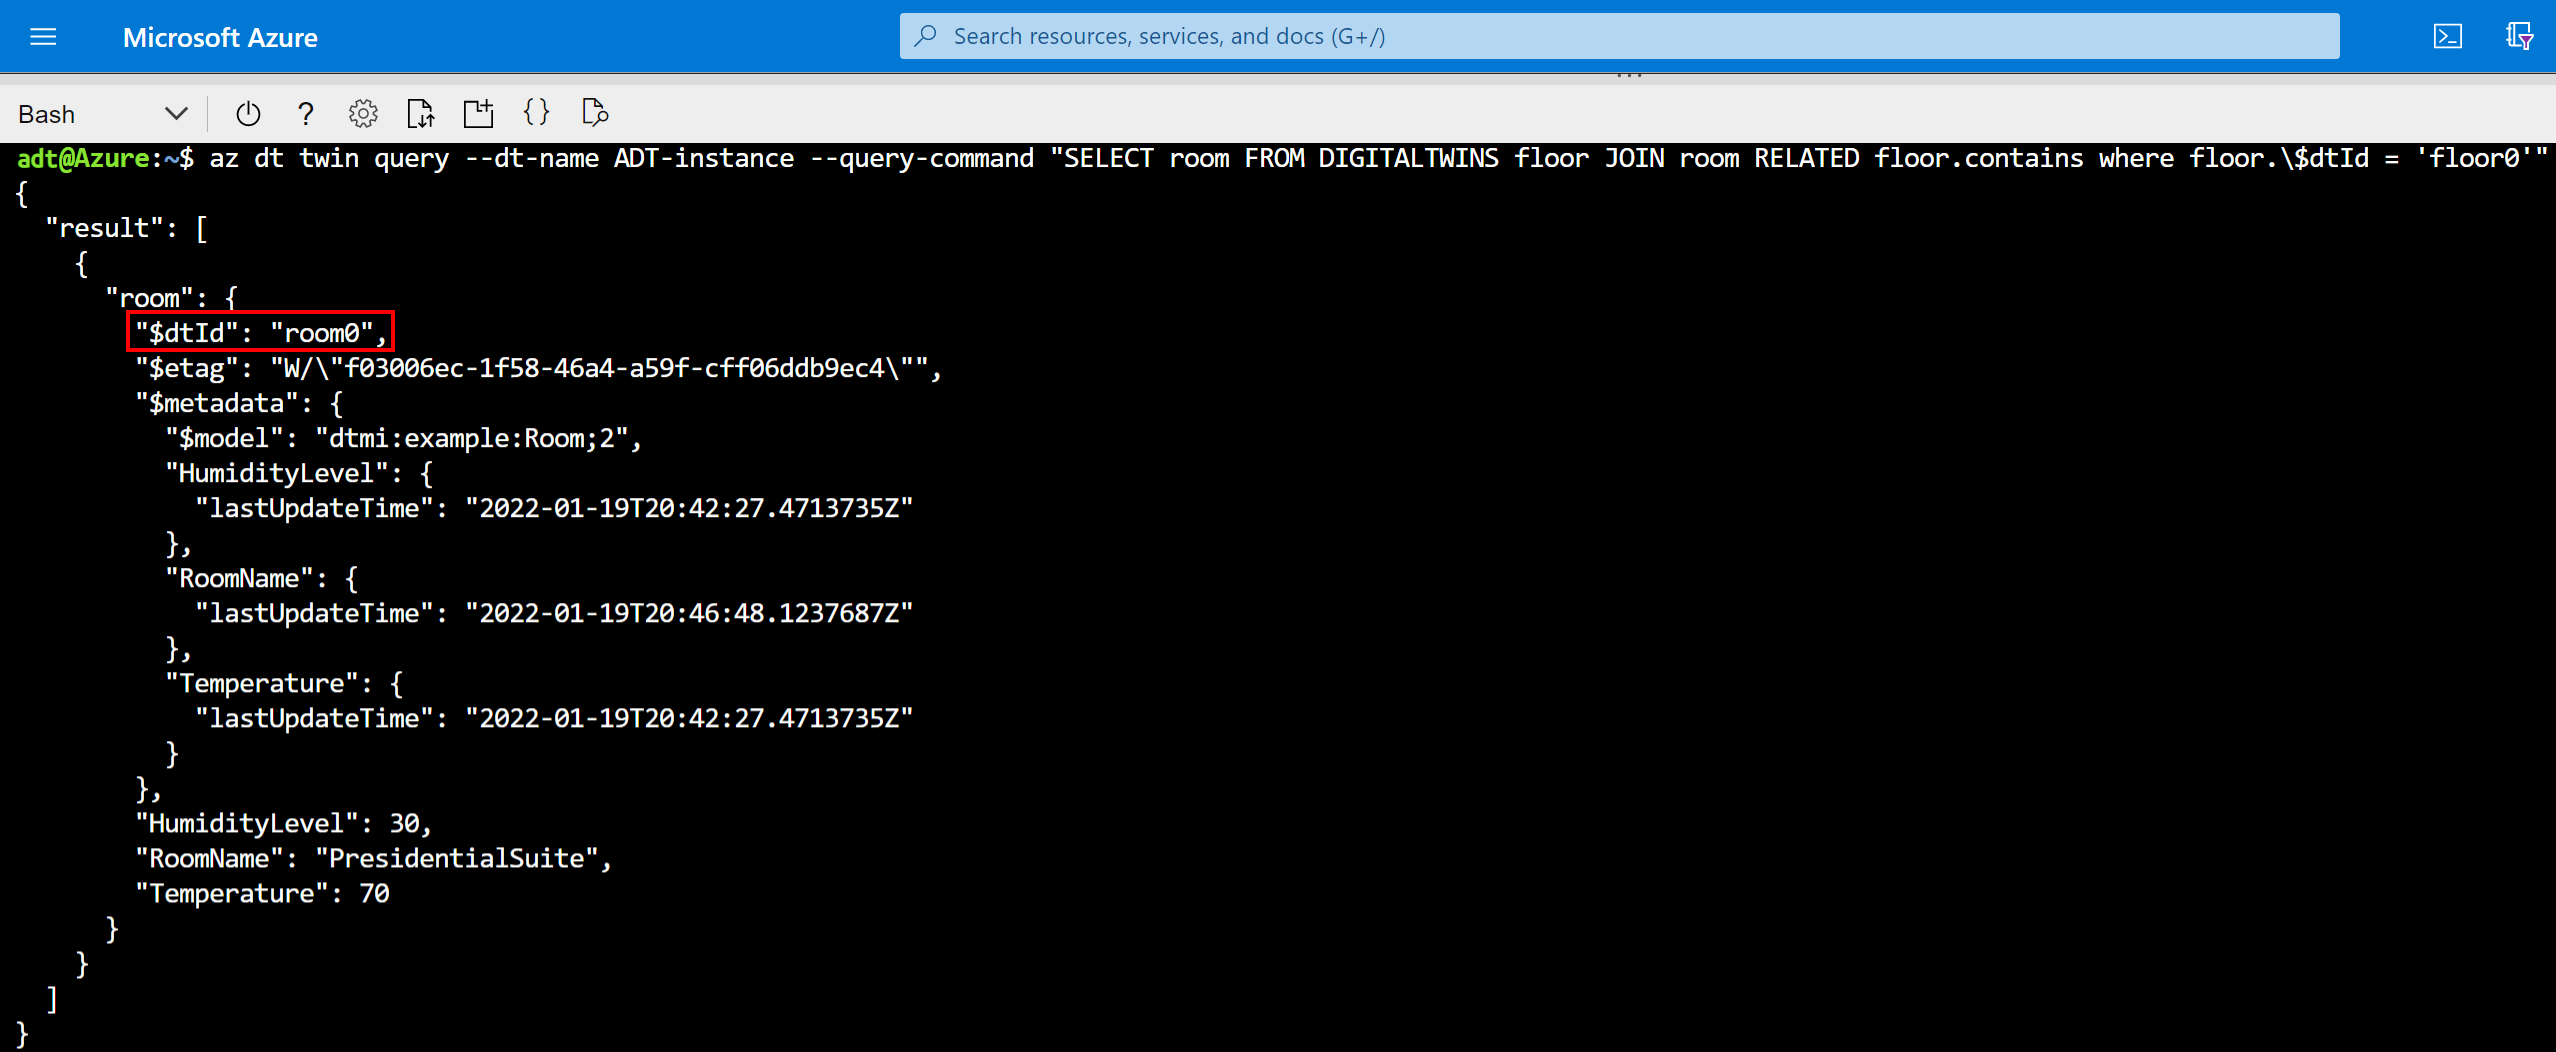
Note
When using Cloud Shell to run a query with metadata fields like this one that begin with
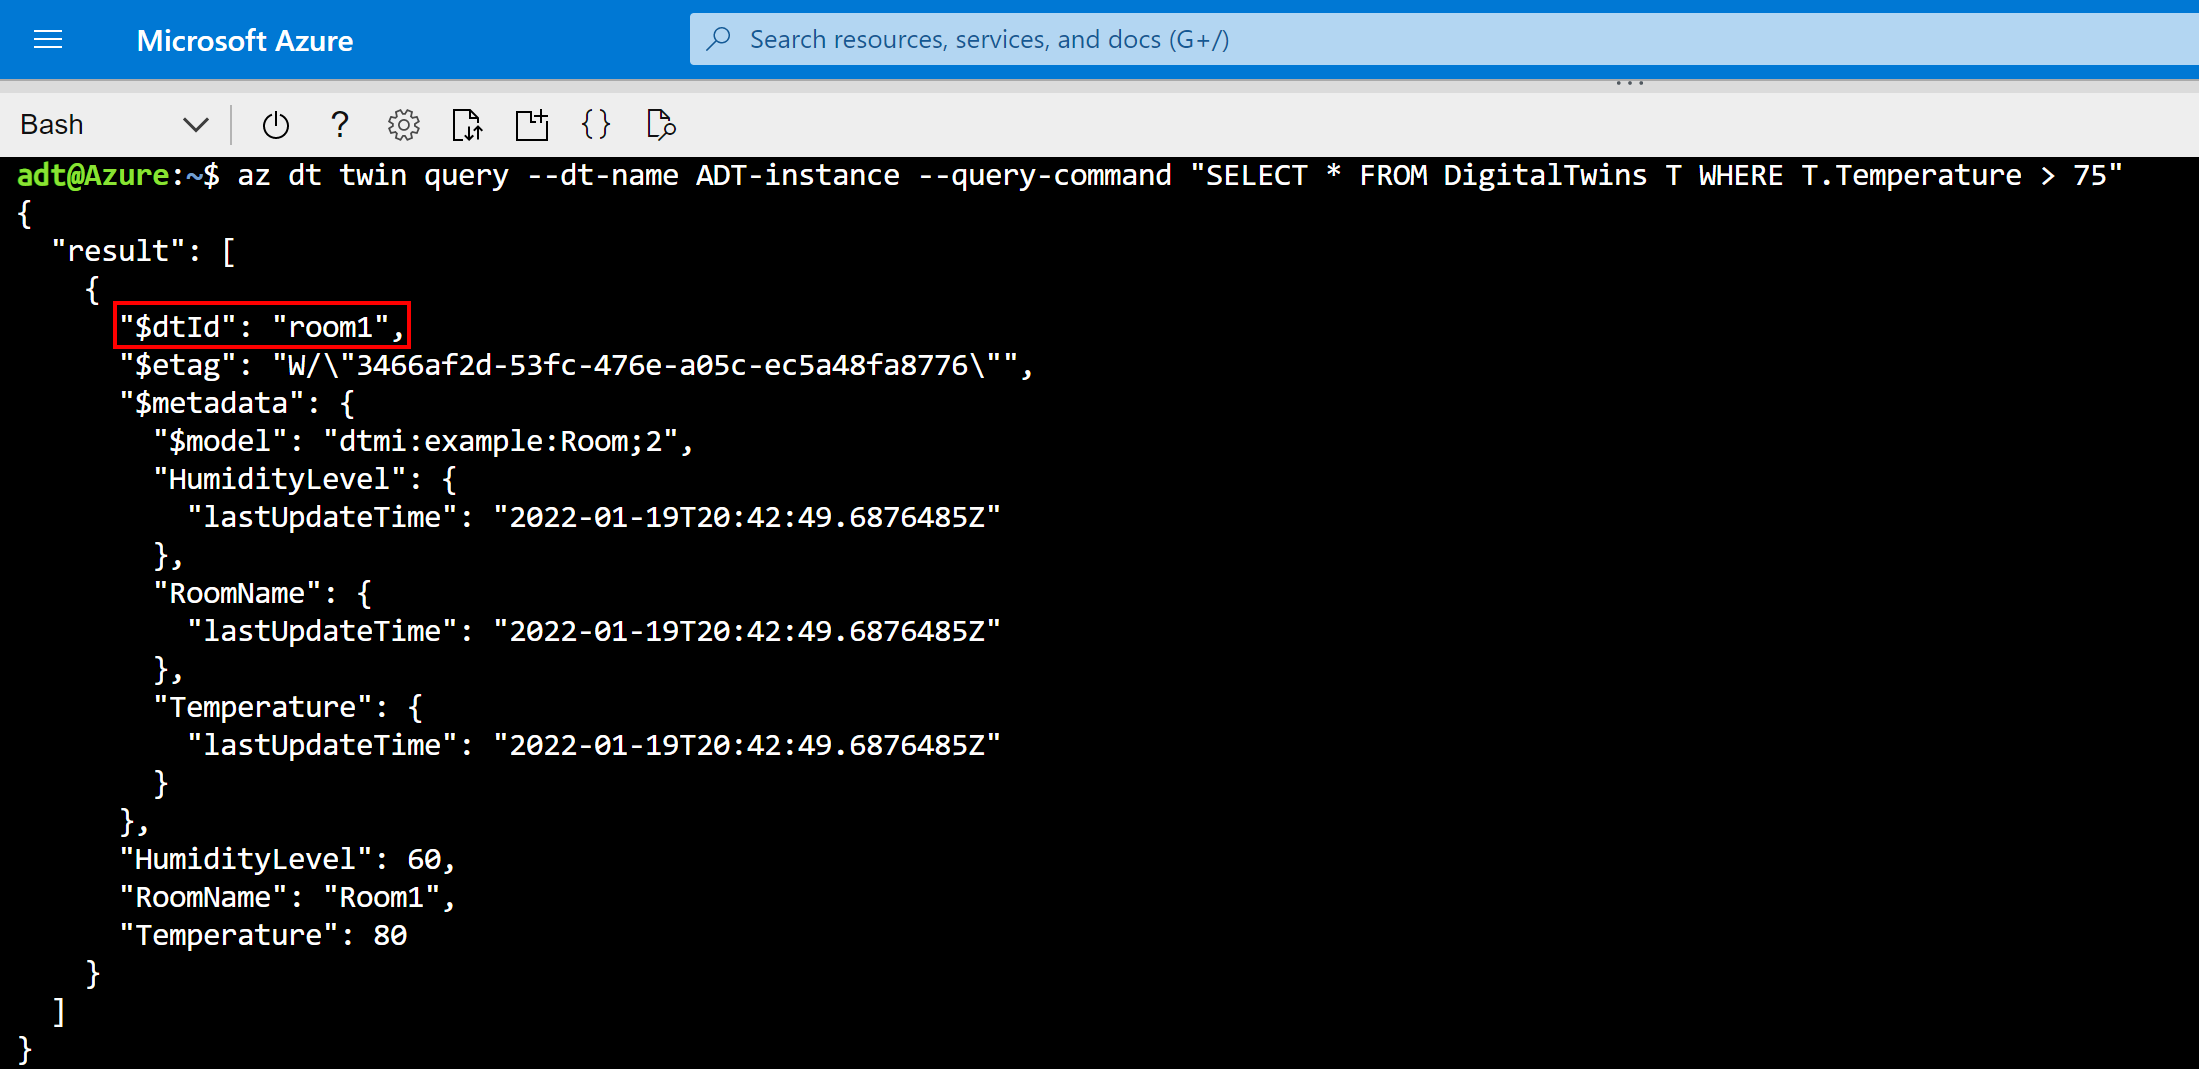
$, you should escape the$with a backslash to let Cloud Shell know it's not a variable and should be consumed as a literal in the query text. This is reflected in the screenshot above.What are all the twins in my environment with a temperature above 75? (query by property)
az dt twin query --dt-name <Azure-Digital-Twins-instance-hostname-or-name> --query-command "SELECT * FROM DigitalTwins T WHERE T.Temperature > 75"You can query the graph based on properties to answer different kinds of questions, including finding outliers in your environment that might need attention. Other comparison operators (<,>, =, or !=) are also supported. room1 shows up in the results here, because it has a temperature of 80.
What are all the rooms on floor0 with a temperature above 75? (compound query)
az dt twin query --dt-name <Azure-Digital-Twins-instance-hostname-or-name> --query-command "SELECT room FROM DIGITALTWINS floor JOIN room RELATED floor.contains where floor.\$dtId = 'floor0' AND IS_OF_MODEL(room, 'dtmi:example:Room;2') AND room.Temperature > 75"You can also combine the earlier queries like you would in SQL, using combination operators such as
AND,OR,NOT. This query usesANDto make the previous query about twin temperatures more specific. The result now only includes rooms with temperatures above 75 that are on floor0—which in this case, is none of them. The result set is empty.


Clean up resources
After completing this tutorial, you can choose which resources you want to remove, depending on what you want to do next.
- If you plan to continue to the next tutorial, you can keep the resources you set up here and reuse the Azure Digital Twins instance without clearing anything in between.
If you want to continue using the Azure Digital Twins instance from this article, but clear out all of its models, twins, and relationships, run the following az dt job deletion CLI command:
az dt job deletion create -n <name-of-Azure-Digital-Twins-instance> -yIf you only want to delete some of these elements, you can use the az dt twin relationship delete, az dt twin delete, and az dt model delete commands to selectively delete only the elements you want to remove.
If you do not need any of the resources you created in this tutorial, you can delete the Azure Digital Twins instance and all other resources from this article with the az group delete CLI command. This deletes all Azure resources in a resource group, as well as the resource group itself.
Important
Deleting a resource group is irreversible. The resource group and all the resources contained in it are permanently deleted. Make sure that you don't accidentally delete the wrong resource group or resources.
Open Azure Cloud Shell or a local CLI window, and run the following command to delete the resource group and everything it contains.
az group delete --name <your-resource-group>
You may also want to delete the model files you created on your local machine.
Next steps
In this tutorial, you got started with Azure Digital Twins by building a graph in your instance using the Azure CLI. You created models, digital twins, and relationships to form a graph. You also ran some queries on the graph, to get an idea of what kinds of questions Azure Digital Twins can answer about an environment.
Continue to the next tutorial to combine Azure Digital Twins with other Azure services to complete a data-driven, end-to-end scenario:
Feedback
Coming soon: Throughout 2024 we will be phasing out GitHub Issues as the feedback mechanism for content and replacing it with a new feedback system. For more information see: https://aka.ms/ContentUserFeedback.
Submit and view feedback for