Note
Access to this page requires authorization. You can try signing in or changing directories.
Access to this page requires authorization. You can try changing directories.
Install an application via Virtual Machine service catalog template.
The application installation scripting supports the following scenarios:
- The most common use case for the RemoteApp app installation is to deploy remote applications that can be accessed from an Azure Virtual Destop.
- Install your prerequisites such as cyber security and monitoring agents.
- Script configuration changes for compliance or application setup.
Note
This sample deployment is just for demo purposes and doesn't represent all the best practices for network, systems, or applications administration.
Prerequisites
The RemoteApp template supports scripting to automate the process of installing applications and configuring the Virtual Machine. Before you can start using the RemoteApp app installation, you need to make sure you have:
- A community, enclave, workload, and at least one workload resource group and permissions to create resources inside the workload resource group.
- Enable
Advancedmaintenance mode for your enclave so you can add the Private Link resources to your enclave managed resource group. - A container (artifacts) within the storage account.
- A community endpoint to the storage account and optionally to an existing copy of AzCopy.exe.
- A copy of AzCopy.exe
- Download AzCopy.
- Upload the AzCopy installer to the storage account at the same level as your app folder.
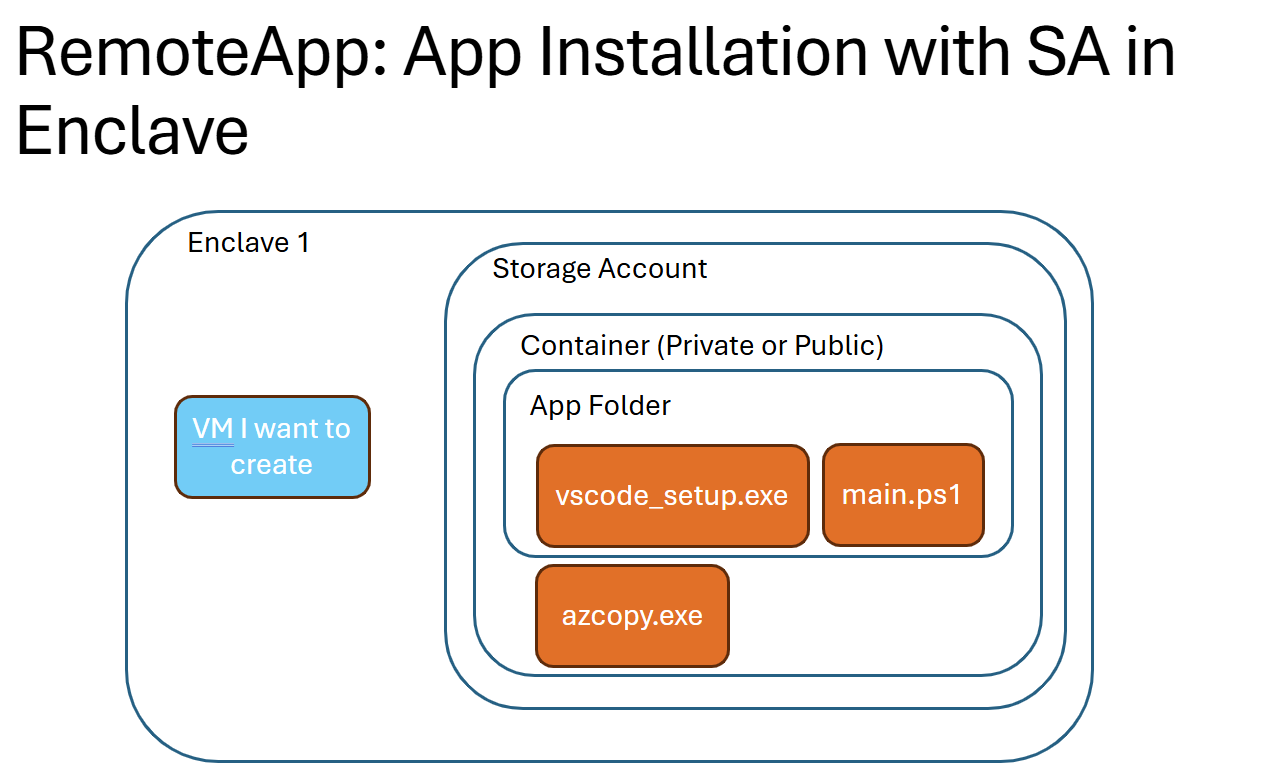
- File Structure:
    - storage account
        - artifacts container
            - app folder
            - azcopy.exe
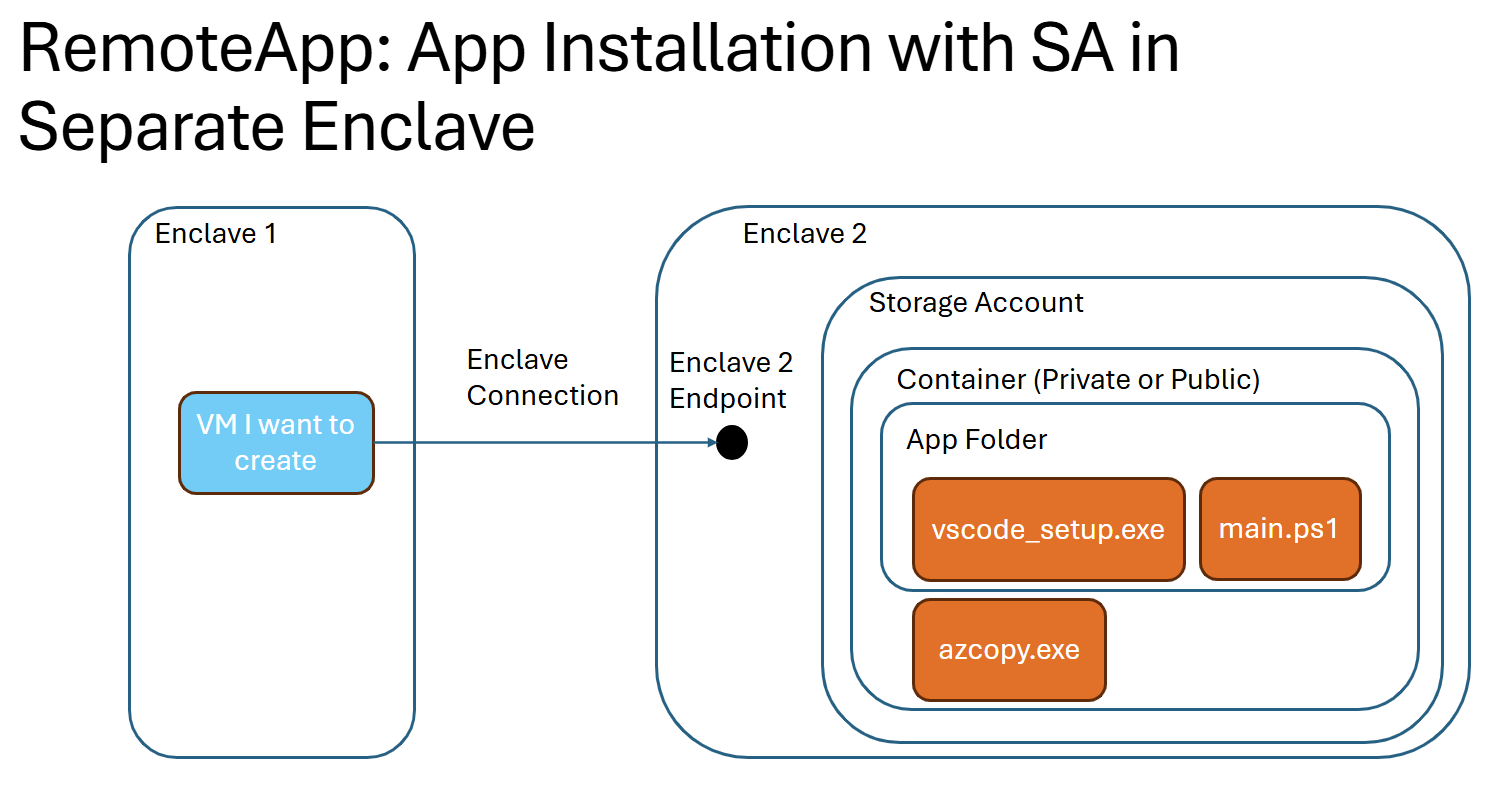
- Enclave connections between the previously made community endpoints and the enclave subnet.
Note
If the storage account is in a different enclave, create an enclave endpoint in the enclave with the storage account. Then create an enclave connection between that storage account enclave and the enclave where you're installing the application.
Azure Resources Deployed
- RemoteApp example Virtual Machine
- Disk
- Windows Virtual Machine
- Windows Virtual Machine Extension
Software Deployed
- Windows
- Application of your choice
Installation
Set up Storage Account to install Visual Studio Code
- Add app folder to container within storage account.
- File Structure:
    - artifacts container
        - app folder
            - app installer
            - main script to install app
            - (optional) additional scripts
            - (optional) azcopy.exe
- File Structure:
- Download the application installer you need. In this example download Vscode.exe and upload the installer into the storage account app folder.
- Upload the
main.ps1application installer script compatible with the version of Visual Studio Code you added to the storage account app folder:# Main powershell script that installs the application Start-Process 'C:/vscode/VSCodeSetup-x64-{version}.exe' -Argument "/VERYSILENT /MERGETASKS=!runcode"
Setup Template
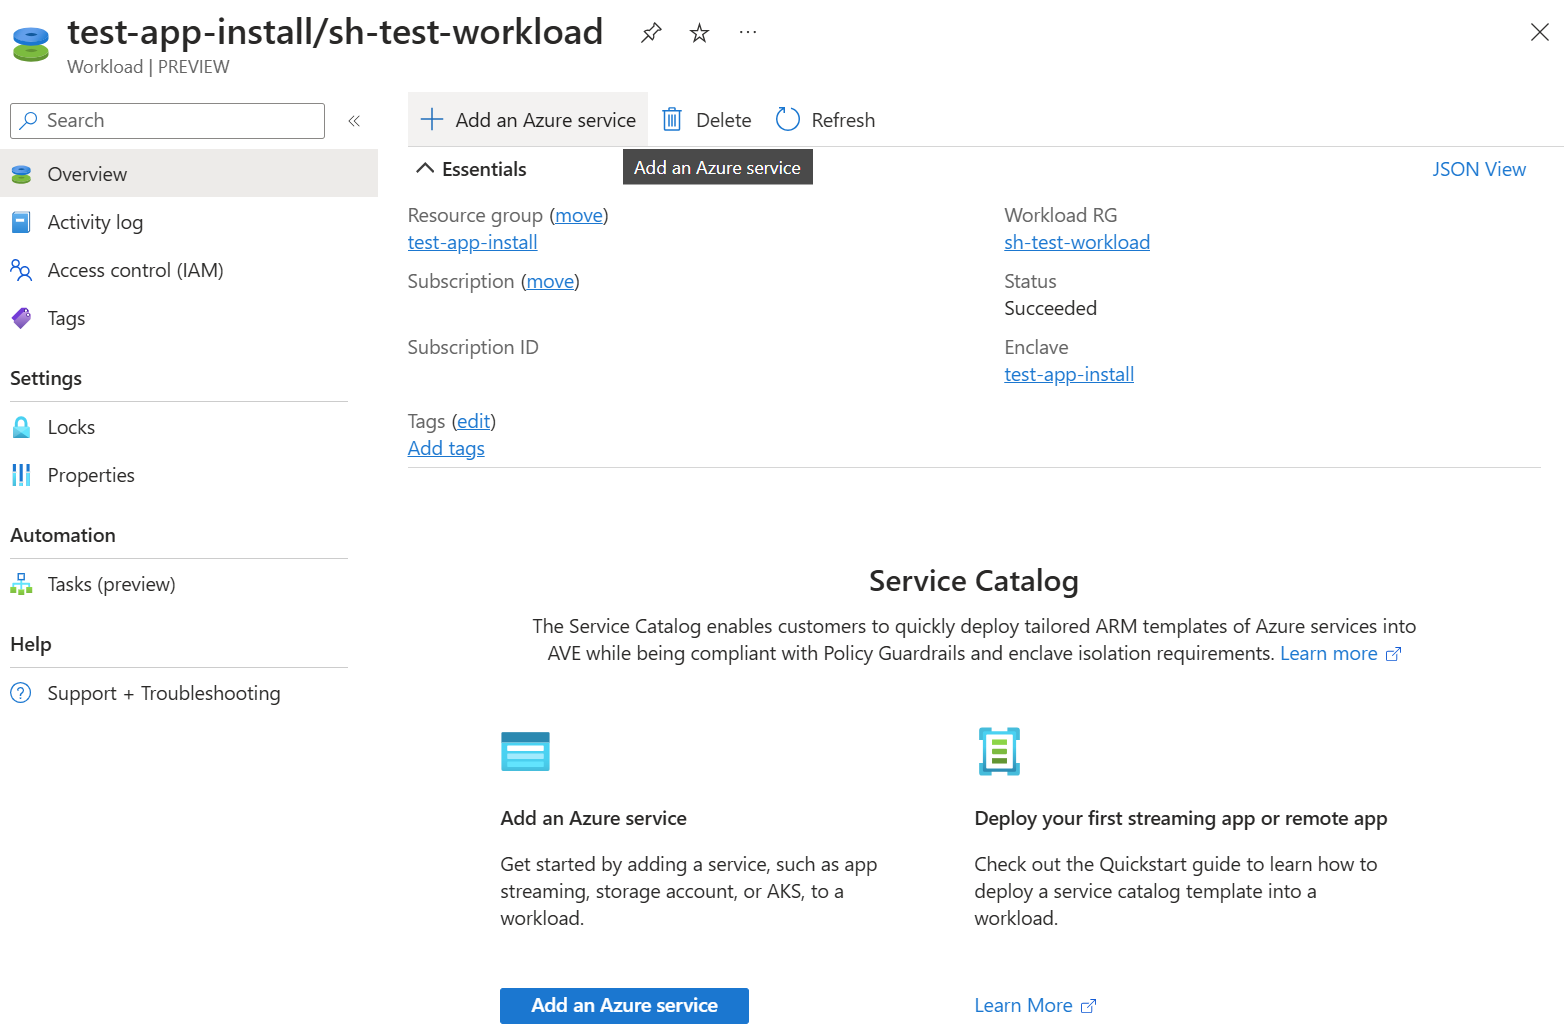
- On the workload overview page, select
+Add an Azure Service.
- For
Service, selectVirtual Machine.
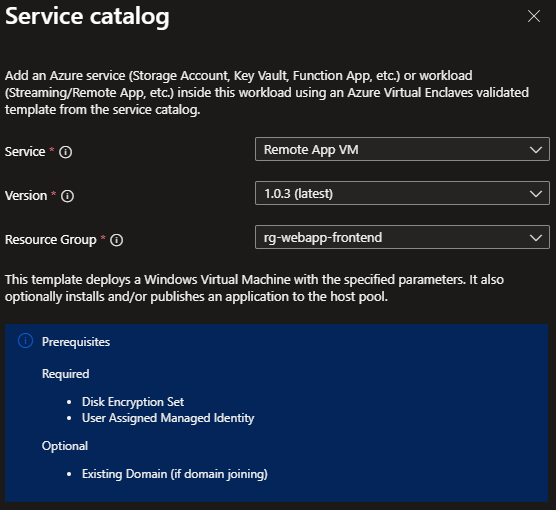
Confirm the resource group selection and select
NextBasics Tab:
- For
Virtual Machine name, input the name of the Virtual Machine. - For
Admin usernameandAdmin password, input the username and password you use to log into your Virtual Machine.
- For
App Tab:
For
App folder URI, input the URI to the container. Select an artifact within the container, copy its URI, remove everything after the folder name in the URI.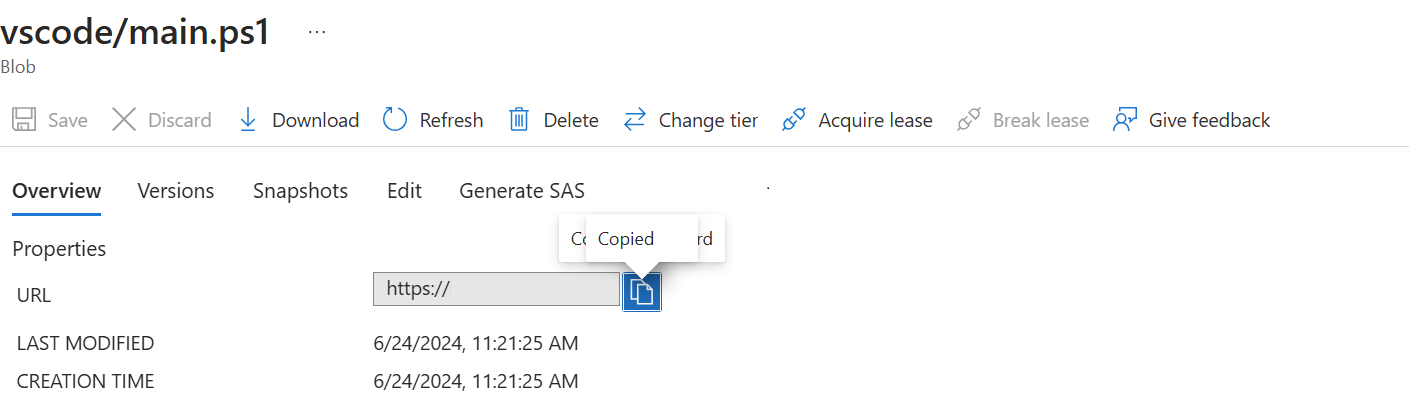
Original URI Fixed URI https:// <storage-account>.blob.core.windows.net/<container-name>/<folder-name>/<script>.ps1https:// <storage-account>.blob.core.windows.net/<container-name>/<folder-name>Example:
- storageaccountexample.blob.core.windows.net/artifacts/vscode
For
Main Scriptinput the name (ex:main.ps1) of the script that installs the application.
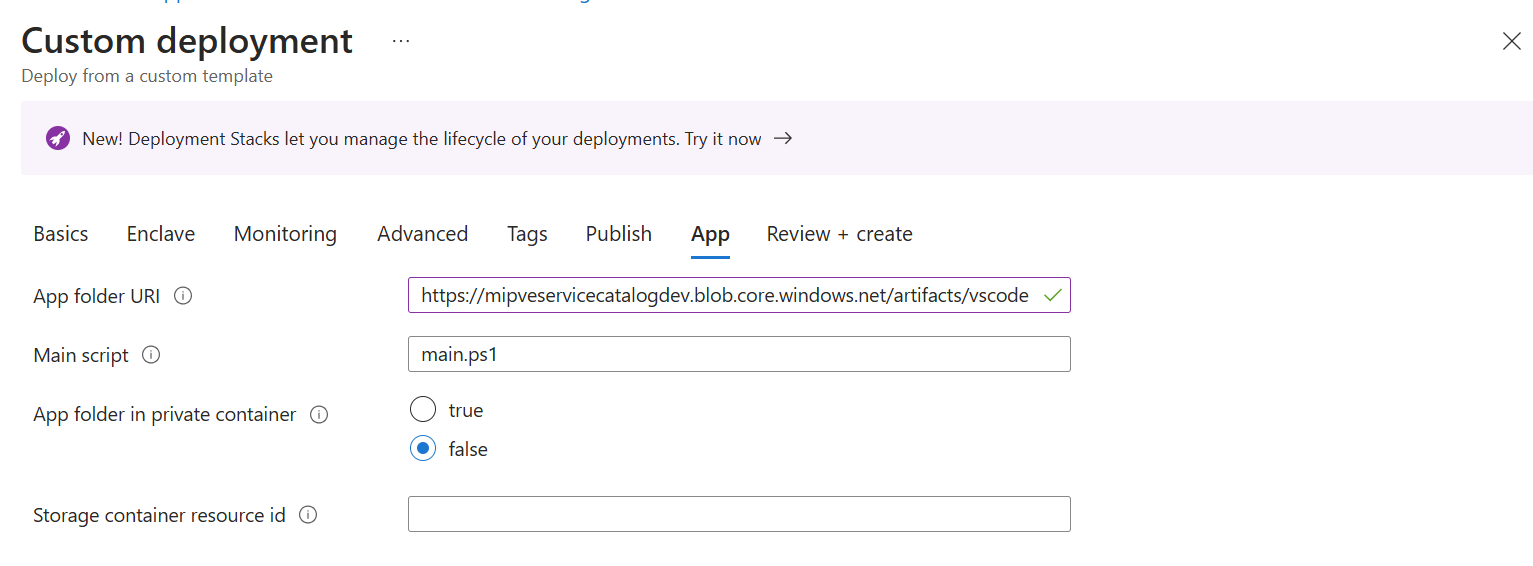
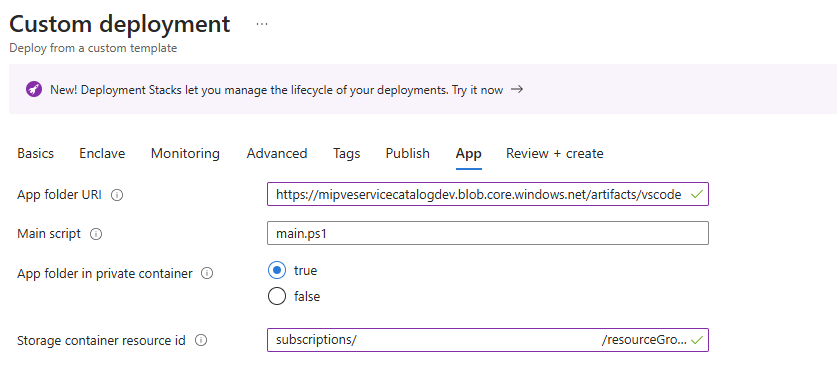
Private Container:
For
App folder in private containerselecttrueto allowreaderrole access to the storage account via the Virtual Machine.For
Storage container resource idget the following three parts:<storage-account-resource-id>+ '/blobServices/default/containers/' +<container-name>.- To get
Storage container resource id, from the storage account, select "Overview," select "JSON View" in the far right corner, copy the storage account resource ID.

- For the container name, copy the name of the private container that holds the artifacts.
- Example storage container resource ID:
subscriptions/000000a0-a0a0-000a-00a0-0000aaa0a000/resourceGroups/providers/Microsoft.Storage/storageAccounts/storage-account-example/blobServices/default/containers/container-name
- To get
If the parameter
AzCopy File URIis displayed, add the URI to the azcopy.exe from the container- Select the file, and copy its URL:

Example Private Container Parameters:
- Select
Review and Create, if validations pass, selectCreate. - Once resources are deployed, check to see if app is installed on application Virtual Machine by connecting to the Application Virtual Machine. Connect to the Application Virtual Machine
WinGet Installation
Folder Structure:
- artifacts container
    - WinGet app folder ('winget')
        - WinGet installer ('Microsoft.DesktopAppInstaller_8wekyb3d8bbwe.msixbundle')
        - Windows UI Library ('Microsoft.UI.Xaml.2.8.x64.appx')
        - main script to schedule install ('main.ps1')
        - script to install and schedule reboot('install_winget.ps1')
        - ('restart.ps1')

- Download installers and upload them to the winget folder in storage container
- WinGet
MSIXbundle (Microsoft.DesktopAppInstaller_8wekyb3d8bbwe.msixbundle) - Windows UI Library (Microsoft.UI.Xaml.2.8.x64.appx)
- WinGet
- Create and upload scripts
- main.ps1
# This script creates and runs a scheduled task to install the appx package and msix bundle with elevated privileges $installScriptPath = "C:\winget\install_winget.ps1" # Create a scheduled task action to run the installation script with elevated permissions $taskAction = New-ScheduledTaskAction -Execute 'powershell.exe' -Argument "-ExecutionPolicy Bypass -File $installScriptPath" # Set the task to start 30 seconds from now $taskTrigger = New-ScheduledTaskTrigger -Once -At (Get-Date).AddSeconds(30) $taskPrincipal = New-ScheduledTaskPrincipal -UserId "SYSTEM" -LogonType ServiceAccount -RunLevel Highest # Register the scheduled task Register-ScheduledTask -TaskName "InstallWinget" -Action $taskAction -Trigger $taskTrigger -Principal $taskPrincipal - install_winget.ps1
Set-ExecutionPolicy -Scope Process -ExecutionPolicy Bypass -Force Start-Process -FilePath "DISM.exe" -ArgumentList "/Online /Add-ProvisionedAppxPackage /PackagePath:C:\winget\Microsoft.UI.Xaml.2.8.x64.appx /SkipLicense" -NoNewWindow -Wait Start-Process -FilePath "DISM.exe" -ArgumentList "/Online /Add-ProvisionedAppxPackage /PackagePath:C:\winget\Microsoft.DesktopAppInstaller_8wekyb3d8bbwe.msixbundle /SkipLicense" -NoNewWindow -Wait $wingetDir = 'C:\Program Files\WindowsApps\Microsoft.DesktopAppInstaller_1.23.1791.0_x64__8wekyb3d8bbwe' $currentPath = [System.Environment]::GetEnvironmentVariable("Path", [System.EnvironmentVariableTarget]::Machine) [System.Environment]::SetEnvironmentVariable("Path", "$currentPath;$wingetDir", [System.EnvironmentVariableTarget]::Machine) # Schedule the reboot script $rebootScriptPath = "C:\winget\reboot.ps1" $taskAction = New-ScheduledTaskAction -Execute 'powershell.exe' -Argument "-ExecutionPolicy Bypass -File $rebootScriptPath" # Set the task to start 30 seconds from now $taskTrigger = New-ScheduledTaskTrigger -Once -At ((Get-Date).AddSeconds(30)) $taskPrincipal = New-ScheduledTaskPrincipal -UserId "SYSTEM" -LogonType ServiceAccount -RunLevel Highest # Register the scheduled task Register-ScheduledTask -TaskName "Reboot" -Action $taskAction -Trigger $taskTrigger -Principal $taskPrincipal - restart.ps1
Restart-Computer -Force
- main.ps1
- Proceed to Deploy Template