Tutorial: Perform manifest-based file ingestion
Manifest ingestion provides the capability to ingest manifests into an Azure Data Manager for Energy instance.
In this tutorial, you learn how to:
- Ingest sample manifests into an Azure Data Manager for Energy instance by using Postman.
- Search for storage metadata records created during manifest ingestion by using Postman.
Prerequisites
Before you start this tutorial, complete the following prerequisites.
Get details for the Azure Data Manager for Energy instance
You need an Azure Data Manager for Energy instance. If you don't already have one, create one by following the steps in Quickstart: Create an Azure Data Manager for Energy instance.
For this tutorial, you need the following parameters:
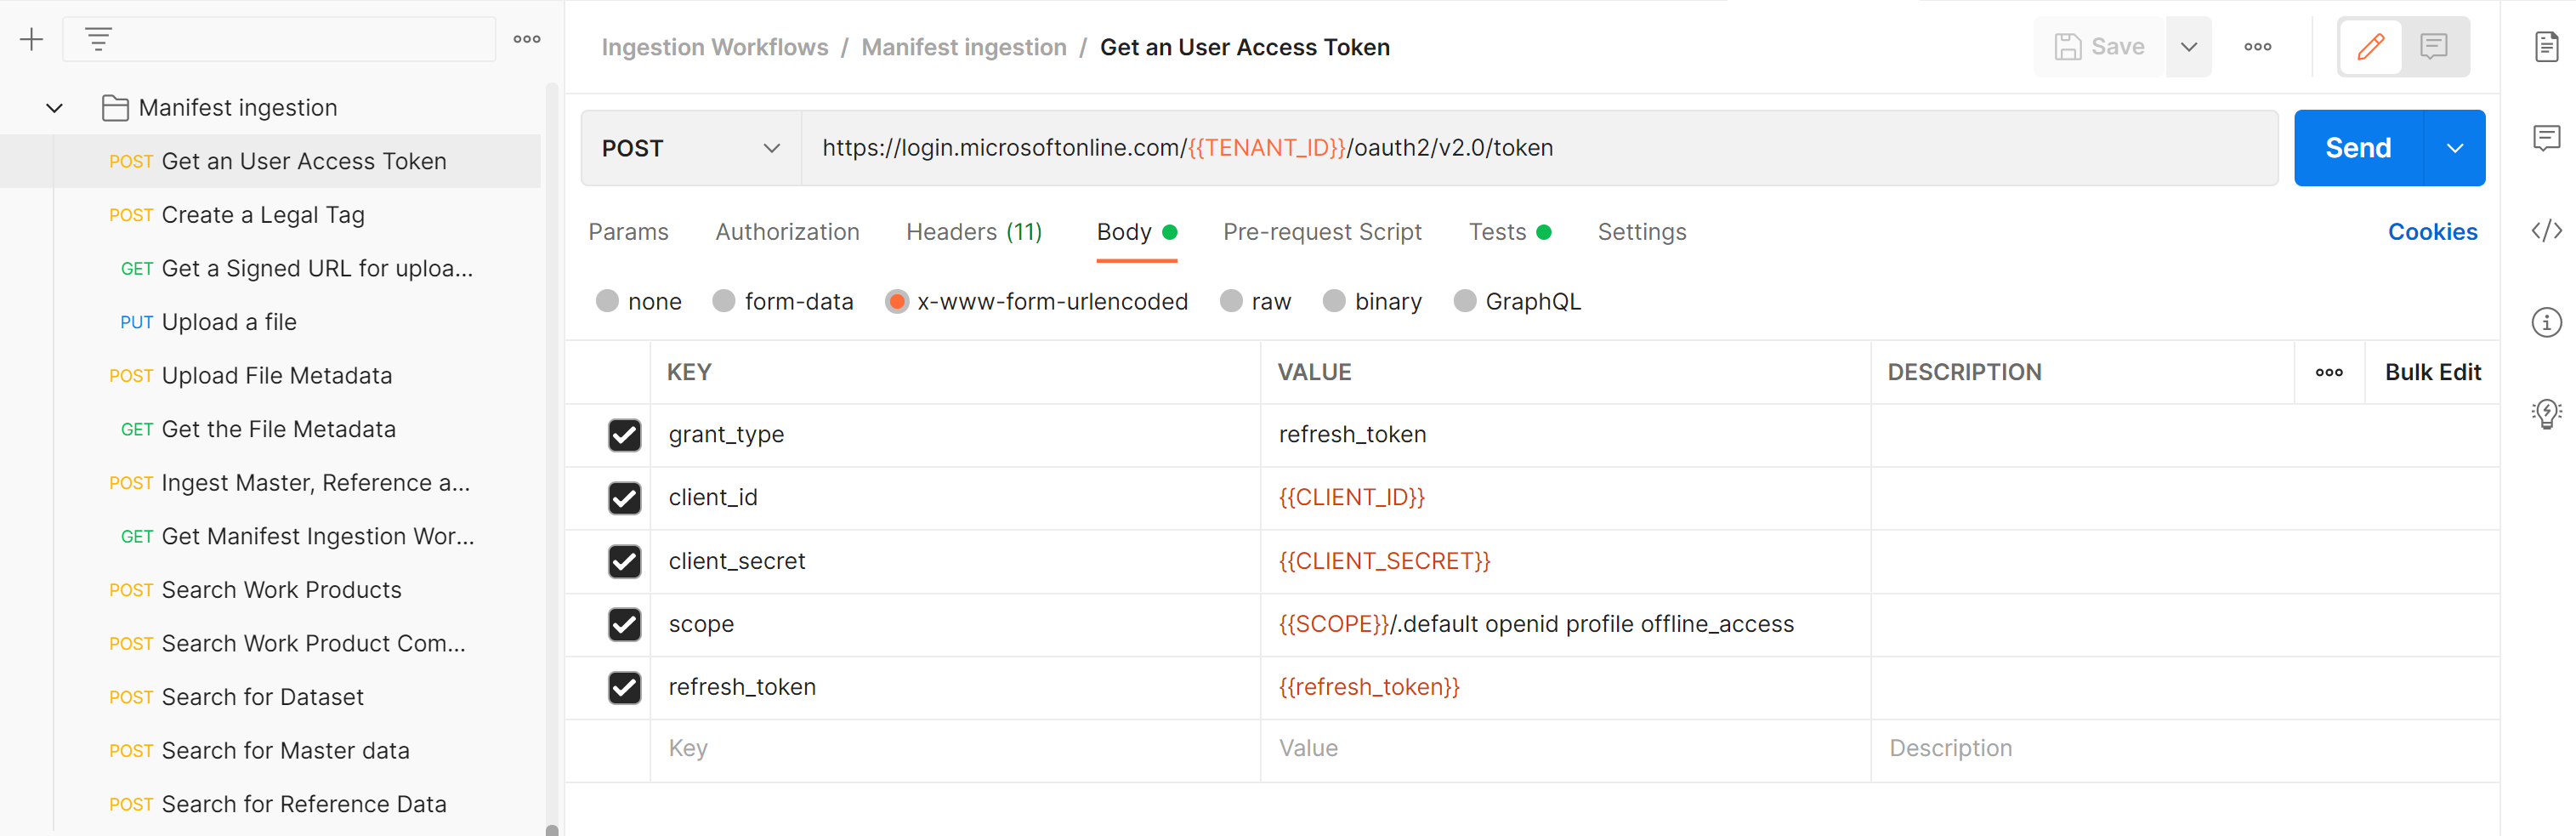
Parameter Value to use Example Where to find this value CLIENT_IDApplication (client) ID 3dbbbcc2-f28f-44b6-a5ab-xxxxxxxxxxxxYou use this app or client ID when registering the application with the Microsoft identity platform. See Register an application. CLIENT_SECRETClient secrets _fl******************Sometimes called an application password, a client secret is a string value that your app can use in place of a certificate to identity itself. See Add a client secret. TENANT_IDDirectory (tenant) ID 72f988bf-86f1-41af-91ab-xxxxxxxxxxxxHover over your account name in the Azure portal to get the directory or tenant ID. Alternately, search for and select Microsoft Entra ID > Properties > Tenant ID in the Azure portal. SCOPEApplication (client) ID 3dbbbcc2-f28f-44b6-a5ab-xxxxxxxxxxxxThis value is the same as the app or client ID mentioned earlier. refresh_tokenRefresh token value 0.ATcA01-XWHdJ0ES-qDevC6r...........Follow How to generate auth token to create a refresh token and save it. You need this refresh token later to generate a user token. DNSURI <instance>.energy.Azure.comFind this value on the overview page of the Azure Data Manager for Energy instance. data-partition-idData partitions <instance>-<data-partition-name>Find this value on the overview page of the Azure Data Manager for Energy instance.
Follow the Manage users guide to add appropriate entitlements for the user who's running this tutorial.
Set up Postman and execute requests
Download and install the Postman desktop app.
Import the following files into Postman:
To import the Postman collection and environment variables, follow the steps in Importing data into Postman.
Update CURRENT VALUE for the Postman environment with the information that you obtained in the details of the Azure Data Manager for Energy instance.
The Postman collection for manifest ingestion contains multiple requests that you must execute sequentially.
Be sure to choose Ingestion Workflow Environment before you trigger the Postman collection.
Trigger each request by selecting the Send button.
On every request, Postman validates the actual API response code against the expected response code. If there's any mismatch, the test section indicates failures.

Here's an example of a successful Postman request:

Here's an example of a failed Postman request:

Ingest sample manifests by using Postman
To ingest sample manifests into the Azure Data Manager for Energy instance by using the Postman collection, complete the following steps:
Get a User Access Token: Generate the user token, which will be used to authenticate further API calls.
Create a Legal Tag: Create a legal tag that will be added to the manifest data for data compliance purposes.
Get a Signed URL for uploading a file: Get the signed URL path to which the manifest file will be uploaded.
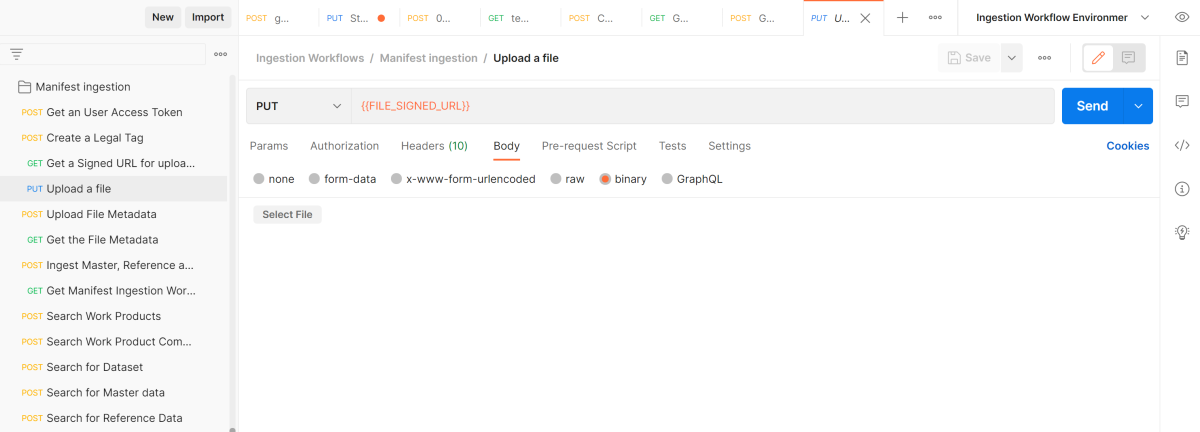
Upload a file: Download the Wellbore.csv sample to your local machine. It could be any file type, including CSV, LAS, or JSON. Select this file in Postman by clicking the Select File button.
Upload File Metadata: Upload the file metadata information, such as file location and other relevant fields.
Get the File Metadata: Call to validate if the metadata was created successfully.
Ingest Master, Reference and Work Product Component (WPC) data: Ingest the master, reference, and work product component (WPC) manifest metadata.
Get Manifest Ingestion Workflow status: The workflow starts and is in the running state. Keep querying until the state changes to finished (typically 20 to 30 seconds).

Search for ingested data by using Postman
To search for storage metadata records created during the manifest ingestion by using the Postman collection, complete the following steps:
- Search Work Products: Call the search service to retrieve the work product metadata records.
- Search Work Product Components: Call the search service to retrieve the WPC metadata records.
- Search for Dataset: Call the search service to retrieve the dataset metadata records.
- Search for Master data: Call the search service to retrieve the master metadata records.
- Search for Reference Data: Call the search service to retrieve the reference metadata records.
Next step
Advance to the next tutorial:
For more information about manifest ingestion, see the OSDU Operator Data Loading Quick Start Guide.
Feedback
Coming soon: Throughout 2024 we will be phasing out GitHub Issues as the feedback mechanism for content and replacing it with a new feedback system. For more information see: https://aka.ms/ContentUserFeedback.
Submit and view feedback for