Note
Access to this page requires authorization. You can try signing in or changing directories.
Access to this page requires authorization. You can try changing directories.
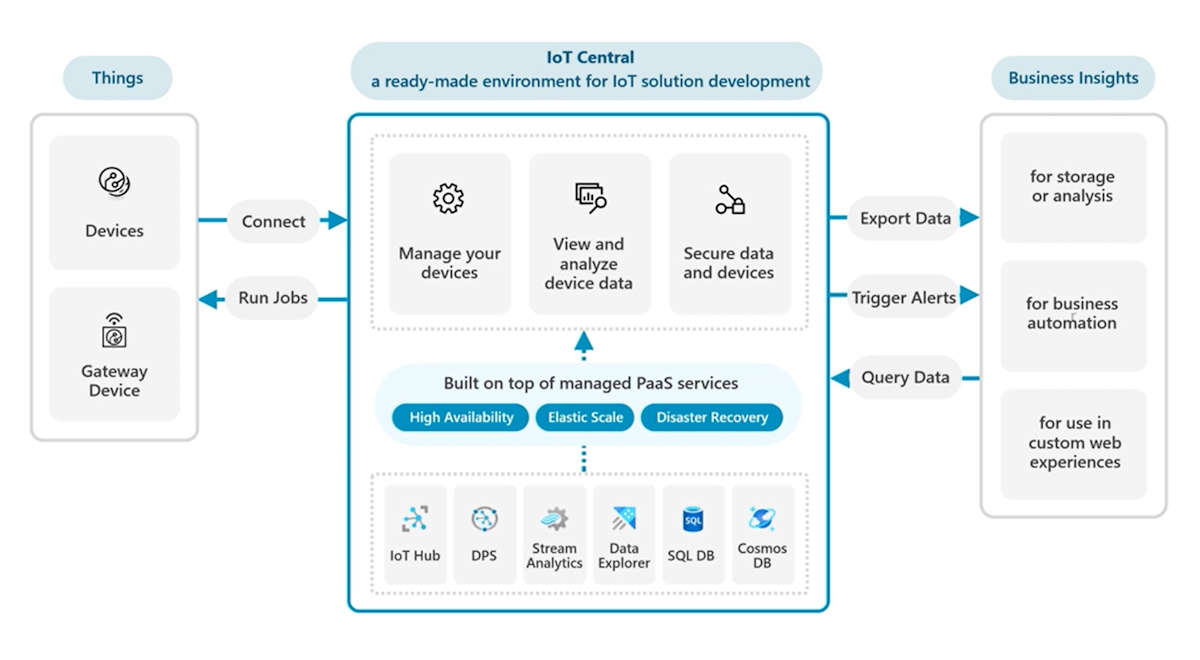
Azure IoT Central is an application platform that:
- Includes rich functionality such as device monitoring and management at scale.
- Provides many built-in features that help you to reduce the burden and cost of developing an IoT solution.
- Has extensibility and integration points that let you use its features and capabilities in your wider solution.
A typical IoT solution:
- Enables IoT devices to connect to your solution and send it data.
- Manages and secures the connected devices and their data.
- Extracts business value from your device data.
- Is composed of multiple services and applications.
When you use IoT Central to create an IoT solution, tasks include:
- Configure data transformations to make it easier to extract business value from your data.
- Configure dashboards and views in the IoT Central web UI.
- Use the built-in rules and analytics tools to derive business insights from the connected devices.
- Use the data export feature, rules capabilities, and APIs to integrate IoT Central with other services and applications.
- Trigger business flows and activities by using IoT Central rules.
- Interact with IoT Central programmatically by using the IoT Central REST APIs.
Export data
Many integration scenarios build on the IoT Central data export feature. An IoT Central application can continuously export filtered and enriched IoT data. Data export pushes changes in near real time to other parts of your cloud solution for warm-path insights, analytics, and storage.
For example, you can:
- Continuously export telemetry, property changes, device connectivity, device lifecycle, and device template lifecycle data in JSON format in near real time.
- Filter the data streams to export data that matches custom conditions.
- Enrich the data streams with custom values and property values from the device.
- Transform the data streams to modify their shape and content.
Currently, IoT Central can export data to:
Transform data at ingress
Devices can send complex telemetry that needs to be simplified before IoT Central can use it or export it. In some scenarios, you need to normalize the telemetry from different devices so that you can display and process the telemetry consistently. To learn more, see Map telemetry on ingress to IoT Central.
Extract business value
IoT Central provides a rich platform to help you extract business value from your IoT data. IoT Central has many built-in features that you can use to gain insights and take action on your IoT data. However, some IoT solution scenarios need more specialized business processes outside of IoT Central to extract value from your IoT data.
Built-in features of IoT Central you can use to extract business value include:
Dashboards and views:
An IoT Central application can have one or more dashboards that operators use to view and interact with the application. You can customize the default dashboard and create specialized dashboards:
To view some examples of customized dashboards, see Tutorial: Create and deploy an in-store analytics application template.
To learn more about dashboards, see Create and manage dashboards.
When a device connects to an IoT Central, the device is assigned to a device template for the device type. A device template has customizable views that an operator uses to manage individual devices. You can create and customize the available views for each device type. To learn more, see Views.
Built-in rules and analytics:
You can add rules to an IoT Central application that run customizable actions. Rules evaluate conditions, based on data coming from a device, to determine when to run an action. Actions include sending messages to other cloud services or calling a webhook endpoint. Rules enable extension scenarios such as:
- Notifying operators in other systems.
- Starting business processes or flows.
- Monitoring alerts on a custom dashboard.
To learn more about rules, see:
- Tutorial: Create a rule and set up notifications in your Azure IoT Central application
- Configure rules
IoT Central has built-in analytics capabilities that an operator can use to analyze the data flowing from the connected devices. To learn more, see How to use data explorer to analyze device data.
Scenarios that process IoT data outside of IoT Central to extract business value include:
Compute, enrich, and transform:
IoT Central lets you capture, transform, manage, and visualize IoT data. Sometimes, it's useful to enrich or transform your IoT data using external data sources. You can then feed the enriched data back into IoT Central.
For example, use the IoT Central continuous data export feature to trigger an Azure function. The function enriches captured device telemetry and pushes the enriched data back into IoT Central while preserving timestamps.
Extract business metrics and use artificial intelligence (AI) and machine learning (ML):
Use IoT data to calculate common business metrics such as overall equipment effectiveness (OEE) and overall process effectiveness (OPE). You can also use IoT data to enrich your existing AI and ML assets. For example, IoT Central can help to capture the data you need to build, train, and deploy your models.
Use the IoT Central continuous data export feature to publish captured IoT data into an Azure data lake. Then, use a connected to Azure Databricks workspace to compute OEE and OPE. Pipe the same data to Azure Machine Learning or Azure Synapse to use their machine learning capabilities.
Streaming computation, monitoring, and diagnostics
IoT Central provides a scalable and reliable infrastructure to capture streaming data from hundreds of thousands of connected devices. Sometimes, you need to run stream computations over the hot or warm data paths to meet business requirements. You can also merge IoT data with data in external stores such as Azure Data explorer to provide enhanced diagnostics.
Analyze and visualize IoT data alongside business data
IoT Central provides feature-rich dashboards and visualizations. However, business-specific reports might require you to merge IoT data with existing business data sourced from external systems. Use the IoT Central integration features to extract IoT data from IoT Central. Then merge the IoT data with existing business data to deliver a centralized solution for analyzing and visualizing your business processes.
For example, use the IoT Central continuous data export feature to continuously ingest your IoT data into an Azure Synapse store. Then use Azure Data Factory to bring data from external systems into the Azure Synapse store. Use the Azure Synapse store with Power BI to generate your business reports.
To learn more, see Transform data externally for IoT Central. For a complete, end-to-end sample, see the IoT Central Compute GitHub repository.
Integrate with other services
You can use the data export and rules capabilities in IoT Central to integrate with other service. To learn more, see:
- Export IoT data to Blob Storage
- Transform data externally for IoT Central
- Use workflows to integrate your Azure IoT Central application with other cloud services
Integrate with companion applications
IoT Central provides rich operator dashboards and visualizations. However, some IoT solutions must integrate with existing applications, or require new companion applications to expand their capabilities. To integrate with other applications, use IoT Central extensibility points such as the REST API and the continuous data export feature.
You use data plane REST APIs to access the entities in and the capabilities of your IoT Central application. For example, managing devices, device templates, users, and roles. The IoT Central REST API operations are data plane operations. The REST APIs enable extension scenarios such as:
- Programmatic management of your IoT Central applications.
- Tight integration with other applications.
To learn more, see Tutorial: Use the REST API to manage an Azure IoT Central application.
You use the control plane to manage IoT Central-related resources in your Azure subscription. You can use the REST API, the Azure CLI, or Resource Manager templates for control plane operations. For example, you can use the Azure CLI to create an IoT Central application. To learn more, see Create an IoT Central application.
Next step
If you want to learn more about using IoT Central, the suggested next steps are to try the quickstarts, beginning with Quickstart - Use your smartphone as a device to send telemetry to an IoT Central application.