Training
Module
Examine approaches to device management at scale using Azure IoT Hub - Training
Examine the approaches to apply device management tasks to large numbers of IoT devices using Azure IoT Hub.
This browser is no longer supported.
Upgrade to Microsoft Edge to take advantage of the latest features, security updates, and technical support.
Use Azure IoT Hub to schedule and track jobs that update millions of devices. Use jobs to:
Conceptually, a job wraps one of these actions and tracks the progress of execution against a set of devices, which is defined by a device twin query. For example, a back-end app can use a job to invoke a reboot method on 10,000 devices, specified by a device twin query and scheduled at a future time. That application can then track progress as each of those devices receives and executes the reboot method.
Learn more about each of these capabilities in these articles:
Device twin and properties: Get started with device twins and Understand and use device twins in IoT Hub
Direct methods: IoT Hub developer guide - direct methods
Note
The features described in this article are available only in the standard tier of IoT Hub. For more information about the basic and standard/free IoT Hub tiers, see Choose the right IoT Hub tier for your solution.
This article shows you how to create two Node.js apps:
A Node.js simulated device app, simDevice.js, that implements a direct method called lockDoor, which can be called by the back-end app.
A Node.js console app, scheduleJobService.js, that creates two jobs. One job calls the lockDoor direct method and another job sends desired property updates to multiple devices.
Note
See Azure IoT SDKs for more information about the SDK tools available to build both device and back-end apps.
An IoT hub in your Azure subscription. If you don't have a hub yet, you can follow the steps in Create an IoT hub.
A device registered in your IoT hub. If you don't have a device in your IoT hub, follow the steps in Register a device.
Node.js version 10.0.x or later. Prepare your development environment describes how to install Node.js for this article on either Windows or Linux.
Make sure that port 8883 is open in your firewall. The device sample in this article uses MQTT protocol, which communicates over port 8883. This port may be blocked in some corporate and educational network environments. For more information and ways to work around this issue, see Connecting to IoT Hub (MQTT).
In this section, you create a Node.js console app that responds to a direct method called by the cloud, which triggers a simulated lockDoor method.
Create a new empty folder called simDevice. In the simDevice folder, create a package.json file using the following command at your command prompt. Accept all the defaults:
npm init
At your command prompt in the simDevice folder, run the following command to install the azure-iot-device Device SDK package and azure-iot-device-mqtt package:
npm install azure-iot-device azure-iot-device-mqtt --save
Using a text editor, create a new simDevice.js file in the simDevice folder.
Add the following 'require' statements at the start of the simDevice.js file:
'use strict';

var Client = require('azure-iot-device').Client;
var Protocol = require('azure-iot-device-mqtt').Mqtt;
Add a connectionString variable and use it to create a Client instance. Replace the {yourDeviceConnectionString} placeholder value with the device connection string you copied previously.
var connectionString = '{yourDeviceConnectionString}';
var client = Client.fromConnectionString(connectionString, Protocol);
Add the following function to handle the lockDoor method.
var onLockDoor = function(request, response) {

    // Respond the cloud app for the direct method
    response.send(200, function(err) {
        if (err) {
            console.error('An error occurred when sending a method response:\n' + err.toString());
        } else {
            console.log('Response to method \'' + request.methodName + '\' sent successfully.');
        }
    });

    console.log('Locking Door!');
};
Add the following code to register the handler for the lockDoor method.
client.open(function(err) {
     if (err) {
         console.error('Could not connect to IotHub client.');
     }  else {
         console.log('Client connected to IoT Hub. Register handler for lockDoor direct method.');
         client.onDeviceMethod('lockDoor', onLockDoor);
     }
});
Save and close the simDevice.js file.
Note
To keep things simple, this article does not implement a retry policy. In production code, you should implement retry policies (such as an exponential backoff), as suggested in the article, Transient Fault Handling.
In this article, you create a back-end service that schedules a job to invoke a direct method on a device, schedules a job to update the device twin, and monitors the progress of each job. To perform these operations, your service needs the registry read and registry write permissions. By default, every IoT hub is created with a shared access policy named registryReadWrite that grants these permissions.
To get the IoT Hub connection string for the registryReadWrite policy, follow these steps:
In the Azure portal, select Resource groups. Select the resource group where your hub is located, and then select your hub from the list of resources.
On the left-side pane of your hub, select Shared access policies.
From the list of policies, select the registryReadWrite policy.
Copy the Primary connection string and save the value.

For more information about IoT Hub shared access policies and permissions, see Access control and permissions.
In this section, you create a Node.js console app that initiates a remote lockDoor on a device using a direct method and update the device twin's properties.
Create a new empty folder called scheduleJobService. In the scheduleJobService folder, create a package.json file using the following command at your command prompt. Accept all the defaults:
npm init
At your command prompt in the scheduleJobService folder, run the following command to install the azure-iothub Device SDK package and azure-iot-device-mqtt package:
npm install azure-iothub uuid --save
Using a text editor, create a new scheduleJobService.js file in the scheduleJobService folder.
Add the following 'require' statements at the start of the scheduleJobService.js file:
'use strict';

var uuid = require('uuid');
var JobClient = require('azure-iothub').JobClient;
Add the following variable declarations. Replace the {iothubconnectionstring} placeholder value with the value you copied in Get the IoT hub connection string. If you registered a device different than myDeviceId, be sure to change it in the query condition.
var connectionString = '{iothubconnectionstring}';
var queryCondition = "deviceId IN ['myDeviceId']";
var startTime = new Date();
var maxExecutionTimeInSeconds =  300;
var jobClient = JobClient.fromConnectionString(connectionString);
Add the following function that is used to monitor the execution of the job:
function monitorJob (jobId, callback) {
    var jobMonitorInterval = setInterval(function() {
        jobClient.getJob(jobId, function(err, result) {
        if (err) {
            console.error('Could not get job status: ' + err.message);
        } else {
            console.log('Job: ' + jobId + ' - status: ' + result.status);
            if (result.status === 'completed' || result.status === 'failed' || result.status === 'cancelled') {
            clearInterval(jobMonitorInterval);
            callback(null, result);
            }
        }
        });
    }, 5000);
}
Add the following code to schedule the job that calls the device method:
var methodParams = {
    methodName: 'lockDoor',
    payload: null,
    responseTimeoutInSeconds: 15 // Timeout after 15 seconds if device is unable to process method
};

var methodJobId = uuid.v4();
console.log('scheduling Device Method job with id: ' + methodJobId);
jobClient.scheduleDeviceMethod(methodJobId,
                            queryCondition,
                            methodParams,
                            startTime,
                            maxExecutionTimeInSeconds,
                            function(err) {
    if (err) {
        console.error('Could not schedule device method job: ' + err.message);
    } else {
        monitorJob(methodJobId, function(err, result) {
            if (err) {
                console.error('Could not monitor device method job: ' + err.message);
            } else {
                console.log(JSON.stringify(result, null, 2));
            }
        });
    }
});
Add the following code to schedule the job to update the device twin:
var twinPatch = {
   etag: '*',
   properties: {
       desired: {
           building: '43',
           floor: 3
       }
   }
};

var twinJobId = uuid.v4();

console.log('scheduling Twin Update job with id: ' + twinJobId);
jobClient.scheduleTwinUpdate(twinJobId,
                            queryCondition,
                            twinPatch,
                            startTime,
                            maxExecutionTimeInSeconds,
                            function(err) {
    if (err) {
        console.error('Could not schedule twin update job: ' + err.message);
    } else {
        monitorJob(twinJobId, function(err, result) {
            if (err) {
                console.error('Could not monitor twin update job: ' + err.message);
            } else {
                console.log(JSON.stringify(result, null, 2));
            }
        });
    }
});
Save and close the scheduleJobService.js file.
You are now ready to run the applications.
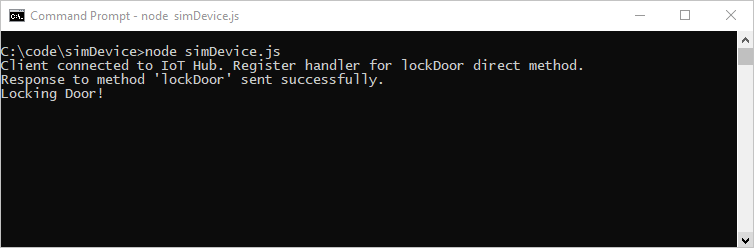
At the command prompt in the simDevice folder, run the following command to begin listening for the reboot direct method.
node simDevice.js
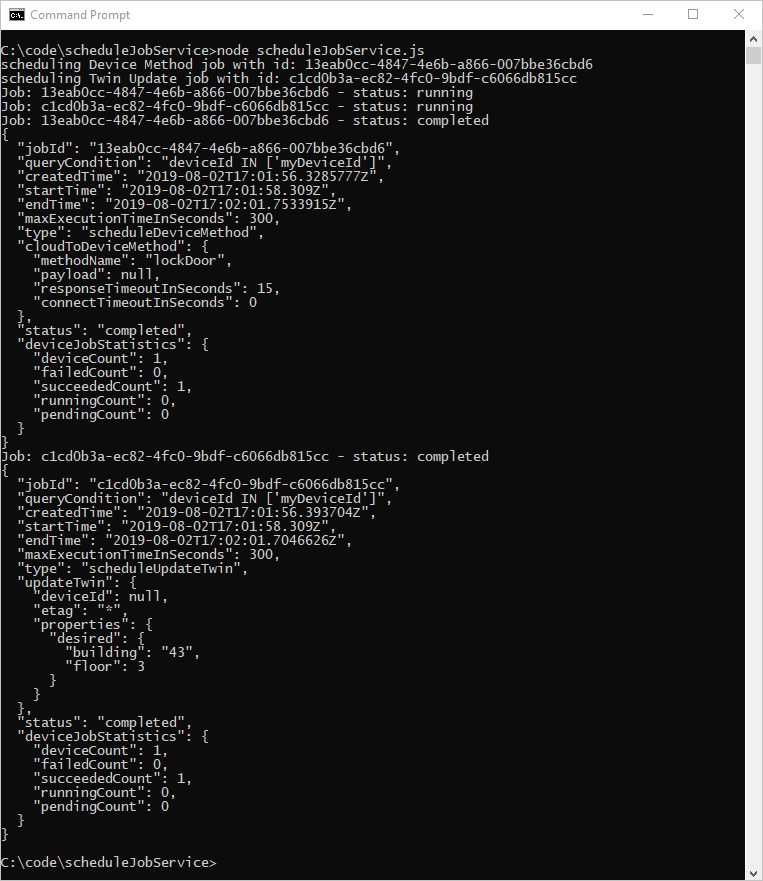
At the command prompt in the scheduleJobService folder, run the following command to trigger the jobs to lock the door and update the twin
node scheduleJobService.js
You see the device response to the direct method and the job status in the console.
The following shows the device response to the direct method:
The following shows the service scheduling jobs for the direct method and device twin update, and the jobs running to completion:
In this article, you scheduled jobs to run a direct method and update the device twin's properties.
To continue exploring IoT Hub and device management patterns, update an image in Device Update for Azure IoT Hub tutorial using the Raspberry Pi 3 B+ Reference Image.
Training
Module
Examine approaches to device management at scale using Azure IoT Hub - Training
Examine the approaches to apply device management tasks to large numbers of IoT devices using Azure IoT Hub.